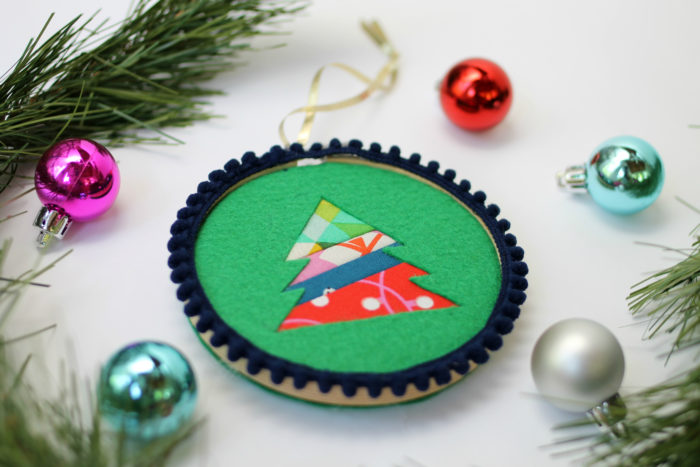
• Skip to primary navigation
  • Skip to main content
  • Skip to primary sidebar
Diary of a Quilter - a quilt blog
  • Home
  • Tips + Tutorials
  • Shop
  • FAQ
  • Subscribe
menu icon
go to homepage
  • Home
  • Tips + Tutorials
  • Shop
  • FAQ
  • Subscribe
    • Facebook
    • Instagram
    • Pinterest
  • subscribe
    search icon
    Homepage link
    • Home
    • Tips + Tutorials
    • Shop
    • FAQ
    • Subscribe
    • Facebook
    • Instagram
    • Pinterest
  • ×

    Felt Tree Ornament Tutorial by guest Stephanie of Swoodson Says

    Last Modified: October 29, 2019 by Amy · This post may contain affiliate links · This blog generates income via ads · 2 Comments

    I’m still in a state of disbelief that Christmas is already here again so soon! Guest writer, Stephanie of Swoodson Says has a cute little felt tree ornament tutorial to help you get ready and get in the Christmas mood. The flannel makes it come together neatly and it’s a great way to use up scraps!
    Felt Tree Ornament Tutorial by guest Stephanie of Swoodson Says by popular quilting blog, Diary of a Quilter: image of a felt tree ornament, some pine tree boughs, and small ball Christmas ornaments.

    Hi! I’m Stephanie from Swoodson Says and am happy to be a guest blogger here today! I absolutely love two things: using up the smallest fabric scraps & making Christmas ornaments, so I thought I’d combine them into the same project! This ornament would be the perfect gift tag or extra touch with any handmade quilts you gift this year, you can use coordinating scraps for the background!

    There are lots of ways to personalize this idea: add hand stitching, quilt the patchwork piece, or embroider some details on. They would make a great gift for quilt guild swaps or for yourself as a fun way to remember what projects you worked on that year! If you need more inspiration, I included this tutorial in a fun list of DIY embroidery hoop Christmas ornaments.

    Ready to make a scrappy tree ornament?  

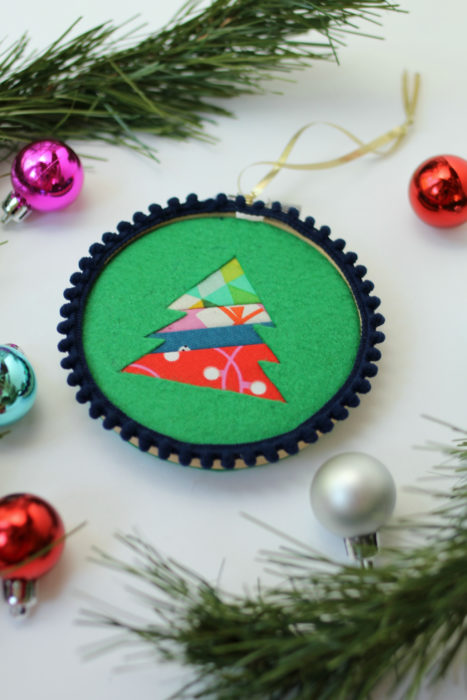
    Festive Felt Tree Ornament Tutorial

    Supplies

    • Freezer paper (I used these printable sheets but you can trace on to standard freezer paper too)
    • Fine point scissors
    • ¼ yard of wool blend felt
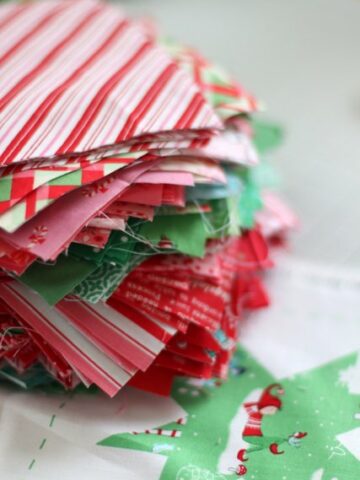
    • Woven quilting cotton scraps
    • Iron
    • 4” embroidery hoop
    • Mini pom pom trim
    • Fabric glue
    • Ribbon
    • Hot glue gun
    • Tree Template File

    Steps to make the ornament

    Felt Tree Ornament Tutorial by guest Stephanie of Swoodson Says by popular quilting blog, Diary of a Quilter: image of a felt tree ornament pattern on top of a piece of green felt fabric.

    Step 1

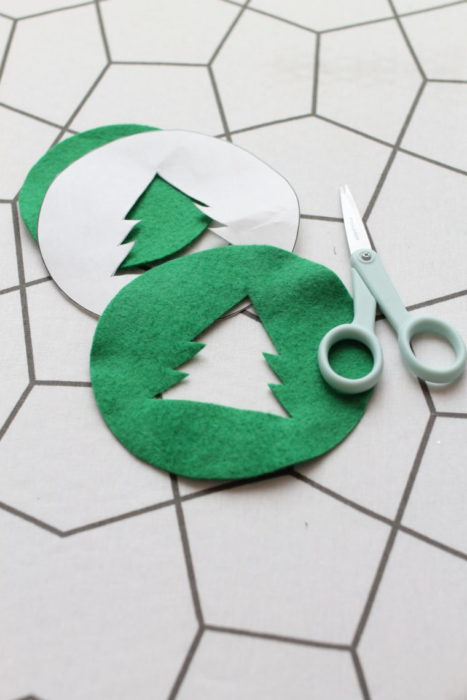
    Use the templates to cut out two circles of wool blend felt. I used printable freezer paper sheets, which you iron on, cut around, and peel off; you can alternatively print the pattern on paper and then trace on to standard kitchen freezer paper.

    Felt Tree Ornament Tutorial by guest Stephanie of Swoodson Says by popular quilting blog, Diary of a Quilter: image of the cut out tree inset.

    Step 2

    Cut the tree inset out of the larger one, using fine tip scissors and careful cuts.

    Felt Tree Ornament Tutorial by guest Stephanie of Swoodson Says by popular quilting blog, Diary of a Quilter: image of blue and red scrappy fabric on a cutting board.

    Step 3

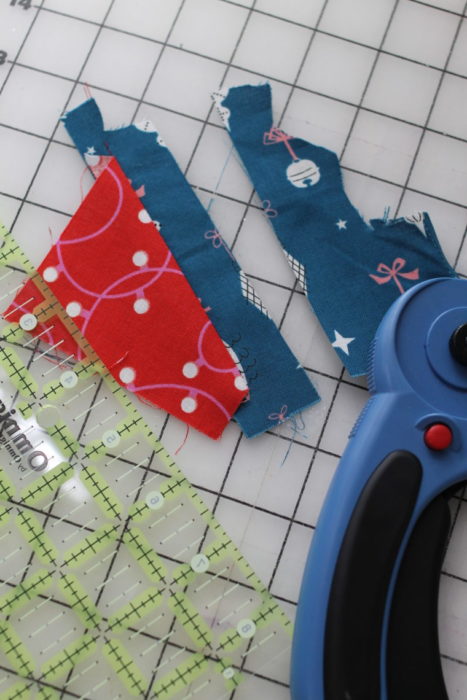
    Time to make the scrappy backing! Arrange your pieces and sew together, cutting straight lines as you go and pressing each one open with an iron. Lay the tree overlay over top to check that it is big enough before stopping.

    Felt Tree Ornament Tutorial by guest Stephanie of Swoodson Says by popular quilting blog, Diary of a Quilter: image of tree inset with scrappy backing.

    Step 4

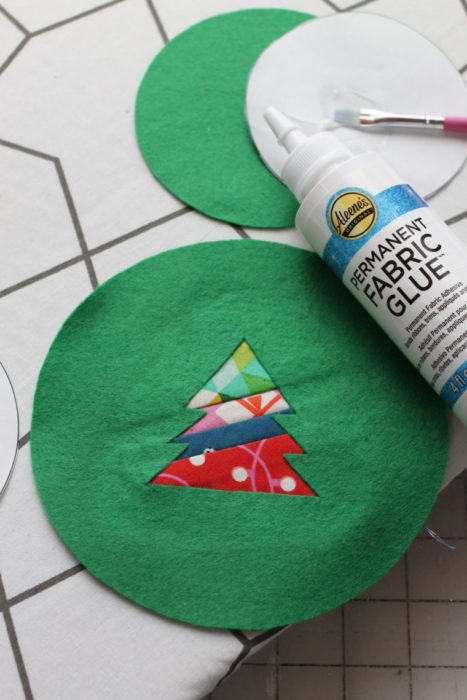
    Use fabric glue on the overlay and gently press down over top of the patchwork, pressing lightly with an iron, and let it dry. 
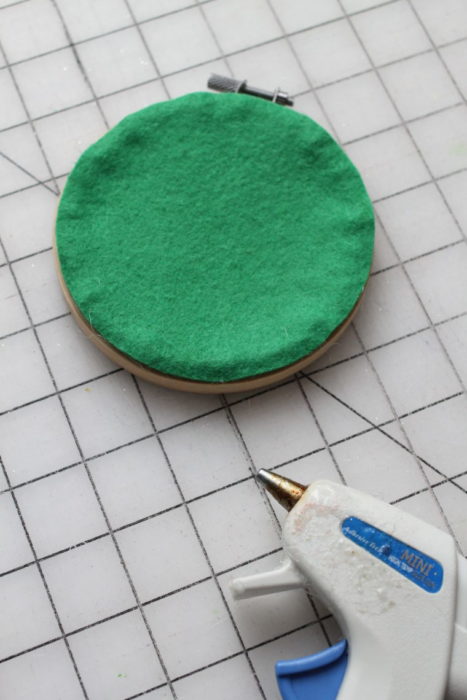
    Felt Tree Ornament Tutorial by guest Stephanie of Swoodson Says by popular quilting blog, Diary of a Quilter: image of tree inset inside a small embroidery hoop.

    Step 5

    Trim any patchwork edges that overlap the felt circle and then insert the felt circle into the embroidery hoop, centered. Tighten the screw and tuck the edges over, hot gluing as you go.

    Felt Tree Ornament Tutorial by guest Stephanie of Swoodson Says by popular quilting blog, Diary of a Quilter: image of green felt backing for the felt ornament.

    Step 6

    Glue the smaller felt circle on the back, covering up the edges.
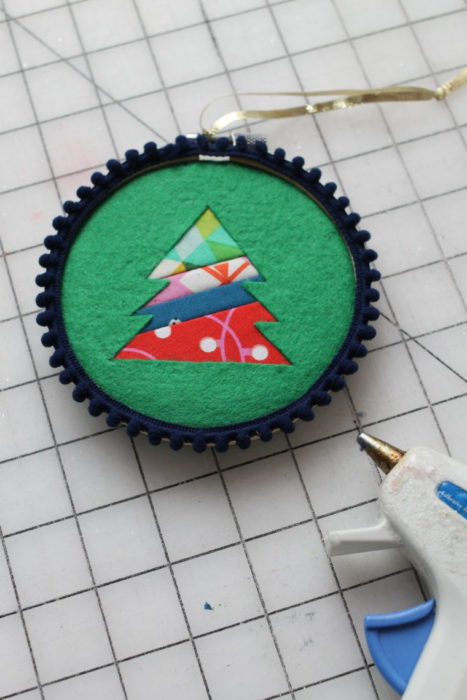
    Felt Tree Ornament Tutorial by guest Stephanie of Swoodson Says by popular quilting blog, Diary of a Quilter: image of a felt tree ornament.

    Step 7

    Hot glue pom pom trim around the edges, tie on a ribbon and you’re done!

    Felt Tree Ornament Tutorial by guest Stephanie of Swoodson Says by popular quilting blog, Diary of a Quilter: image of a felt tree ornament, some pine tree boughs, and small ball Christmas ornaments.

    If you’re looking for more DIY ornament ideas, check out this roundup of the prettiest fabric Christmas ornament tutorials and my favorite felt Christmas ornaments to sew.       

    Who will you be making this felt tree ornament for? Share in a comment below!

    Share this:

    • Click to share on Facebook (Opens in new window)
    • Click to share on Pinterest (Opens in new window)
    • Click to share on Twitter (Opens in new window)
    • Click to print (Opens in new window)
    • Click to email a link to a friend (Opens in new window)

    Related

    « Sugarhouse Park Fabric Collection by Amy Smart
    Pine Hollow Quilt Along Week 5 »

    Filed Under: Christmas, guest post, Sewing for Your Home

    Reader Interactions

    Comments

    1. craftytadpole

      October 22, 2019 at 9:20 am

      Thank you! I look forwards to having this one my tree this year.

      Reply
    2. Jeannie

      October 26, 2019 at 5:31 pm

      this is adorable! Can’t wait to make a few. Thanks,

      Reply

    Leave a ReplyCancel reply

    This site uses Akismet to reduce spam. Learn how your comment data is processed.

    Primary Sidebar

    My name is Amy Smart and I'm a quilter, pattern and fabric designer, wife & mom. Excited to have you here!

    more about me →

    THE PERFECT PLACE TO START

    I SEW WITH

    Baby Lock Sewing Machines

    MY FABRIC COLLECTIONS

    Fabric Collections by Amy Smart for Riley Blake Designs.

    FAVORITE FABRIC SHOPS

    COME SEW WITH ME CRAFTSY CLASS

    Pre-cuts Shortcuts Video Craftsy Class with Amy Smartma

    SEARCH

    Top Posts & Pages

    • Diary of a Quilter by Amy Smart - a Quilt blog
    • 25 Favorite Charm Square Quilts & Projects
    • Last minute handmade gifts
    • What's happening: September 2023 Version
    • Fast Four Patch Quilt Tutorial + KITS

    Footer

    ↑ back to top

    PRIVACY POLICY

    DISCLAIMER

    TERMS & CONDITIONS

    ACCESSIBILITY POLICY

    NEWSLETTER

    SIGN UP for weekly emails & updates!

    CONTACT

    FAQ

    This site uses affiliate links:

    I make a small commission on some purchases with no additional cost to the reader.

    As an Amazon Associate, I earn from qualifying purchases.

    Copyright © 2022 Diary of a Quilter - a quilt blog