
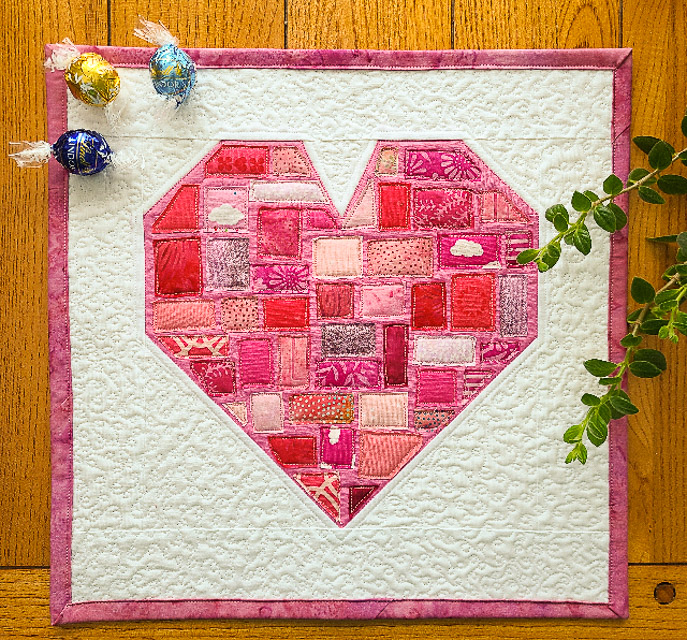
This really fun Valentines project is perfect for using some of your favorite red and pink scraps. I'm excited to have Leanne as a guest contributor today sharing a tutorial for a Scrappy "Ticker-Tape" Quilted Heart block.
Hi, I’m Leanne from Devoted Quilter. I’m a quilter, pattern designer and teacher living in Newfoundland, Canada and I love sharing my quilts, my faith and my beautiful province on my blog, Instagram and Facebook.
If you’ve made even one quilt, you probably have scraps lying around. The more quilts you’ve made, the more scraps you have. I’ve made a lot of quilts over the past 20+ years and, let me tell you, I have the scraps to show for it! Even though we make scrappy projects, those scrap bins never seem to get any emptier, do they? Well, today I’m excited to share my Ticker Tape heart block with you. It’s a fun way to use some of those scraps, even the really small ones, and it’s perfect for Valentine’s Day or Galentine’s Day or a baby quilt or wedding gift…The possibilities are endless!

The tutorial for the 10 ½ʺ block is in this post, but if you want the PDF pattern to keep you can get that here.
Let’s get started!
Fabric Requirements:
From solid white, cut
- 2 5 ½ʺ squares
- 1 3ʺ square
- 1 2 ¾ʺ square *
From pink, cut
- 1 8 ½ʺ x 10 ½ʺ rectangle
- 1 3ʺ square
- 2 3ʺ x 1 ¾ʺ rectangles *
- 2 2 ½ʺ squares
* These pieces will be used to paper piece the triangle in a square unit. If you prefer to use a tri-recs ruler, cut these pieces as required to make a 2 ½ʺ square unit.

Draw a diagonal line from corner to corner on the white 5 ½ʺ squares and the white 3ʺ square.
Make the half-square triangles

Pair the white 3ʺ square right sides together with the pink 3ʺ square and stitch ¼ʺ away from the drawn line on both sides. Cut apart on the drawn line to make two half-square triangles (HSTs). Press the HSTs open, then trim them to 2 ½ʺ square.
Make the triangle in a square unit

To make the triangle in a square unit for the top-center of the heart, print out the template included in the PDF pattern. Be sure to print at ‘actual size’ or ‘100%’ and check the 1ʺ test square. Paper piece the unit using the white 2 ¾ʺ square for the center triangle and the pink 3ʺ x 1 ¾ʺ rectangles for the sides. Alternatively, use a tri-recs ruler to piece a 2 ½ʺ triangle in a square unit.
Make the bottom of the heart

To make the bottom of the heart, place one white 5 ½ʺ square on the bottom left corner of the pink 8 ½ʺ x 10 ½ʺ rectangle, with the drawn line going from the left side to the bottom. Stitch right on the line, then trim away the excess fabric, leaving a ¼ʺ seam allowance. (insert picture 5)
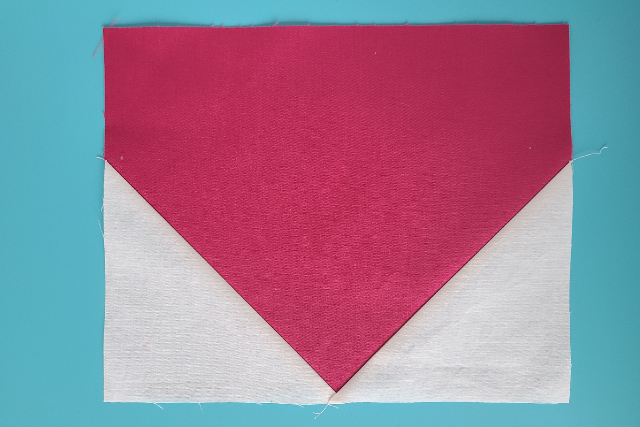
Press the corner open, then repeat on the bottom right corner with the remaining white 5 ½ʺ square. (insert picture 6)
Assemble the heart

Lay out the HSTs, the pink 2 ½ʺ squares and the triangle in a square unit as shown for the top row of the heart. Stitch together, then press the seams either open or towards the pink squares.
Stitch the top row to the bottom of the heart. Press the seam towards the bottom piece.
Add the ticker tape scrap pieces
Now comes the really fun part! Using small pieces from your pink scrap box, start filling up the heart.

For now, just lay the pieces on the heart because you may want to move them around as you fill it in. Leave a small gap around each piece and don’t forget to leave space for the seam allowances at the top and the sides of the block.

I used my scissors to straighten up the edges of the scraps or to cut larger pieces to size. If you want to be more precise, you could use your rotary cutter, but scissors are faster and I was happy with the slightly imperfect lines. I also didn’t bother to press my scraps (too lazy!), but you certainly could. (insert picture 9)
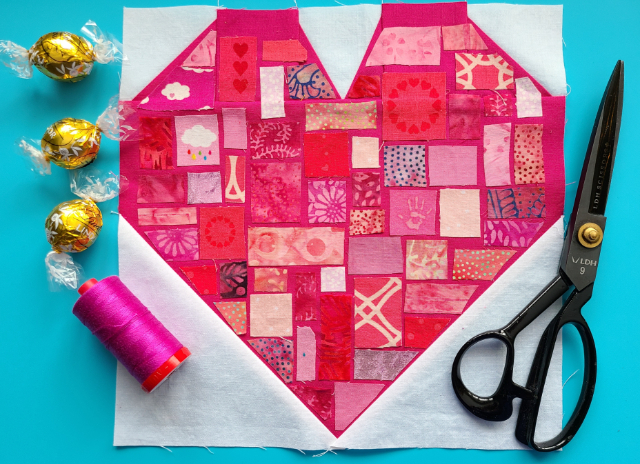
Keep going until the heart is completely filled in and you are pleased with the arrangement. Then, using a washable glue stick, glue each scrap piece to the heart.
At this point you can choose when you want to stitch around each of the scraps to secure them - now or with the quilting. Now is the better choice if you think it’ll be a while before you can get to quilting your block because I find the glue stick doesn’t always hold securely if the block is going to be handled a lot. But doing it with the quilting is a great choice if you know you’ll get the quilting done soon and you want to save a bit of time by only stitching around the pieces once.
You can also choose how you want to stitch around the pieces. A zig zag stitch is a great option for preventing frayed edges. If you don’t mind frayed edges, then you can use a simple straight stitch about ⅛ʺ in from the edge.
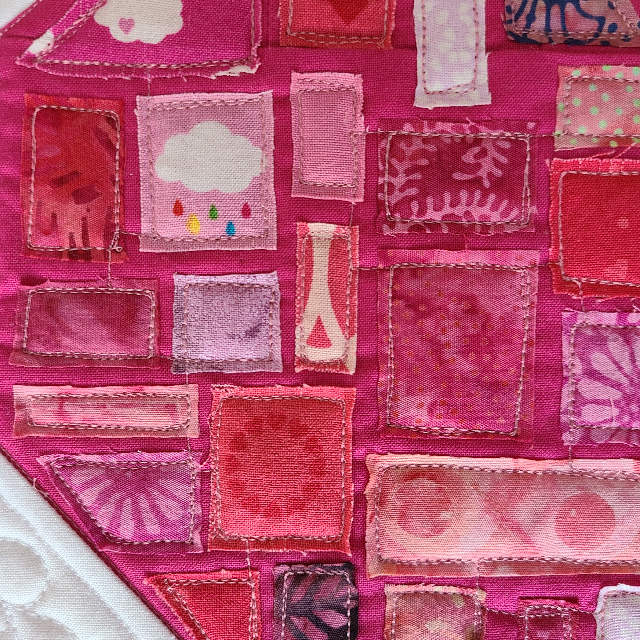
I chose to stitch around my pieces with the quilting and I quilted them using my free motion foot and Aurifil 2430 50 wt. I went around each piece twice and I purposely didn’t stay exactly on the line when going around the second time as I wanted the added movement from the imperfect lines. After the second trip around a piece, I just stitched across the gap to the next piece and kept going. Other than an empty bobbin or a thread break, it was easy to stitch all of the pieces on a block in one go.
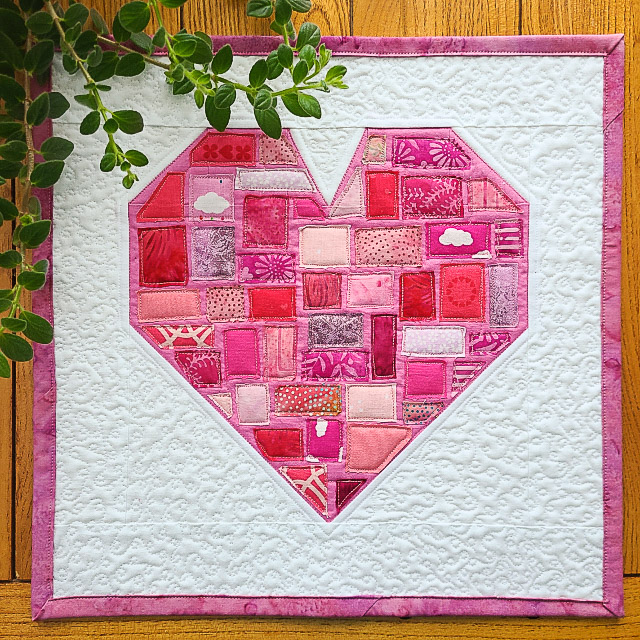
I couldn’t decide if I wanted to make a one block mini quilt or a three block table runner, so I made four blocks so I could do both!
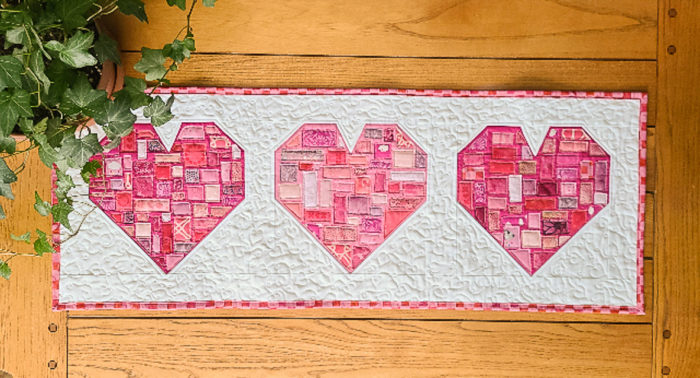
I used 2 ½ʺ sashing and borders for the table runner and 2 ½ʺ borders for the mini. You’ll find the cutting instructions for the sashing, borders and binding for both the mini and the table runner included in the PDF pattern.

I hope you’ll tag me if you share a Ticker Tape Heart project on Instagram or Facebook. I’d love to see!

Thank you so much Leanne! This looks like such a fun project for using scraps - even fussy-cutting some of your favorites. If you don't have time to make one this year you can pin the image above to find it for easy reference later!

ingridmijares
Es un hermoso bloque. Gracias por el tutorial ❤️
Rebecca Harris
Such a fun post! I love both tutorials. We all have so many pretty scraps, and rarely know what to do with them.