
When looking for a quilt design, there are a myriad of quilt pattern options to choose from. That can be a little overwhelming. Here are a few basics about how to work with quilt patterns. Most quilting patterns have some things in common: A list of fabric requirements and directions for cutting the fabric, assembling the pieces, and laying out the quilt.
 Part 3 of the Beginning Quilting Series
Tips when working with (most) quilt patterns:
- It’s a good idea to read the pattern all the way through before you start cutting into your fabric or sewing – helps to get ‘the big picture’ of the project.
- Some patterns give experience levels such as Beginner, Intermediate and Advanced. Start with something simple for your first projects and save the more advanced designs after you’ve gained some confidence. Saves some possible frustration.
- Patterns can be found individually packaged, in books, magazines or online. I've got a whole slew of free quilt patterns and tutorials here. Many of them are very beginner friendly and a perfect next-step after this first, simple patchwork quilt. Another great resource with hundreds of free quilt patterns is Fave Quilts. I also have a shop with over a dozen popular quilt patterns here.
One of the fun aspects of quilting is coming up with your own design. Some things to consider:
- Graph paper and a ruler are helpful tools.
- Keep in mind the basic rule of quilting: always sew with a ¼” seam allowance. (This might seem really small if you are used to sewing clothes.) Therefore, you need to add that seam allowance on to all four sides of your shape.
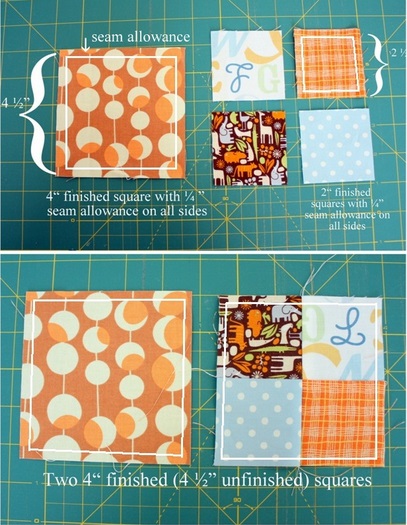
For example, if you want to make a quilt out of 4” squares, you need to allow ¼” of fabric on all sides of the square for the seam allowance. This means you need to cut a 4 ½” square. If you want to create a 4” block out of four different squares you want four 2”finished squares, which means you will need four 2 ½” squares. This will create an unfinished block at 4 ½” and a finished block at 4”.
Yes, quilting does require math. (See? Your elementary school teacher was right!) I look at it as a way to keep my brain from total atrophy and an effort to stave-off Alzheimer's.
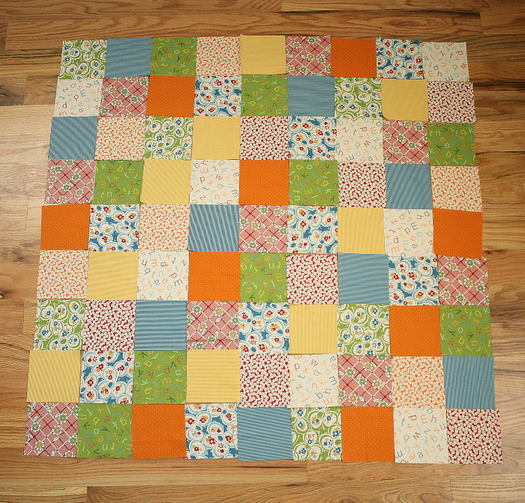
For this project, as we continue on our Quilt Along, we are going to make a simple patchwork baby quilt measuring 42″ x 42″ using 81 squares 4″ x 4" (finished) with 3″ wide borders on all sides. Therefore we are going to cut 81 squares 4½”x 4½”. The quilt will be laid out 9 x 9 squares.
Fabric requirements for Beginning Patchwork Quilt:
- nine ⅛th yard pieces for blocks*
Most stores will cut ⅛th yard pieces, but not all. Might be a good idea to ask first. I am using 10 different fabrics because I want two prints in each color, so I’m getting ten ⅛th yard pieces. Because I’m nerdy like that. If it’s easier, you can use 5 ¼ yard pieces. Just depends how many different fabrics you want in your quilt.
- ½ yard for border
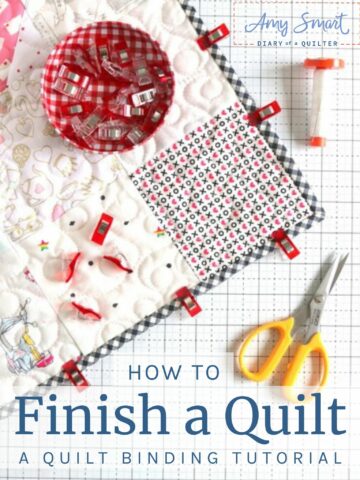
- ⅜ yard for binding (this is the outside edge that finishes the quilt)
- 1 ¼ yards for back
*[PRECUTS OPTION: If you choose to use Charm Packs instead of cutting your own fabric squares: these squares come pre-cut at 5". You will need 2 Charm Packs. You can either cut them down to 4 ½” squares and use 81 squares like the quilt above, or you can leave them at 5" and will only need 64 squares for a quilt layout of 8 x 8 squares. OR you can do 9 x 9 squares and leave off the outside borders. Either option works. Everything else will be the same: sewing, borders, quilting, etc.]
Up next Tuesday in our Quilt Along Series: Cutting Fabric

Lori Holt
Hi Amy...<br />I love your fall table runner, your 1970's sewing book and your turqoise pot-thingy...LOL<br />I thinkk the string quilt would be so fabulous!<br />xx<br />lori
Anna @ Fresh Dew Drops
Love the fabrics and colors you chose for your fall table runner, especially the turquoise.
Tara
I love the fabrics and colors too. To me, it feels like fall without screaming fall - does that make sense?<br /><br />Tara<br />www.tarabeingtara.blogpost.com
DJ Rose
I LOVE the fall colors. I've been wanting to make one of these for SO long. I think I will start with a fall one. Thanks for sharing. (I'll post when I do and link back here.)
~Niki~
very nice. i used to quilt ALL the time, now not so much~I'm in a crochet mode now. I used to make tons of table runners~the easy way (stitch, flip, and iron) 😉 my own method~or so i thought lol. lovely!
Dree
I need a new table runner now that our house furniture shuffle is done. I would like to somehow make black, brown, yellow(like your yellow on the end) and some deep purple look good together. And then it sounds like Halloween and I go do something else :)<br /><br />Yours is lovely.
Kelli
What a cute fall table runner! I have been wanting to make one but I haven't sat down to do it. Possibly this weekend!<br /><br />Kelli<br />xoxo<br />loveoursimplelife.blogspot.com
Anna
love the fall table runner, I love fall! 🙂 And that books looks like it's full of goodies!
Char @ Crap I've Made
I LOVE your runner. And I'm not kidding...I really am going to make a second one to solve the whole dilemma of where to use it.
madebymum
The brown/ orange combo rocks.
Candace
Beautiful table runner, I love the fall colors, and it does look great with the turquoise.
Judy
Love the colors in your table runner! Fall is my favorite time of year - I should get cracking on one for my table too! Great idea and an easy way to change the look in the kitchen!
Michelle
A perfect way to bring a little bit of autumn inside, it is spring here in NZ but I plan to whip up a new runner too! Thanks for the inspiration.
Katie
I have the bhg sewing book, too, same story! My 8- and 10-year-old daughters have commandeered it though.
Denise
I am inspired! Only one dilemma for me. I have a round table and would like to make a round one. Do you have any hints or tricks for binding a round quilt?
Laura
You inspired me! Here's my runner: https://creatingforkids.blogspot.com/2010/09/table-runner.html. Thanks for the tutorial. <br />Also, I was recommended to your blog by a local friend, but I think your husband's family knows mine. I grew up in Frederick and my maiden name is Morrison. <br />Thanks for you blog!
Laure
I've been lurking around your blog for a couple of months now and loving it. My mother is an obsessed quilter. I, on the other hand, don't really know how to sew. I've recently decided to dust off the machine I got as a gift (from my mom) a few years ago, and I'm determined to complete your beginning quilting tutorial! Thanks for posting it, wish me luck 🙂
Chris S
I love all your table runners! Thanks for a great easy tutorial. So easy to make up new ones as the seasons change. I have never quilted as you go, looking forward to doing this today, thanks again!
Adora Avaltroni
I love how easy you make it to quilt. I have a question, though: I found this awesome pattern for a crib quilt, but I want to make a quilt using a super queen batting. How do I convert it?
amy smart
Would you like to make the same squares quilt only in a queen-size version? Since this is a very basic patchwork design I would just pull out some graph-paper and a calculator and expand the quit to the size you want. First subtract the border widths you'd like to use from the finished measurements and then divide the remaining number by 4.5" (the size of the finished squares). That will
Miriam Ayala
i love the way the runners come together so quickly and your clear & precise instructions. Thank you Amy!!