
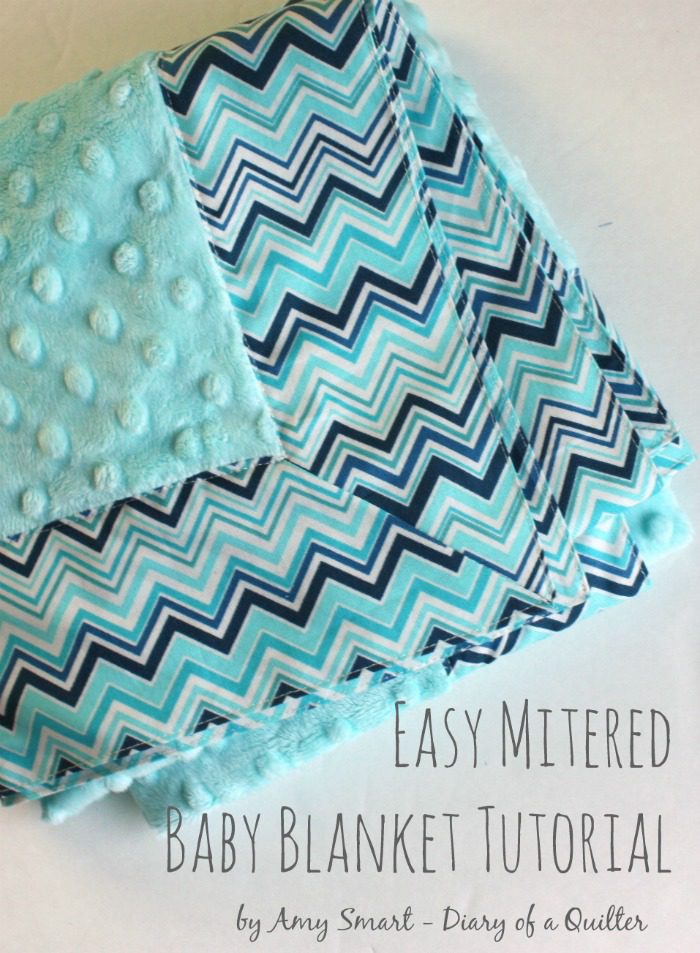
Today I am sharing a simple mitered, self-binding baby blanket tutorial for a quick and easy project finish.
This is in honor of a drive for Project Linus called Luke's Loves, and part of a series coordinated by Kim West of A Girl and a Glue Gun. Be sure to visit Kim for links to a whole series of tutorials for blankets as she spreads the word about Project Linus and specifically the Luke's Loves. More on those two things following this tutorial.
This self binding baby blanket works great in flannels, and cottons. (I used a Cuddle/minkie fabric for the center panel to make it extra snuggly, but I wouldn't recommend minkie for both front and back because the minkie is a little trickier to work with.) I would also recommend pre-washing all fabric (and ironing) before making this blanket. (This tutorial was originally created for the Shannon Fabrics Cuddle blog, but I am finally re-posting it on my own blog.)
Fabric requirements for your Self Binding Baby Blanket:
- 1 ¼ yards backing/binding
- ⅞ yard of contrasting fabric
Tools needed to Make your Self Binding Baby Blanket:
- Rotary cutter, ruler, and mat
- sewing machine and basic sewing notions
- an ‘erasable’ ink pen
- a walking-foot for a sewing machine is also handy if you have one
Self Binding Baby Blanket Step by Step Tutorial:
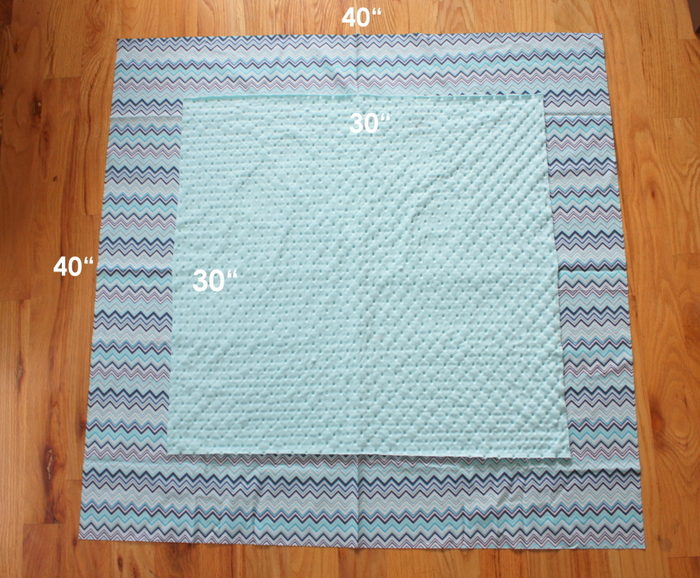
1. Cut backing fabric into a 40″ x 40″ square and contrasting fabric into a 30″ x 30″ square. Fold your squares diagonally to make sure they are truly square pieces.(If your yardage is not quite wide enough, you can cut your squares smaller, just keep the back 10″ bigger than the contrast fabric.)
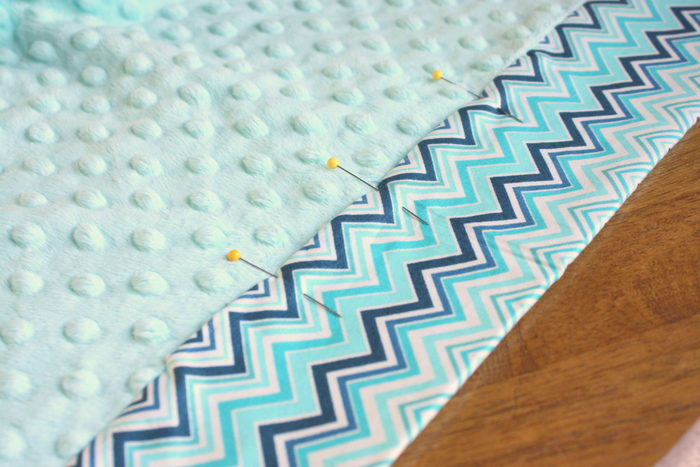
2. Place your contrast fabric, right sides together and centered in the middle of your cotton square.
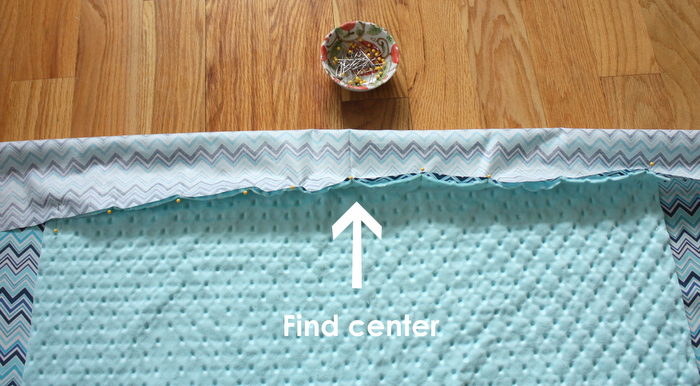
3. Find the center of one side of your Cuddle fabric and one side of your cotton fabric. Pin at the center and then pin edges of Cuddle fabric to the edges of the cotton. Don’t pin all the way to the corners of the Cuddle fabric – leave about 1 inch on either end un-pinned.
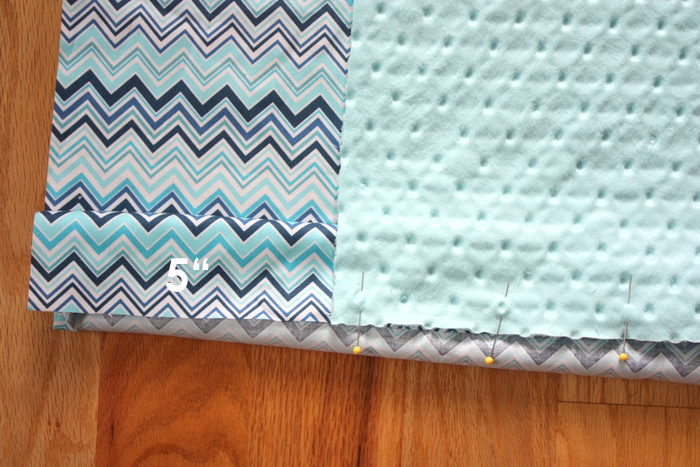
You will have a 5″ space of left-over cotton fabric on either side.
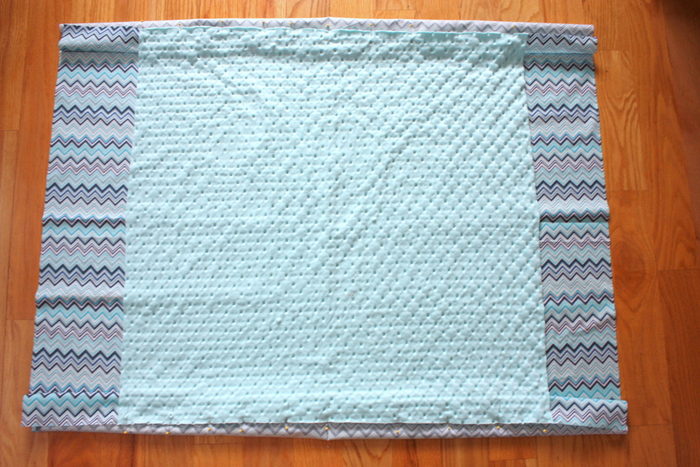
4. Repeat on opposite side and then on remaining two sides.
When you are done pinning you will have floppy outside fabric corners.
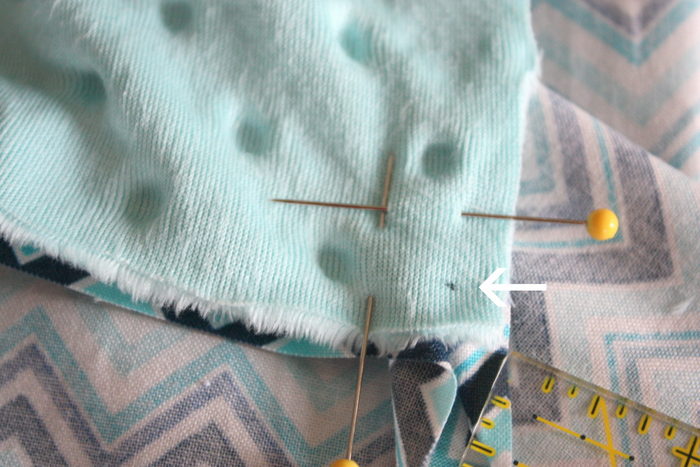
5. Using a ruler, mark a small dot ¼″ in from both edges at all four corners.
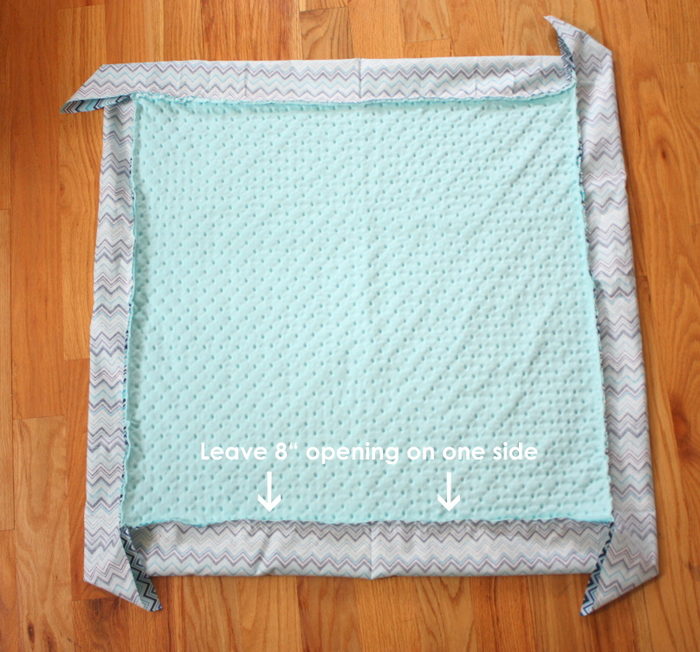
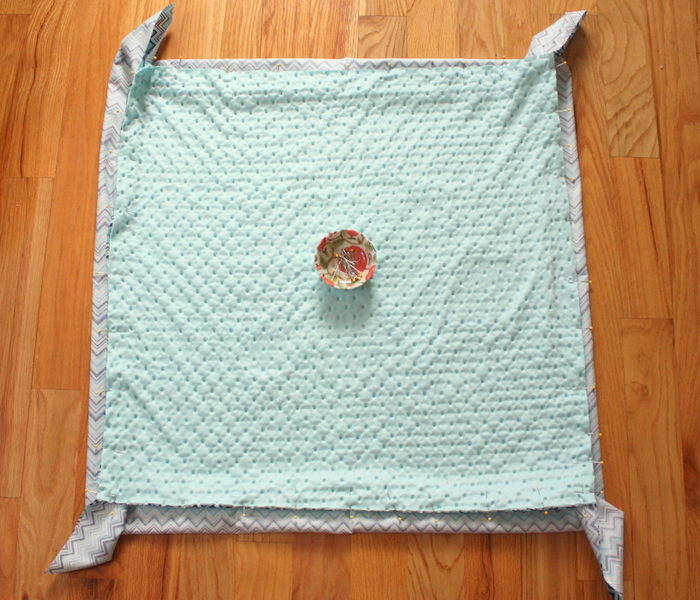
6. Sew all four edges together using a ¼″ seam allowance. On one side, leave an 8″ opening for turning blanket right-sides-out. I highly suggest using a walking-foot if you have one to avoid any stretching or puckering.
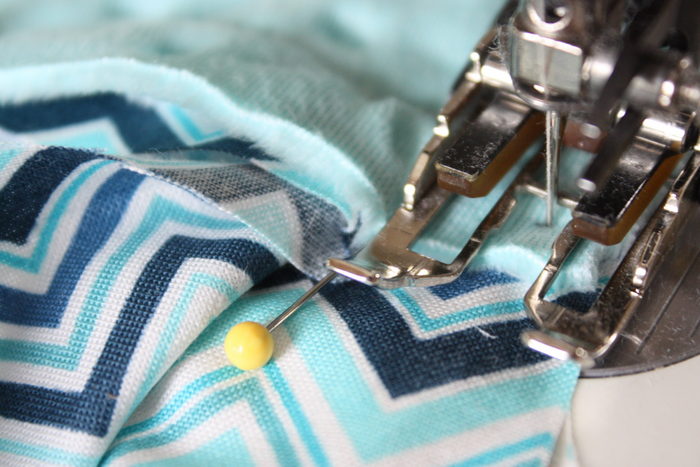
As you are sewing each side, pull the next side out of the way and sew seam until you get to the marked ¼″ dot. When you get to the quarter inch dot lift the needle and turn the blanket. Pull the side of the outside/backing fabric you just sewed away and start sewing the new side of backing fabric to the center conrast fabric beginning at the ¼″ dot.
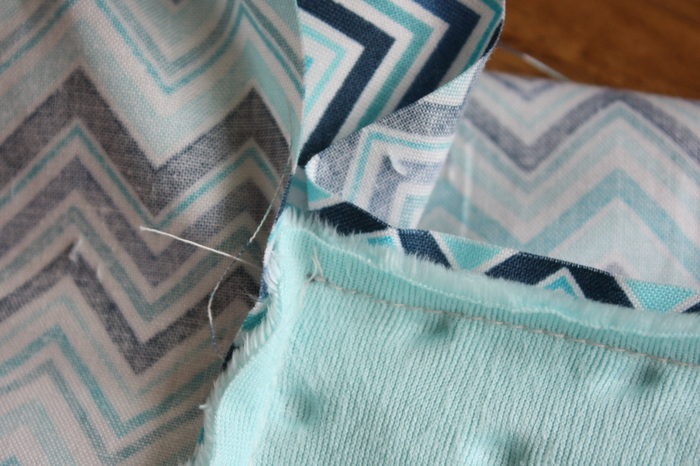
The corners will look like this after sewing, with the floppy outside corners still open.

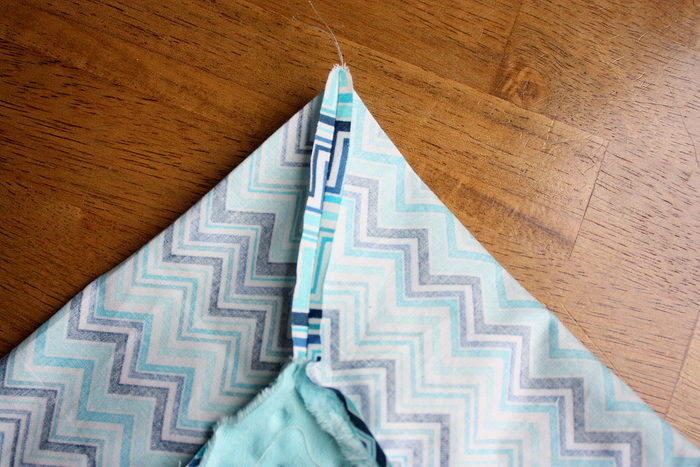
7. To make the mitered corners pull the center fabric away from the outside fabric. Start with one corner and pull the corner ‘flap’ taught, matching up raw outside edges to create a triangle. Fold the center fabric in half diagonally on itself, matching up intersecting seams for that corner on top of each other. This should create a 45 degree angle next to the triangle ‘flap.’ Line up a ruler with the folded edge of the center panel fabric and mark a line starting where the seam ends and draw to the outside folded edge of the backing fabric.
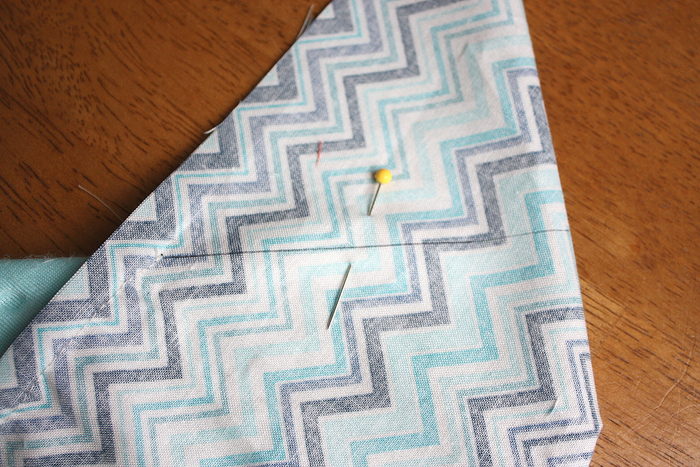
I’d suggest putting a pin in to hold everything together while you take it to your machine.
8. Starting at the ¼″ endpoint of original seam, sew directly on the line to the edge of the folded backing fabric. Trim excess triangle ‘flap’ ¼″ away from the new seam and discard.
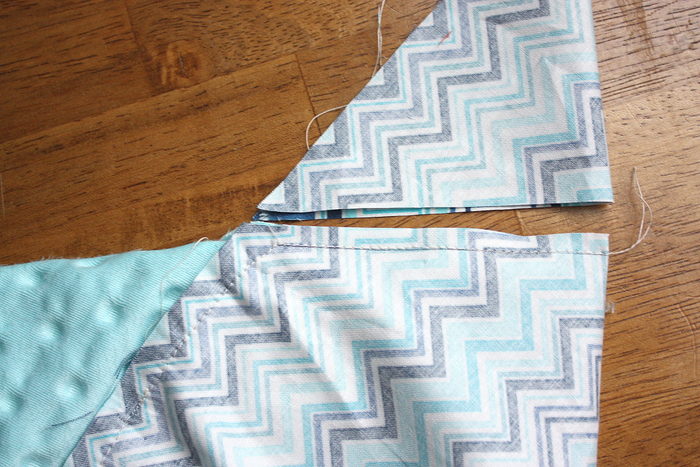
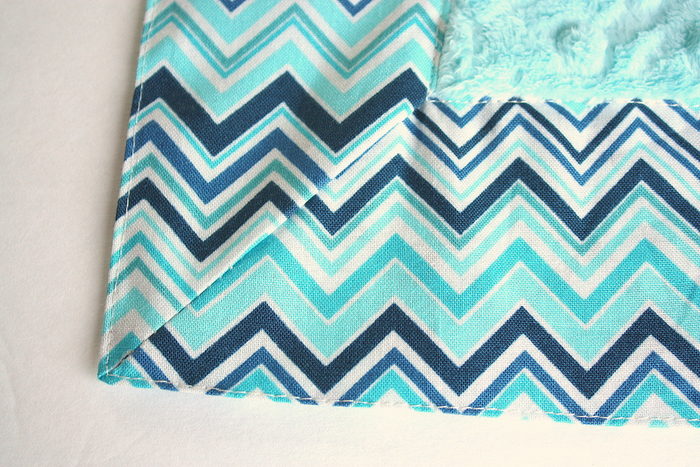
 9. Flatten and press new seam open. (While you’re at it, press the other seams away from the center fabric so that it will lie flat when you turn it right sides out.) Repeat process with remaining 3 corners.
10. When all four corners are mitered, turn blanket right-sides out. Carefully shape the blanket including the self-binding cotton edge so that the blanket is square. Press outside edges flat. Tuck edges of center fabric square toward the outside/backing fabric. Pin open edge together.
11. Top stitch all the way around the outside of the center fabric, at the same time closing the opening used for turning. Top stitch around the outside blanket edge to give it a crisp finish. I also choose to draw a 12″ square in the middle of the center fabric with an eraseable pen and top stitch on that line as well to keep the center portion of the quilt from shifting when it’s washed.
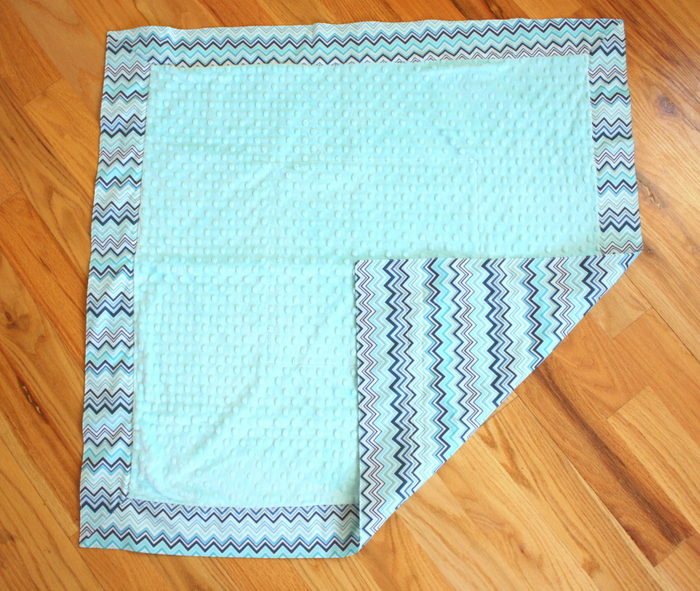
And there you have it, your self blinding baby blanket is done!
The first time you try this method it will probably take a little bit of time and effort to get things right, but I guarantee after that first time, you will be able to whip these suckers out for all your favorite new babies in no time.
I am re-sharing this self binding baby blanket tutorial today in honor of the Luke's Loves blanket drive on behalf of the charity Project Linus. Kim of A Girl and a Glue Gun has a dear friend who lost a child, Luke, at 2 years old. Every year Luke's family, in honor of this sweet boy who loved his own blanket, makes a goal to donate 200 blankets to local centers that provide resources for children in need.
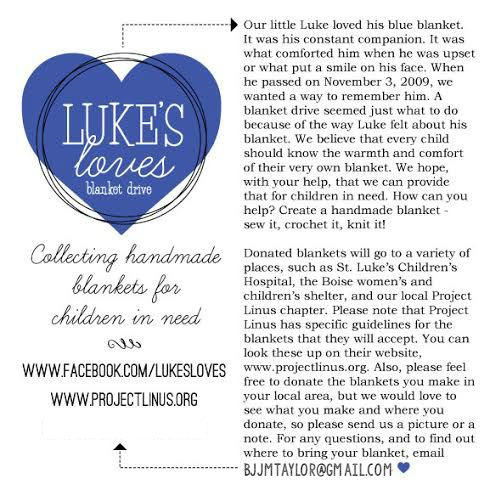
Kim is supporting this family in getting the word out about this drive You can read more about Kim's help with the Luke's Loves drive here as well as Luke's Loves on FB here.
Project Linus gives blankets to children who have been traumatized or are in need. They prefer handmade blankets/quilts because of the love that goes into them. They need to be at least 36" x 36". Crib-size quilts are most in need. You can also find out more about Project Linus on Facebook or their website, to find local chapters collecting donations.
Kim wants to help Luke's family reach (and exceed!) their goal of 200 quilts donated to Project Linus. (You can send the quilt to Luke's Loves or donate it to your local chapter.) If you make a blanket or quilt inspired by Luke's Loves share with Kim. You can link up your blankets here or tag them on Instagram with #lukesloves.
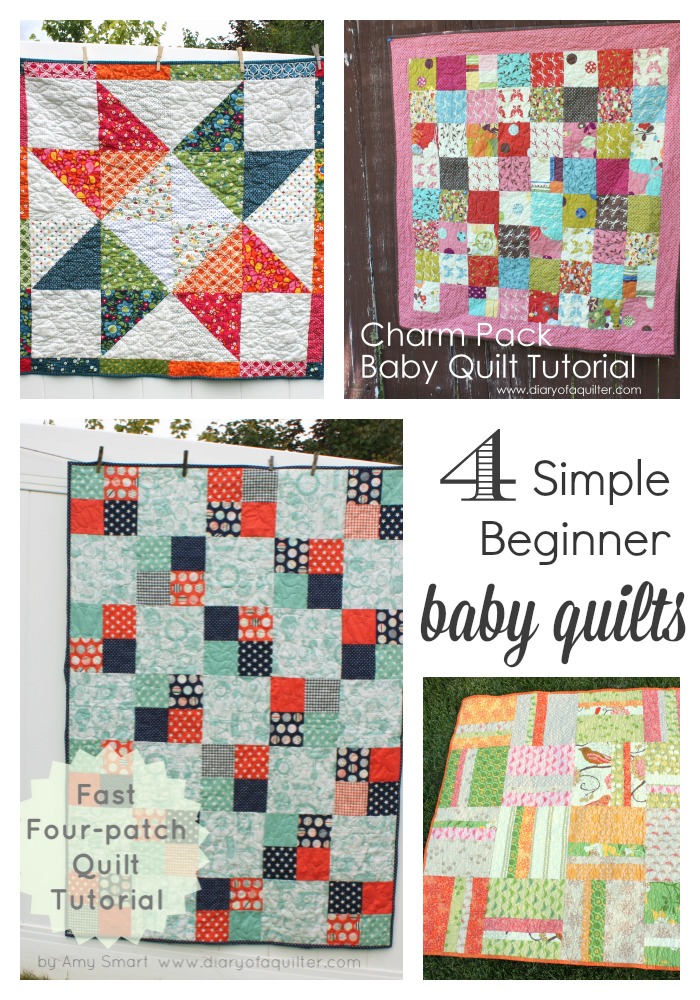
Here are a few more very simple quilt tutorials, perfect for quick quilts to donate to this very worthy cause: Fast Four Patch quilt, Simple Stripes quilt, Easy Charm Squares quilt, and Star Baby Quilt Tutorial.

Carol
I've made a few of those self-binding baby quilts, but always forget how to make them. Thanks for this great tutorial on making one...I've pinned it so I won't lose it! What a wonderful way to honor a lost child and such a worthy cause.
Clara Chandler
Thanks so much for the tutorial and the information about Luke's Love. I've donated to Project Linus in the past and it certainly may be time to stitch a blanket for them again.
Steph Beardsley
Does the binding hold up well with no batting in it? I've never made a blanket/quilt without any batting before.
Gail
Thanks for the great tutorial! I can't wait to try it!
Des
Great Post! I love making baby quilt for Project Linus and local charities. Thank you!
kimbowest
Amy! You are just amazing! what a great tutorial! Thank you so much for everything!
Amy
I love this and can't wait to try it. Thank you for the inspiration!
karen b
Thanks for sharing this method. I didn something kind of like this when I was brand new and didn't know how to bind a quilt. I made the binding much smaller, though, like a regular quilt binding, and I used a pieced quilt top and batting layer.
Laura arnold
These are so much fun to make.
Charlotte Knight
When I purchased this "nubby" fabric to make this blanket, the saleswoman told me it would wash fine but to keep it out of the dryer or the "nubs" would flatten out. Has anyone had any experience with this happening?
Sarah
I know this comment is old, but in case someone is wondering how it holds up...
I have made dozens of blankets with the nubby minky and not had an issue. I have one blanket that 5 years old and washed weekly- it has a couple nubbies that have flattened out, but most of it is unchanged. I think that is more due to regular use than the dryer!!
Amy
Awesome! Thanks so much for the update, Sarah!
Darline CHambers
I love these self binding blankets but have a problem with getting the corners right. Any help would be appreciated?
Chris Westra
Thanks for the awesome tutorial. I always have trouble making self-binding blankets. With your tutorial I will never have trouble again. Thanks for sharing your knowledge.
Michelle Zychowski
so does this blanket have to be square...or can you do a rectangular shape? Making one for my sisters baby and i wanted to make it as big as my fabric will allow.
Amy Smart
I haven't tried it, but I can't see why it wouldn't work with a rectangle as well. If you try it, let me know how it goes!
jane p
I have made this as a rectangle too -- works just fine. I don't like to have pieces of fabric left over so i make the blanket the full size of the outer/back/binding piece.
It's also ok to have a bigger border but you have to be careful with doing the corners.
Amy Smart
Thanks Jane!
Judy
If I use a piece of fabric that is 29 by 32", should I add 5 inches to each side and then use the directions? Would that work?
Thank you for more info and these are very nice directions on your blog.
Amy Smart
I *think* so. In theory I can't see why it wouldn't work, but I haven't tried it myself, so I don't want to say for sure. If you try it, will you let me know how it turns out?
Cathy
Hi. Is there any way to get a batting in there?
Amy Smart
Possibly - I've never tried though. You'd probably want to baste it or secure it in place somehow, just so it doesn't slide around. Let me know how it goes if you try it.
Jennifer Gietzen
Would this work is I have a 30 inch square and a 36 inch square??
Amy Smart
I think so! The binding edges would be just a little more narrow. If you try it, let me know how it goes. Good luck!
Jennifer Gietzen
It worked out really well the border's just not quite as big but it still looks really cute! This is a super cute and super simple blanket I love it I'm going to make more thanks for the instructions
Amy Smart
Awesome! I'm so glad to hear that it worked out! Thanks for the update!
Carrie Johnson
How big is the finished blanket?
Amy Smart
It's about 36" x 36"
Lacey
I'm making one of these with flannel. Should I prewash the fabric?
Amy Smart
I usually pre-wash flannel, just because it does shrink a lot. Probably a good plan before you piece this.
Amber
How would like work for a quilt front that is 30'' x 40''?
Trudi
Hi- Love your blog! I am a newbie to all things sewing! I was trying to make the minky blanket and the material just spread apart at the place where I rotary cut 🙁 Is it because I should have changed my rotary blade!? Just thought of this as I am writing!
I am also the worst straight line cutter! My fabric if big gets smaller and smaller! Ha!
Thanks for the scrumptious photos of your work!
Mary Horner
I think I followed the instructions correctly but my corners didn't turn out? Help!
Holly
This tutorial is great! I've made this a few times, shrinking the size and making it rectangular to make burp cloth. It works even if you change the size or make it rectangular you just need to make sure your "border" all the way around is the same (ex. 2 inches, 5 inches, etc.)
Cathy Mathis
There is a newer way to make the self binding baby quilts that is much easier. I use to make them this way look it up on u tube. You did a great job.
Connie
Beginner here! Lol! Can you switch the minky to make the border out of instead? So what I'm asking is, can the cotton be the middle and the milky be the larger part as long as you are even all the way around?
Amy
That's a good question. In theory, yes, but I've never tried it so I don't want to steer you wrong. The one hesitation I'd have is the mitered seams in the corners would be a lot bulkier - they definitely would not lie flat like the cotton fabric. The other aspect is that minkie is super stretchy and a little harder to work with than regular quilting cotton. It could be easier for the blanket to be misshapen.
If you try it, let us know how it goes!
Emily Elizabeth
Just made this tonight! I did use two kinky fabrics and it definitely came out a little wonky, but I’m really pleased with how it turned out! Thanks so much for the tutorial!
ganniebozeman1Sherrie
Can you use fleece for both sides?
Amy
Yes! That would work great!
Pat Kovacs
thanks for showing us how to do this.. my first one . It's for my niece. came good.
Judy Wilder
Hi Amy
I have made tons of these blankets. I want to make a larger one. Using 60" fabric. Do you have any ideas for a design for the inner fabric instead of just a plain square.
Sarah
I just made one with batting and it turned out great! I basted the batting to the back piece first, and then made the blanket the same way as the tutorial. I did the inner square top stitch like Amy suggests, because I wanted to make sure everything stayed in place when I wash it.
Gina
What a great idea for someone who has lost a child. Thank you very much! I’m going to start one now!
Gina
Bernadine
I too have made several blankets. Forgot all the details. Thanks so much for posting.