
A new year for me usually (but not always) puts me in the mood to clean out and get organized. The goal isn't a picture-perfect space - it's a room that makes it easy to sit down and sew without having to clear a path first. In this post, I'll walk you through some of my favorite simple, step-by-step clean-out process to declutter what you don't use, organize what you do, and set up a few easy systems that will keep your space feeling calm and creative for the year ahead.
After Christmas, my Sewing Room is always in dire need of a clean out. My sewing space is in the original formal dining room of our house (which we never used for dining.) It's great because it's right off the kitchen/hub of the home, but in December it also becomes the "Christmas Catch-all Room" for gift wrapping, Christmas cards, etc. etc. Hence for me it's always in desperate need of a big tidy up at the beginning of the year!
I had big plans to do it all this week and then write a post all about it. Well, that was not really a realistic plan.
The more I dug in the bigger mess I made. (Maybe you can relate to this. 😅)
And then I realized I didn't need to force an artificial deadline on such a big and important task. I'm feeling motivated, so this room is still very much a work in progress.
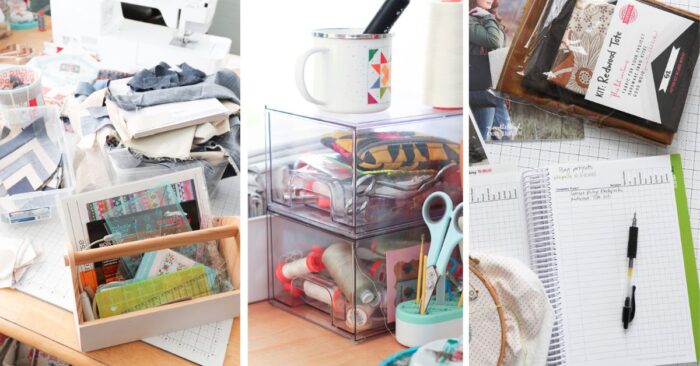
Here's a little reality check of what my Sewing Room still looks like right now. There are piles everywhere at the moment. I share this so that you can know you are not alone! (Scroll to the bottom to see the worst corner of this room/my secret shame. I can't believe I'm putting it on the internet.)

That said, I decided to still share some of the tips and tools that I'm using for this organization job incase they are beneficial to anyone else out there. I'll continue sharing more of my progress throughout the year. Maybe we could be accountability partners on our organization progress. 🙂
Getting Started
First things first: Clear trash and do a quick reset gathering current projects together.
- Trash/recycling first (packaging, dried markers, old papers)
- Gather "belongs elsewhere" items into one basket and remove them
Just getting rid of all of the trash in the room feels so cathartic.
I had plans to finish my Christmas sewing projects that were still out, but decided that in order to really prep this room for the new year, I wanted to gather them up and put them away for next year.

I then rounded up all of the other current projects scattered around my sewing room and put each project together in one pile/bin/box.

Make decisions fast: keep / donate / toss
This is a classic technique from organization gurus. Use these three categories to decide what to do with everything you touch and make a decision quickly.
- Toss: broken, dried out, duplicate junk, mystery parts you'll never use
- Donate: tools you don't reach for, fabric you don't love, patterns you won't make (I've got a list of ideas for Places That Take Fabric Donations Here)
- Keep: only what supports what you actually plan to sew
Sort by category (not by where it currently lives)
From the keep pile, sort your items and make quick piles/bins for:
- Fabric (yardage, scraps, precuts, specialty)
- Tools/notions (rotary stuff, rulers, pins/clips, thread, zippers, elastics)
- Patterns + books
- Projects (active vs. someday)
- Paperwork/receipts/shipping supplies (if you have them)
Once you've gathered by category, start putting them away. As I got to each location I suddenly felt like cleaning out that whole drawer, box of notions, etc. I held back for now, just putting things away today. Once I get through this initial tidy-up session, I'll tackle each drawer, shelf, etc. one at a time over the next few weeks so I don't get burned out.
My favorite Ruler Storage Hack: Command Hooks
I have been using this hack for over 5 years now and it's SO SIMPLE. After years of planning to put up a pegboard or some other system for hanging my rulers I stumbled on this fast and easy solution: Command Hooks. All of my rulers are within easy reach of my cutting table, and this system makes it so easy to keep them put away and organized.

I use the Medium Wire Toggle hooks and just stick them right on the side of my Pax Ikea Wardrobe. These hooks can hold 2-3 rulers (depending on the size) and they've held strong for 5 years! I'm just now starting to replace them. And the best part is that it takes under a minute, and no extra tools or skills to install them!


Contain + label (simple storage that works)
- Put like with like in clear bins/drawers
- Label everything (even if it feels obvious)
- Store by frequency: daily-use within arm's reach; occasional higher/behind
I've got a few suggestions of tools and systems that I use to get myself organized.
I love clear bins that are 12" x 12"and varying depths. These are great for storing finished blocks, pattern books, and fabric your using to make these blocks all in one handy place. I can easily see and grab whichever project I want to work on.

My favorite are Art Bins because they stack so nicely. They also have options for dividers and tubs that fit inside the bins for further organization. They

These kind of bins are usually on sale this time of year at big box stores like Michael's. Now that JoAnns is gone (😪) they're harder to find, but there are lots of Art Bin options still available on Amazon.
Label All The Things
I know that Labeling things feels unnecessary, but it really can make a difference. I've accumulated a stack of clear boxes over the years, but honestly don't always remember what's inside. Just last month I was looking for mini embroidery hoops that I knew I had somewhere, I just totally forgot that I'd put them in a box of cross-stitch supplies. That box finally got a label.

My biggest hang up with labeling things is trying to find labels or a good label maker to use. A few years ago someone recommended the Nimbot label maker and it has been life changing!

The NIIMBOT label maker is a small, handheld printer that you can keep in a drawer, and fast enough that you'll actually use it while you're organizing. I love that it connects SO easily to your phone (via an App and bluetooth) and prints clean, easy-to-read labels without ink, so you can quickly anything. There's a new version available since I bought mine and they're usually between 33% - 40% off on Amazon. (And they're available in cute colors too!) A GREAT deal for something that will change your life.

Seeing the labels on these boxes also keeps the projects front-of-mind and I'm more inclined to pull out and work on them!
Labeling containers also keeps me from tossing random things into a box-I'm much more likely to only put what the label says inside.
Clear Storage Drawers
Another favorite find for storing all of my sewing supplies are these clear plastic stackable drawers. I found these ones on Amazon (they come in a set of 4), but you can find similar options at Walmart and other big box stores. Look in the kitchen and bathroom storage aisle for other great clear storage drawers, etc.
I love being able to easily SEE what's inside and find what I need at the same time everything is sorted together and dust free. I keep a couple next to my sewing machine with supplies I often use AT my machine that I can easily grab when needed. (Like thread, scissors, etc.) I also recommend having a simple bobbin holder next to your machine.
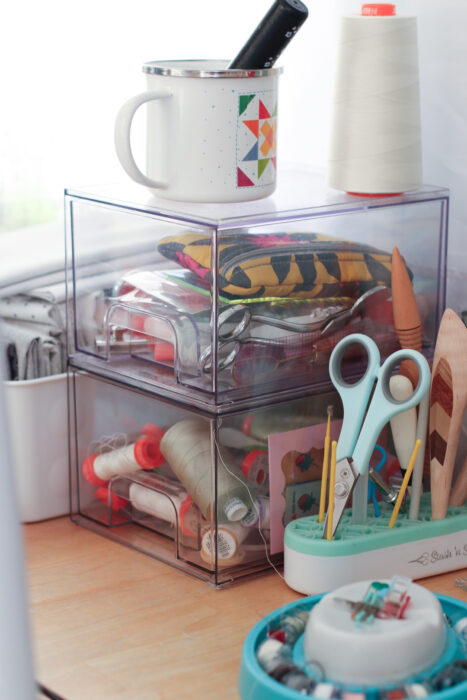
I keep another set on the dresser with things like labels, washi tape, mini precuts, stickers, specialty rulers, etc.

I use some decorative jars with lids for things like binding clips, safety pins, etc. I also recommend having a simple bobbin holder next to your machine.
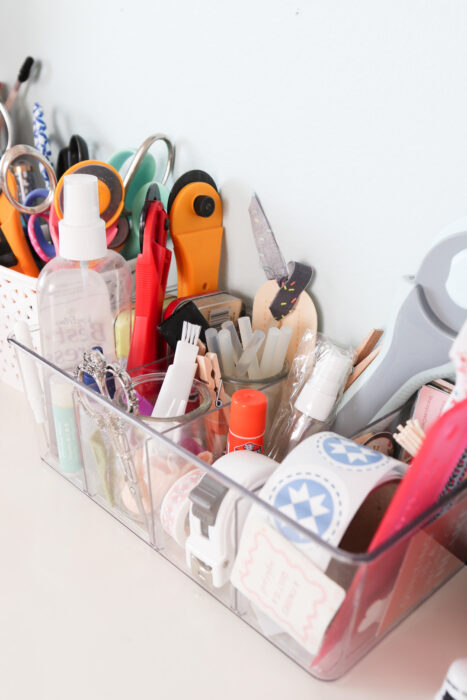
I also love these clear boxes with dividers for keeping tools and notions handy. I also use them in my pantry, medicine cabinet, kitchen cupboards etc.
Precuts and Fabric Storage Systems
Missouri Star Quilt Company recently released some new storage systems for precuts and fabric. They sent me some product samples to play with and try for myself. The precuts storage systems come with clear vinyl pouches with zip closure fabric boards with elastic. They also have sturdy folding boards for yardage storage like mini bolts.

The Charm Pack portfolios consist of a 10 x 8" [2" D-ring] binder with pocket and card, featuring 4 translucent 7.5" x 8" vinyl pouches with zip closure and 6 x 6" fabric boards with elastic. They're the perfect size for holding 5" x 5" charm squares. I used one set to organize my charms, blocks, and scraps that I'm using to piece these mini Log cabin blocks all in one spot.

I love the little pouches, but the D-Ring binder feels a little awkward to me. I think I'd rather just file the pouches in a box.
However, I love the Layer Cake Folio storage system. This includes a 13 x 13" folio made of rigid translucent clear plastic. Inside, you'll find (4)12.5 x 13" vinyl pouches with zip closure and (4) 11 x 11" fabric boards with elastic. The pouches are perfect for storing your 10" x 10" precuts (layer cakes), but they are also GREAT project pouches for storing blocks and works in progress. They'd also be perfect for taking multiple projects to a retreat.


In one pouch I put blocks in as well as the fabric and the patterns so that everything is collected and stored together.


I love that the clear vinyl pouches keep everything neat and safe, but also easy to see and find what I'm looking for.
Another option for something similar is to make your own clear vinyl pouches. Caroline from Sew Can She has a list of Free patterns to sew a variety of sizes of clear storage bags.
To be honest though, the price on the MSQC Layer Cake folio is so good that it would be hard to just get the supplies to make your own for less than what it costs to buy the folio.

Another fabric storage tool Missouri Star recently released are their Bitty Bolts. These 12" x 6" bolts come in a package of 12 heavy, sturdy boards and include a folding guide. I used them to clean up a bunch of my Confetti Cotton Solids yardage.

I also used them to coral some of my loose print yardage. There is also a bolts storage bag that they fit in nicely. I didn't think I would need that, but once I put everything inside, I loved how neat and organized it looked as well as keeping things dust free.

For more Sewing Room Organization ideas check out this guest post from Andy of A Bright Corner.
Start a Big-Picture Plan - Make Lists
One of the fastest ways to feel "organized" in your sewing room isn't another storage bin or label - it's a quick inventory of your works-in-progress. When I don't have a list, projects tend to multiply, supplies get bought twice, and I waste time trying to remember where I left off. But when taking time to write everything down, it instantly clears the mental clutter and helps me finish what I've already started.
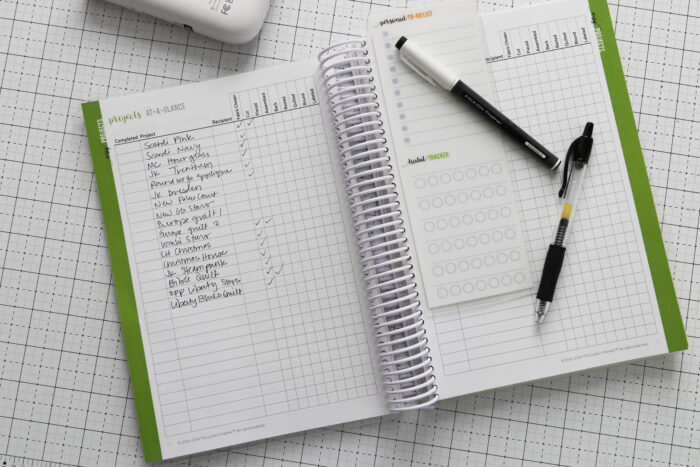
I love planners and note books and always use a calendar planner. This year I'm adding a new planner to help me get myself organized. The Quilter's Planner comes in multiple formats (coil-bound, binder, looseleaf, hardcover). It includes practical pages like monthly calendars, sewing machine + sewing tools inventory pages, and project planning sections (including "Projects At-A-Glance") to help you track WIPs and supplies. It also adds a reference section with quilting measurements and techniques, traditional quilt block patterns, plus other craft-room accessories and digital organization printables.
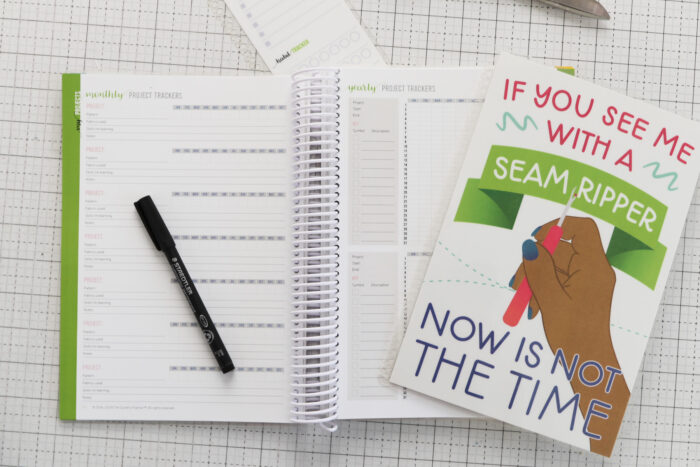
One of my goals this year is to finish many of the WIP's (Works In Progress) that I've started over the past 2 decades. I'm started making a list of them. I'm sure I'll be adding more quilts to the list as I continue to clean my sewing room and unearth more.
I'm also keeping track of Hand-Stitcing (embroidery, cross-stitch) projects that I've started as well as Bag projects, patterns and kits that I have.
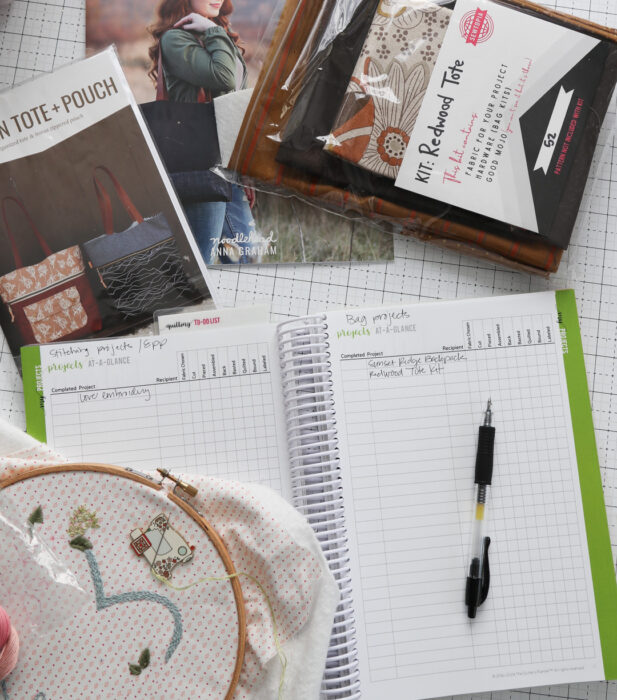
The Quilter's Planner is fully customizable with many options including coil bound (like mine), 3-ring binder style, looseleaf or hard cover. You can choose to have a calendar or not, clip in book marks and dividers and you can choose your own cover.

You can get 10% off the Quilter's Planner with the coupon code QPAMYSMART at checkout.
Of course, you can also create your own binder and lists.
Lisa Donnelly offers a free printable weekly planner and tips to get organized here.

Quilt Pattern Stand
One more tool that has helped my table feel (and brain) feel so much less chaotic disorganized. And it's such a simple thing. A while ago the Fat Quarter Shop sent me their Bee's Knees Metal Book Stand by Lori Holt . It is a sturdy, magnetic metal stand that keeps your quilting books, patterns, or tablet propped up at a comfortable angle while you sew.

I LOVE it because it's keeps my sewing table better organized and the patterns I'm working on more visible. I also use it to hold up my phone for watching videos or just keeping it from getting lost in the clutter. 😉 It's also a great spot for keeping track of and using magnetic needle minders.
Of course you can use any type of book stand that you want, but honestly, this has been the simplest game changer. It keeps the papers and patterns on my sewing table from getting lost in the shuffle as well as making them easier to read when I'm using them!
What If You Don't Feel Motivated To Organize
Important not if you don't feel motivated to do it right now: don't do it right now.
You have my official permission to wait until you do feel motivated. I've learned I get so much more done when I'm actually in the mood to clean and organize.

That said, a few small things that might spark your motivation:
Set a "tiny timer." Tell yourself you're only doing 10 minutes (or even 5), then stop when it goes off-starting is usually the hard part, and you'll often keep going once there's momentum.
Pick one micro-win. Choose a single, concrete task like "clear the cutting table," "empty one trash bag," or "sort one bin," so you can actually finish and feel progress fast.
Use the "make it easier later" rule. If you don't want to clean, just do the next thing that will make tomorrow's organizing easier-gather everything into one pile, label one container, or put all like-items into one basket to sort later.
Honestly, one small thing might be enough to spark both your creativity and your motivation.
For more ideas about sparking your creativity, check out this guest post from Aqua Paisley.

Reality Check
I mentioned at the beginning that I would share my secret shame with all of you. This is the corner of my sewing room that you never see in my photos because it's a total disaster. 🫣 It's where I keep my batting and batting scraps and it's a disorganized mess.

So, as you can see, I still have plenty of ways to get myself organized. But I'm feeling motivated and I'm going to harness that motivation as long as I can!
I'll keep you posted on my progress. Best of luck with your own motivation and organization progress for the new year!

Linda Schaefer says
I still got you beat with the sewing room mess!! 😜
Karen E. says
Thank you so much for keeping it real! My sewing room looks much the same (quite possibly worse! Okay, definitely worse! 😂🤣) The best part is keeping projects moving along towards the finish!
I’m looking forward to piecing up Scandi Hearts! ❤️💕❤️
Hugs!
Sam Harvey says
I love your ideas, your relaxed spirit, your news letters and patterns! Keep em coming Amy!
Amy Smart says
Aww, thank you! That means a lot.
Carol Saucier says
Best article I’ve read on cleaning/organizing sewing room. Thanks. I share my space (enclosed garage) with canning supplies, canned goods, pantry, freezer, wash and dryer so had to get creative. Dedicating January to that project. Got side tracked when I found partial completed blocks and pieces given by my cousin years ago. Decided to use completed pieces for a lap quilt which I’m doing now when not sorting drawers and trays. Wish me luck.
Susan Roberts says
I love your honesty and all your many tips for organizing our sewing rooms! I always say I'll keep it organized and clean, but somehow that does not happen - this year my goal is to organize well and keep it that way! I really loved your "special cabinet" at the end of your post - nice to know because most of us have an area like that too! Happy New Year!
Joanne says
Thank you for sharing your creative space. It’s really a lovely space! And the stash in the photos is serious eye candy!
I have a question - i have a space behind the door similar to yours and am thinking of adding a storage piece (likely from Ikea). Do you find having the furniture behind the door an issue?
Thanks much
Amy Smart says
Hasn't been an issue for me. I needed the space for the furniture/storage. 😅
Diane S says
Thank you for sharing your pictures, especially the one at the end! I'm not the only one that has areas (or entire room!) that look like that. Thanks for the ideas and motivation. And remember to give ourselves grace and enjoy the hobby we love!
linda Schiller says
I like to wash and press any fabric I buy that exceeds 1 yd. I write the amount on the selvage and fold it to fit on a plastic hanger. I try to group according to color. I have a rod in my closet and I also end up hanging some fabric in my clothing closet.
I do have a problem of holding on to tiny scraps - i.e., small triangles from trimming - not sure I will ever do anything with them so why am I keeping them!!!
Amy Smart says
Hah - I totally get it!
Donna Halvorsen says
I recently bought on Amazon these little drawers that secure under your desk or table with double sided adhesive. They also come with dividers. I put one under my desk top for things like large paper clips, markers etc. The other one I put under my sewing table and it holds my machine needles, mini screwdrivers, seam ripper, thimbles, chalk, etc. I love them and might get a couple more.
Amy Smart says
Oh, what a great suggestion! Thank you for sharing. I'm totally going to go look for them!
Arlene Helms says
Great post!! I think many of us have the chaos room after the holidays. 😄 I appreciate your willingness to share so we can all say "yep! My room looks like that too!". This year, like you, I decided if I get it done by the end of January, that's a win. And I need a sunny day where I can dive in first thing to power my motivation. 🤣 In my room, it's the scary closet that needs to be done first so I can have any hope of getting things off of the surfaces. 🤞🏻🤞🏻🤞🏻🤞🏻 Good luck to all of us!!
Mary Davies says
Some great ideas re plastic clear boxes and print labeller. Love the Fischer Price finger puppet on your shelf. I have my daughter’s on my dresser in the kitchen. Such happy memories of playtime with my daughter.
Amy Smart says
Aww thanks. I love it too. I found it when helping my parents move a few years ago. It represents happy memories for me too!
Gale Miller says
Thank you, Amy! Great tips and organizational strategies. My room is in progress. Notating WIP's, new goals and taking it one pile at a time. Thank you again for sharing your progress. Deep breath.
Amy Smart says
Good for you!
Cindy Smith says
Lots of great ideas. I bought the label maker - half off!!
Pattye says
Thanks for the recommendation on the label printer. I ordered one in sage green. I hope you get a commission!
Amy Smart says
I do! Thanks Pattye! Plus, I think you'll love it. It's so simple to use and it's been a gamechanger for me!
Mary Davidson says
Hi Amy, thanks for a great and motivating newsletter. I feel better knowing that there are plenty of us in the same boat. How do you not get distracted? I think the timer would help me. I love your work and always look forward to your emails.
Amy Smart says
I think a timer is a great idea! I've heard that's a really useful technique for lots of tasks that need doing.
Delma Torrez says
I Loved your what a shame corner, that's how my space looks right now! Thank You for all the helpful tips.
Julie says
I FEEL VINDICATED ‼️‼️‼️‼️‼️
Thank you so much for being real. I think anyone who creates with their hands just naturally creates messes hahaha!
Amy Smart says
💯 Absolutely! I'm so glad you feel vindicated. 😉
Pat Hanna says
Ooooooh, that shame corner! If only mine was confined to a corner! Goal for January is to get things tidied up. I need to be more realistic in answering the questions like "will I use this in the foreseeable future?" "Do I enjoy looking at it on the floor?" and the big one: "so what if I spent a lot of money on this, especially since it is not useful to the quilts I am making NOW." Let's face it, tastes change. Someone else will love it, especially if they can get it for a bargain price at a resale shop.
Gwyn Welliver says
I have a corner like that as well! You have inspired, enabled, me to make the Trentham quilt. I bought the foundation papers and Jen's lovely book. Now I am thinking about fabric. I also revisited your Manx block tutorial. I am thinking that may be a good travel project. Take care and thank you!
Amy Smart says
You're welcome 😉 - that Trentham quilt is so much fun. Enjoy!
Ruth schipper says
I’m wondering how to get musty smell out of fabrics I had stored for a long time ?but still have a lot of good usage?! I’d donate a lot of it.
Amy Smart says
That is a really great question. I don't have an answer, but it would be a great question to research. Maybe someone here will have some experience to help us?
Paulette says
I’ve heard that putting smoky smelling quilts or musty fabric in a large garbage bag with a bat of Irish Spring soap helps cut the odors. I have not tried this yet.
Amy Smart says
Thanks, Paulette!
Margot says
I would try washing in the machine with detergent and vinegar.
Margot says
I love my XStitch app for keeping track of my crossstitch charts and supplies - it’s always with me.
Any good suggestions for an electronic list of my quilting patterns?
Sandra Lanter says
You are an inspiration…… I have such a mess. I will tackle it a small portion at a time. Seems like I am always finishing up a quilt for someone special and then I’m just tired . I also am a squirrel.😀 thank you for your advice on so many aspects of the PROBLEM!
Elaine says
Like your organization tips and the fact you are willing to share. I too have one of those corners stuffed-but no space at the moment.
Sonia says
Thanks for the great tips on getting organized. The other day I walked in and straight back out again because of the mess my sewing room is. Today I am going in and applying some of your tips.