
I love mini quilts - they're a fun way to try a new pattern or color palette and a fast finish, without having to commit to a big project. Today guest poster Shelly of Coral + Co is sharing this fun, modern free mini quilt pattern. Might be just the thing you need to get some creative juices flowing as well as a the satisfaction of a mission accomplished.
Hello friends, it's Shelly from Coral + Co stopping by. I'm glad to be sharing a fun mini quilt pattern to keep you busy during this current time. It's a simple project that is beginner-friendly and is a great way to use up charm packs, mini charm packs, some of your favorite scrap fabrics. If you like sewing with charm packs, you might also like this Easy Charm Square Quilt Pattern or the Four Square Baby Quilt Pattern.
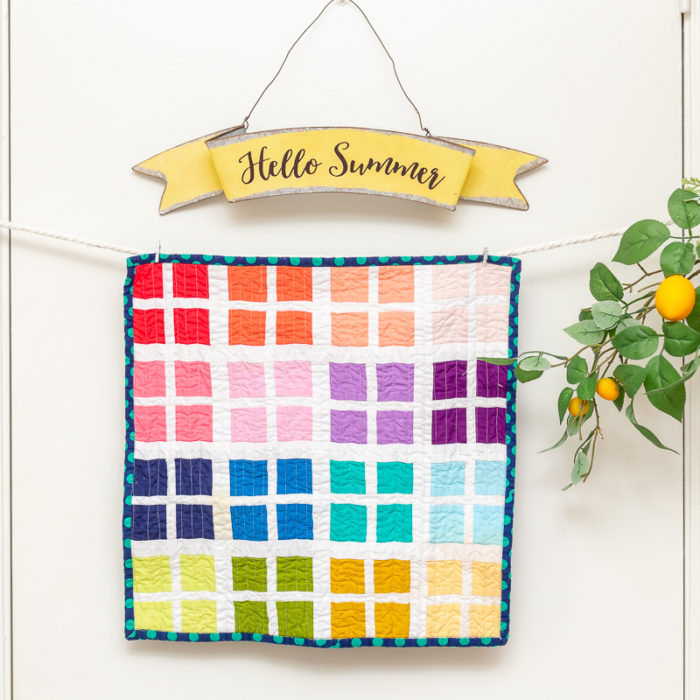
This simple design would make a lovely wall hanging or even add some decor to your tablescape. My kids have decided that this is the perfect size quilt for their dolls, so this mini quilt will be found keeping their American Girl Dolls toasty warm in bed.
I have included all the fabric requirements, cutting instructions, and how to piece it together in the instructions below. I even made a PDF coloring sheet for you to start planning your own version.
Window Pane Mini Quilt Pattern

Before you start: RST = Right Sides Together WOF=Width of Fabric
Fabric requirements:
- Sixteen (16) - 5" x 5" Squares of various fabrics. This is a great way to use random charm squares you might have leftover. You could also use a mini charm pack here. You would need 4 of each print and would skip cutting the 5" x 5" squares.
- ½ Yard of your Main Fabric
- ¼ Yard of your Binding Fabric
- 23" x 23" Square Fabric for the Backing
- 24" x 24" Square Fabric for the Batting
Cutting Instructions:
From 16 colored 5" x 5" squares - cut each into 4 squares 2.5" x 2.5"
From ½ yard white yardage cut:
- 1 strip 2.5" x 32" - subcut into 32 strips 1" x 2.5"
- 1 strip 5" x Width of Fabric - sub cut into 16 strips 1" x 5" and 12 strips 1.5" x 5"
- 3 strips 1.5" x 21.5"
- 2 strips .75" x 21.5"
- 2 strips .75" x 22"
Binding: ¼ yard - cut 3 strips 2.5" x WOF
Batting: 23" x 23" square
Backing 24.5" x 24.5"
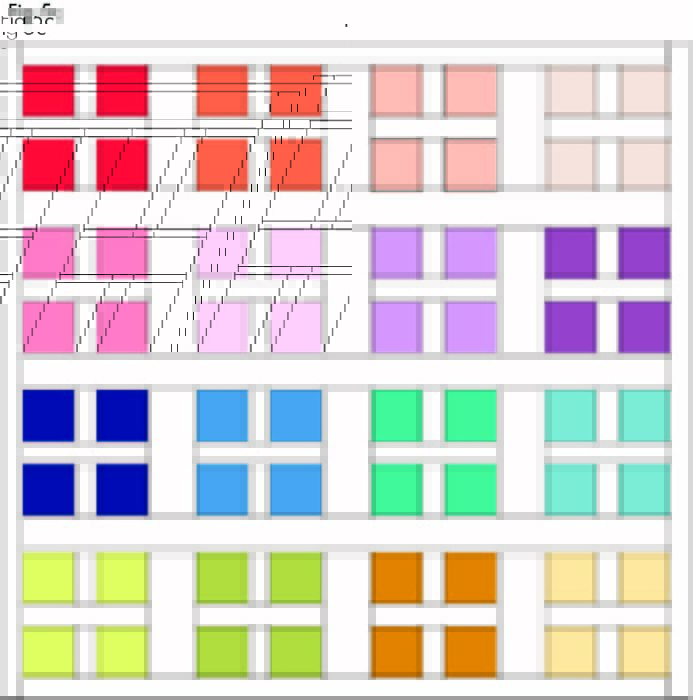
Piecing the mini quilt:

Step 1a - Place 1" x 2.5" white sashing rectangle RST over 2.5" x 2.5" colored square. Sew ¼" seam as pictured in Fig 1a.
Press open. Step 1b- Place second 2.5" x 2.5" colored square RST over the unit made in step 1a. Sew ¼" seam as pictured in Fig 1b. Press open.
Make two (2) of these.

Step 2a - Place 1" x 5" white sashing rectangle RST over the bottom edge of the unit made in step 1b. Sew ¼" seam as pictured in Fig 2a. Press open.
Step 2b - Place unit made in step 1b RST over unit made in step 2a as pictured above. Sew ¼" seam as pictured in Fig 2b. Press open.
Block will finish at 4.5" x 4.5" (5" x 5" unfinished)
Make 15 more of these window pane blocks in a variety of colors.

 Step 3 - Sew together 4 colored window blocks alternating with 3 white 1.5" x 5" sashing strips. Press seams toward the sashing strips.
Repeat process with remaining 12 blocks and sashing strips to make 3 more rows.

Step 4 - Place 21.5" x 1.5"strip RST over the first row of blocks. Sew ¼" seam as shown in step 4a. Press seam toward sashing strip.


Continue to add alternating block rows and white 1.5" x 21.5" sashing strips as shown in Fig 4b and press open. Continue adding the rectangle sashing and rows until you have 4 rows total as show below in Fig 5a.

Step 5a - Place .75" x 21.5" strips RST over the top edge and bottom edge of the quilt top. Sew ¼" seams as shown in step 5a. Press seams toward border strip.

Step 5b - Place 22" x .75"strips RST over the side edges and bottom edge of the quilt top. Sew ¼" seams as shown in Fig 5b. Press seams toward border strips.
Step 5c - Press the quilt top flat and square up.

Step 6a - Make a quilt sandwich layering the backing, batting, and quilt top. Place your backing Wrong Side Up, place batting over the backing, and center the quilt top Right Side Up on the top of the sandwich. Baste layers to hold together.

Step 6b - Quilt straight rows ½" apart or as desired. (Tips for Basting and Quilting found here.) Trim away batting and backing.

Step 7 - Sew 2.5" x WOF binding strips together end to end and bind quilt to finish. (Tips for how to finish and bind a quilt here.)
![]()
You can download the PDF version of the coloring sheet by clicking here: Blank Windowpane Mini Quilt
Don't forget to Pin the Window Pane Mini Quilt Pattern to make later!

The Joyful Quilter
Thanks for hosing Shelly on your blog. Her tutorial made a quilt that is SEW charming!