
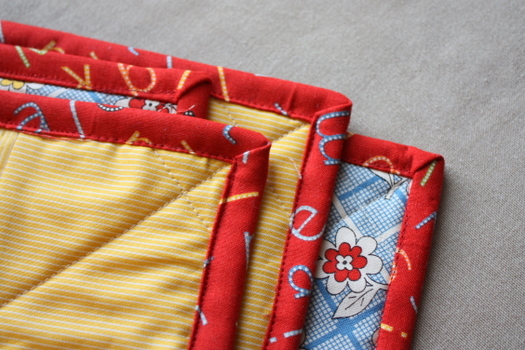
 This week we’re going to talk about adding a machine-done binding to finish you project. Next week we’ll finish by talking about hand-done bias-binding. Pick whichever option works best for you! A neat binding makes the quilt look professional, crisp and finished. It can also provide a cute ‘frame’ for the design. When I first started quilting I was so intimidated by the thought of adding a binding to a quilt. I was amazed (and stoked) when I learned how easy they are.
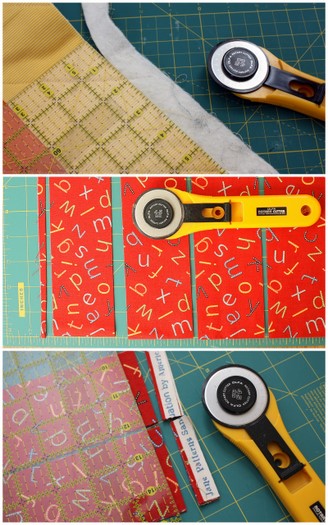
First you are going to trim the excess batting and backing fabric from your quilted project. Use a rotary cutter and your ruler to have a neat, square edge.
Next cut you binding strips: Four 2 ½” wide (x width of the fabric) strips will be just enough to bind your baby quilt. [To find the amount of strips you will need for a bigger quilt, find the measurement of the perimeter of your quilt. Divide that number by 42 - for the roughly 42" of the width of the fabric - and cut that number of strips. For example: if your quilt measures 55" x 80" find the perimeter: 55+55+80+80=270. Divide 270 by 42 = 6.4286. Because the number is bigger than 6 you will need 7 2 ½”x42" strips to have enough to go all the way around. Does that make sense?]
Trim the selvage edges off you strips.
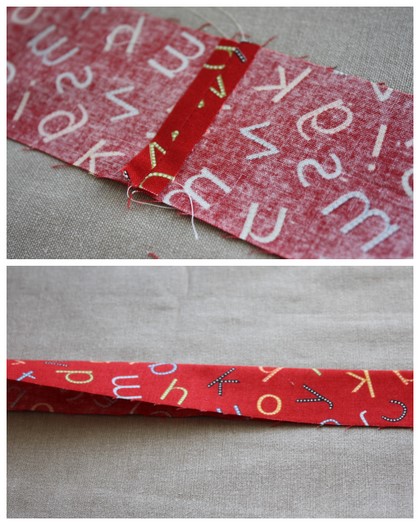
Sew the strips together end to end to create one long strip. Press seams open. Fold strip in half lengthwise and press.
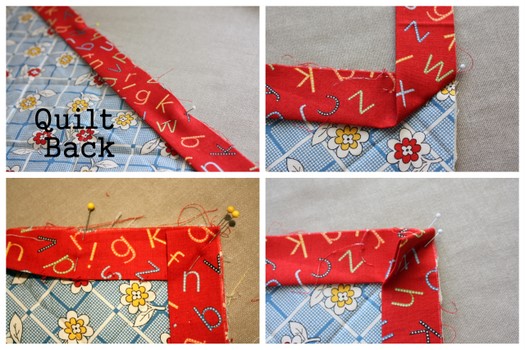
Starting towards the center of one side (you don’t want you ends to join near a corner – makes it a lot trickier) pin the raw edges of your pressed strip to the raw edges of the BACK side of the quilt.
When you get to the corner you are going to miter the corners. To do this fold the strip up at a 45 degree angle when you reach the corner of the quilt. Put a pin in at a 45 degree angle to hold that corner in place. Then fold the strip down to match the raw edges with the next side of the quilt. The fold should line up with the edge of the last side you were pinning to. You will have a little triangle that sticks up – place another pin at a 45 degree angle on the other side of the little triangle flap.
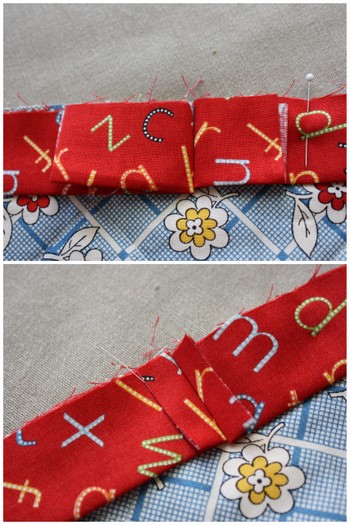
When the strip gets back around to the beginning fold the ends down so that the strips meet-up. Press with your iron to make a crease at both folds. Trim strips to about ¼” away from fold. Pin together and sew seam right on the press marks of both strips. Press seams open and voila – a perfectly joined binding!
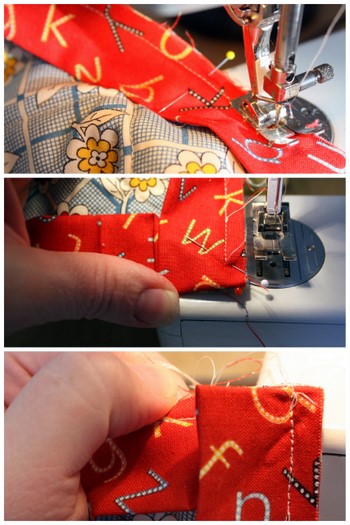
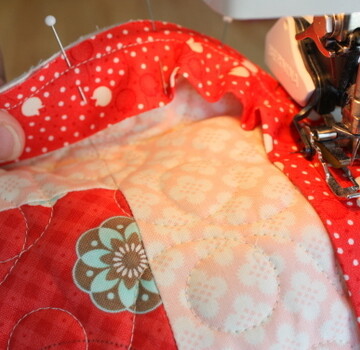
Now sew the binding to the back of the quilt with a ¼” seam allowance. (If you have a walking-foot feature on your machine, I recommend using it here.) When you get to the corner stop your seam about ¼” away from the end of that side. Lift the presser foot and rotate the quilt in the new direction, putting the triangle flap the other direction start sewing from the beginning of that side. (I know this feels strange and confusing at first, but trust me, it works and makes a nice crisp mitered corner!)
When all four sides are sewn to the back of the quilt, fold the folded edge of the binding to the front of the quilt and pin in place. Mitered corners should fall into place. It’s like magic. Pin abundantly to keep the binding in place in preparation for machine sewing. I would even recommend pressing to help hold that binding in place.
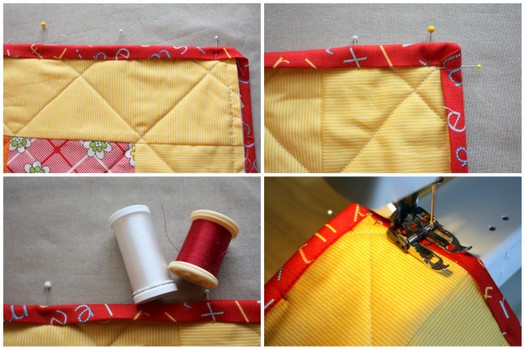
Using either a matching thread or an invisible thread (good if you don’t want your stitching showing as much on the back of the quilt) carefully stitch the binding down working from the FRONT of the quilt. Carefully pivot the needle when you get to the corners and continue sewing all the way around the quilt. This is a time I would suggest back-stitching at the start and finish.
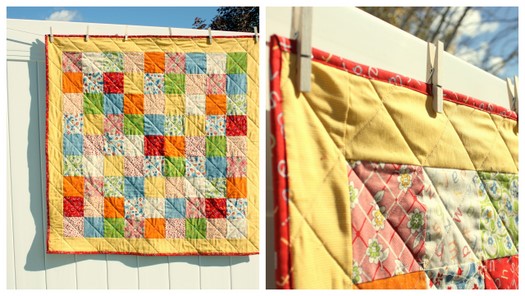
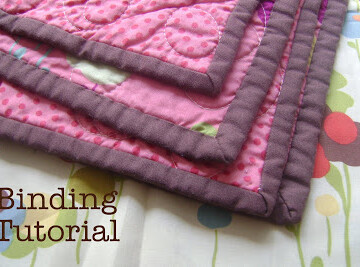
You’re done and you’ve got a crisp, professional looking binding on the edge of your quilt. The double fold layer of fabric will also provide extra durability and longevity to the quilt. The one drawback of putting on a binding with the machine is that it’s difficult to control what the stitching looks like on the back (another reason to use a busy backing fabric.) If you’re not too picky about where the stitches end up on the back, it’s still a great way to finish a binding quickly.
Up Next on our Quilt Along Series: we’ll get a little more advanced discussing bias binding and quilt washing and care.

I have a stack of quilts to bind. Which I really don't mind - I love riding in the car or watching TV with a quilt to bind. I've finished two of the above - I'm going to work on the biggest one while I watch the finale of Project Runway - which I still haven't seen yet (no spoilers!). I'm a PR newbie this season and I'm totally hooked and already sad it's over. Makes me kick myself even more that I didn't go to Mood when I hit the fabric district last spring. Rats.
And thanks so much for your Halloween Quilt love. It was such a fun project - no rules, no pattern, just sew-as-you-go. I think it's one of my new favorites. (How many times have I said that before?)
Originally written November 2010
Tanya
I'm a project runway junkie, too. Sometimes, I get the show and reality mixed up and I imagine a show for quilters designing quilts. I would watch it, but I doubt anyone else would 😉
Aunt Spicy
I am so mad at my tivo, it failed me on recording PR! But gosh do I need the binding tutorial!
John'aLee
I agree...I love binding quilts while traveling! And I too am a Project Runway die hard fan. I have the first 4 seasons on DVD and I watch them while I travel and while I do my handwork in the car.
A Plain Path
Thanks for the link to the tutorial.
Q @ JAQS
I like having the option available for machine binding also. You never know when you might need it :). I haven't tried it with a full size quilt yet - been experimenting with pillows and small projects.
The Bailey Family
I have a question about this...<br /><br />So when you bind it with a machine, you sew it twice and see the front stitching on the back? I'm just confused!
amy smart
@Bailey Family,<br /><br />Yes! You are correct. When machine sewing a binding you sew it twice. One time to sew the binding itself to the quilt (this will be hidden), and then second, sew it down after you flip and pin to the front. This is when you want thread that matches or coordinates (or invisible) because it will show on the back side as well.<br /><br />I hope that clarifies some. Thanks
Allie
Your stack of quilts look yummy!
madebymum
hand stitching the binding is my favourite to.
Elizabeth D.
Too funny, I was a PR newbie this year too, and I loved it. And it is a shame you didn't go to Mood. It looks like so much fun in there! Thanks for sharing your link, you had me at "fast." Binding is my least fave part of quilting!
Paula
Thanks for the excellent binding tutorial. As a new quilter I'm still gettting the hang of binding - and making my corners look like corners. This helped a lot.
Phyllis
Thanks for this tutorial. The instructions are very well written. I think I will give this a try. Thank you for taking the time to do this.
mille
Thanks for the nice comment in my blog about the flowering snowball:) And I'm with the rest of 'em - love the halloween quilt, especially the 2nd one!
Martha anne
Yeah that you so much, I have been avoiding making my first quilted table runner from fear of hang stitching the binding! The perfect post for me 🙂
Joseli e Waleska
Thank you! is the first post that really is worth about bias sewing ("viés" in my language).
Alyhs
This is super helpful! Thank you for putting this together for us "newbies" :] -Alyhs of <a href="https://livingunlife.blogspot.com/%22" rel="nofollow">Living an Unlife</a>
Kelly
Your tutorials are amazingly clear and simple to follow. I made my first quilt using them and was even impressed with my efforts! xxx
Kelli H
First quilt now finished! Thanks so much for your tutorial!
aislingcryan
There's a fabric DISTRICT? Wow, I need to make a trip to the US and in particular NY at some time soon!<br />a
Pastel
Thank you for this tutorial! I have finished five quilts and have struggled on the binding. Not tonight! I finished my sixth quilt with little effort on the binding!
Swell Papel
This is a great tutorial! I just finished my 1st baby quilt and it was such a positive experience that I can't wait to make another one!
Sharon P.
My 16-year-old daughter just finished her first t-shirt quilt for her 4-H project. She is easily discouraged and the instructions kept her in line. She can't wait to start cutting up her next stack of old t-shirts.
Gamecocks for Gravy
Thanks so much for this tutorial. I've almost finished my second quilt from it!
Julie
Amy, I have a quick question regarding the joining of your binding in this tutorial (which is excellent, by the way). How are you sewing the ends together exactly? I keep re-reading the passage, but I am just not computing it (guess I am a visual learner). Where exactly are you sewing the ends together at? Really appreciate all of these great quilting tutorials!
amy smart
After you've trimmed the strips and pressed where they butt against each other with the 1/4" seam allowance remaining on either end, lift up the binding strips and pin the ends of the fabric together. Then sew your seam right on that pressed crease. Press the seam open and finish pinning the binding to the quilt. I hope that helps. Have you got to that point on an actual project? It'
kim
great tutorial. i made my first quilt recently and used this as reference. i was very intimidated by the binding, but this made it so easy, and it looks really nice. i linked to your tutorial in my blog post: https://kcm702.wordpress.com/2012/11/25/quilt/
TK
Awesome tutorial! I made my first quilt using it as my teacher! I hadn't really sewn since jr. high home-ec class!! I linked to your tutorial on my blog: https://holyknollies.blogspot.com/2013/01/best-present-ever.html <br /><br />Thanks for putting this together!
amy smart
That is so great! I love seeing all of these first quilts! I must post a disclaimer preparing you all for the highly addictive qualities of quilting. I don't want anyone coming back and saying they weren't warned! 🙂
Luneta Wanda
Press the seam open and finish pinning the binding to the quilt. I hope that helps. Have you got to that point on an actual project<br /><a href="https://goo.gl/fJipdP" rel="nofollow">foto payudara</a>
HLP!
My binding is turning out wonky. It looks like it isn't wide enough, but I double checked the width of the binding and my seam allowance. I wish that I could post a picture, so you could see! Any advice?
Karen (Cupcake) Carter
Thank you for this awesome tutorial! This is the first quilt I have ever made. My husband gave me a Brother Project Runway Edition sewing machine last Xmas and this was the perfect project to break it in with. It was so much fun! Thanks again!
jolie
This comment has been removed by the author.
jolie
Great tutorial.... especially the "....start sewing from the beginning of that side. (I know this feels strange and confusing at first, but trust me, it works and makes a nice crisp mitered corner!)...Thanks.
Meg
Well, I did it. Made my first quilt!! Andi, my dog, is very pleased with the final product. Thank you for this very easy to follow tutorial, I can’t wait to make many more...maybe even for a human next time.