

Today I'm going to share a quick method of making a quilted table runner by quilting and piecing all at the same time!
(Does that blow your mind? I hope not. It's really fun. And easy, I promise.) Let's start playing, shall we?
Free printable PDF version of this tutorial is available at the bottom of this post.

How to Make a Quilted Table Runner: a Step by Step Tutorial
Begin by deciding what size quilted table runner you want. I do it by taking the piece of batting right to my table itself. (Please don't enlarge this picture or you will see pencil scribbling, pink nail polish, green sparkly marker, etc. This is why I didn't buy my kitchen table from the Pottery Barn. Saves a lot of stress. But I digress . . .)
You can make any size quilted table runner you want, so customize it to your space. Do keep in mind that your runner will shrink when you wash it, so you may want to cut a little bigger. After you've cut your batting, cut your back fabric slightly larger than your batting all the way around. You can make a reversible quilted table runner if you pick a pretty fabric for the back.

Iron your batting (if it was a wadded up remnant like mine) on a low heat setting. Be careful not to stretch it out of shape. Then iron your backing fabric on a high-heat cotton setting to get all wrinkles out. You will be sewing your top strips through all the layers of of batting and backing so you want to start as smooth as possible. If you are using a Warm & Natural type batting it has a little bit of adhesive stuff on it (which is why you don't want to iron directly on it on a hot setting.) This is helpful for keeping your batting and backing fabric together and smooth.
After both pieces are pressed individually, center the batting on the wrong side of the backing fabric. Carefully flip both over and press the backing fabric with batting underneath on a high heat setting. This will create enough of a bond to hold them together without having to pin the heck out of them. If you feel more comfortable, or if you batting isn't lightly adhering to the backing fabric, you could use a quilters spray adhesive to hold them together.
Okay, onto the fun part.

Next cut a collection of strips of different fabrics. This is a great way to use up all those scraps that accumulate that you just can't bear to part with. This would also be a great use for a Jelly Roll or Honey Bun. I personally like the variation of strip widths in my runner, but that is purely personal preference. (Some of my fabrics are old from my stash, and some are from collections like Verna and Hunky Dory by Moda as well as Simply Sweet by Henry Glass.)
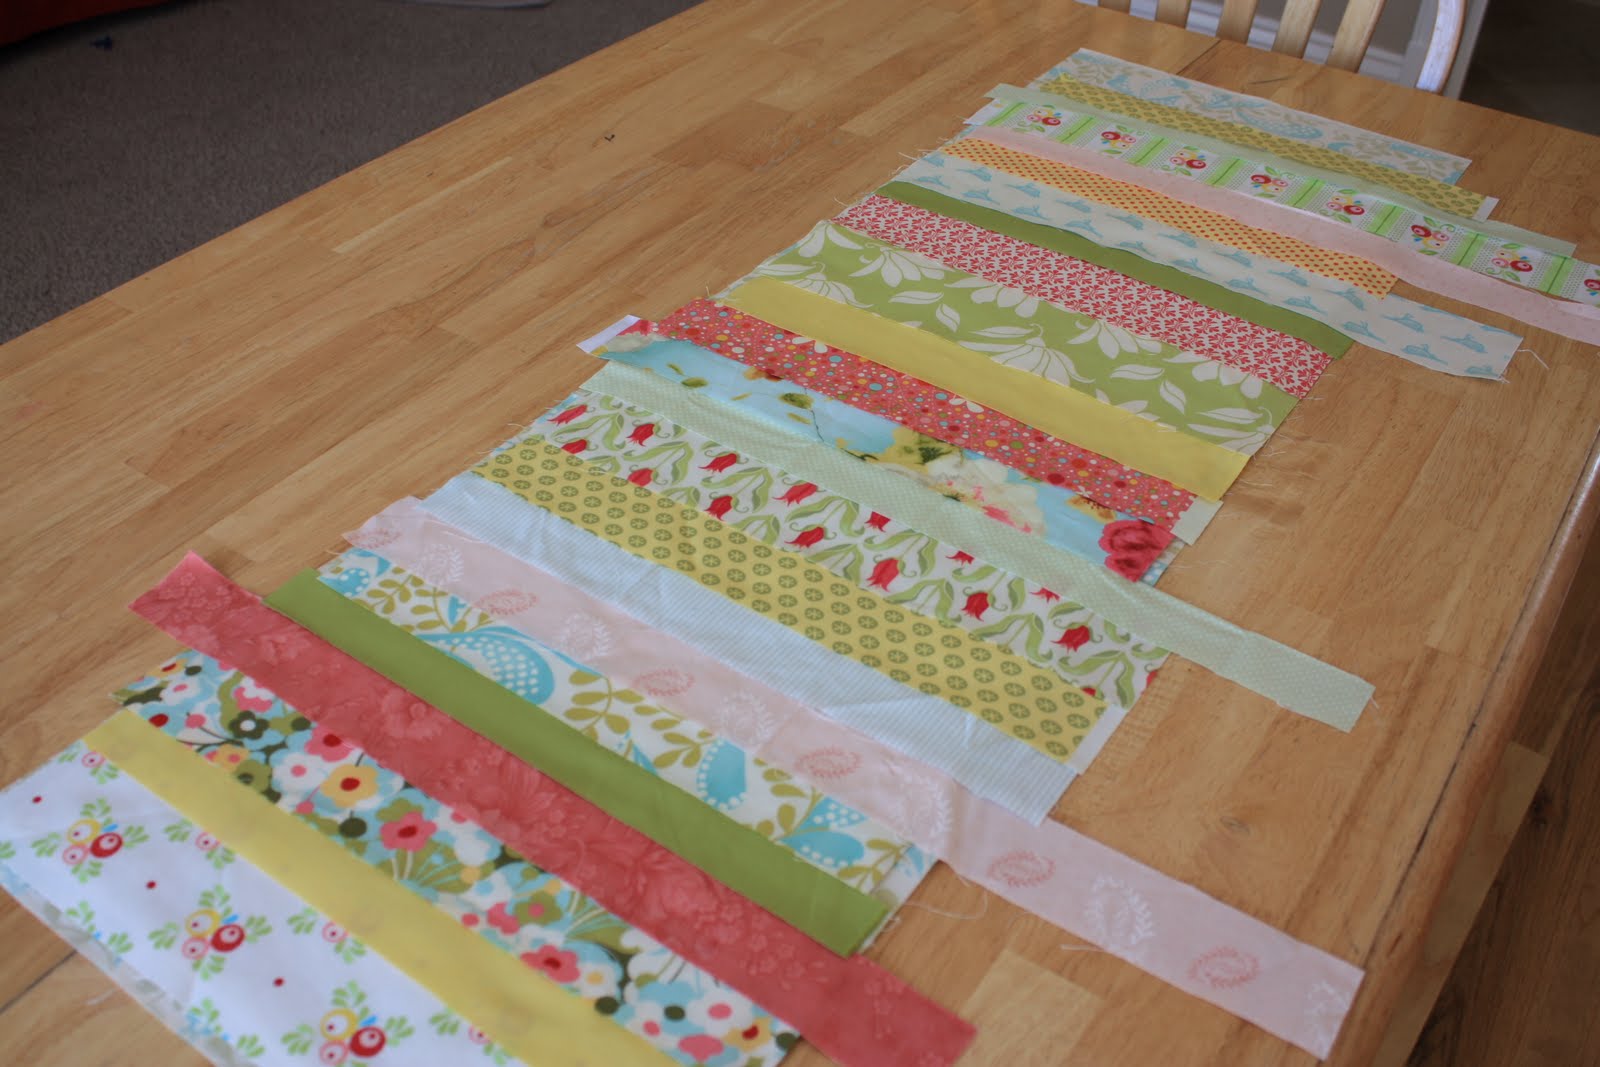
Arrange your strips on top of your backing and batting.
Trim any long ends so the strips are roughly the same length.
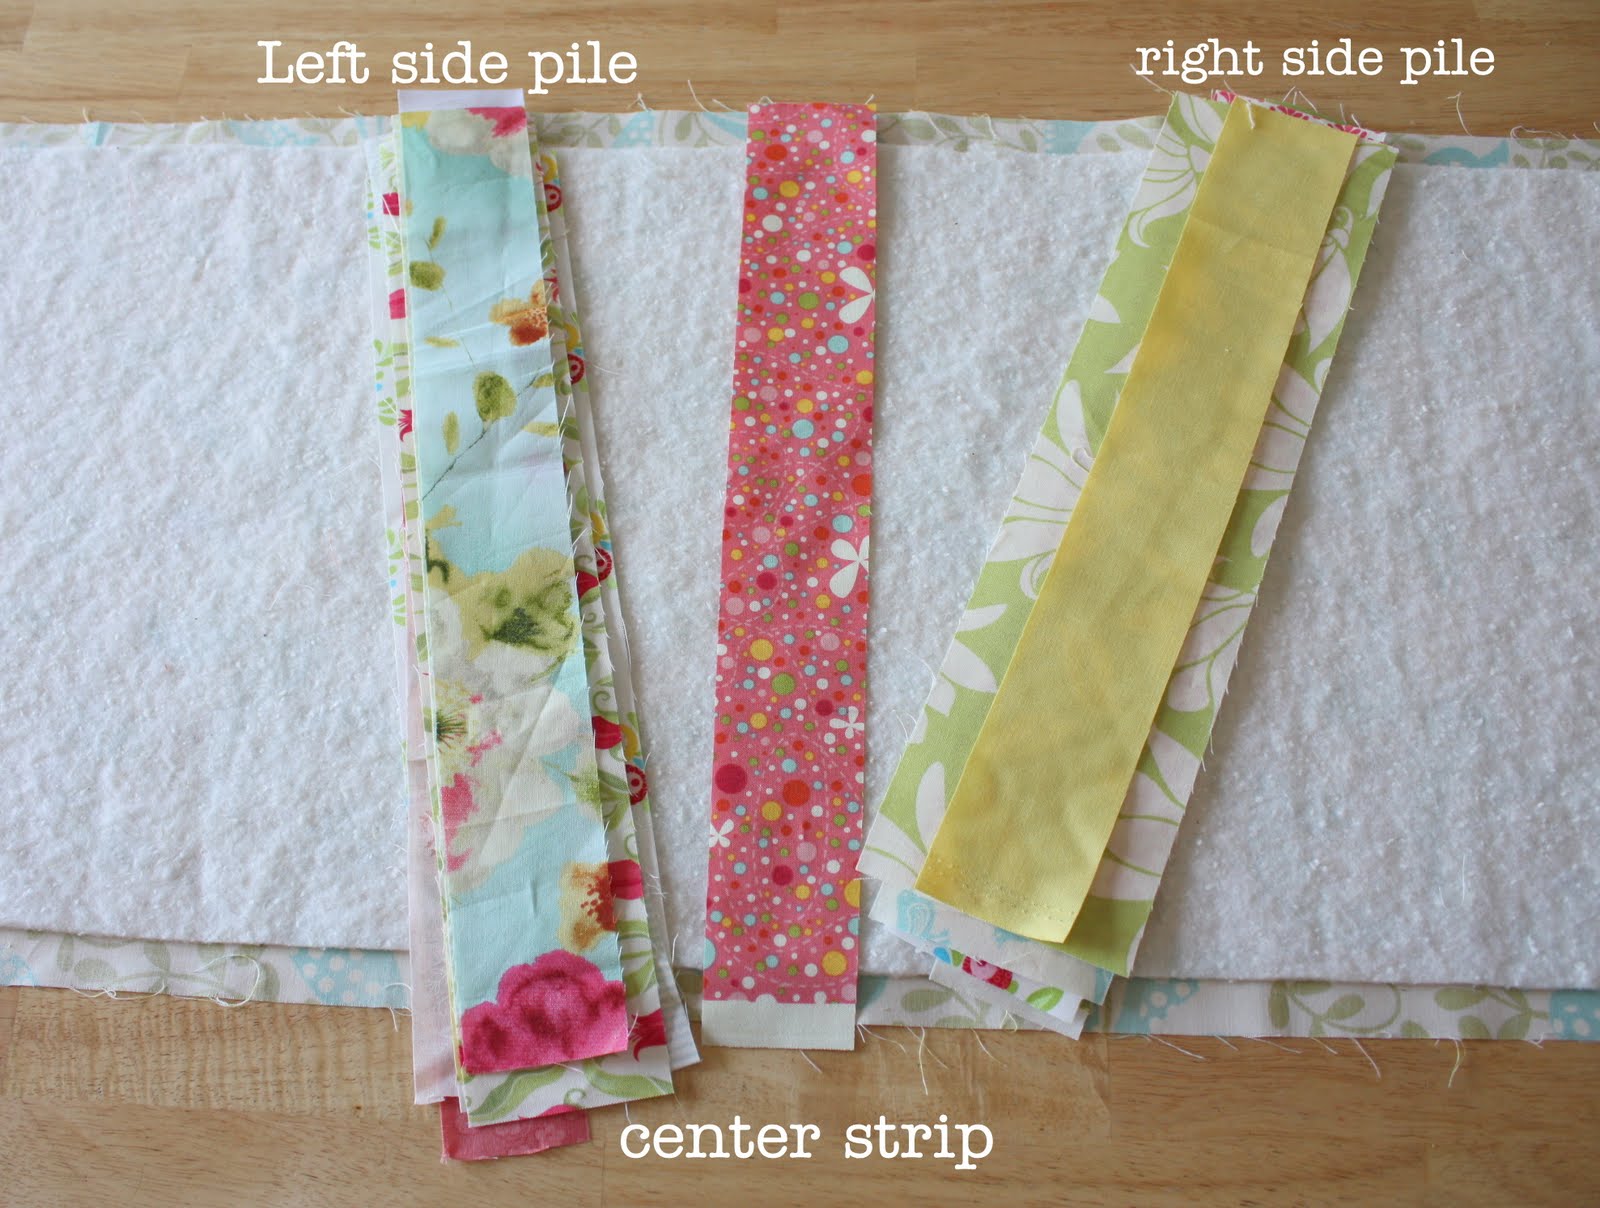
Starting at the center strip (roughly - doesn't have to be absolutely perfect - this isn't rocket science) stack the strips in order they were laid out, making two piles - a right-side-of-center pile and a left-side-of-center pile. Keep the strips and piles in order so you don't have to think (as much) while you sew.

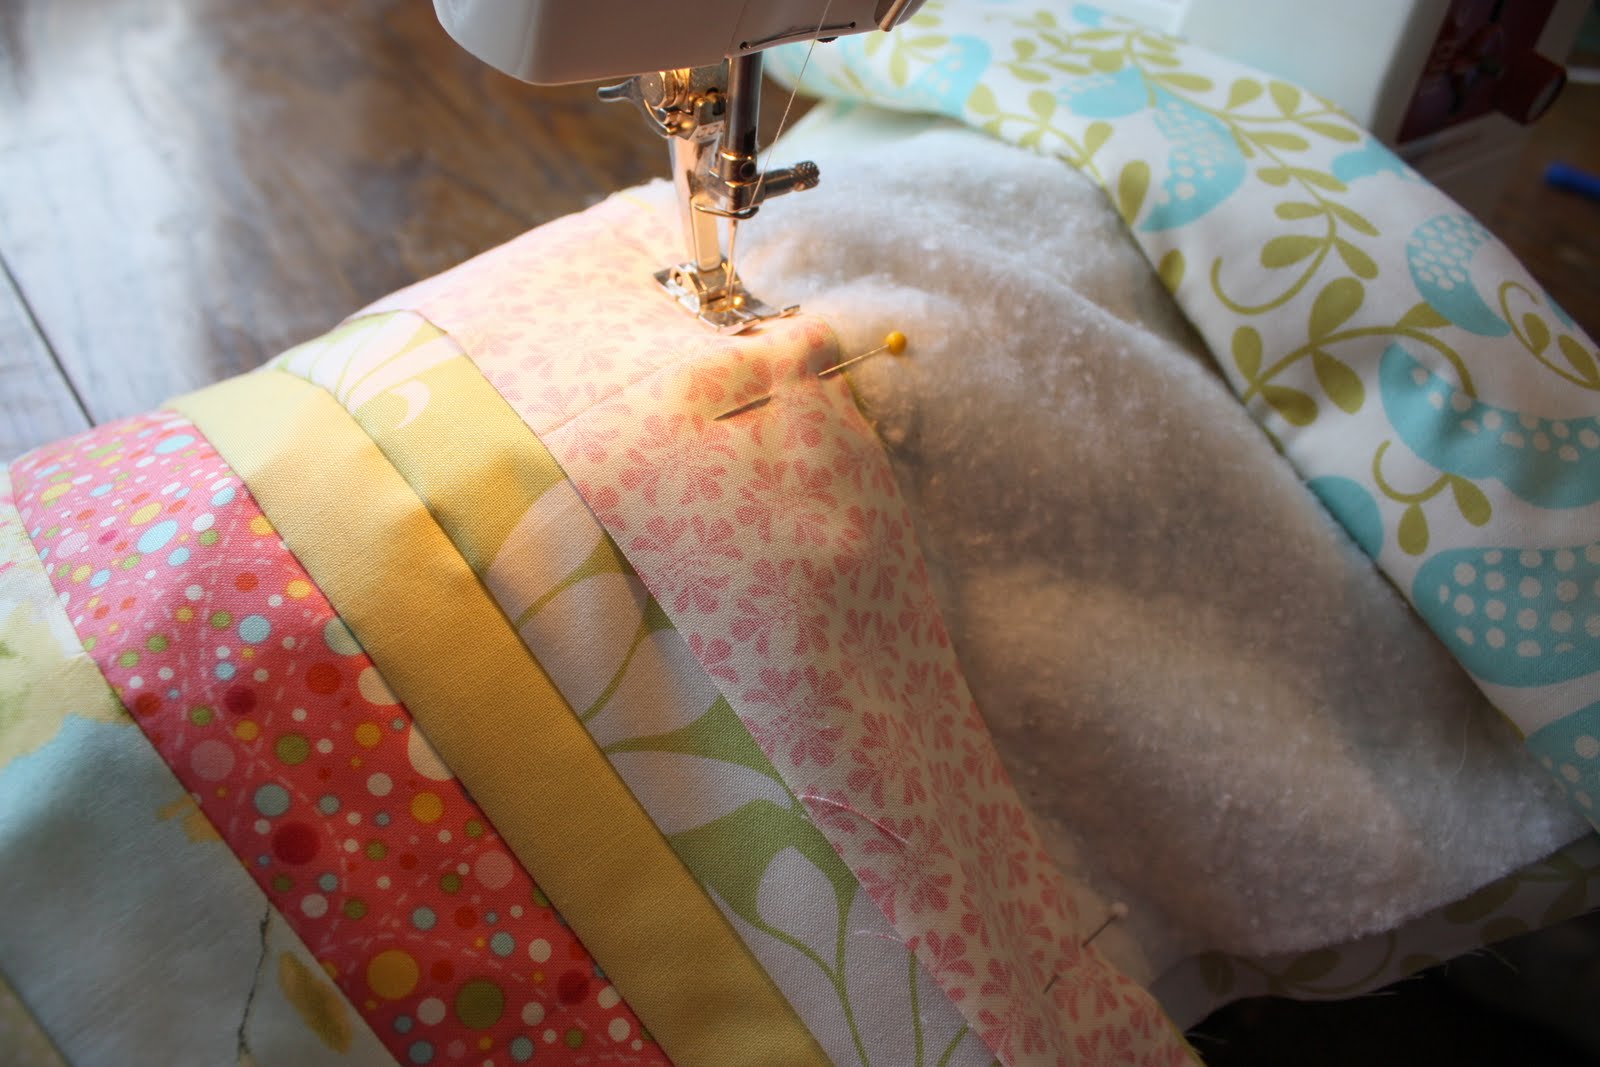
Take the first strip from the right-side-pile and pin it (right sides together) matching right edges. (I know, I know, pinning is a pain, but it really does help here to keep the strips straight.)

Take the whole thing to the machine and sew a ¼" seam down the right edge of the strips - through the batting and backing fabric. (It helps to roll the right end of the batting/backing so it doesn't wad up on that side while you're sewing.)
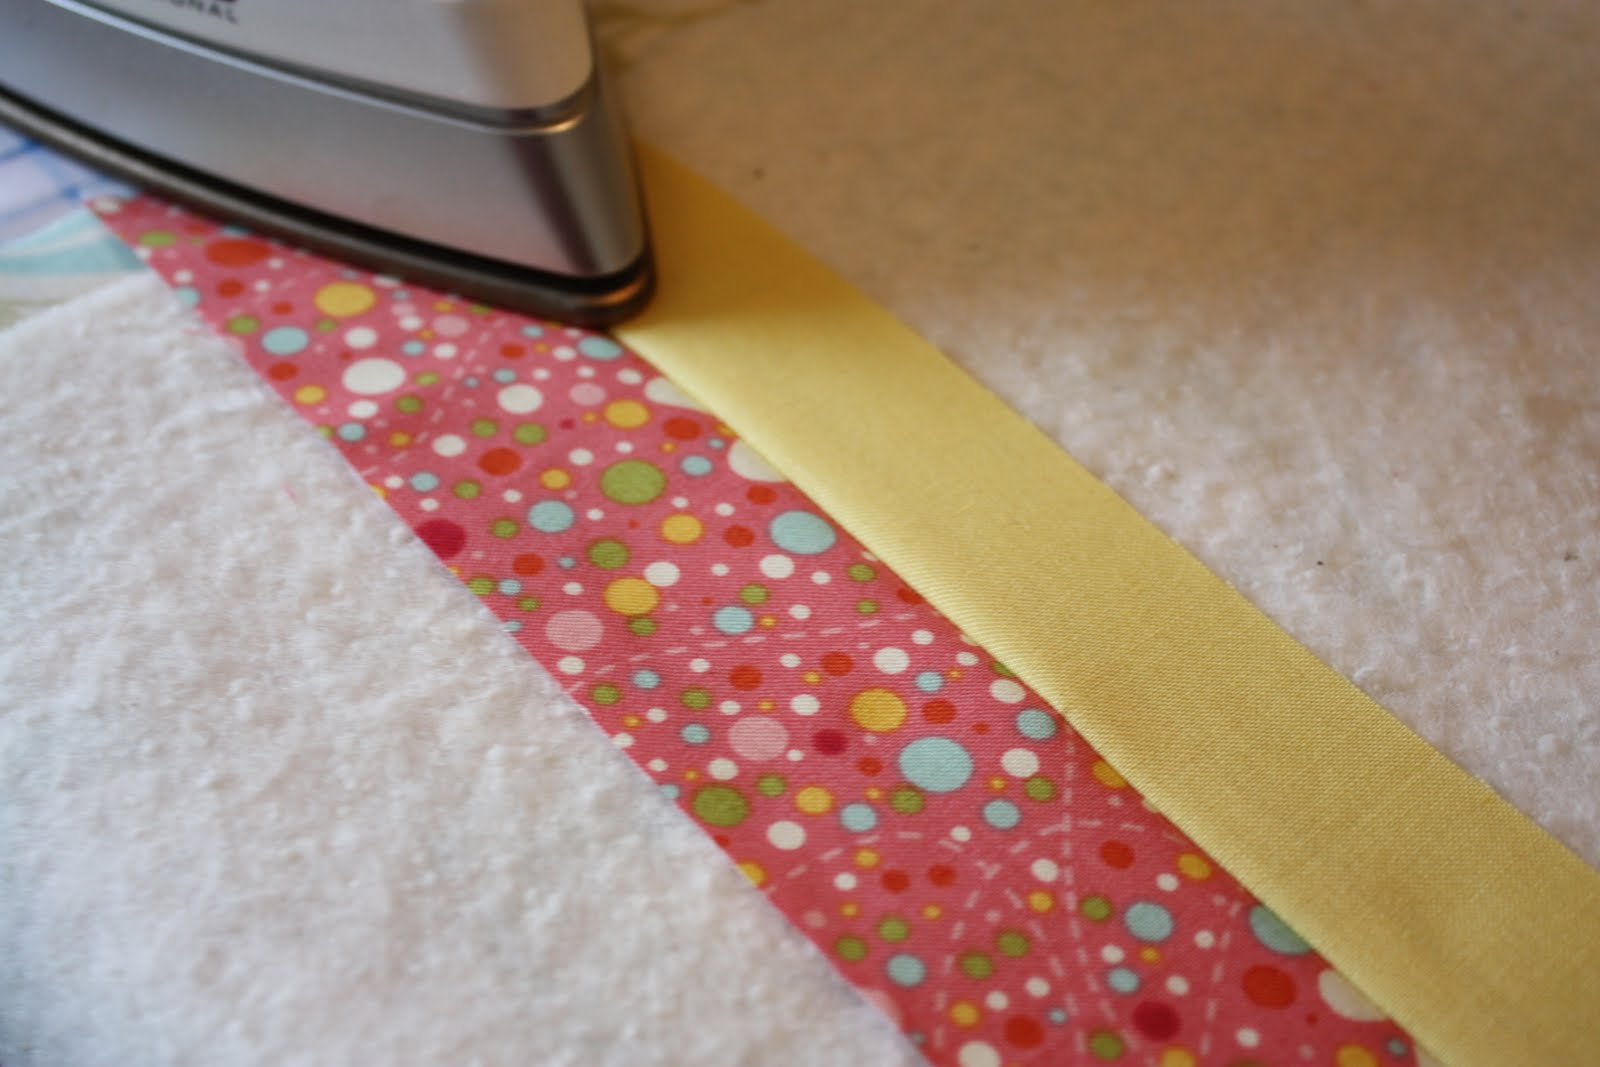
Now press that seam open.
(Do it carefully on the first few strips so you don't melt your batting.)
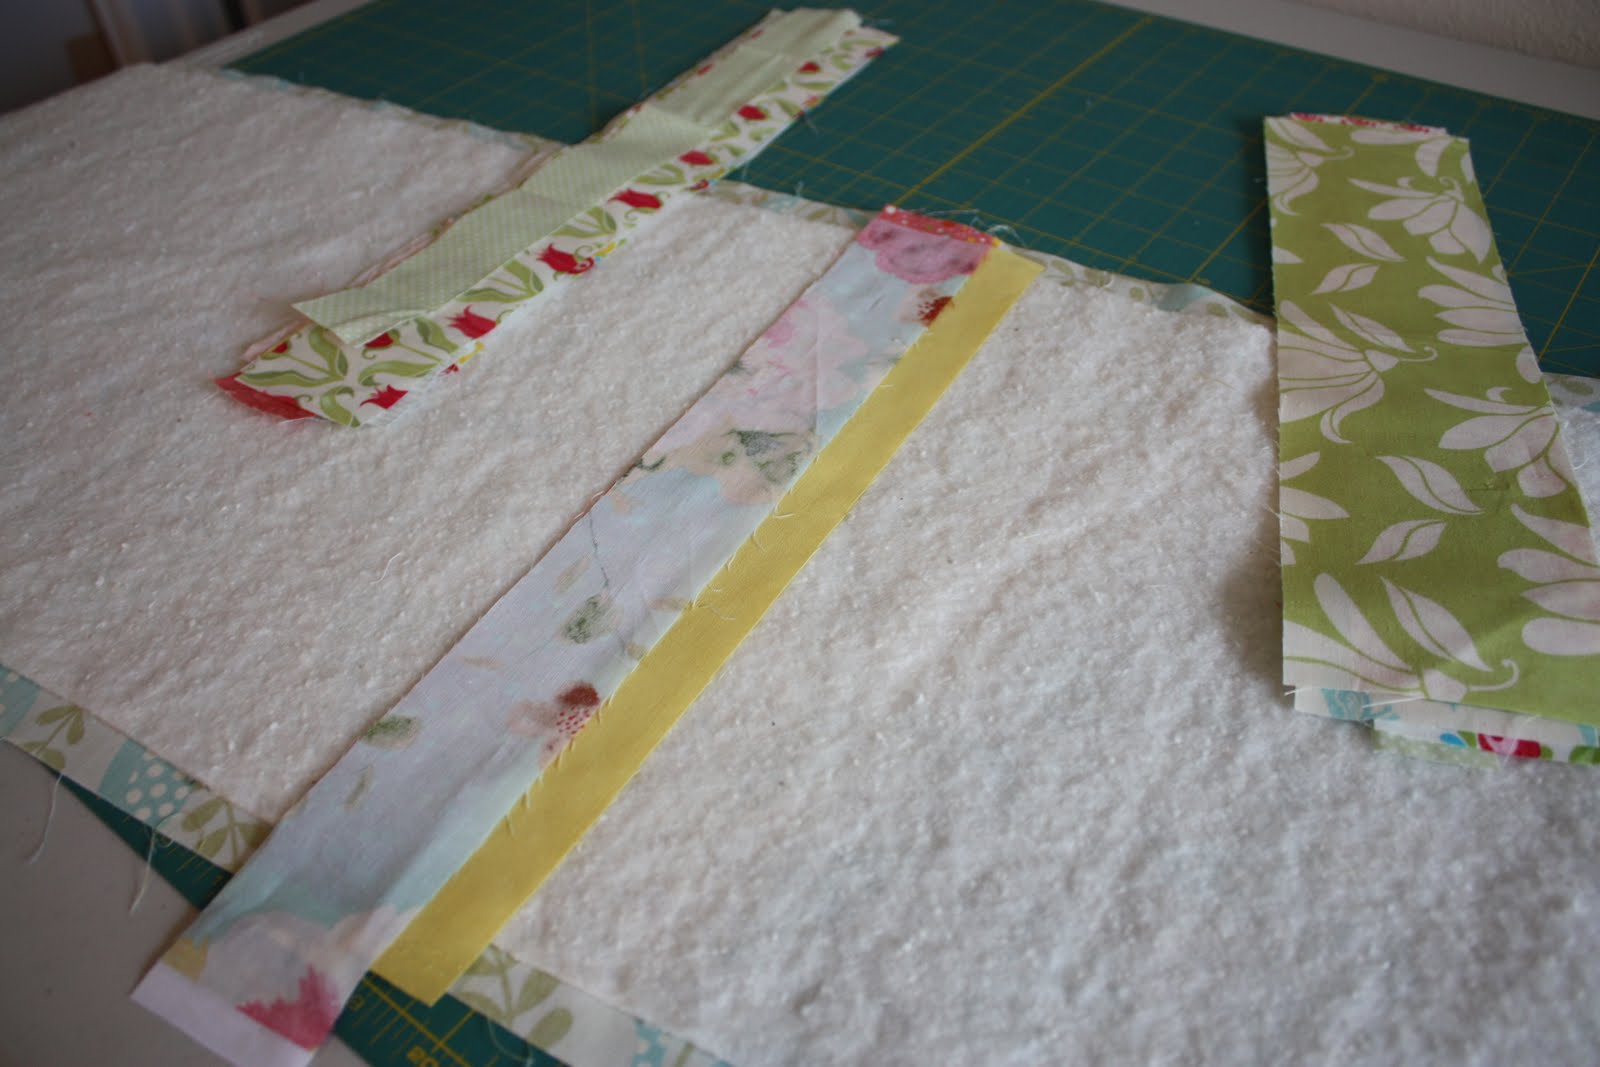
Return to your two piles of strips and this time take the top one from the left-side pile. Pin the strip in place matching the left edges. Repeat the process, sewing another ¼" seam and pressing the seam open. Let me stress here, don't skip the pressing step. Your strips will lie neater and flatter will get a much cleaner looking project in the end.
Repeat these steps, alternating right-side and left-side piles until you have finished sewing all the strips to the edges of the table runner.

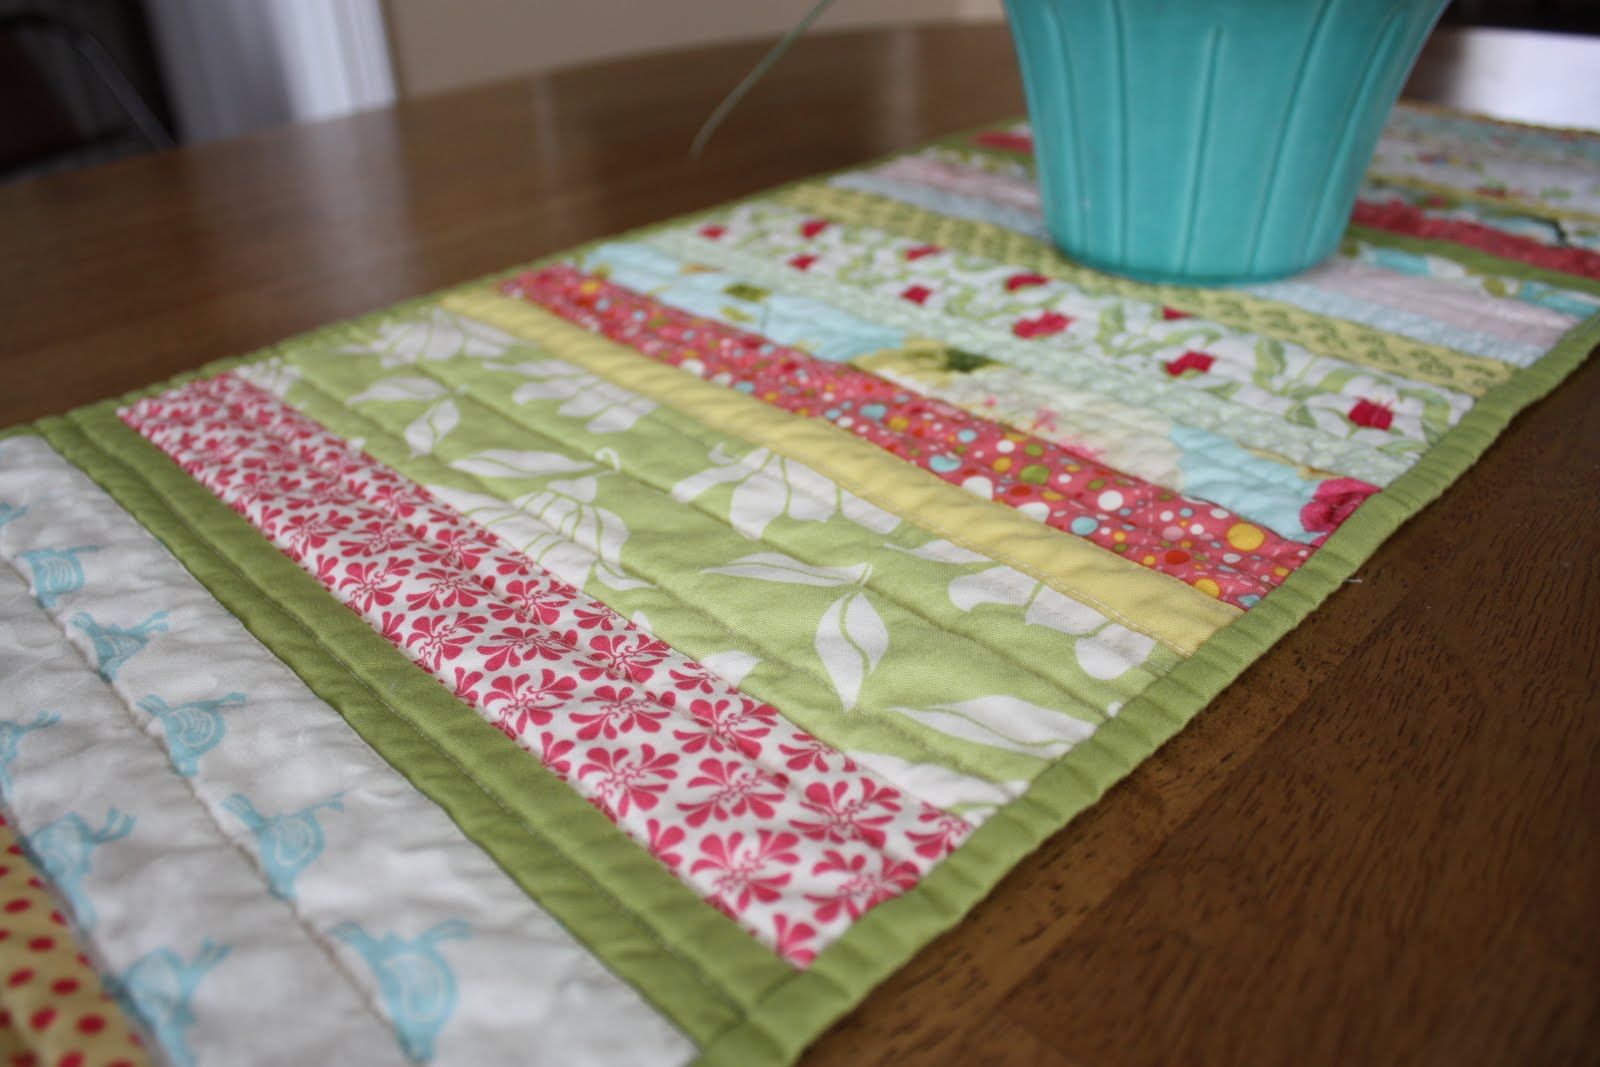
See how pretty it looks? Really, you could just stop here and bind if you like, but personally I love the look of quilting, so let's do that next!
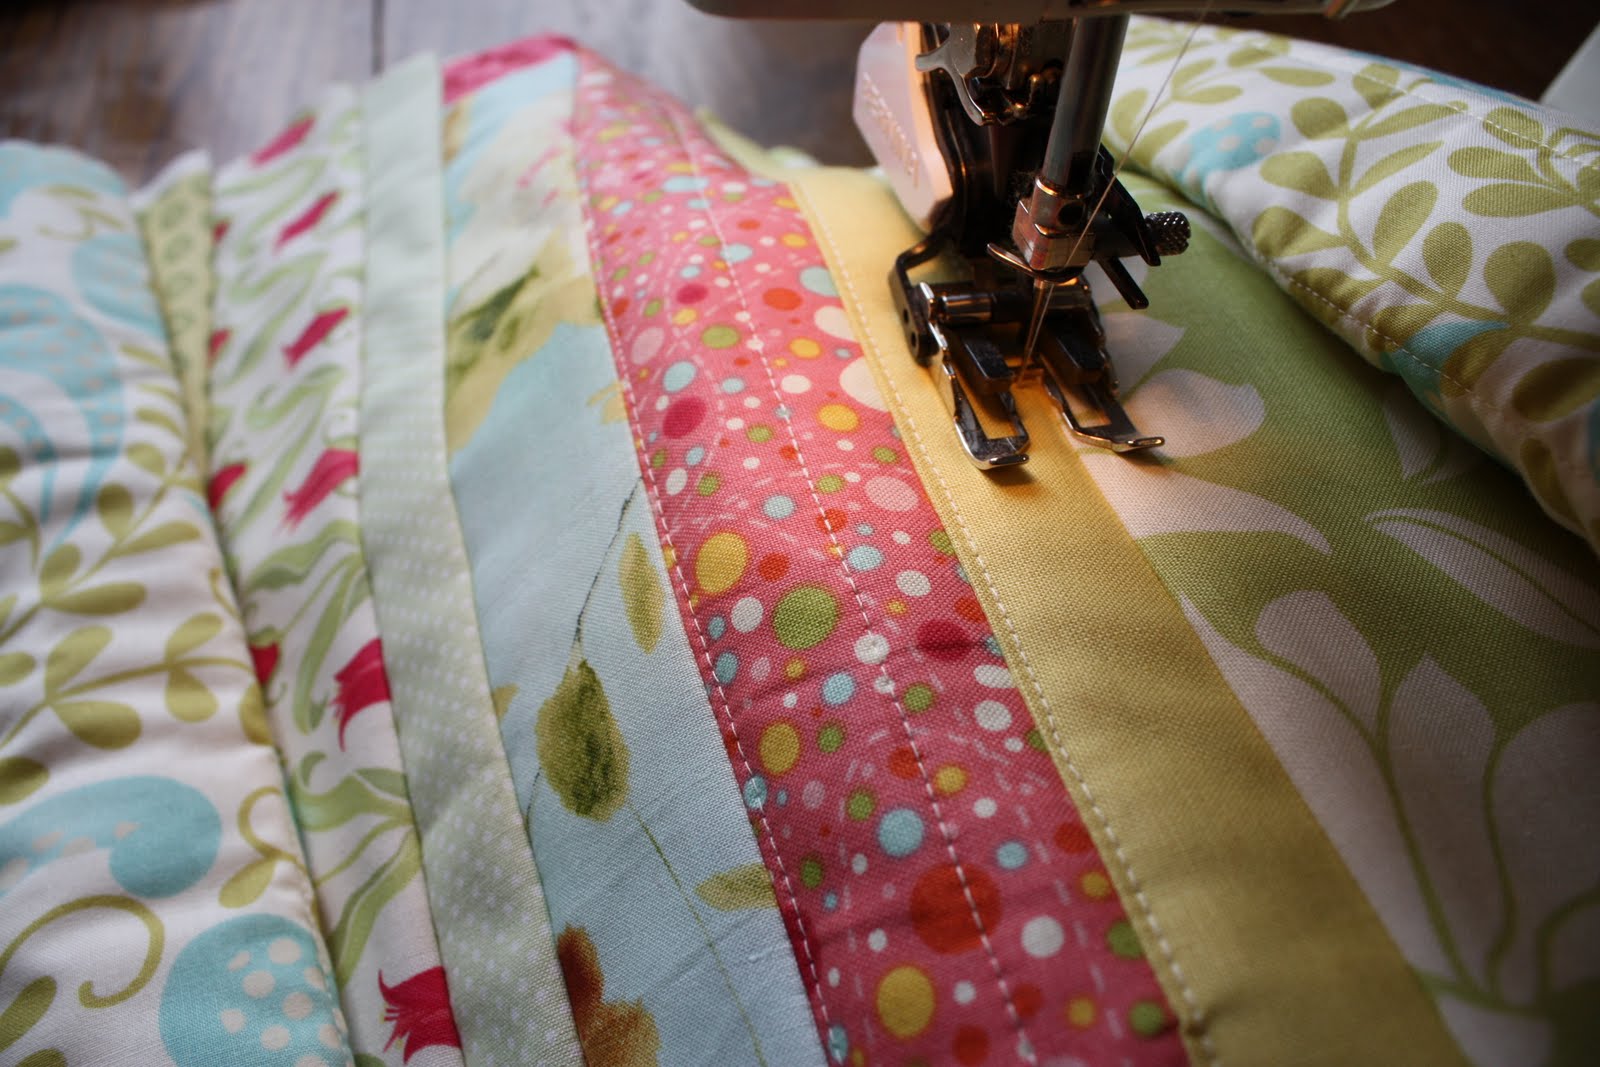
The quilting is pretty simple at this point. I just 'eyeball' straight lines using the strips as guides. Again I start in the middle, this time working toward the right side. Then come back to the middle and work toward the other direction. I sew one line down to the edge of the quilt, pivot the foot parallel to the edge of the runner, drag the thread about an inch (or however far apart you want the quilting to be), pivot the foot again and sew a new row of quilting going the opposite direction from the row you just finished.
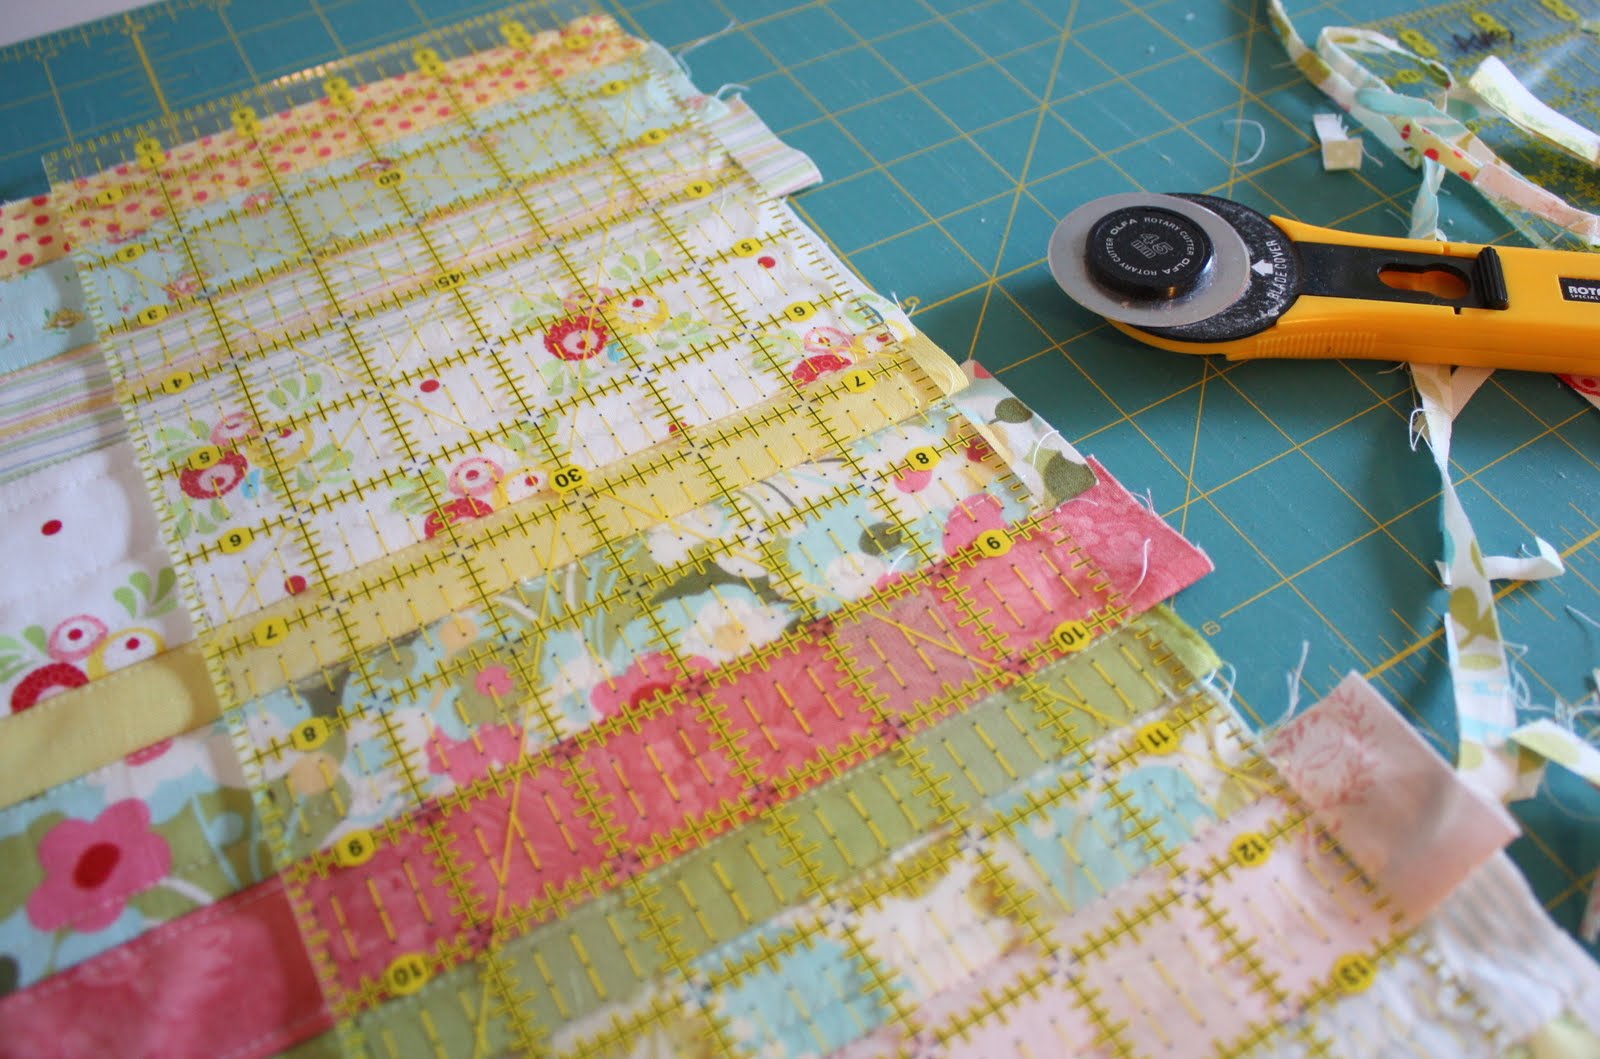
When everything is quilted as much (or as little) as you'd like, square off the raw edges.
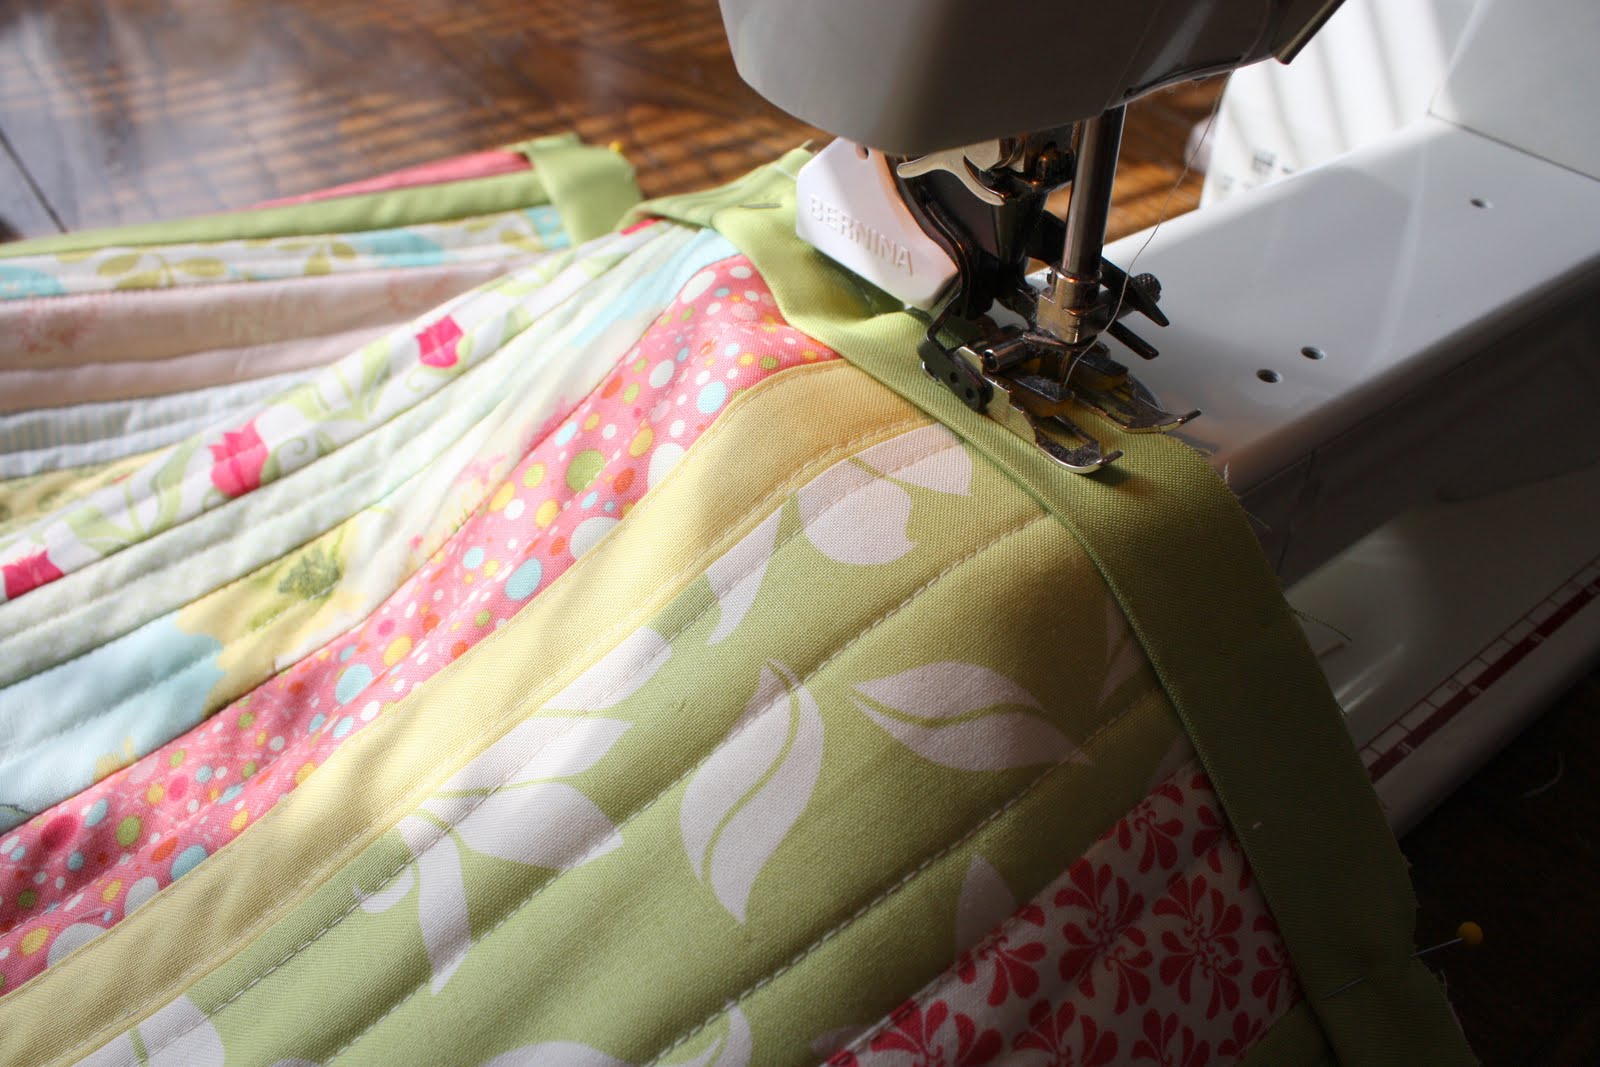
Then it's time to attach the binding. Rather than go into all that here (this post is already kind of lengthy) I have a binding tutorial here.
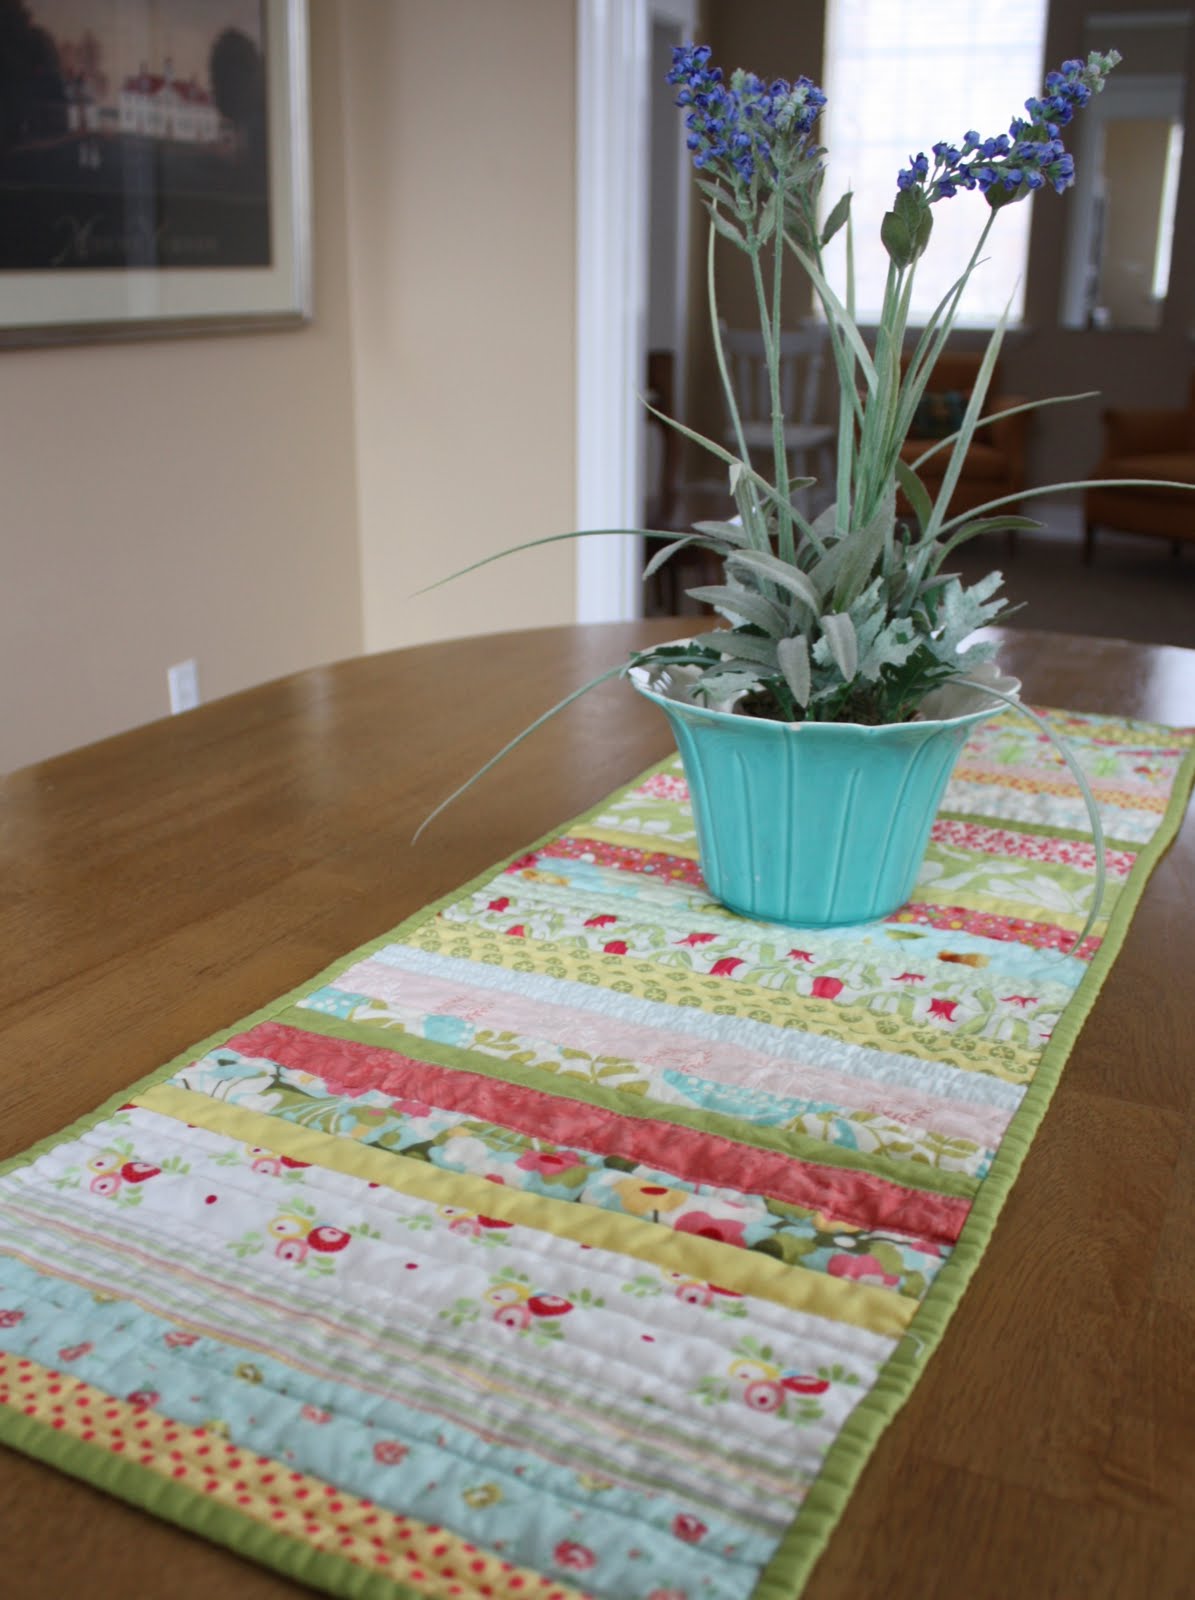
And voila! Here's what it looks like fresh out of the dryer. I love how a quick wash softens up the look of the whole thing.
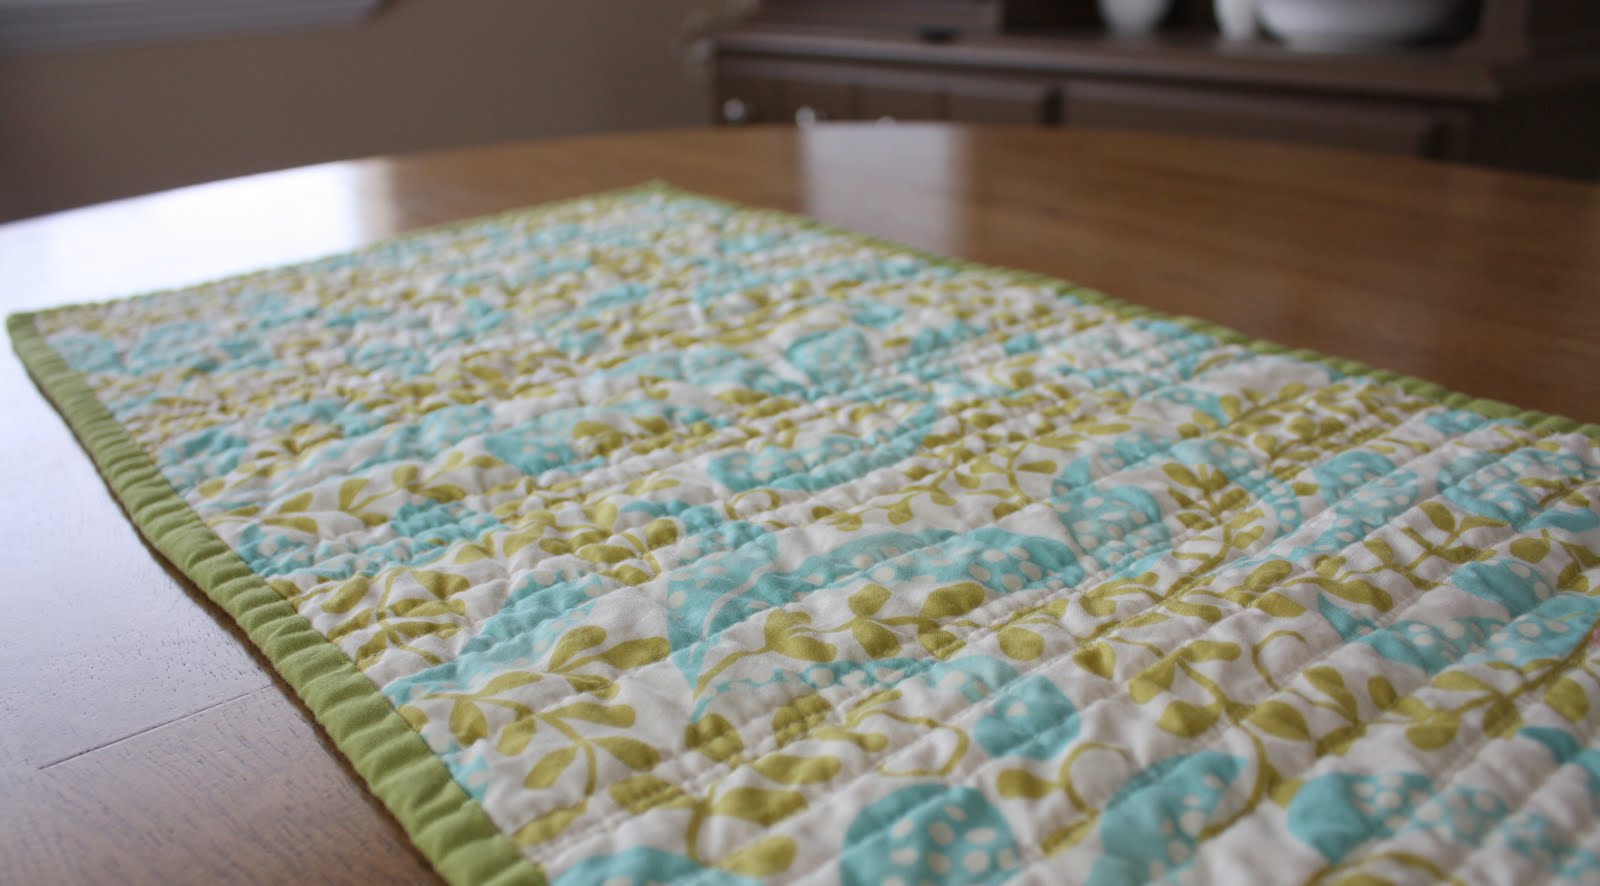
I also love how the back looks - a pretty, quilted runner on its own.


Quilt Nut
These are so cute. And I just cleaned out my scrap bin today and found a bunch of jelly roll strips and some batting remnants. And just the other day I was wishing I had a new runner for our coffee table. Guess what I might do tonight?
Amy
so cute!
Sarah Craig
How timely! I was just trying to figure out what to do with a Christmas honeybun - not enough for a quilt, but it could make some really neat table runners and hot pads! Thanks!!!
Kari @ Ucreate
Amy, thank you so much for letting me use this for "Create With Me" this month...you're amazing!
AnneMarie
Very pretty! I'm on a stash-busting mission lately. I may have to give this one a shot. Much easier than learning to free-motion where I've been struggling lately.
Magnolia Bay Quilts
Great tutorial! It's so pretty!
Char @ Crap I've Made
I'm totally going to Create With You!
~Niki~
neat! I've been making this kind for years for christmas gifts and never thought to put up a tutorial!<br />fun fun, and easy! yes, definitely!
Simone de Klerk
Wonderful! I think I will have a try one of these days (o:
Amy
These are beautiful - thanks for your terrific tutorial!
betseysumners
Thank you! This is great, now I will dive into my stash and make my own!
Andrea
That is GENIUS!! My mom paid to take a class to learn this. I am so excited! I can't wait to get started! I just redid my kitchen and I've been wanting to make a runner for the table to match the new colors!!
Amy
Holy cRap! This looks easy enough for me to do! Think I'll make a Halloween strip runner! YAy!
Chris
Amy, I actually made a table runner about two weeks ago using this tutorial. It turned out so great. I haven't blogged about it yet, but you can see a preview in my new header. Thank you so much for a great idea. I really that it doesn't require a walking foot.
Aimee
Just lovely! I am totally inspired!
Jan
Thanks for sharing. I have been looking for a great table runner idea, and I love yours. I can't wait to start my own.
Debbie Cook
Great idea! Thanks for sharing it. 🙂
Micki
I love it! Thank you so much for posting this! I remembered seeing this technique when I was a teen but I couldn't quite remember how to do it. I need to get working now 🙂
Irina
what a nice tutorial, so simple and such a wonderful result! thank you!
Gremma
This is so cheerful and fun! I plan to make it as soon as I can! Thank you so much.
Gremma
PS: I signed up for your email subscription too! I appreciate you having that option!
The Farar Family
Thanks for the tutorial! I gave it a try and it turned out great {you can see it on my blog-I linked to your tutorial}! I love your blog! Thanks!
Gremma
I love this tutorial and I love your blog! I also read your tut on the nursing cover. Thanks for your generosity in sharing your talents!
Aimee
I LOVED your quilted table runner idea and featured it <a href="https://sprik.blogspot.com/2010/08/brief-bits_17.html" rel="nofollow">here.</a> So cute!
CreativeMama
I was looking for easiest quilting tute to get started on my quilting expedition, thanks a ton. This post relieved of my jitters and here i am ready to make my first quilt ever.
Chic Creations
Thanks for sharing this great table runner, and for the tutorial. Love it.
STAYC
I LOVE this! Just finished mine this morning - perfect tutorial - thank you for sharing!!!!<br /><br />www.peterandstacy.blogspot.com
Suzanne
I don't recall which road I traveled down to find your tutorial but it is great! I just finished a birthday table runner that coordinates with a birthday quilt I made. My son's 8th is Sunday and the party is Saturday. I have a million things to do but I've had a bee in my bonnet about the tutorial since I read about it. Finally, i surrendered last night and pulled out the fabric.
jujama
Thanks for sharing 🙂 I've finished mine.<br />https://jama-jujamy.blogspot.com/2010/09/jesien-jesien-juz.html
Canadian Kristin
This is adorable! Thanks for the very detailed tutorial with step-by-step instructions! I'm a newbie quilter and the details really make the pattern seem achievable!! Saving this for scraps (when I have accumulated some)! 🙂
Karen
Love your blog.....I heard about it at Pleasant Home blog where I am learning (I think) how to use up my stash. This table runner sure looks fun and very similar to the string quilt I'm working on at present. So, guess I now have another project (which I will give to my sister)...this runner! Thanks for the tutorial!<br /><br />Karen
Angela Timms
OH THANK YOU for this tutorial it is very easy to understand. I think I am going to use this for a changing pad I am going to make for my little baby.
Martha anne
All Moda is on sale today at Porters, I am making this table runner! You have made my day! Ahhh I cannot wait 🙂 grinning, so happy. Totally fallowing your blog now 🙂
isewinla
hey i also finished this runner. would you check it out https://sewerjoyceinla.blogspot.com/2010_11_01_archive.html
Magiczna Fabryka
This is great, just we finished sewings festive. Thank you for sharing!
Shelly
Made one of these for my mom for Christmas and she LOVED it. Thanks for sharing.
susan
Thank you for this tutorial. One of my best friends turned 41 today and I hadn't bought her a present due to the constant presence of sick kids lately. I made this runner after lunch and was almost done in time for the school run. I finished hand sewing the binding while my husband drove us to the school, popped the runner into a gift bag and the present was delivered. My friend loved it and
susan
Made one of these this afternoon for my friends 41st birthday present. Amost done in time for the school run so my husband drove while I finished sewing the binding on the way there. Popped it into a gift bag and delivered it to the birthday girl. She loved it, as did I. Guess I will have to make one for myself next. Bet that one takes longer than two and a half hours to make!
Ginger
LOVE THIS!!! Found you from Family of Savages (she made a few of these as Christmas presents) and I cannot wait to make one! Thank you so much for sharing such a great tutorial! I'll let you know when I post about it! <br />xoxo<br />Ginger<br />SSB
Ginger
BTW, I'm your newest follower! 🙂
Aimee
Hello Amy!! I just found your blog...I didn't even know you did one! 🙂 I love it! Adding it my blog reader and I am going to attempt this beautiful runner! Hugs!!
sweet & lovely crafts
This is amazing! I can't wait to try to make one! Looks like a great tutorial!
Dawn
Thank you for this tutorial, it was so quick and easy for a new quilter like me to follow! I linked to your blog on my post. :)<br /><br />https://afewgoodyarns.blogspot.com/2011/01/finally-finished-project.html
Amanda
Love it! You were featured today on my blog - Today's Top 20! Love if you could stop by!<br />Amanda<br />www.todaystoptwenty.blogspot.com
Liz
This is great! Thanks for sharing. We will be featuring you on our blog ziggycrafts.blogspot.com. I can't wait to get started!
www.thisoldhouseinnewliberty.blogspot.com
Thank you for this awesome tutorial I just made one yesterday in a short amount of time, I still have to put the edging on but had it "done" enough to grace the dinner table last night!<br /><br />I also put a link on my blog to yours!!<br /><br />Nancy
Joy of all Crafts
Wow!! thanks so much! Can't wait to make this!
Mimi
I love this method and have did one in blues and purples - it was gorgeous and also my BIL's favorite!! You have inspired me to make some during the March Break holiday with a palette of spring fabric!! Thanks!
Mimi
I love this method and have did one in blues and purples - it was gorgeous and also my BIL's favorite!! You have inspired me to make some during the March Break holiday with a palette of spring fabric!! Thanks!
Nancy Sue
Great tutorial! Thanks for the tip about not melting the batting on the first coupla strips. My iron thanks you! Kudos!
Emily
I just found your site and I love it! Thank you for making the tutorials so simple and easy to understand! I can't wait to get started on some of these projects!
Studio Valerie
Thank you for posting this tutorial. I think I now know what my next quilting project will be!
Peach Rainbow
Beautiful - Thanks for sharing!
Vanilla
This is a wonderful tutorial.<br />I never thought of doing it this way. <br />Thanks for sharing
Suzanne
Hi Amy, Funny thing...I found your tutorial a while ago and used it to make a table runner. I have been trying to explain to my SIL about this technique but she couldn't wrap her brain around it. On her own, she found this post and sent it to me. I only laughed because, well, I had used it too. It's the one that made the light bulb turn on for me too.
Rachel
LOL...I am Suzanne's SIL (above)and I really want to thank you for this! I am pretty visual, and Suzanne kept verbally considering "quilt as you go" for several projects. Every time she mentioned it, I asked her to (AGAIN!) explain it to me. It was not working...I would have had her show me, but we live about 1800 miles apart. So I went searching and found this. Truly awesome, and I
Darlene's Quilts and Stuff
These will make great gifts. Thanks for doing this and sharing. Ifollow your blog all of the time.
Karina
I've been wanting to make this runner for awhile - finally got around to it. I used leftover fabrics from a banner project - so I had everything already on hand. You have saved me from my fear of quilting - I'm in love with this easy project (although I did cheat and machine sew the bias trim). Thanks so much. <br /><br />https://bunchesandbits.blogspot.com/2011/11/
elnorac
Thank you so much for this beautifully-written tutorial! I'm about to finish hand-sewing the binding on my first table runner, and I love it. Will post it in your Flickr group when it's done. It's only the second thing I've quilted, so it seems like a real big deal to me. Thanks for the tutorial and all the other inspiration you share.
historygirl
This was the quickest project I have ever completed! Here is my finished product. I posted a link from my blog to yours!<br /><br />https://www.crafty-canadian.blogspot.com/2011/11/crafting-crafting-everywhere.html
Anonymous
Thank you for the simple and easy to follow instructions. I just finihsed [in dryer] my table topper. It was a brown bag project that I had no idea what I was getting. I hope she likes it- We'll see at our quilters Christmas gathering tonight. If I can figure out how to post photos, I will. I love your site. It's very welcoming and helpful. I am a beginner sewer & quilter and I really
Mel
Amy - Thanks so much for this tutorial. I've looked at it at least 100 times, but haven't tried it. Last week I trying to figure out what to make a friend's wife and had about 2 hours before I had to mail the box to New Zealand. I had Christmas fabric and then I remembered this tutorial! Thanks so much. She loves it!
Susan
What an absolutely perfect tutorial! Concise, clear and easy!! Thank you!
Susan
Thank You...perfect tutorial!!
Fignie
I made my first one last week ... and LOVED IT!! Thank you so much for posting this tutorial! I'll be making more!
Jen Conlon
Great tutorial! You've been featured on the <a href="https://qualitysewingtutorials.blogspot.com/" rel="nofollow">Quality Sewing Tutorials blog</a>.<br /><br />We hand select only the best free tutorials and patterns for home sewers.<br /><br /><a href="https://qualitysewingtutorials.blogspot.com/p/featured-button.html" rel="nofollow">Grab a brag button!</a>
UKMUMINUSA
I just made a runner using your tutorial, thanks it was so easy.
ChristinNC
I've had you in my favorites for a while now and always wanted to try this runner - your runners are nothing less than adorable (I love the one you made for your mom in law)<br />I finished my first one yesterday and also noted credit to you and added a link to your tutorial. Many thanks for sharing how to create these beautiful runners :)<br />Here is how mine turned out! https://
doodlebugmom
I am new to your blog, love this! I bookmarked you.
nayhu
Is very, very, beautiful<br />Congratolations<br />Nayhu
Joyce
I love this- I may try to teach this to a few 6th graders next year.
Erin
Oh Happy Day!!!! I just wait to try this. I just made my first set of foundation piecing coasters with random sized and shaped scraps and this is so going on my to do list soon! Thanks 🙂
Caroline
I love this! May I feature it (and some of your other tutorials) on http://www.sewcanshe.com? I'll only use a couple pictures and link back to you for the tute. Please drop me a line and let me know... caroline@sewcanshe.com<br /><br />Thanks!<br /><br />Caroline
Kay :-)
yay!! My first FINISHED quilt project 🙂 I have many partials.... but never could SEE the way to finish them! Your tutorial has helped me figure it out... I am excited to dive back in my fabric stash!
Infarrantly Creative
This turned out Gorgeous! Love the colors and all the different fabrics.... Just Fab.
thewrightfamily
Thank you for sharing such a great tutorial, I whipped up a Halloween version this afternoon.<br />
labriek
I'm getting ready to put a Halloween table runner together this evening, thanks to your tutorial! Thank you!
Connie
I just found this on Pinterest and made up a couple winter runners. So easy and cute!! And your binding tutorial (I've always hated binding!!) made it quick and easy! Thanks so much 🙂
amy smart
I'm so glad, Connie!
Shannon
I LOVE this table runner. And using your awesome beginners series for quilting, I'm learning to use my sewing machine and play with quilting! So I'm making this runner my first project. I'm using a Moda jelly roll for my strips (with a couple other strips of another fabric mixed in). It's going well so far considering it's my first quilt and first major sewing project. <br /><
Feldman Family
I just finished making this table runner! It turned out very nice. <br />Thank you for the tutorial!<br />Savana
arlene.haymond
Oh My Gosh! I love this and the technique! I just bought the Modern Baby book just for your quilt. So glad I found you! Thanks!!!
Sandy
This is so cute! Your tutorial is wonderful - easy to follow with great photos. I will have to try one of these. Thanks so much for sharing.
Sara
I made a Halloween table runner using this tutorial. I am so happy! Thank you!
Therese Ruff
Really cute! I am thinking red white and blue picnic, and I think book covers! Looking forward to sewing tomorrow! Thanks.
Therese Ruff
Really cute! I am thinking red white and blue picnic, and I think book covers! Looking forward to sewing tomorrow! Thanks.
Jake A.
Pinning this. Looks like a great way to work with some of the scraps I have!
Nancy at EmbroideryIt.com
Thank you! I was just thinking the other day I would like to do a quilt as you go pattern. This is perfect!<br />
Suresh Puli
WOW..!! These are absolutely gorgeous table runners and looking great great and thanks for sharing the tips and it is really helpful.To buy more table runners you can visit here.<br />Buy Dining Table Set Online<br />https://www.at-home.co.in/home-home-linen-table-linen-table-mats-napkins
Julierose
Oh I just found your tutorial--Love, love love this method. I need one for a hostess gift and will make it oday...thank you so much for a great method--am bookmarking this baby! hugs, Julierose
settykumar
nice cloth work.<br />buy nilkamal table online <br />https://www.at-home.co.in/furniture/nilkamal-novella-07-chair/p-7273534-83908917234-cat.html<br />
Nile New
<a href="https://www.nilepure.com/%d8%b4%d8%b1%d9%83%d8%a9-%d8%b5%d9%8a%d8%a7%d9%86%d8%a9-%d9%85%d9%86%d8%a7%d8%b2%d9%84/" rel="nofollow">شركة صيانة منازل فى اكتوبر </a><br /><a href="https://www.nilepure.com/%d8%b4%d8%b1%d9%83%d8%a7%d8%aa-%d9%85%d9%82%d8%a7%d9%88%d9%84%d8%a7%d8%aa-%d9%83%d9%87%d8%b1%d8%a8%d8%a7%d8%a1/" rel="nofollow">شركات مقاولات كهرباء فى اكتوبر</a><br /><a href="https://
Nile New
<a href="https://www.nilepure.com/%d8%b4%d8%b1%d9%83%d8%a7%d8%aa-%d9%84%d8%a7%d9%86%d8%af-%d8%b3%d9%83%d9%8a%d8%a8-%d9%81%d9%89-%d9%85%d8%b5%d8%b1/" rel="nofollow">شركات لاند سكيب </a><br /><a href="https://www.nilepure.com/%d9%84%d8%a7%d9%86%d8%af-%d8%b3%d9%83%d9%8a%d8%a8-%d8%ad%d8%af%d8%a7%d8%a6%d9%82/" rel="nofollow">لاند سكيب حدائق</a><br /><a href="https://www.nilepure.com/%d8%b4%d8%b1%d9%83%d8
Nile New
<a href="https://www.nilepure.com/%d8%a7%d9%81%d8%b6%d9%84-%d9%81%d9%84%d8%aa%d8%b1-%d9%85%d9%8a%d8%a7%d9%87/" rel="nofollow">افضل فلتر مياه </a><br /><a href="https://www.nilepure.com/%d8%a7%d9%86%d9%88%d8%a7%d8%b9-%d9%81%d9%84%d8%a7%d8%aa%d8%b1-%d8%a7%d9%84%d9%85%d9%8a%d8%a7%d9%87-%d9%88%d8%a7%d8%b3%d8%b9%d8%a7%d8%b1%d9%87%d8%a7/" rel="nofollow">انواع فلاتر المياه واسعارها </a><br /><a href="http
Nile New
<a href="https://www.nilepure.com/%D8%B4%D8%B1%D9%83%D8%A7%D8%AA-%D8%B1%D8%B4-%D8%A7%D9%84%D9%85%D8%A8%D9%8A%D8%AF%D8%A7%D8%AA-%D8%A7%D9%84%D8%AD%D8%B4%D8%B1%D9%8A%D8%A9-%D8%A8%D8%A7%D9%84%D8%AA%D8%AC%D9%85%D8%B9-%D8%A7%D9%84%D8%AE/" rel="nofollow">شركات رش المبيدات الحشرية بالتجمع الخامس</a><br /><a href="https://www.nilepure.com/%D8%B4%D8%B1%D9%83%D8%A7%D8%AA-%D9%85%D9%83%D8%A7%D9%81%D8%AD%D8%A9-
Nile New
<a href="https://www.nilepure.com/%D8%B4%D8%B1%D9%83%D8%A7%D8%AA-%D9%85%D9%83%D8%A7%D9%81%D8%AD%D8%A9-%D8%A7%D9%84%D9%81%D8%A6%D8%B1%D8%A7%D9%86-%D9%81%D9%89-%D9%85%D8%B5%D8%B1-2/" rel="nofollow">شركات مكافحة الفئران فى مصر</a><br /><a href="https://www.nilepure.com/%D8%B4%D8%B1%D9%83%D8%A7%D8%AA-%D8%B1%D8%B4-%D8%A7%D9%84%D9%85%D8%A8%D9%8A%D8%AF%D8%A7%D8%AA-%D8%A7%D9%84%D8%AD%D8%B4%D8%B1%D9%8A%D8%
Nile New
<a href="https://www.nilepure.com/%D8%B4%D8%B1%D9%83%D8%A7%D8%AA-%D8%AA%D9%86%D8%B8%D9%8A%D9%81-%D8%A7%D9%84%D9%85%D9%88%D9%83%D9%8A%D8%AA-%D8%A8%D8%A7%D9%84%D8%AA%D8%AC%D9%85%D8%B9-%D8%A7%D9%84%D8%AE%D8%A7%D9%85%D8%B3/" rel="nofollow">شركات تنظيف الموكيت بالتجمع الخامس</a><br /><a href="https://www.nilepure.com/%D8%B4%D8%B1%D9%83%D8%A7%D8%AA-%D8%AA%D9%86%D8%B8%D9%8A%D9%81-%D8%A7%D9%84%D9%85%D9%88%
Nile New
<a href="https://www.nilepure.com/%D8%B4%D8%B1%D9%83%D8%A9-%D8%AC%D9%84%D9%89-%D8%B1%D8%AE%D8%A7%D9%85-%D8%A8%D8%A7%D9%84%D8%AA%D8%AC%D9%85%D8%B9-%D8%A7%D9%84%D8%AE%D8%A7%D9%85%D8%B3/" rel="nofollow">شركة جلى رخام بالتجمع الخامس</a><br /><a href="https://www.nilepure.com/%D8%B4%D8%B1%D9%83%D8%A9-%D8%AC%D9%84%D9%89-%D8%B1%D8%AE%D8%A7%D9%85-%D8%A8%D8%A7%D9%84%D8%B4%D8%B1%D9%88%D9%82/" rel="nofollow">
Nile New
<a href="https://www.nilepure.com/%D8%B4%D8%B1%D9%83%D8%A9-%D8%AA%D9%86%D8%B8%D9%8A%D9%81-%D8%B9%D9%85%D8%A7%D8%B1%D8%A7%D8%AA-%D8%A8%D8%A7%D9%84%D9%82%D8%A7%D9%87%D8%B1%D8%A9/" rel="nofollow">شركة تنظيف عمارات بالقاهرة</a><br /><a href="https://www.nilepure.com/%D8%B4%D8%B1%D9%83%D8%A9-%D8%AA%D9%86%D8%B8%D9%8A%D9%81-%D8%B9%D9%85%D8%A7%D8%B1%D8%A7%D8%AA-%D8%A8%D8%A7%D9%83%D8%AA%D9%88%D8%A8%D8%B1/"
Nile New
<a href="https://www.riyadh-constructions.org/%d8%a7%d8%b9%d9%85%d8%a7%d9%84-%d8%a7%d9%84%d8%aa%d8%b4%d8%b7%d9%8a%d8%a8%d8%a7%d8%aa-%d9%88%d8%a7%d9%84%d8%af%d9%87%d8%a7%d9%86%d8%a7%d8%aa/%d8%b4%d8%b1%d9%83%d8%a9-%d8%aa%d8%b1%d9%83%d9%8a%d8%a8-%d8%a8%d8%a7%d8%b1%d9%83%d9%8a%d8%a9-%d8%a8%d8%a7%d9%84%d8%b1%d9%8a%d8%a7%d8%b6/" rel="nofollow">شركة تركيب باركية بالرياض</a><br /><a href="https://
Nile New
<a href="https://www.riyadh-constructions.org/%d8%a7%d8%b9%d9%85%d8%a7%d9%84-%d8%aa%d8%b1%d9%83%d9%8a%d8%a8-%d8%a7%d8%ac%d9%87%d8%b2%d8%a9-%d9%85%d9%86%d8%b2%d9%84%d9%8a%d8%a9/%d8%b4%d8%b1%d9%83%d8%a7%d8%aa-%d8%a7%d9%86%d8%b0%d8%a7%d8%b1-%d8%a7%d9%84%d8%ad%d8%b1%d9%8a%d9%82-%d9%81%d9%8a-%d8%a7%d9%84%d8%b3%d8%b9%d9%88%d8%af%d9%8a%d8%a9/" rel="nofollow">شركات انذار الحريق في السعودية</a><br /><a
Nile New
<a href="https://www.nile7.com/%D8%B4%D9%82%D9%82-%D8%AA%D9%85%D9%84%D9%8A%D9%83-%D8%A8%D8%A7%D9%84%D8%B1%D9%8A%D8%A7%D8%B6" rel="nofollow">شقق تمليك بالرياض</a><br /><a href="https://www.nile7.com/%D8%B4%D9%82%D9%82-%D8%AA%D9%85%D9%84%D9%8A%D9%83-%D8%A8%D8%AC%D8%AF%D8%A9" rel="nofollow">شقق تمليك بجدة </a><br /><a href="https://www.nile7.com/%D8%B4%D9%82%D9%82-%D8%AA%D9%85%D9%84%D9%8A%D9%83-%D8%A8%
Nile New
<a href="https://www.nile7.com/%D8%B4%D9%82%D9%82-%D9%84%D9%84%D8%A8%D9%8A%D8%B9-%D9%81%D9%8A-%D8%A7%D9%84%D8%AE%D8%A8%D8%B1" rel="nofollow">شقق للبيع في الخبر</a><br /><a href="https://www.nile7.com/%D8%B4%D9%82%D9%82-%D9%84%D9%84%D8%A8%D9%8A%D8%B9-%D9%81%D9%8A-%D8%AC%D8%AF%D8%A9-%D8%A8%D8%A7%D9%84%D8%AA%D9%82%D8%B3%D9%8A%D8%B7" rel="nofollow">شقق للبيع في جدة بالتقسيط</a><br /><a href="https://
Nile New
<a href="https://www.nile7.com/%D8%B5%D9%88%D8%B1-%D8%B4%D9%82%D9%82-%D8%AA%D9%85%D9%84%D9%8A%D9%83" rel="nofollow">صور شقق تمليك</a><br /><a href="https://www.nile7.com/%D8%B4%D9%82%D8%A9-%D8%B1%D9%88%D9%81-%D9%84%D9%84%D8%A8%D9%8A%D8%B9-%D8%A8%D8%AC%D8%AF%D8%A9" rel="nofollow">شقة روف للبيع بجدة</a><br /><a href="https://www.nile7.com/%D8%B4%D9%82%D9%82-%D8%AA%D9%85%D9%84%D9%8A%D9%83-%D8%A8%D8%AD%
Nile New
<a href="https://www.riyadh-constructions.org/%D8%A7%D9%86%D8%A7%D8%B1%D8%A9-led/" rel="nofollow">انارة led</a><br /><a href="https://www.riyadh-constructions.org/%D8%A7%D9%84-%D8%A7%D9%8A-%D8%AF%D9%8A/" rel="nofollow">ال اي دي</a><br /><a href="https://www.riyadh-constructions.org/%D8%A7%D9%86%D8%A7%D8%B1%D8%A9-%D9%84%D9%8A%D8%AF/" rel="nofollow">انارة ليد</a><br /><a href="https://
Nile New
<a href="https://www.riyadh-constructions.org/%D8%B4%D8%B1%D9%83%D8%A9-%D8%AA%D8%B1%D9%83%D9%8A%D8%A8-%D9%85%D9%83%D9%8A%D9%81%D8%A7%D8%AA-%D8%A8%D8%A7%D9%84%D8%B1%D9%8A%D8%A7%D8%B6/" rel="nofollow">شركة تركيب مكيفات بالرياض</a><br /><a href="https://www.riyadh-constructions.org/%D8%B4%D8%B1%D9%83%D8%A9-%D8%AA%D9%88%D8%B1%D9%8A%D8%AF-%D9%88%D8%AA%D8%B1%D9%83%D9%8A%D8%A8-%D8%A7%D9%86%D8%A7%D8%B1%D9%
creditos con asnef
Hi there! This is kind of off topic but I need some help from an established blog.
Is it very hard to set up your own blog? I'm not very techincal but I can figure things out pretty
quick. I'm thinking about setting up my own but I'm not sure where to start.
Do you have any points or suggestions? Thanks
creditos con asnef
Mishka
How timely! I was just trying to figure out what to do with a Christmas honeybun – not enough for a quilt, but it could make some really neat table runners and hot pads! Thanks!!!
company in riyadh
How timely! I was just trying to figure out what to do with a Christmas honeybun – not enough for a quilt, but it could make some really neat table runners and hot pads! Thanks!!!
Janell Evans
I use this process to make baby quilts. I use strips of flannel for the top and by using fleece I don't use batting makes up to a 45" x 60" quilt easy peasy or any size smaller as you like.
Carole A. Brachna
Wow, I'm late to this party, but love this idea. Just bought s mini jelly toll and have never quilted, so this mjsy be just right. Thank you!!
marcyg
Thanks for the reminder of how easy it is to do table runners with the quilt-as-you-go technique. Placemats would be just as easy too!
Sanjana Dua
Its wonderful ! Thanks for sharing the tips specially its step by step tutorials and it is really helpful.
Lisa
I totally forgot about this. This would be an interesting way to back and finish a quilt.
I really enjoy your site. I have learned quite a lot.
I am about to make the lone star baby quilt. I need to make 2 quilts for separate friends in separate cities.
I will double up and instead of cutting my squares in half I will sew them together and cut after!
Different backing for different babies 😉
Amy
Oh that's so great! Thanks so much for letting me know. xo
Charlene Gibbins
I am a beginner to sewing and quilting. I used your tutioral to make a table runner. It is not quite finished. But so far it looks good.
Amy
Good for you!! I'm so glad.
Ginger
I wanted to make a spring table runner and I didn’t want to spend days doing it. This table runner was perfect! I’ve never done “quilt as you go” but your instructions were very clear and easy to follow. I’m thrilled with how it turned! I’ll definitely be making more of these. Thank you for a great tutorial!
Amy
Wonderful! I'm so glad to hear!