
In this post I will show how to cut and sew a bias binding to finish a quilt as well as how to finish a quilt with rounded corners.
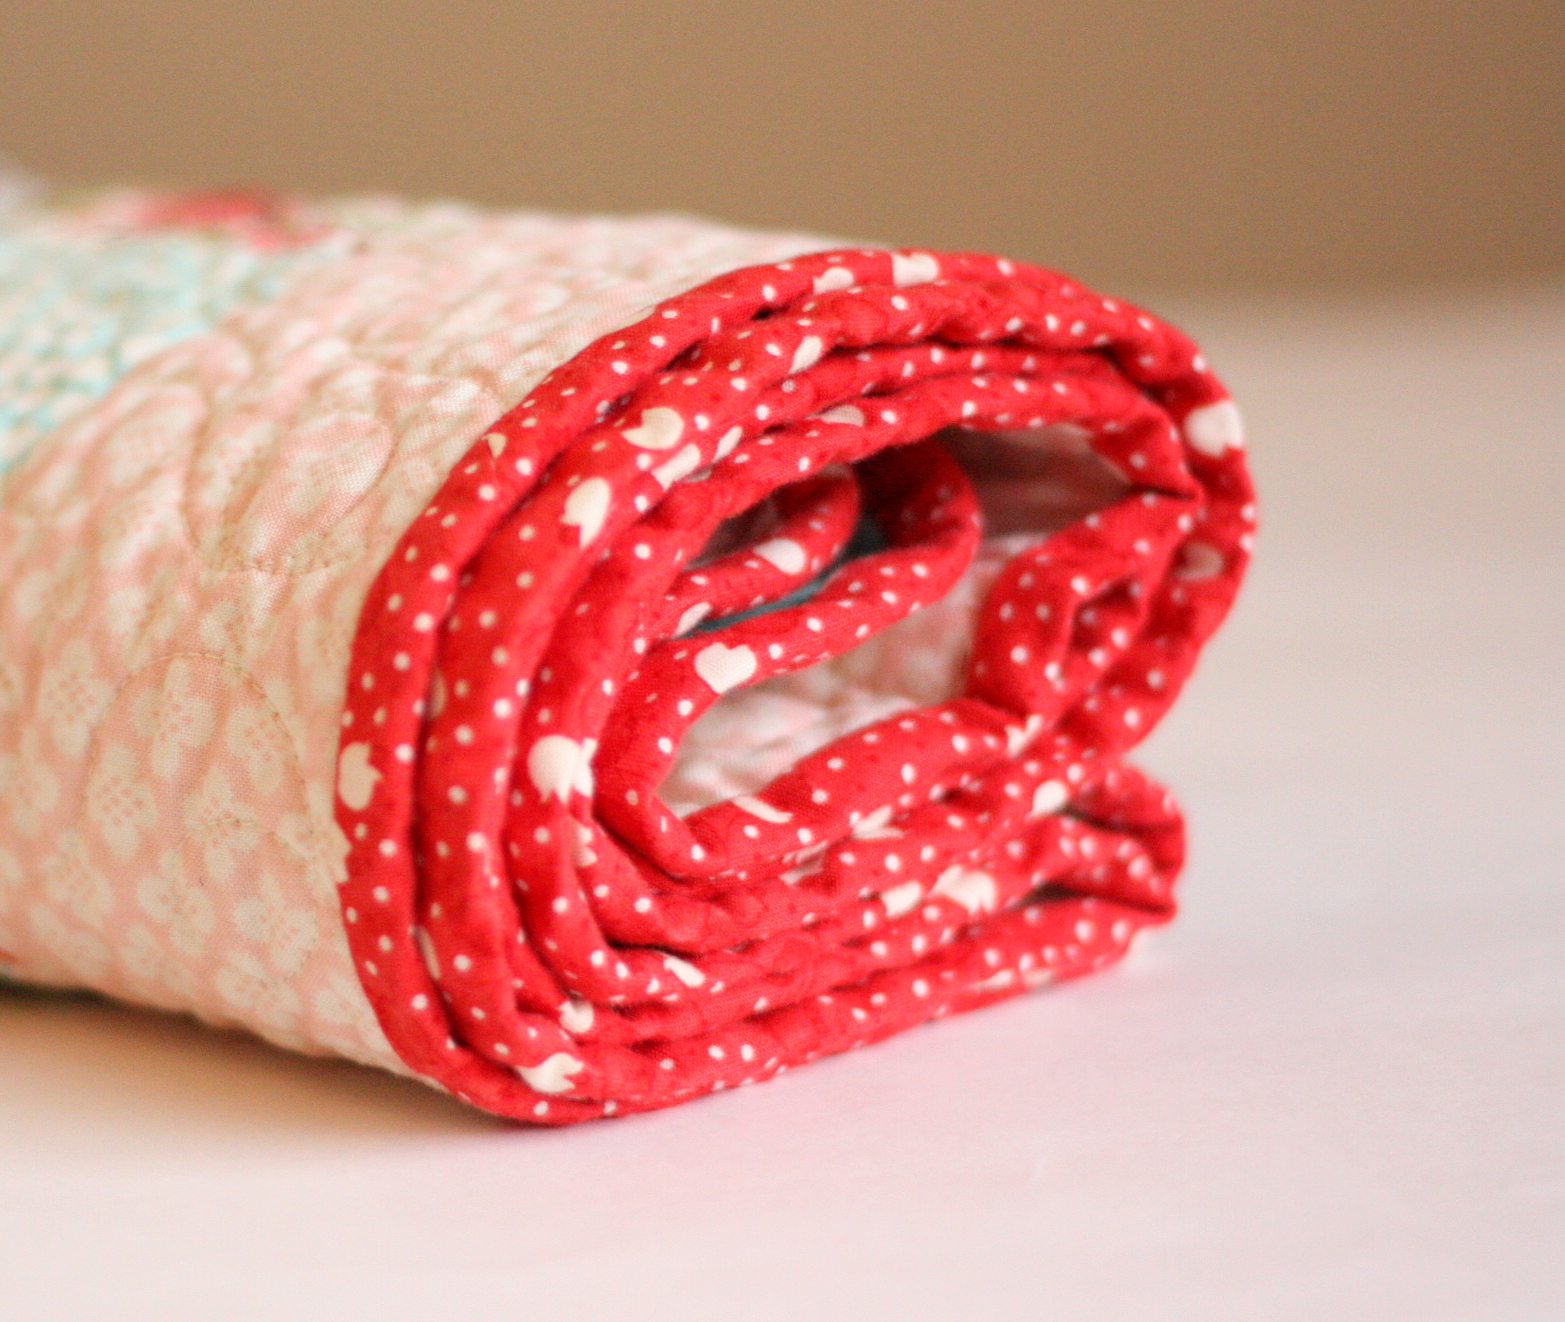
For our final week of the Beginning Quit Along Series we are going to talk about another method for binding a quilt and how to care for quilts. Today we are talking about bias binding, hand finishing and curved borders - which might be a good option for those of you who get the heeby-jeebies with mitering corners.

Cut a Bias Binding: This binding method is very similar to the one last week. The major difference is that instead of cutting the fabric straight across the grain of the fabric, we are going to cut it on the bias. Cutting something on the bias means to cut diagonally across the grain of the fabric. There are a couple of benefits to cutting binding strips on the bias: stretch in the fabric for going around curves and scallops, and added durability. There are lots of nifty methods for cutting your own bias strips, but I’m going to go with super basic and just cut strip by strip.
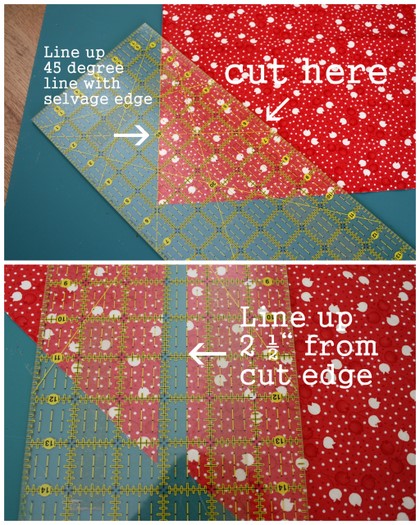
First, open your fabric and lay right-side up on the cutting mat. (I am using a ½ yard piece of fabric. That’s more than enough for a baby quilt, but the wider yardage gives me longer strips for less piecing.)
Starting at the bottom left corner (if you are left handed start at the bottom right), find the 45 degree line on your cutting ruler. (Most quilting rulers should have this line.) Line up the 45 degree line along the selvage edge of the fabric. Cut off bottom left-hand triangle. Now turn the ruler parallel with the new bias edge. Line-up the 2 ½” line along the new bias edge and cut your first 2 ½” wide strip.
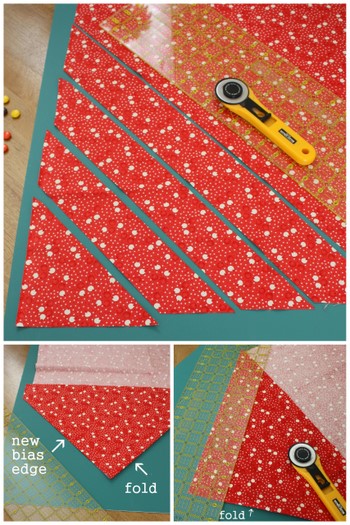
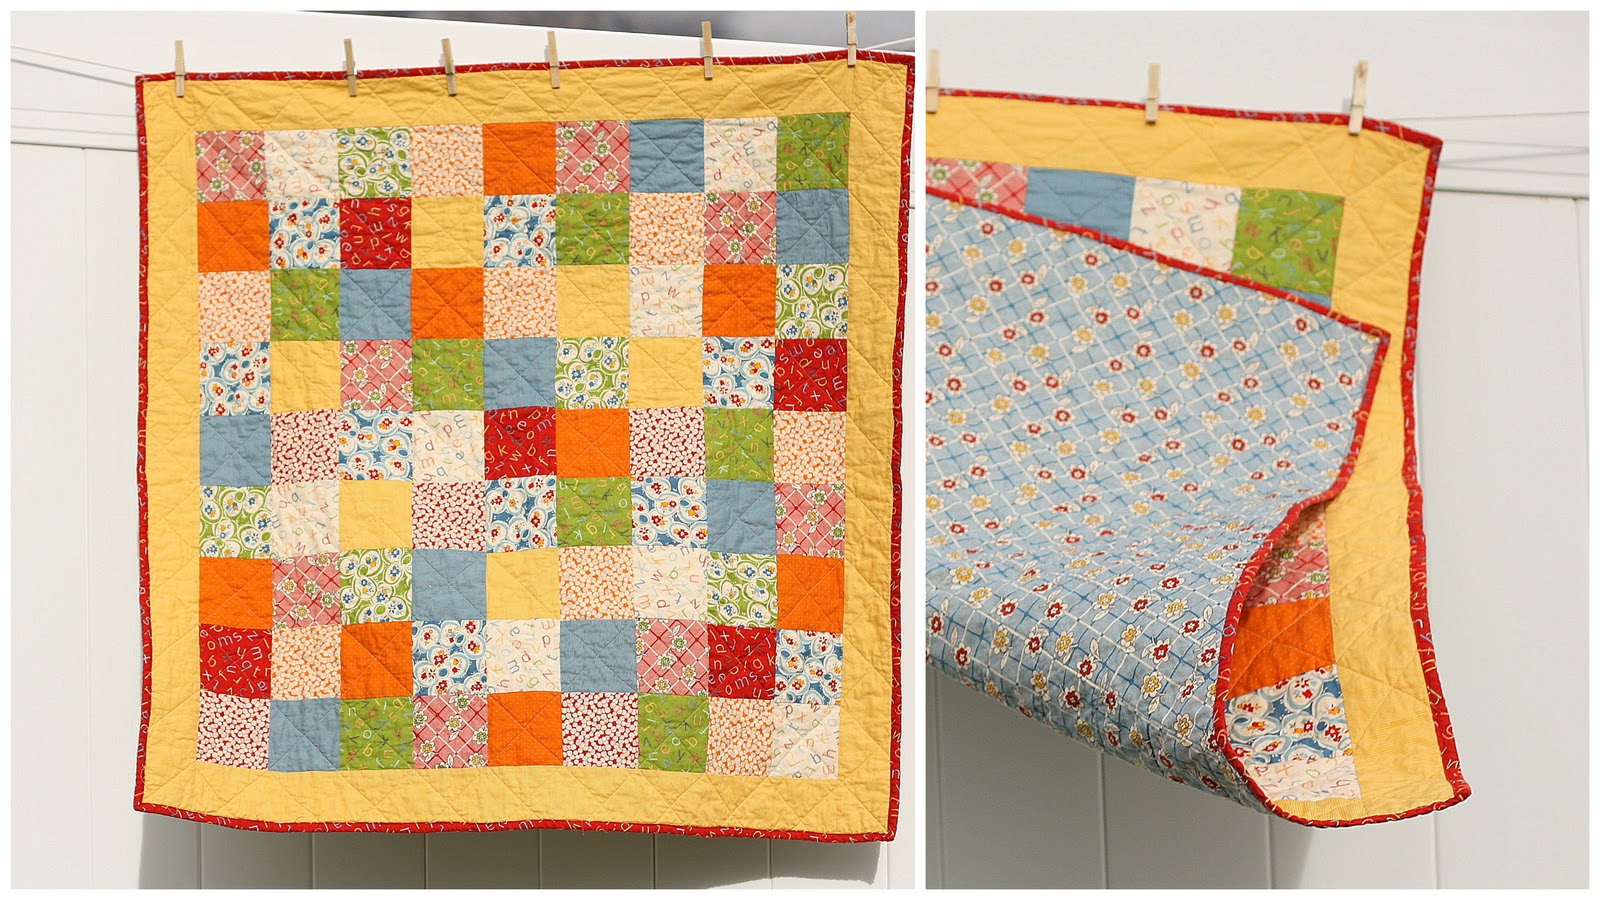
Continue cutting 2 ½” strips. When the fabric gets too long diagonally to cut with your ruler, flip it to wrong-side up and fold the fabric wrong sides together matching up the bias edge. Then you can lay your ruler on top, and continue cutting 2 ½” strips. For this 42″ x 42″ baby quilt I cut 7 bias strips working right from the bottom left hand corner.
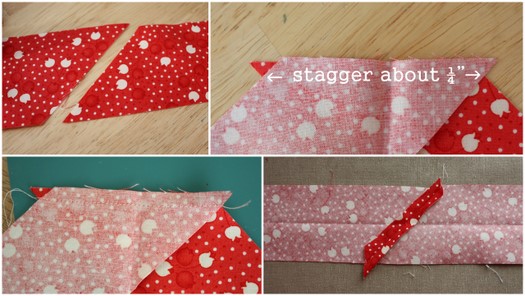
Because they are cut on the bias, these strips will have 45 degree edges. Match strips going opposite directions (top left) and place strips right sides together (they will be perpendicular to each other). Match edges to be sewn and stagger ¼” (see picture). Sew ¼” seam. Press seams open. (These diagonal seams will create a lot less bulk than the straight seams we used last time.)
This next step is totally optional – I’m going to show you how to round your edges.
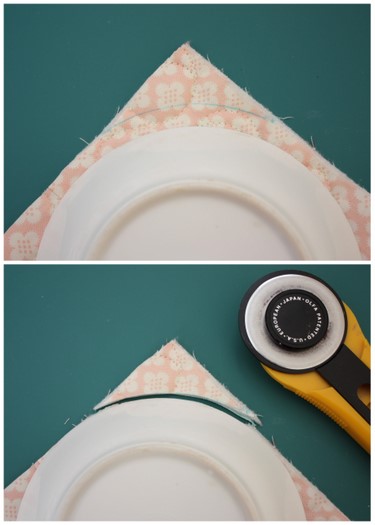
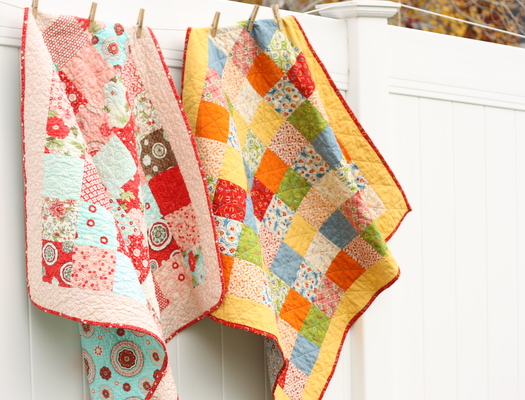
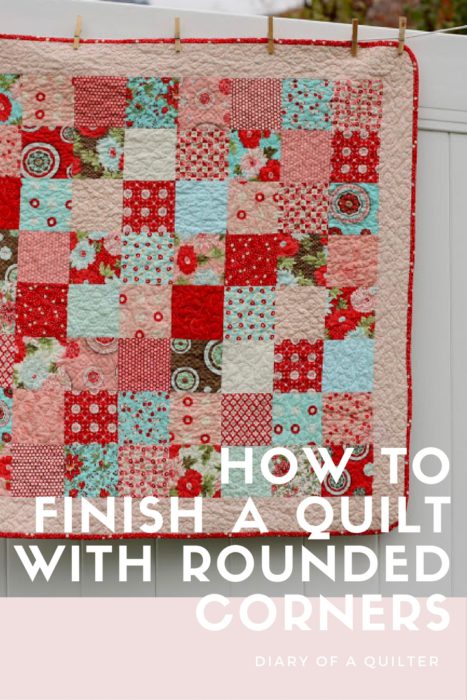
For some of you who are a little wary of mitered corners, this may be a good option for you. 🙂 This will only work with bias strips because they have some stretch! Using a small plate (or some other circle) mark a gentle curve at each corner of your quilt. I like to use the plate itself as my guide for trimming the corner.
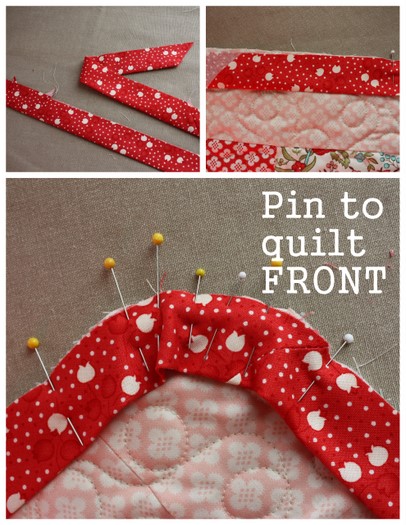
Press bias strip in half. (The pressed fold creates a nice, straight edge that is easily blind-stitched to the backing.)
Hand Finished Binding: pin the raw edges of binding to the raw edges of the quilt FRONT. When you get to the curved corner, carefully pin the edges around the curve. (I obviously like a lot of pins here to hold it in place.) You can also miter with the bias binding as we talked about last week.
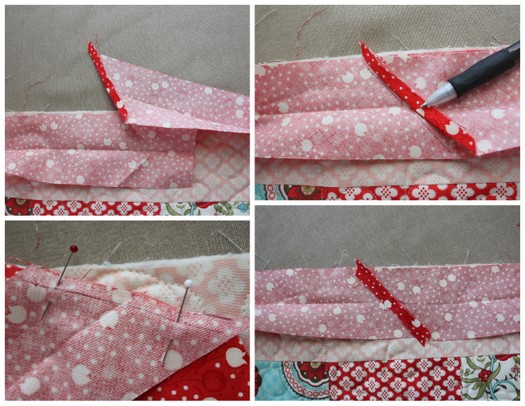
When it’s time for the strips to meet-up fold and press back the start side ¼”, pull the strip taught over the end side of the strip and mark a line. Trim the end side of the strip ¼” past the line. Match up strips and sew on the line. Press open.
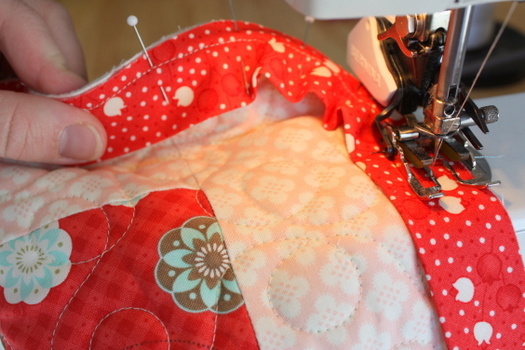
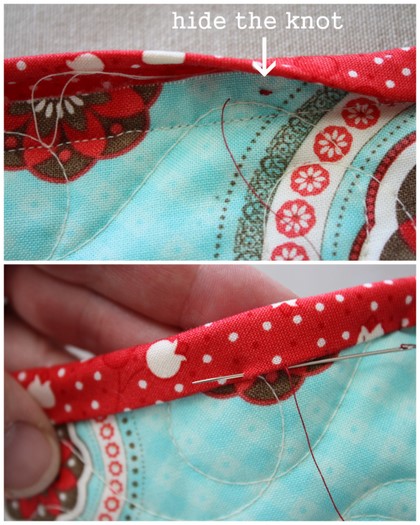
Fold the binding to the back side of the quilt and pin in place. Using a matching thread knot one end and hide it under where the binding will cover. Coming through the very bottom edge of the binding’s folded edge slip the needle through the quilt back, slide it through the layers of the quilt, coming up at the edge of the binding fold about ¼” away. Repeat the process tacking down the binding edge with this blind stitch.
Even though it takes more time than machine binding, I like this method of finishing a quilt best because all stitching is hidden. You can do the same with straight-cut binding strips as well. It’s a great project to do while just watching TV and you’ll be surprised how fast it goes.
Washing quilts: I LOVE to wash my quilts right when they’re finished – especially if they’ve been machine quilted – because it softens them up a lot and gives them more of a crinkly, antiqued look.
If you’ve used Cotton batting, the batting will shrink a little adding to the puckered feel. I usually wash my quilts in cool water on a gentle cycle with a small amount of detergent and dry them in the dryer on low. The first time you wash a quilt, throw in a Shout Color Catcher (found in your grocery laundry aisle) to catch any dye. Nothing worse than dye running through a finished quilt. If you’ve used high-quality quilting fabrics, you shouldn’t have this problem. If you buy fabrics at the big box fabric stores, or if you’re using a lot of solid reds or blacks, I would pre-wash the fabrics before you make the quilt. If it’s too late for that now, use the Color Catcher and don’t let the wet quilt sit in the washing machine. Check for any dye running before you put it in the dryer.
We're done!
And that's it! Thanks so much to all who commented and contributed.
Click here to see the entire Beginning Quilting series from start to finish.


Chris
It's been a wonderful how-to series. Thank you for sharing...both quilts are lovely.
live a colorful life
Those quilts are both so cute. And the fabric in each is some of my favorite. (Sometimes I think I say that about every quilt I see because there is SO much fabric that I like, but American Jane really IS special, that's for sure!)
Angie
Both of those quilts are so cute! I do love that Bliss fabric---but then again, I'm always drawn to yellow too. 🙂 Guess I need some charm packs of each, right? 😀
UmmaThreads~ Crafty Squirrel
Wow, I absolutely love the second quilt. Hipp hipp Hooray for bias binding. I'm gearing up to making some myself, it's a labor of love. And, I'm def sticking to rounded corners for my items, mitered corners give me the hibby gibbies.
Canadian Kristin
Okay, I have read and re-read your bias-binding suggestions and am almost ready to jump in and finish off my first three quilts [biting nails] [nervously drumming fingers on table top] [trying to summon the courage to try] I really REALLY like all the photos explaining step-by-step... okay... I can do it... I believe in me... um... okay...here I go!!!<br /><br />Thanks for the good instruction.
lifeinredshoes
I cannot thank you enough for the time and energy you put into this project. Because of you, and Allison, I am finally catching on:)<br />Bless your hearts!
Courtney Dirks
Especially love the red/pink/& teal. I just went to a "boutique party" doing a little early Xmas shopping tonight and I was just talking about how I love that combination of colors. It's so refreshing. And on another note, I just started following your blog recently and it's like a breath of fresh air each time I swing through, I love your banner, the whole look and feel
Cris A
I don't think I've seen the curved corners before! Cute as can be!
Little Quilter
I love that Bliss quilt! so fresh
Purple Quilter Queen
Oh Amy - those are adorable. I love the curved corners. Will have to try that sometime. That Bliss is heaven! I've got to get me some! Cute! Jenn
Anonymous
Goodness, the pink/red quilt looks just like strawberry shortcake. I love it! <br /><br />Thanks for the wonderful tutorial series. It was really helpful!<br /><br />-Holly
Paula
Thanks for sharing! I love the rounded corners.
Heather
Ooh - thanks for the tip on rounding corners - I think I might try this on my next quilt.
Lisa
Love the rounded corners on the quilt ... tried it on a twin and it came out fabulous ... hadn't thought of using it on a lap quilt ... until I saw yours 😉
Leah
Thanks so much for this... I'm about to bind a circular table topper, and found this looking for hints.
YorkshireKaren
Thank you SO much for your "how to" series; it's 10 years since I've quilted, and had completely forgotten the basics. Your series has brought the memories flooding back, and inspired me to get quilting again...starting with two unfinished ones that have been crying out to be finished all these years!
Celi [diario de crecer]
I love it!!
Courtney
I just finished my very first quilt (and very first sewing project) with the help of this tutorial series! It was awesome & I appreciate you posting all of these tutorials so much. I posted a picture of my quilt on my blog if you'd like to see. 🙂 Thanks again!
artistryinfaux
WOW I have searched for some tutorials on binding. This is absolutely the best one I have seen. Very nicely done and great pictures, easy to understand and follow. <br />I have been gathering tutorials to share and hope that you won't mind. <br />I have just begun quilting and will use this one because I love the rounded corners. Reminds me of the ones my grandmother use to make.
ginnie roberts
i love being able to read and seeing the quilts thank you.ginnie roberts.
Marathon Maritza
I know you did this series ages ago, but I wanted to let you know that it is still very handy! Thank you so much -a Newbie wannabe quilter
maroccanmint
Thank you for this great tutorial!<br />Round corner waiting for me and my new quilt 🙂
Becca
I just finished my first quilt last night using this series. My quilt turned out nicely, and I learned a ton just by physically doing the work. Thanks for this tutorial - I imagine it was a ton of work. It definitely helped motivate me and I'm looking forward to applying this new knowledge to my next quilt in a month or two.
amy smart
Awesome! I'm so glad it was helpful. The first quilt is always the trickiest because everything is new. It's like driving - the more you do, the more it feels like second nature and gets really fun. Good job!
Andree Shedd
I'm so so so happy I found your blog!! I'm a novice with a huge curiosity and love of quilts. I've got 3 tops I really enjoyed piecing together but after piecing I freeze...can't seem to figure out how to border, sandwich, quilt, bind them. You've inspired me!! You make it seem like even I can do it!!! Thank you for the time and effort you put into your blog!!<br />I'd
Andree Shedd
This comment has been removed by the author.
Francina
Thank you sooooo much!!!!! I'm looking forward to sew my first quilt and your large explanations and advises will be really useful. Thanks for thinking of the beginners!! Thats very nice 🙂
Inge
Thanks a lot for your turorials! After reading through your posts I finally found the confidence to start quilting!
Amy Smart
Awesome! I'm so glad to hear that!
Mercy Fonseka
it's a nice tutorial. I know nothing about quilting. I read to understand to get a hang. Thanks for simple instructions.
Nia Lorre
You don't want to know how long I have been quilting and have never used this method for finishing the binding. I always struggle with that dang seam after I have sewn the binding on (invariably without leaving enough wiggle room). I am definitely going to do this on my next project. Thanks very much for sharing this!
Amy
Great!
Alba
I'm completely new to sewing, and yesterday I finished my first quilt following your tutorial. I didn't quite manage to machine sew both sides of the binding (no walking foot), so eventually I got my seam ripper out and had a go by hand, which looks really great. Thank you very much for all the work you put into posting. It was very easy to follow! 🙂
Amy
Congratulations! That is wonderful. Thank you!