
Ahh, January. Christmas is getting put away. We've had snow days that make you want to just stay inside. Staying in my pajamas until 4. Having a sick kid on the couch one day this week even forced me to sit and watch the Princess Bride one afternoon. I'm definitely liking the slower pace. It feels good to have Christmas deadlines over and to gradually clean up my sewing space.In the process I pulled out my Steampunk blocks that I started a few months ago. (Well, technically, it was a year ago that I took a class and made one block, but October is when I started making them in earnest.)
Since then I've made about 12 more blocks and thought I would share the update. These are SO fun to make. Plus I'm having a blast playing with wild fabric choices - things that I wouldn't normally put together. It's pushed me out of my comfort zone and been so liberating!
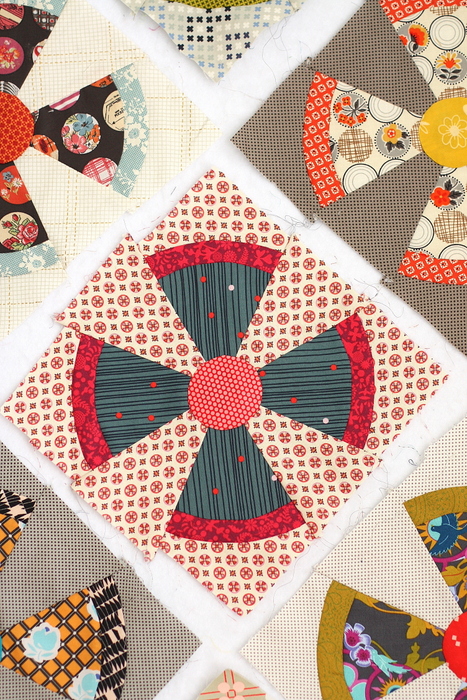
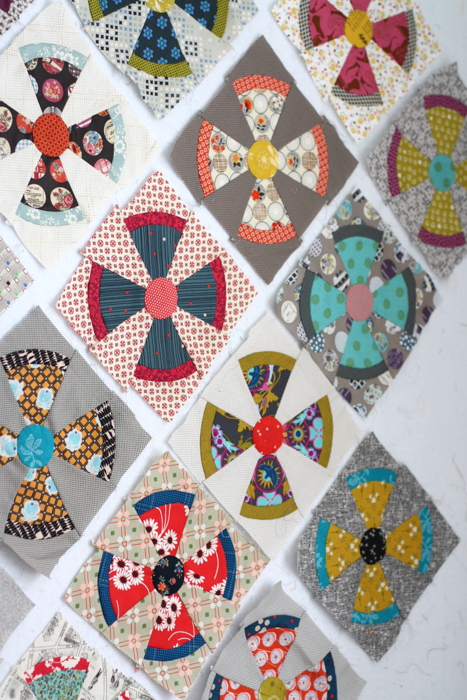
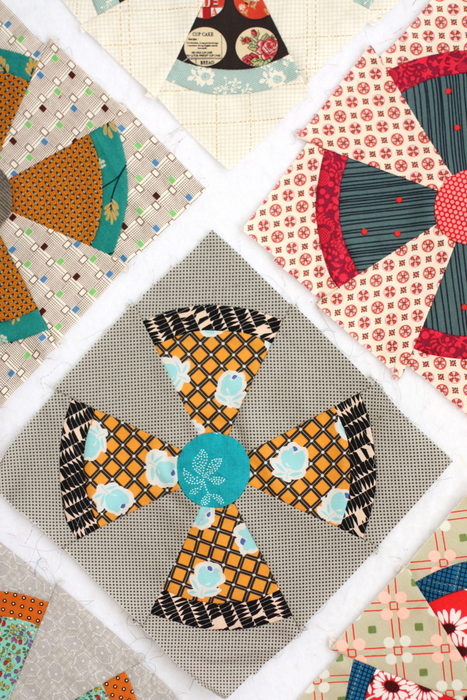
Here's a sample of a few of the blocks that have come together so far...
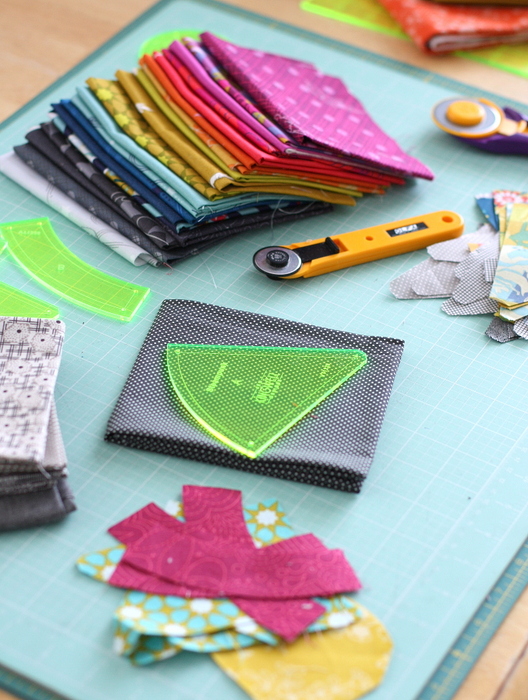
My process thus far has been to pull the fabric into stacks of three for each block, then mass-cut multiple blocks at once using the templates and a small rotary cutter. When that's done, I stack the pieces in order in a pile. That way, when I've got an extra minute to sit and sew, or when I want a break from other projects (or when I should be doing other things, but I can't resist sewing another 5 blocks) I've got them ready to go.

The piecing is really fun. I loved this pattern for years, but the curves always intimidated me. Taking Jen's class last year helped me SO much in getting over my fear of this block. She demo'd how to make them with hand-piecing, but they are also really simple to machine piece. (For one thing, the curved wedges have a gentle curve, so pinning works well. I also started using the Curve Master presser foot that I bought a few years ago and it works great. (That foot makes me feel so clever. It took some practice to get used to it, but now I'm unstoppable.)
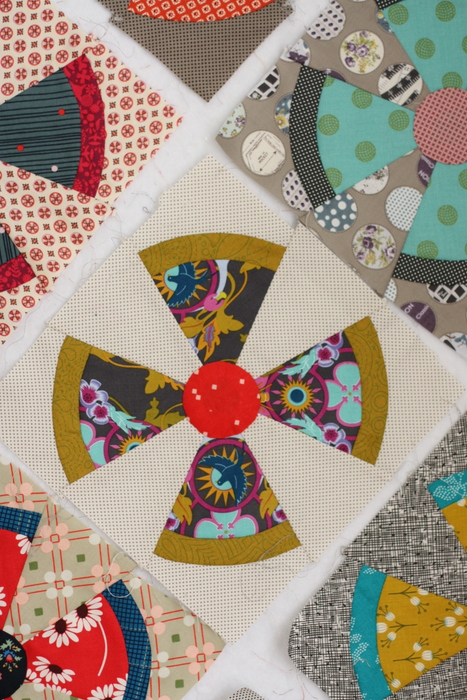
The center circle does need to be appliqued. You could do it by machine, but I enjoy hand applique, so I don't mind doing them by hand. I just save up a bunch of blocks after they've been pieced, and then do all the circles at the same time. I am trying out the new Aurifil 80wt thread for the first time and it is FABULOUS. It's so lightweight that the stitches practically disappear.
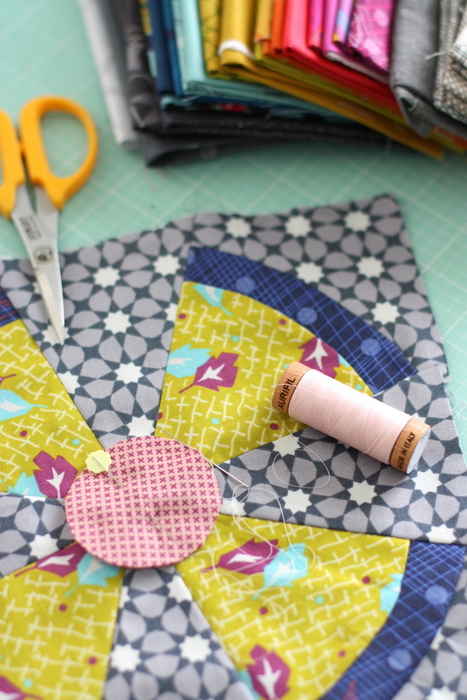
Another great tool for getting nice, round circles is using the Perfect Circle templates. I struggle with getting my circles to look perfectly round - these are the best tip - especially if you do a lot of applique circles because they come in so many different sizes. They are circle templates made of special plastic that won't melt if you iron them and you can use them over and over again. Basically you trace the circle template and cut your fabric with a generous ¼" seam allowance around the edge. Then you do a running stitch about ⅛" away from the edge of your cut circle, place the Perfect Circle template inside and gently pull your thread to gather the fabric around the back side of the template. Then using a warm iron, press the gathered circle with the plastic template still inside the fabric - this will give you the perfect circle shape. Gently open the gathered stitches and remove the template, reshape and press again, using some starch to give your circle a nice, crisp edge and finish. I use the 2 ¼" templates for the Steam Punk circles. (They come in the bigger circle pack. There is also the original small Perfect Circle package.) They are a great investment - especially if you do a lot of applique circles.
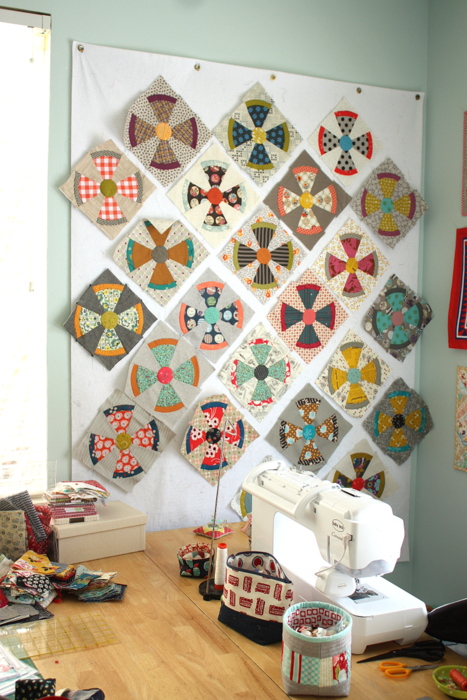
I cleaned off my design wall so I could lay out the blocks I've made so far and get a big-picture view. This is crazy scrappy already (which is exactly the look I'm going for) but I wanted to step back and see what I still need to bring balance to the force. Also, I need to figure out what fabric I'm going to use for the sashing. I'm loving the colorful addition of the Alison Glass Seventy Six fabrics (available here, here, here, and here) in the blocks. I'm also really liking the darker background blocks - so I'll probably make some more of those.
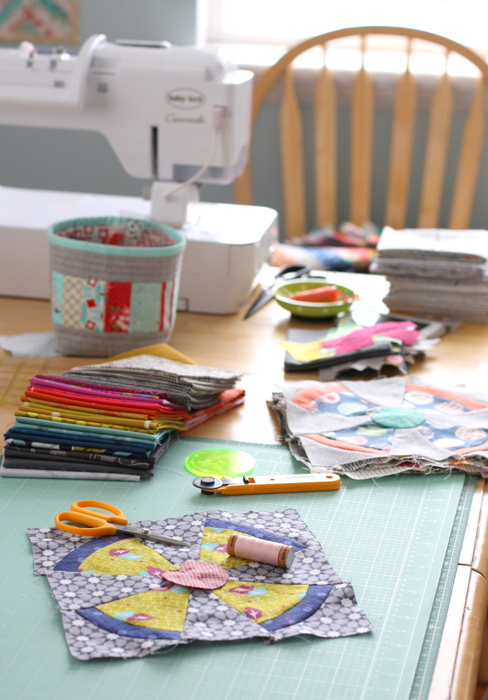
You can find the pattern, Jen Kingwell's Steam Punk, here (in the US) and here (in Australia). I've also been glad to have Jen's acrylic templates. They have the added seam allowance for each piece and have super helpful for doing all my cutting. (I have cut my outside pieces slightly bigger so that I have more room to square-up the blocks at the end.)
I'm working on a big project to share later this month, but these blocks are proving a worthy distraction.
Peggy
What great blocks Amy! I have yet to start my Steampunk.
Karen Goad
I am making those too but I am using the old 1930s pattern where it is called "air ship propeller" it is from the old Kansas City Star Newspaper
Robby
Your blocks are really coming together nicely. Thanks for all the tips on what's helping you.
Paula
Hope your child is feeling better! Love the Steampunk and want to make it one day.
Amy Smart
100% back to normal. I think he was just wiped out and needed a day to lie low. That + the Princess Bride seemed to do the trick. 😉
sherry
i love those steam punk blocks ... but it is down my list a little ... maybe in the fall
Ronni
I am sew getting one of those magic curvy foots today:)
Starting the New Year with curves!
Rachel at Stitched in Color
I absolutely love this pattern every time I see it! Yours are looking great. I agree on more dark backgrounds! Maybe a really bold sashing choice like Kona Pickle or Wasabi?
Emily C.
That's really beautiful! Thanks for sharing the details of this - I'd love to try it out some day!
Linda Dutch
Your blocks are looking wonderful all together up on the design wall! It's a great scrappy mix fo fabrics too!
Julie
That picture of your design wall is intriguing. It looks like it might be a piece of flannel hanging from hooks? Is that right? I'm looking to make a design wall and I like the idea of being able to take it down if needed. Any tips based on your experience?
Amy Smart
I love my design wall! Mine is made by Fons and Porter. I bought mine at JoAnn's but I've also seen them available at Connecting Threads. THere are lots of tutorials for making your own though. Here are a bunch: https://blog.shopmartingale.com/quilting-sewing/9-quilt-design-wall-ideas/
Emilee
They look so good!!! It is going to be an amazing quilt when finished!!
Kim Funk
I still have my almost done one block from the class! I shall bookmark this post and come back to it when I need inspiration to get going!
Karen Seitz
Your blocks look great! I had hoped to receive the Halo templates for Christmas, but no luck for me. I'll have to break down and order them soon.
Toni
I love what you are doing with these! I am having fun with glitter quilt blocks and I agree the templates are the way to go! I've had the steam punk pattern for awhile, but now I've ordered the templates. 🙂 Thanks for sharing your inspiration.
Rose
Your steampunk blocks are great! I took Jen's class last year and so far all I have is the one block we made that day and a large plastic tote box full of fabric I pulled for the class. When Jen was in town later in the year I bought the plastic templates for this quilt and after reading your blog I'm itchin' to get stitchin'!
Judy @ Sew Some Sunshine
This is looking amazing! I love your fabric choices for this. Great tips as well. Can't wait to see more. Maybe one of the darker backgrounds for the sashing?
Rosemaryflower
This blocks are so cute. I am tired of "pinwheels" but this is completely different and adorable, of course!
I love curves so much. yikes. These look so fun
This looks great Amy
Amy Smart
Thanks Rosemary!
kathy o
Your blocks are wonderful! I have the pattern, templates & scads of fabric....now I just need to find the courage to dive in. Thanks for an inspiring post.
Amy Smart
You're welcome! And I understand - I needed courage myself! Once you make a few blocks, you'll be hooked.
janicekholton
Hi Amy, love how these blocks are turning out. Are you trying to stick with a certain palette of colors and if so which ones and how did you come to choose those colors?
Amy Smart
I based some of my colors off of Jen Kingwell's latest collection, Moving On Lawns - and then pulled colors that played well with them. I'm sticking with mostly warm, saturated colors and blacks/grays.
Barbara McDonald
I'm really liking this quilt! I have no modern quilt fabrics, so I'll just live vicariously through you!!
Jamie
Maybe the wilder the fabric the more toned down it all looks together? It's beautiful!
helen
This is coming on so well. I have some Tula I have had in mind for this, it all seems rather difficult though
Amy Smart
I was intimidated too and was lucky enough to take a class. But once I tried a block, they were way less difficult than I thought.
Barbara
I want to make this. I have a accuquilt die cutter and wondered what size the circle, etc is as I may be able to some I have to cut out the patterns.
Amy Smart
The finished size of the center circle is about 2 1/4" wide.
Pat Anderson
You're doing a great job with your fabric choices--so fun! I have the pattern and it is on my bucket list. Love Jen's patterns so much! Thanks for the inspiration to get going on mine!
Annie
Such a lovely quilt Amy ... love the mix of fabrics you chose. The block looks more complicated than it appears at first. I think I will tackle this one soon. Love all of your work and all of your thoughts. Also, want to thank you for the wonderful list of places to donate quilts ... I mainly make lap quilts and have been donating some to our local hospitals here in Massachusetts for Chemo patients, some for ailing newborns needing extra comfort, and am always on the lookout for those who may benefit from quiltie hugs. I am relatively new at quilting and to your blog. I look forward to each and so admire you.
Susanna
Where did you find Jen's templates with the seam allowance added? I ordered the pattern from Jen and mine says I have to add 1/4 in for seam allowance. I'm a fairly new quilter ... decided to try something besides straight lines for piecing but am finding this one to be a bit difficult to teach myself.
Amy Smart
I bought those templates from Jen herself. I'm sure they'll have them in their shop - or you could contact them and ask for a US distributor. They were worth the purchase - it's made the project so much easier!
Judy
Amy, just found your post on Steam Punk. Love your quilt, your blocks could be my blocks! I also started with Jen's fabrics then added to that. First time for me to go a little wild and crazy with fabric choices, now it's all I want to do. Your tips on piecing this are spot on, go generous of you to share. I'm in the process of big stitch quilting mine, first time for that also. For everyone out there who has been wanting to make this quilt, go for it. Like Amy says " the blocks are very addicting," I needed 41 and I stopped making them at 58. Used the extras on the back. Thanks Amy, will continue to read your blog.
Amy
Your quilt sounds wonderful! Getting back to my Steam Punk blocks is top on my list after the kids are back in school!
Kitty
I am currently piecing this one also. Yours is gorgeous. I have a question. Have you heard of anyone cutting away the fabric under the appliquéd center? Seems a bit bulky to quilt thru.
Amy
That is a really great question. I haven't heard any specifics on the Steam Punk blocks. I've heard different schools of thought on cutting away behind applique. Some feel that cutting away weakens the quilt. But quilting through multiple layers would be tricky if hand quilting. I'd reach out to Jen Kingwell as she is the designer of this block and has taught classes multiple times AND she hand quilts all of her quilts. She'd probably have better insights than me. Good luck!
Sallie McIntosh
I tried to order the steam punk pattern and template. Filled it all out, got down to pay with paypal and nothing happened. Could go no further. What can I do?
Amy
I don't sell Steam Punk patterns or templates, so I'm not sure what happened. You'll have to reach out to the shop where you were trying to purchase them. Or try purchasing them from a different shop. I saw them available on etsy here: https://tidd.ly/3f6LiW2