
In the mood for some fall-inspired sewing, but don't have the time to take on a big project? This simple patchwork pumpkin quilt block is a quick finish and perfect for using up some of your favorite scraps.
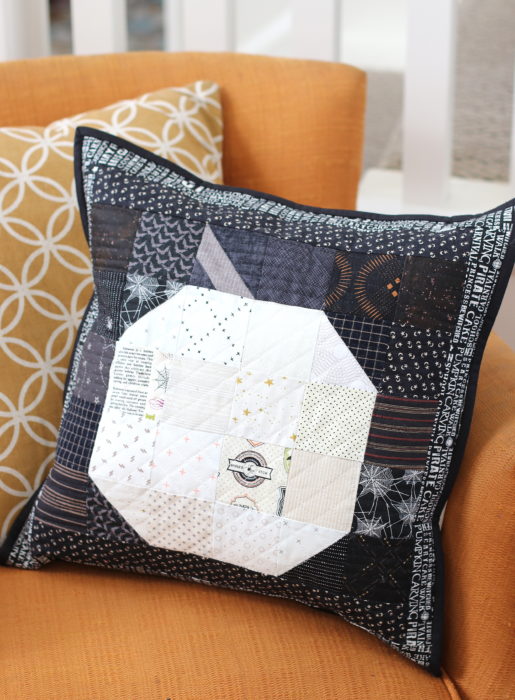
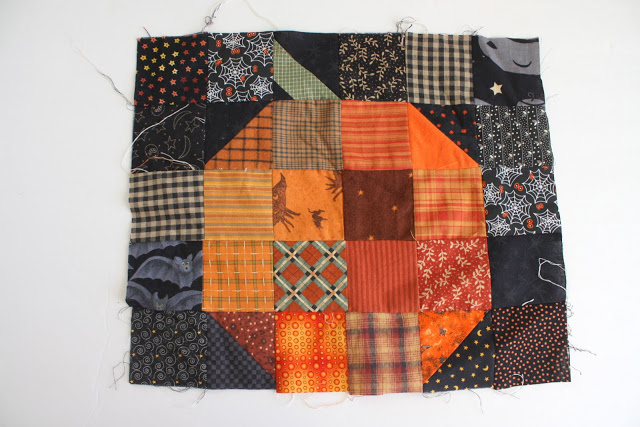
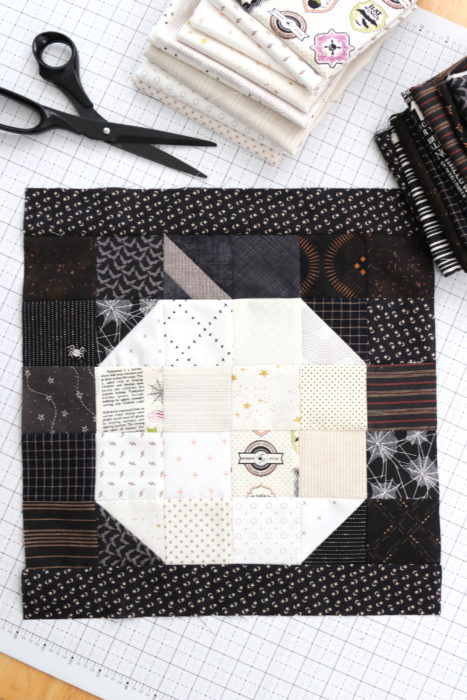
I love white pumpkins. After making my scrappy orange pumpkin blocks a few years ago and thought it would be fun to make an updated white patchwork pumpkin version using some leftover low volume scraps. Many of the prints - both black and white - are left over from making this Halloween bunting quilt a couple of years ago.
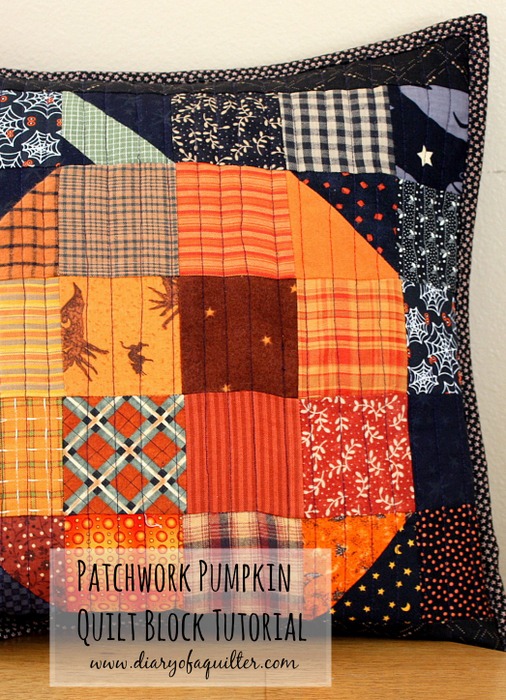
Here are the simple instructions for this Patchwork Pumpkin quilt block tutorial as well as some other patchwork pumpkin projects to make some quick scrappy Halloween decorations.
(You can find a printable PDF version of this tutorial here for $1.50.)
Quilt Block tutorial (13 ½" x 13 ½" finished)
Fabric requirements:
- 16 orange (or white) squares 2 ¾" x 2 ¾"
- 17 black squares 2 ¾" x 2 ¾"
- 1 black square 1 ½" x 1 ½"
- 1 green square 2 ¾" x 2 ¾"
- 1 black strip 1 ½" x 14"
- 1 black strip 1 ¾" x 14"

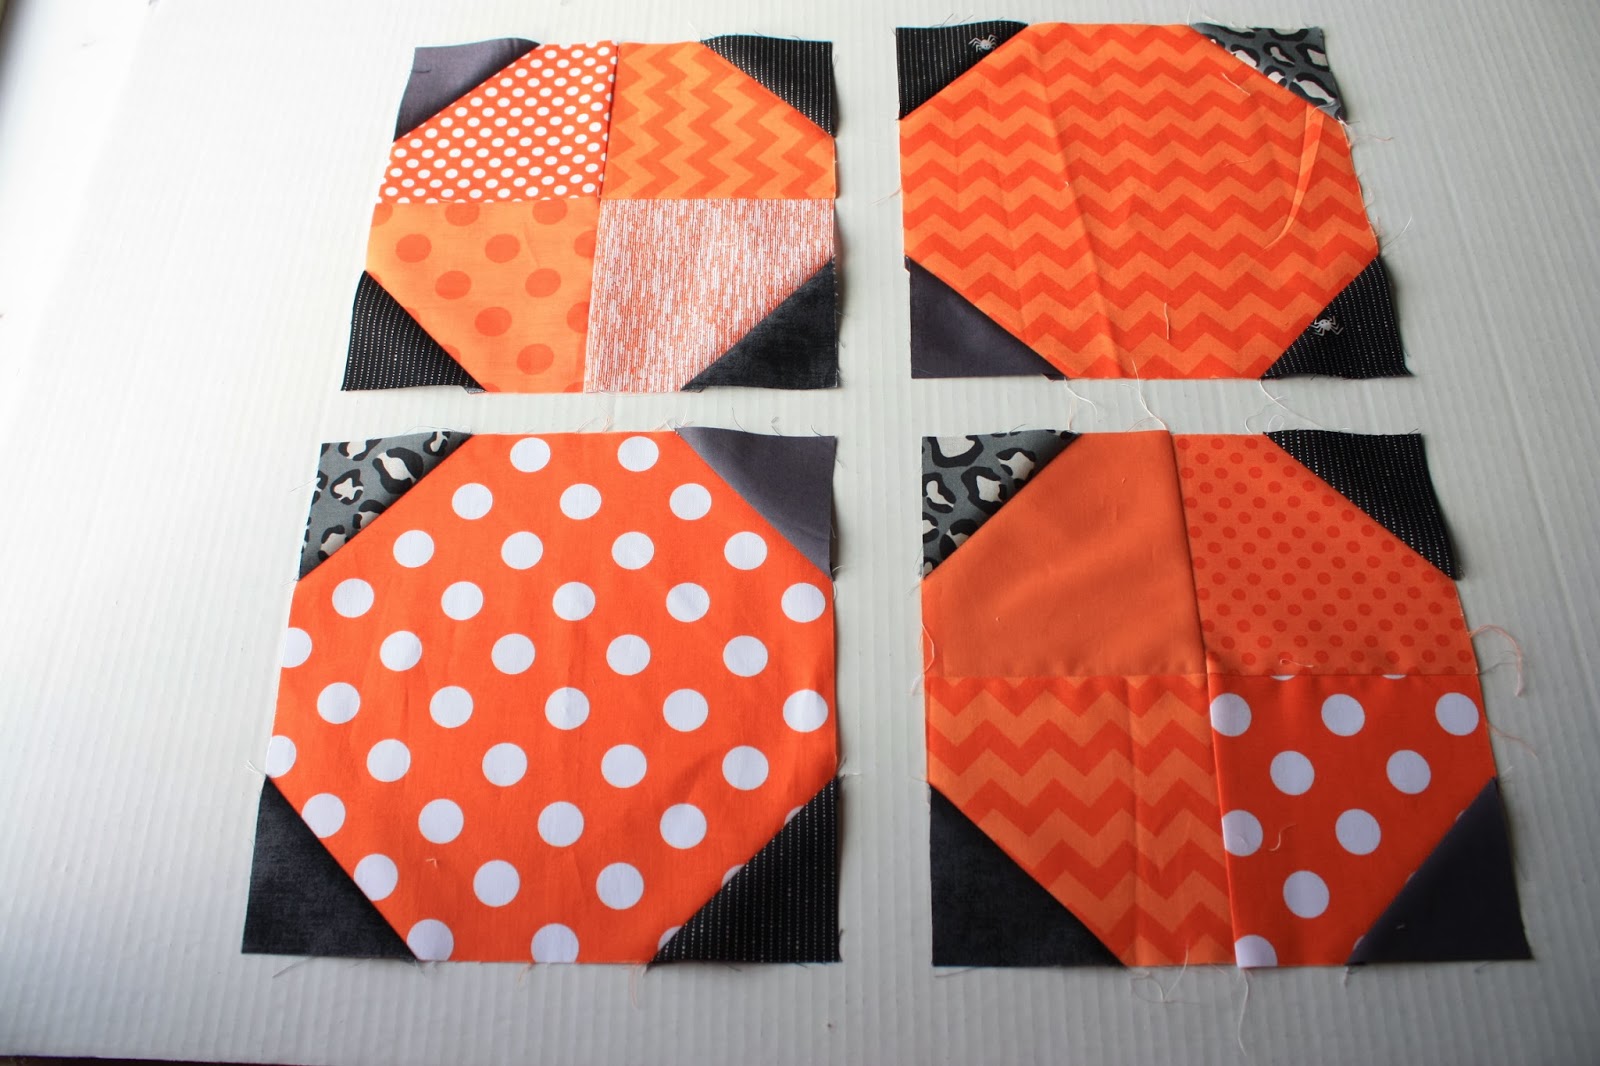
To create the 16-patch pumpkin block begin by matching 4 black 2 ¾" x 2 ¾" squares with 4 orange 2 ¾" x 2 ¾" squares. Draw a diagonal line on the back of the orange squares and sew pairs together directly on the line. Trim ¼" away from the seam to create a ¼" seam allowance and press blocks open, pressing seams toward the black.
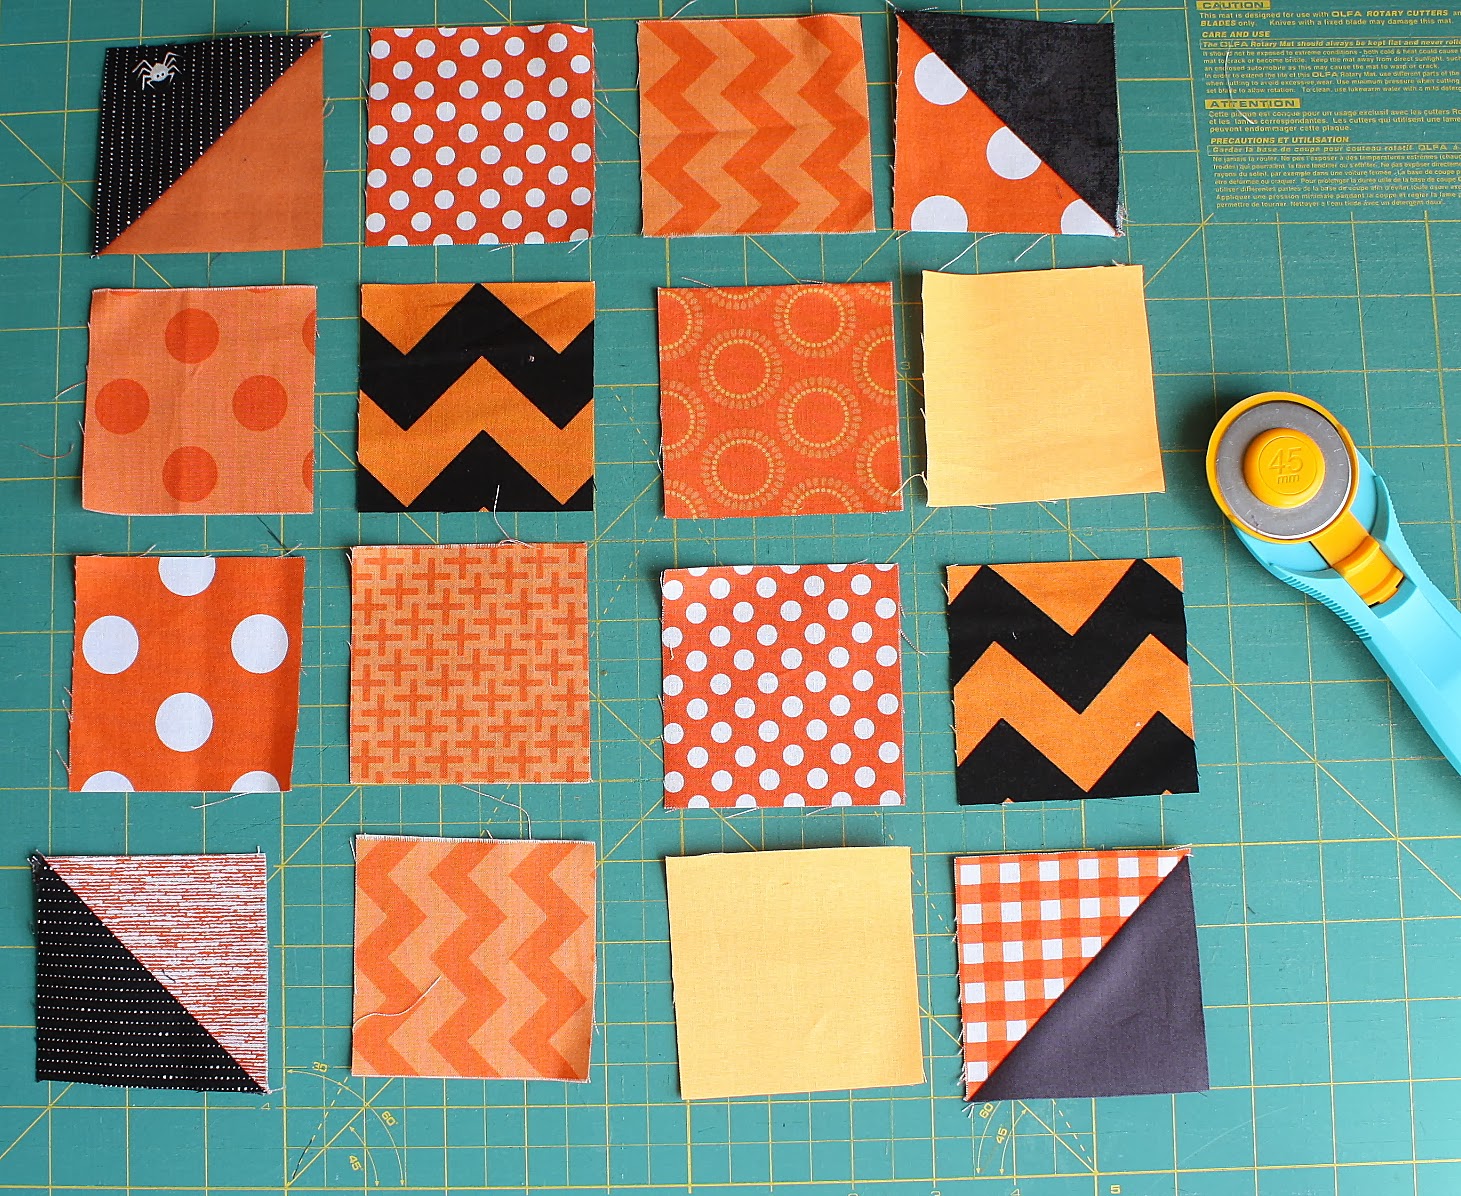
Layout remaining orange 2 ¾" squares with new half-square-triangle orange and black blocks into four rows of four.
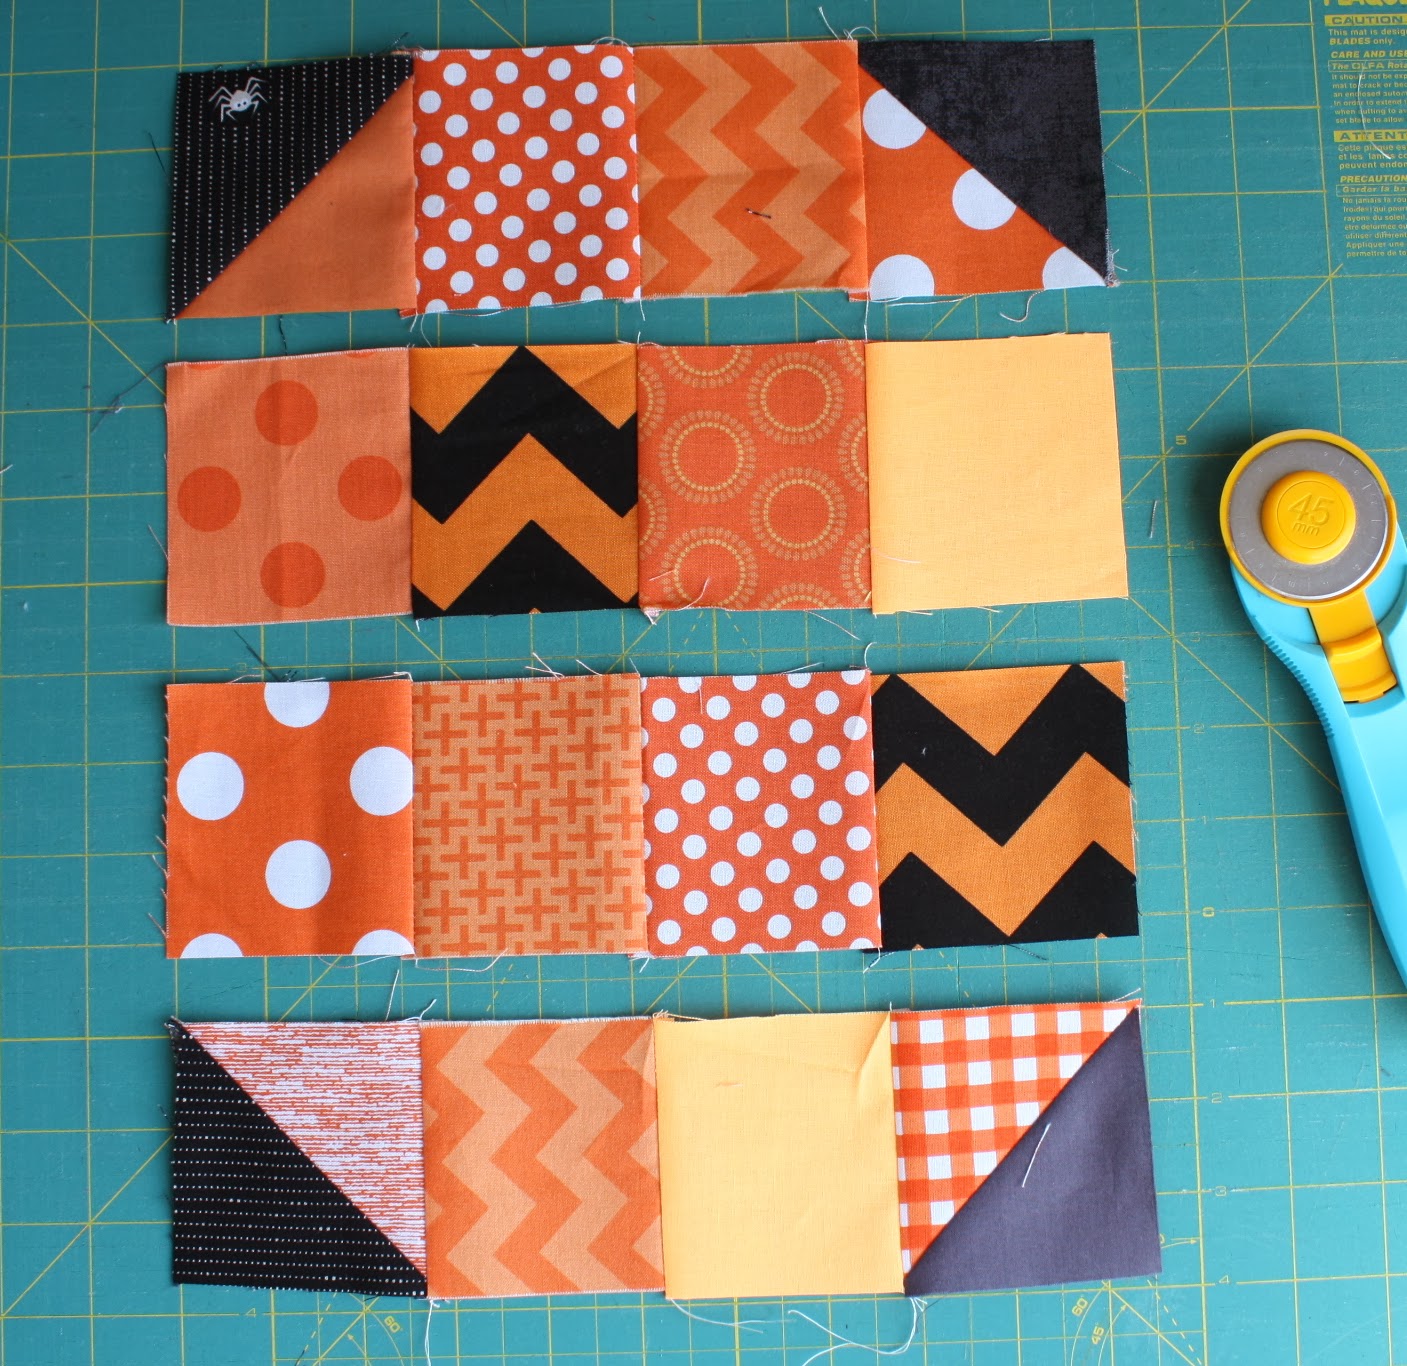
Sew together into four rows, pressing seams in alternating directions, every other row.

Sew four rows together.
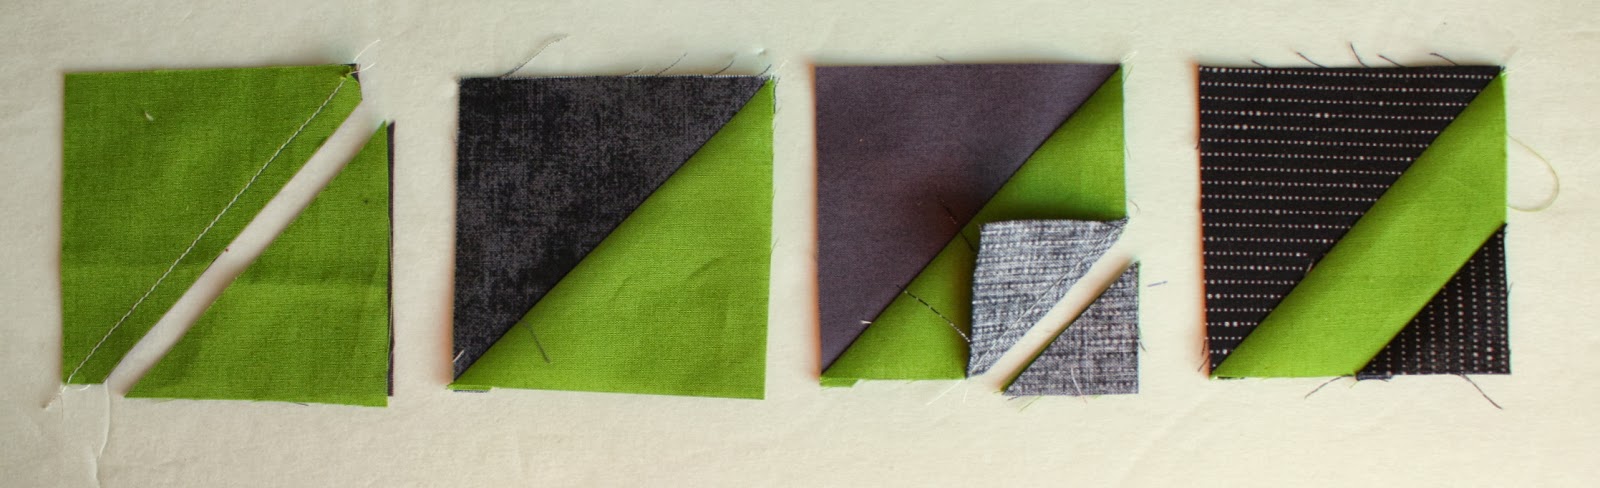
To create green stem blocks, match-up a green 2 ¾" block with a black 2 ¾" block. Draw a diagonal line on the back of the green and sew directly on the line. Trim ¼" away and press block open. Match up a 1 ½" square in the corner of the green triangle. Draw a diagonal line and sew directly on the line. Trim ¼" away and press corner open. Repeat four times to make 5 stem blocks.
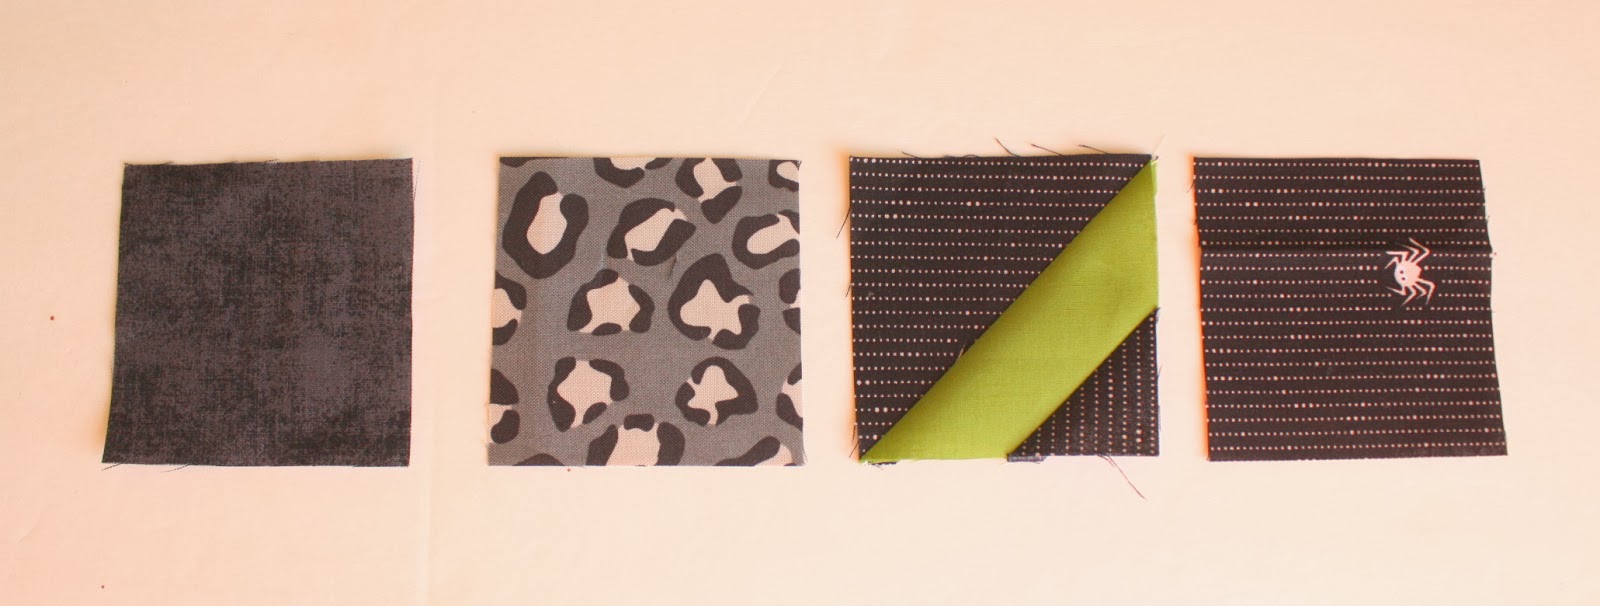
To create stem row, use 3 other black 2 ¾" squares and sew together into a row of four. Press seams all one direction.
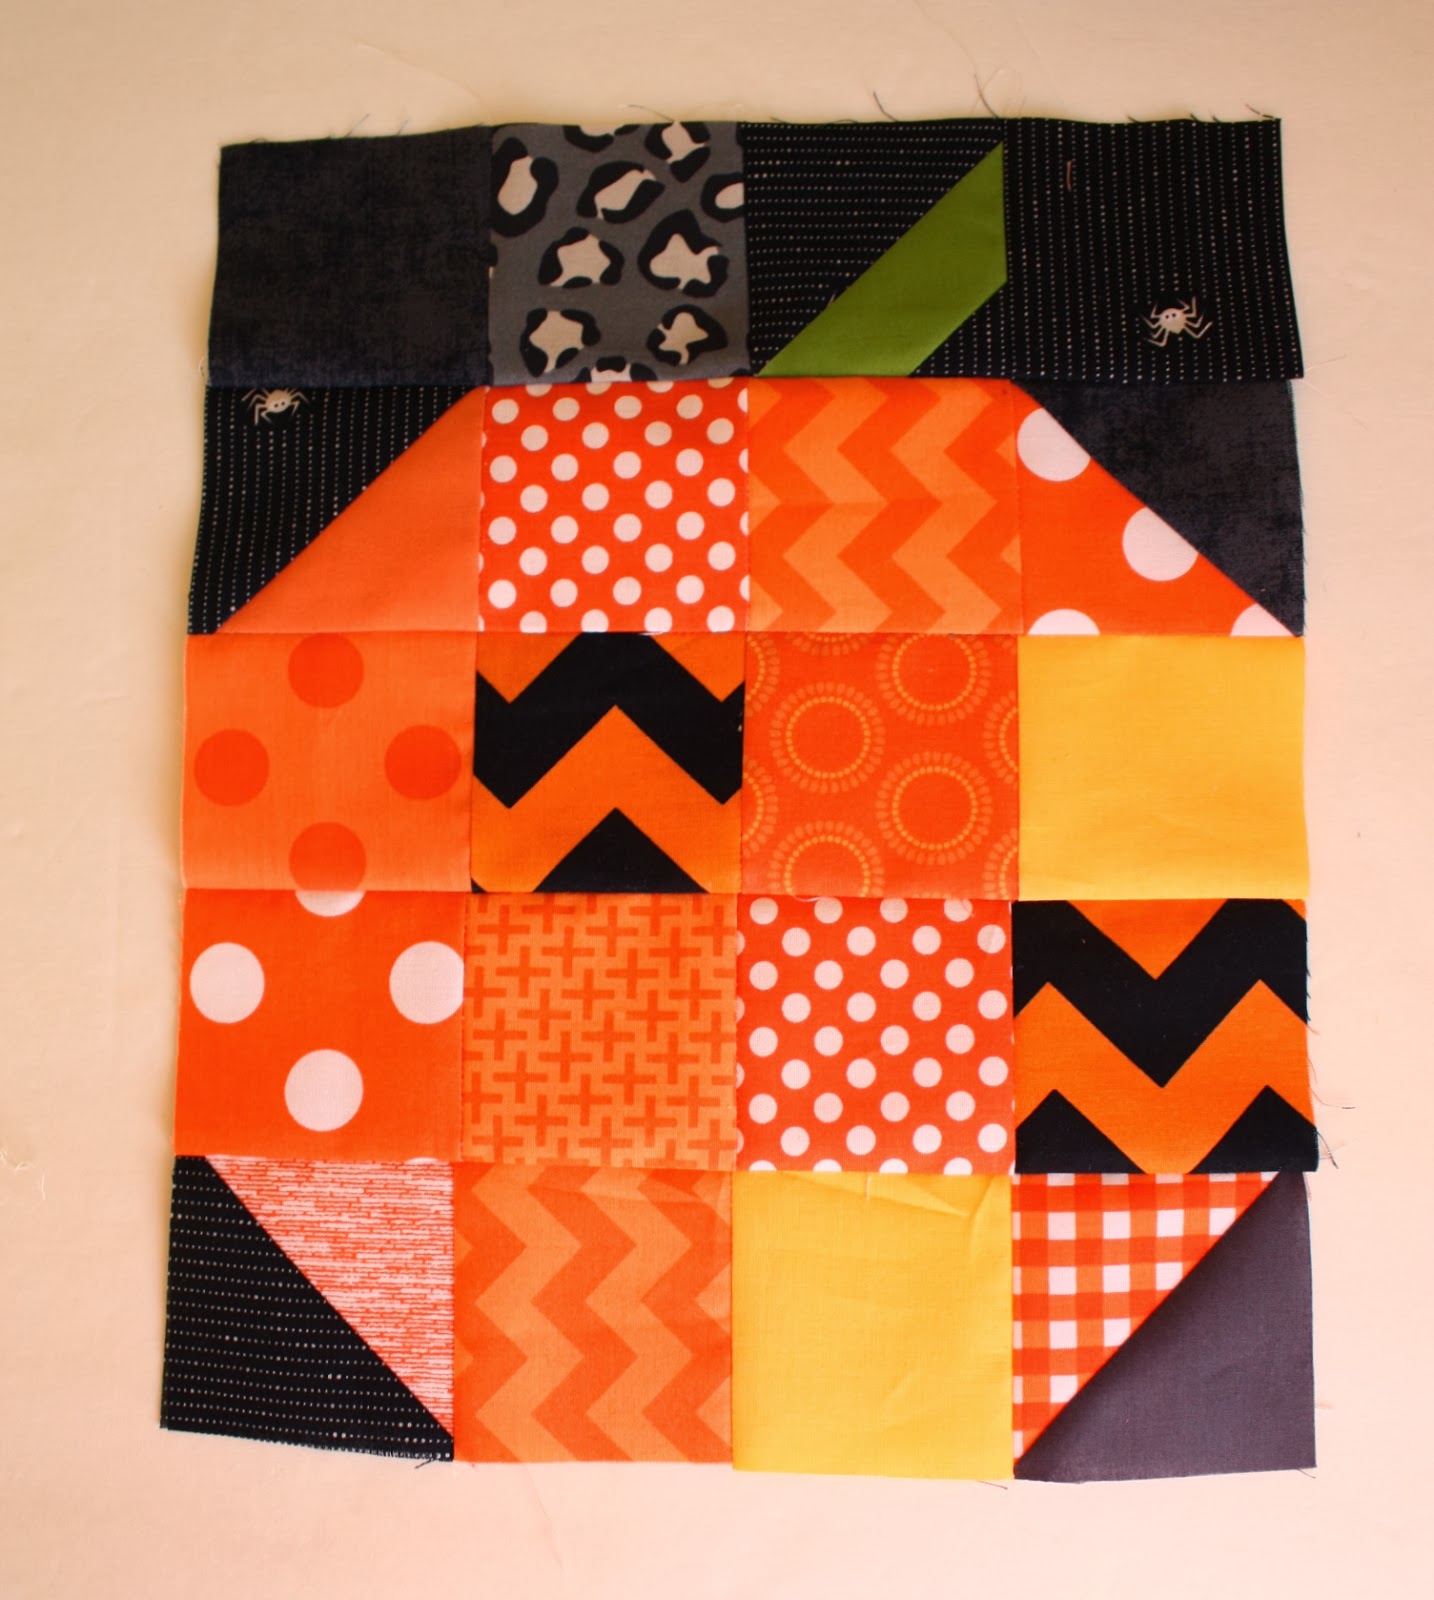
Attach stem rows to the 'top' of each of the 5 pumpkin blocks.
Sew two rows of five 2 ¾" x 2 ¾" black squares. Sew to both sides of the pumpkin block. Add black 1 ½" x 14" strip to the top of the block and black 1 ¾" strip to the bottom of the block.
To use as a pillow, use your favorite pillow finishing method and stuff with a 14" x 14" pillow form.

For the white pumpkin patchwork pillow I wanted a slightly larger size so I added an additional border to the outside for a 16" x 16" pillow.
I cut 2 outside border strips 2" x 14" (for the sides) an 2 strips 2" x 16 ½" for the top and bottom.
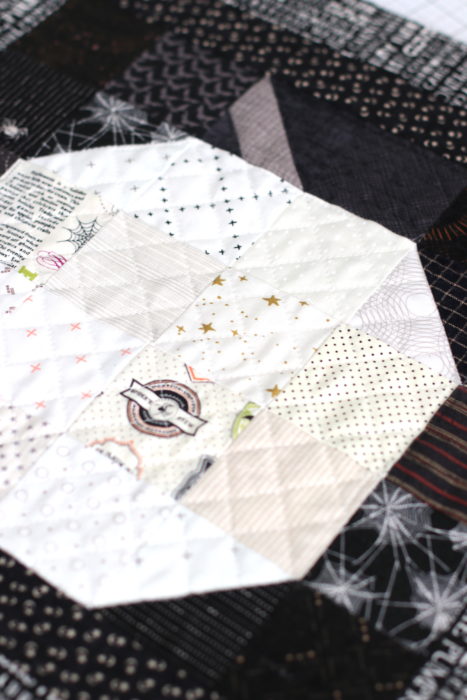
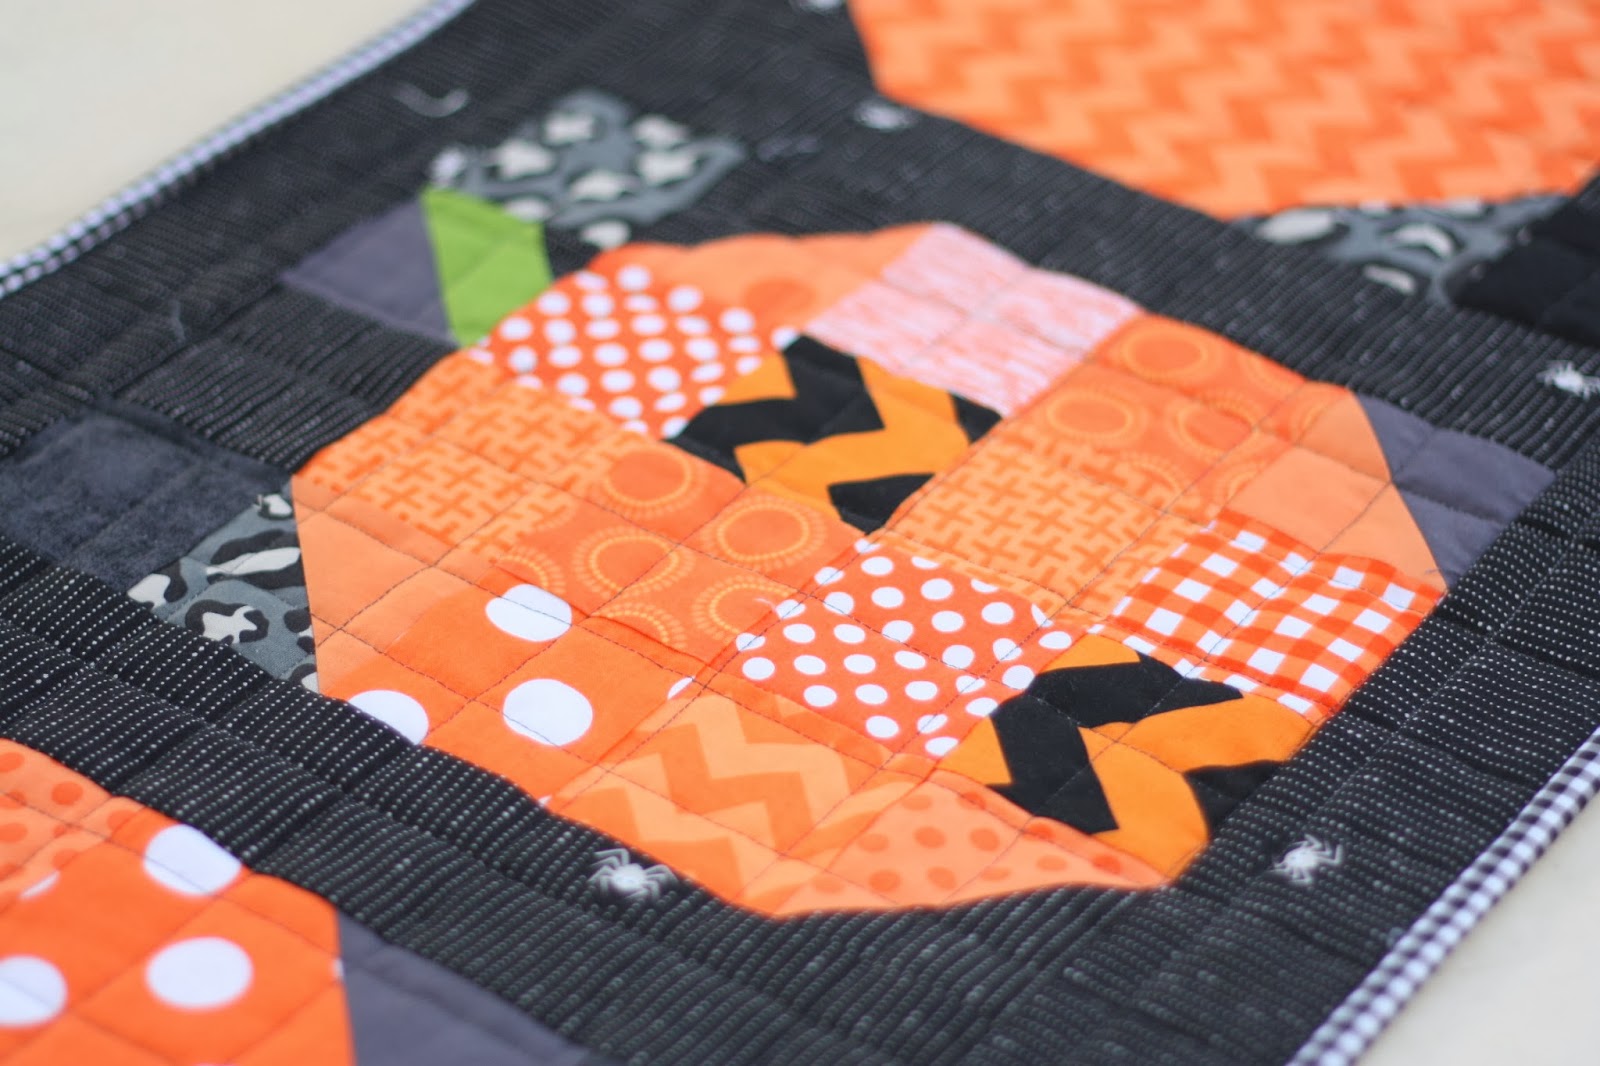
To give the pumpkin a little texture, I quilted the patchwork block on a scrap of batting. Here are some simple machine quilting basics. If you choose to add some quilting, do this step before you make it into a pillow. Use a batting scrap bigger than the block itself while you add the quilting and then trim the sides so that you have clean edges.
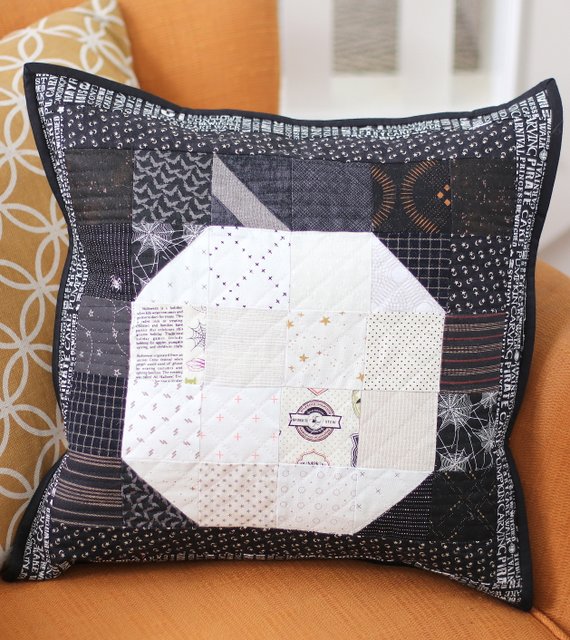
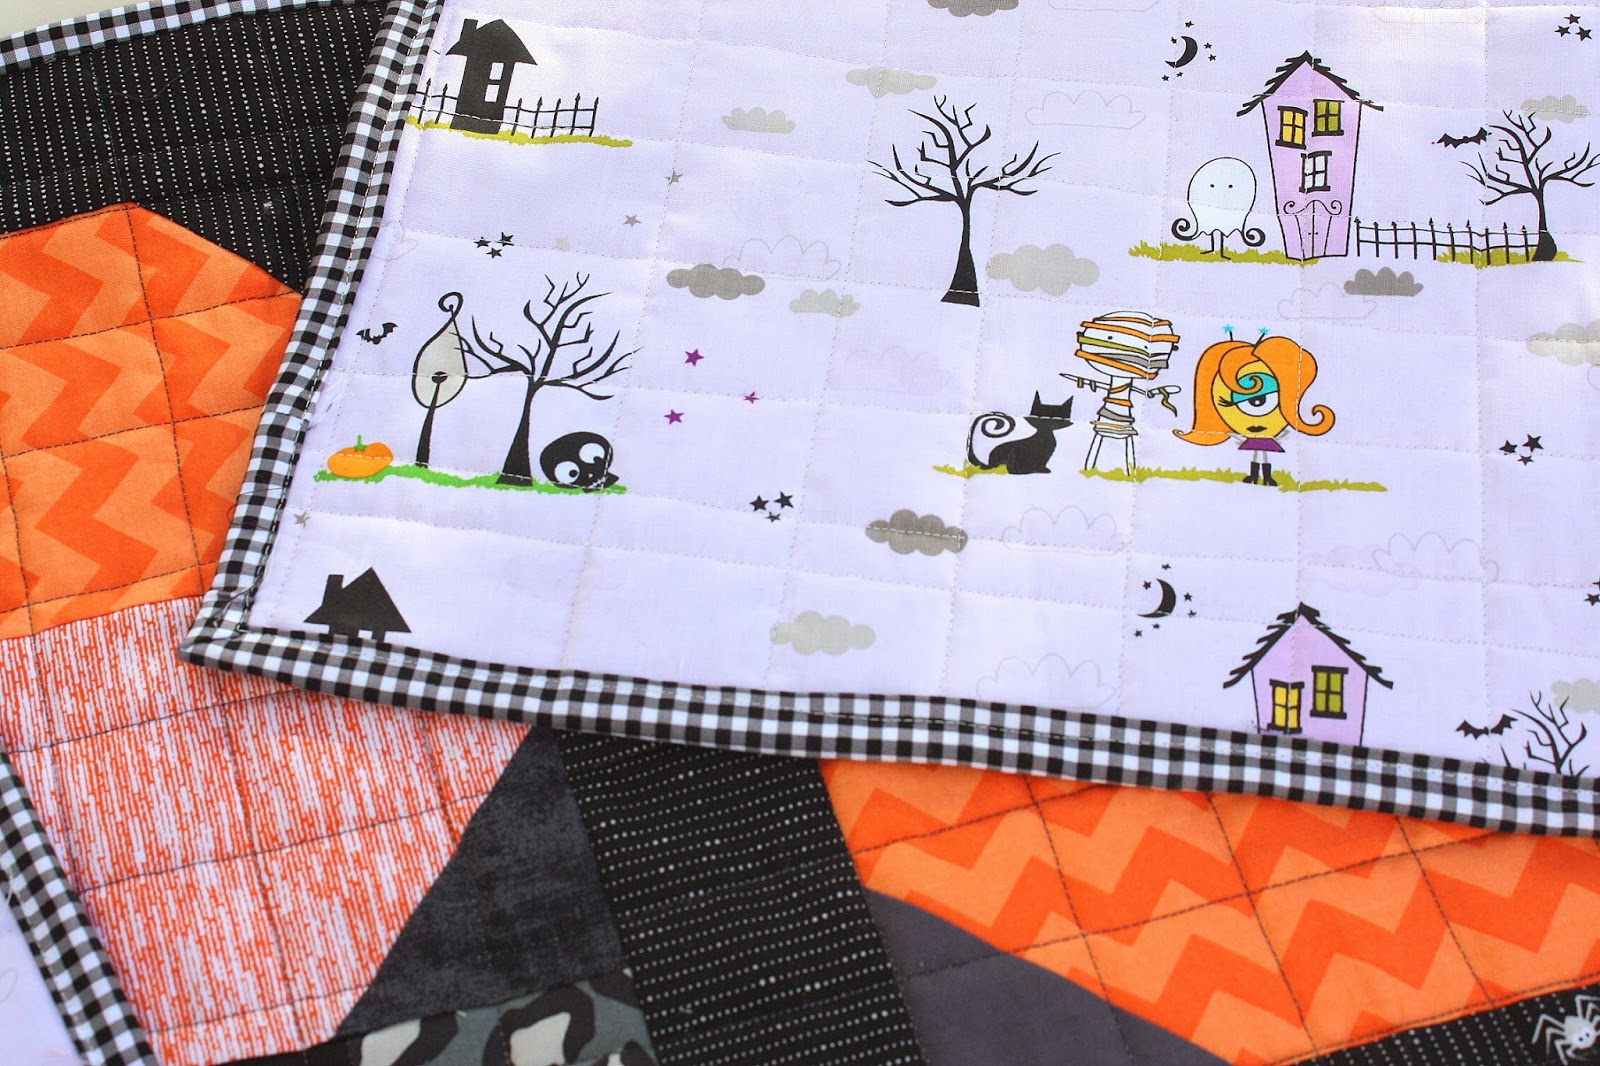
To finish the pillow I used this method for cutting a back and adding outside binding. I love the way the black binding around the edge pops!
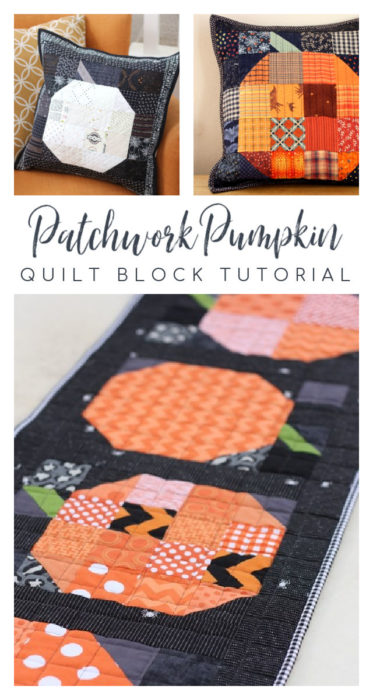
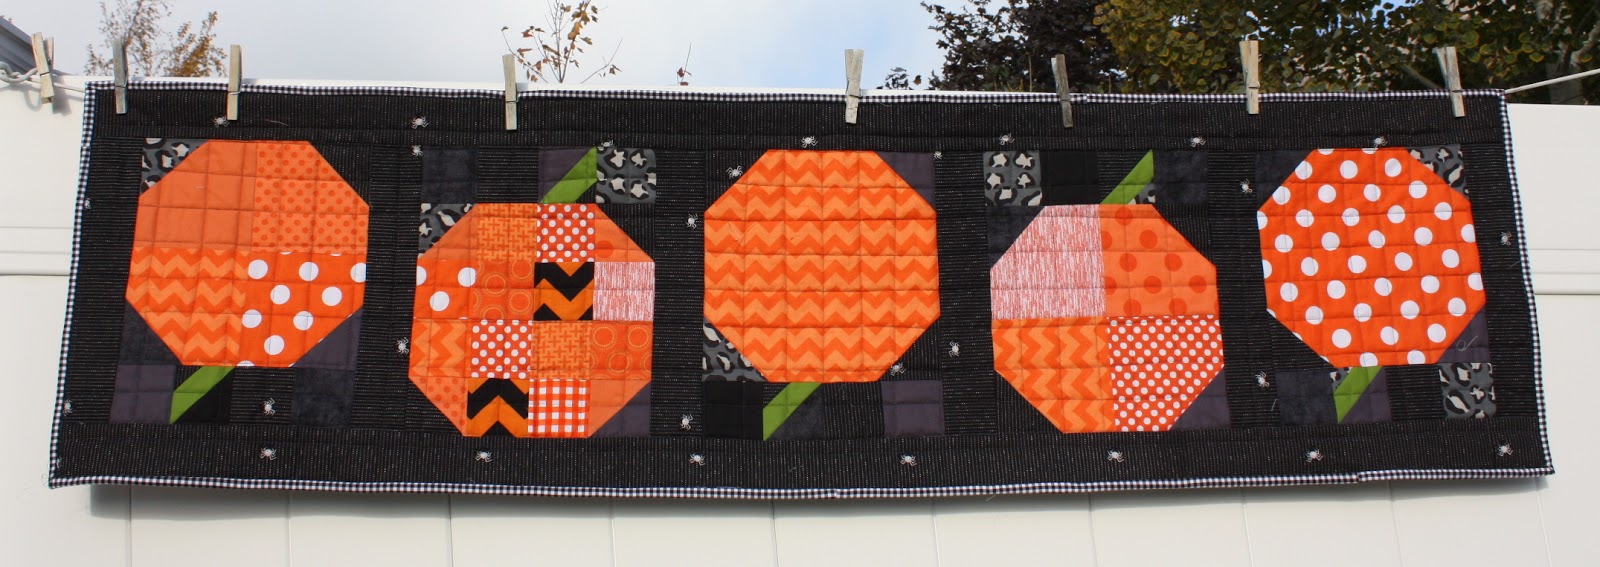
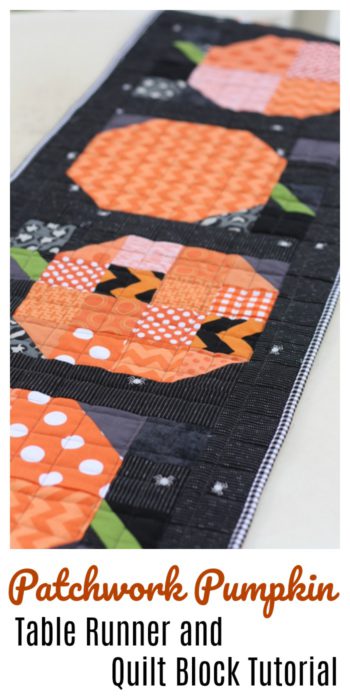
This patchwork pumpkin quilt block is super versatile. Here's an option for making a patchwork pumpkin Halloween table runner.
The table runner tutorial includes a variety of styles of pumpkin blocks to make it an even scrappier and unpredictable patch of pumpkins, good for showing off larger pumpkin prints as well. This row version could be easily replicated to make an entire quilt.
Table Runner Tutorial 15 ¼" x 57 ½"
Fabric Requirements for the table runner:
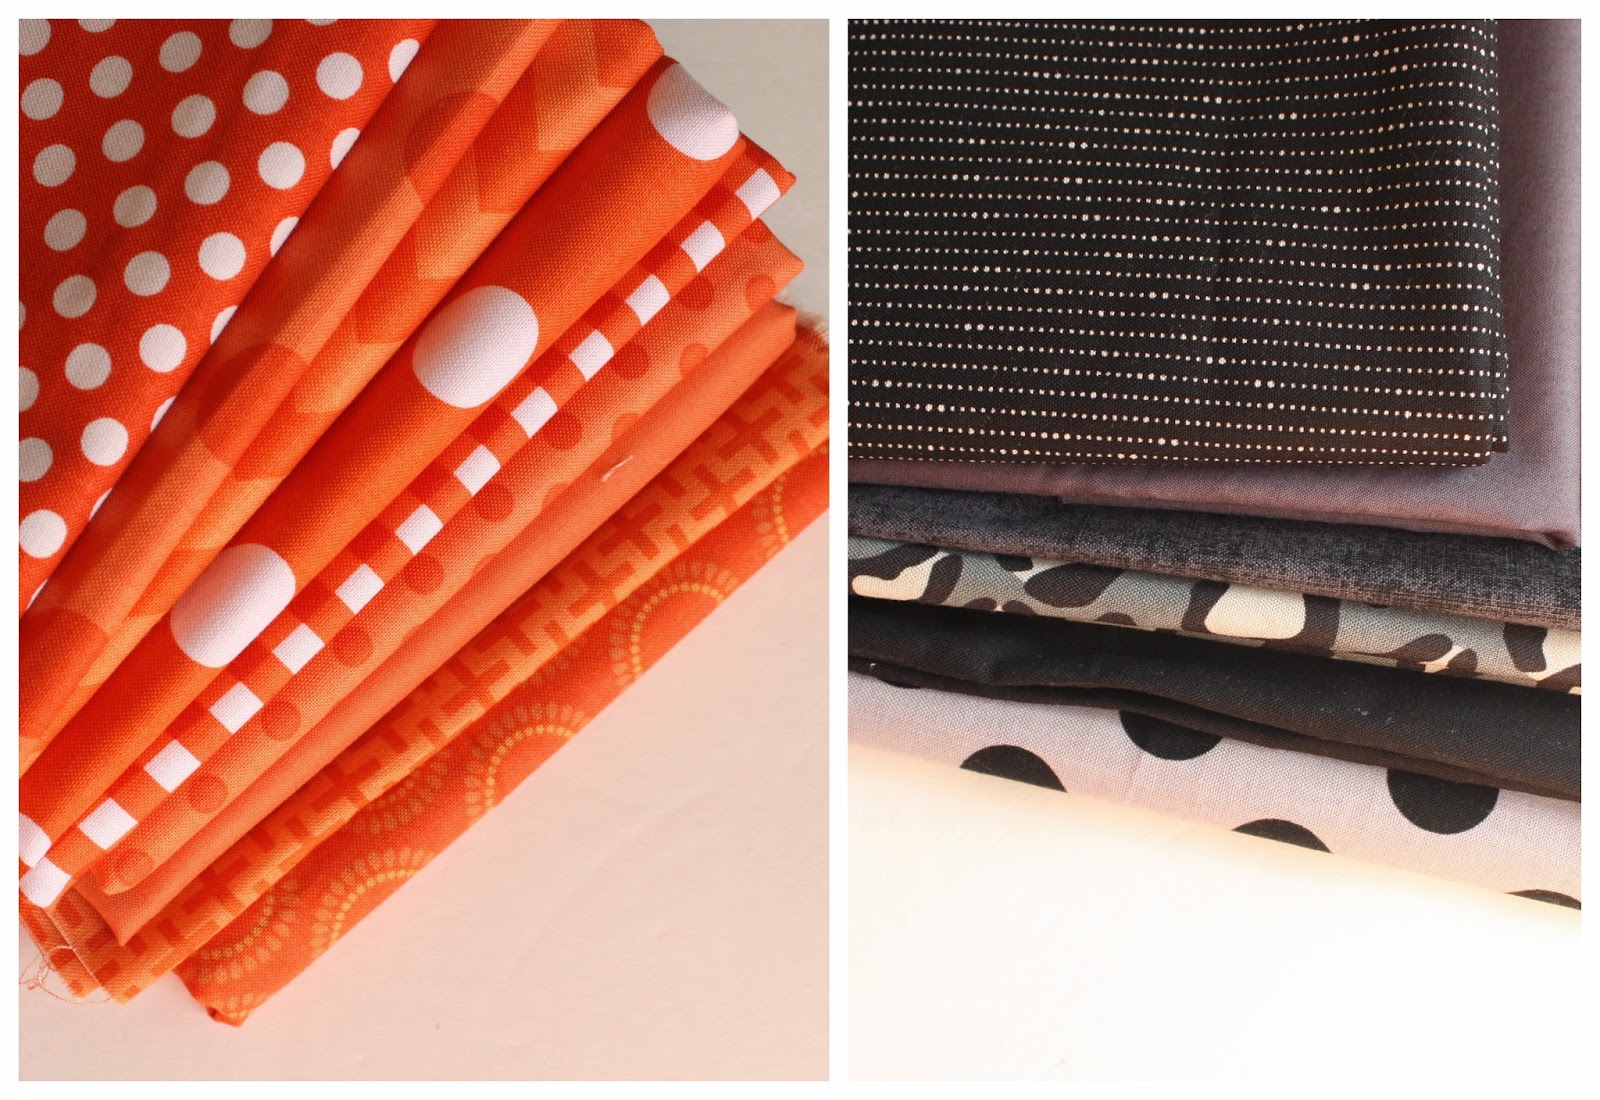
- 4-5 assorted orange and black fat quarters or assorted scraps
- Sashing ½ yard black print (I used the black spiders from Too Cute to Spook)
- Green solid: ⅛ yard
- Gingham Binding: ⅜ yard
- Backing: 1 ⅛ yard
Cutting
From assorted oranges cut:
2 squares 9 ½" x 9 ½"
8 squares 5" x 5"
16 squares 2 ¾" x 2 ¾"
From black sashing yardage cut:
5 strips 2 ½" x 42". Sub cut 2 strips into 6 pieces 2 ½" x 11 ¾". Use remaining strips to create two 2 ½" x 57 ½" border strips.
From black scraps (including sashing print) cut:
40 squares 2 ¾" x 2 ¾"
5 squares 1 ½" x 1 ½"
From green cut:
5 squares 2 ¾" x 2 ¾"
From binding cut 4 strips 2 ½" x 42"
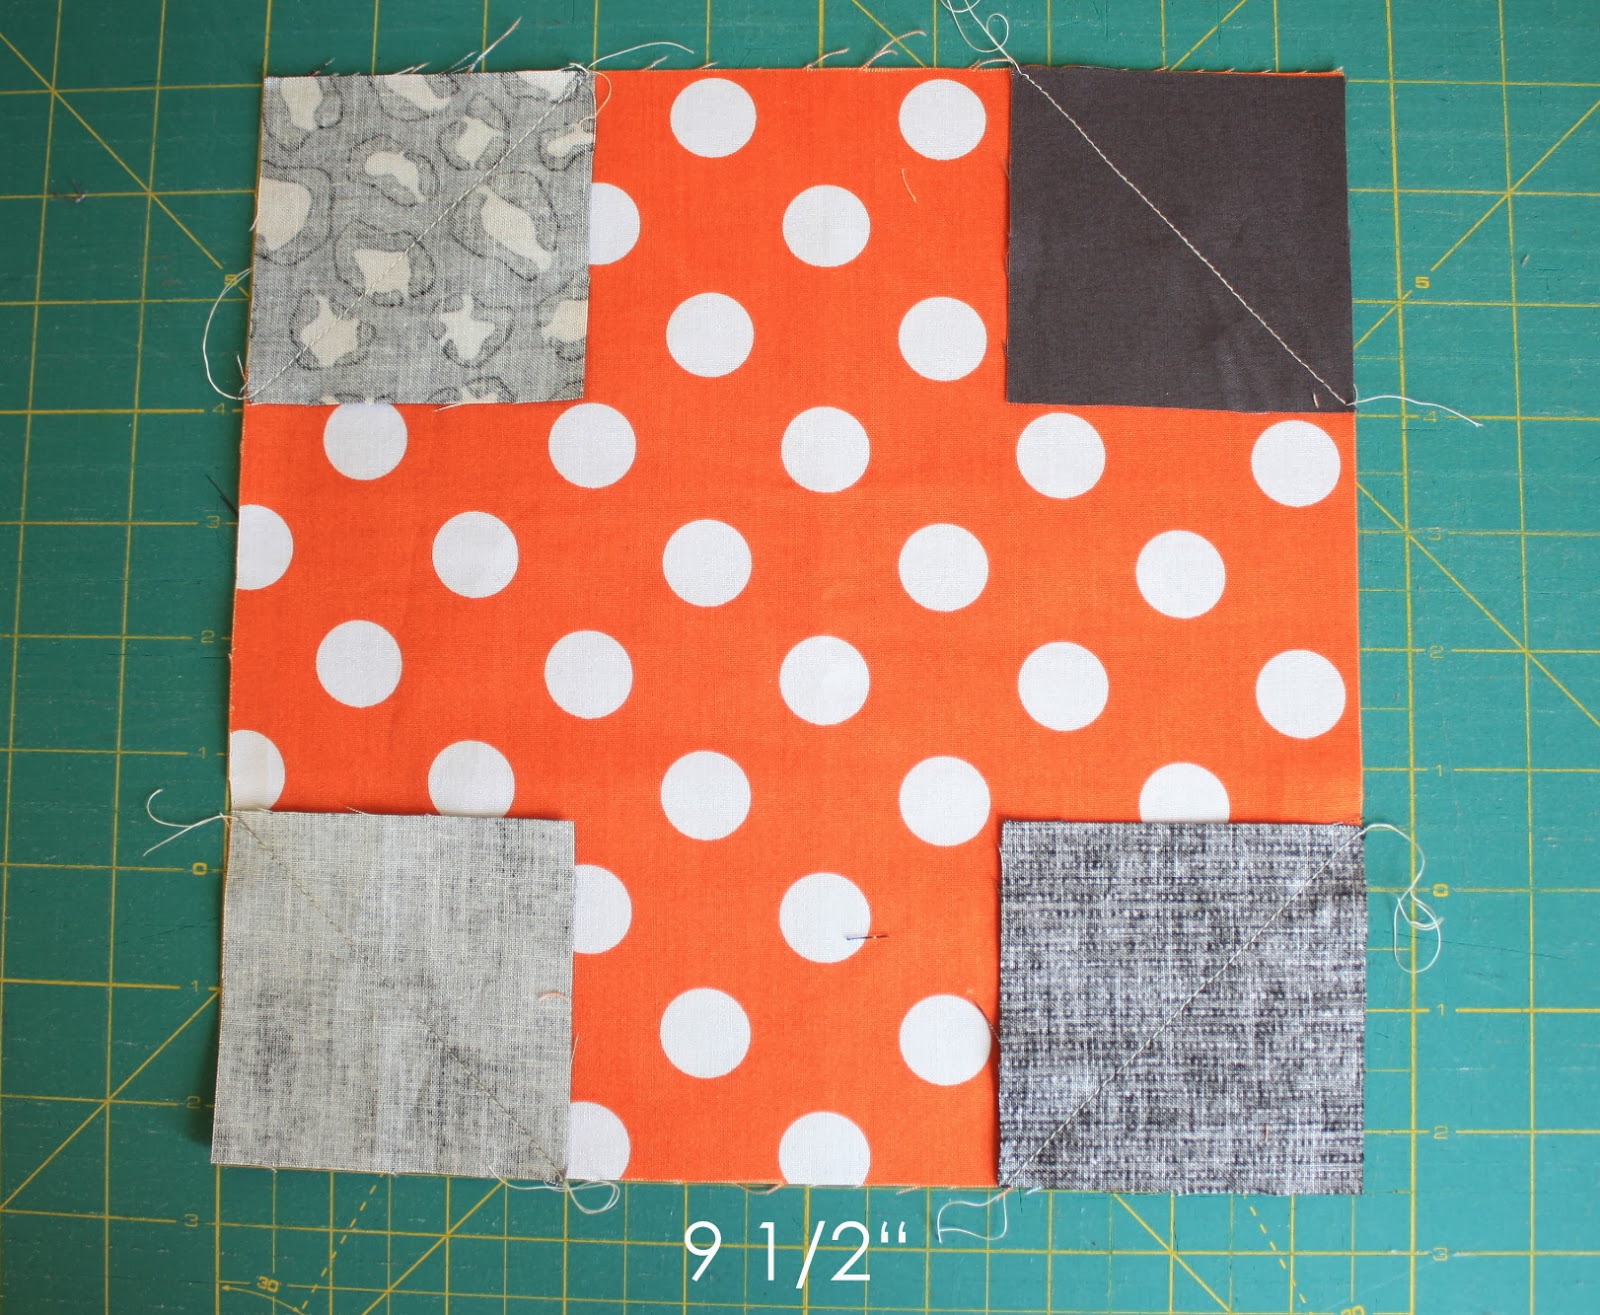
Take four of the 2 ¾" x 2 ¾" black squares and draw one diagonal line across them. Place them in the four corners of the 9 ½" x 9 ½" orange blocks. Sew directly on all four diagonal lines.
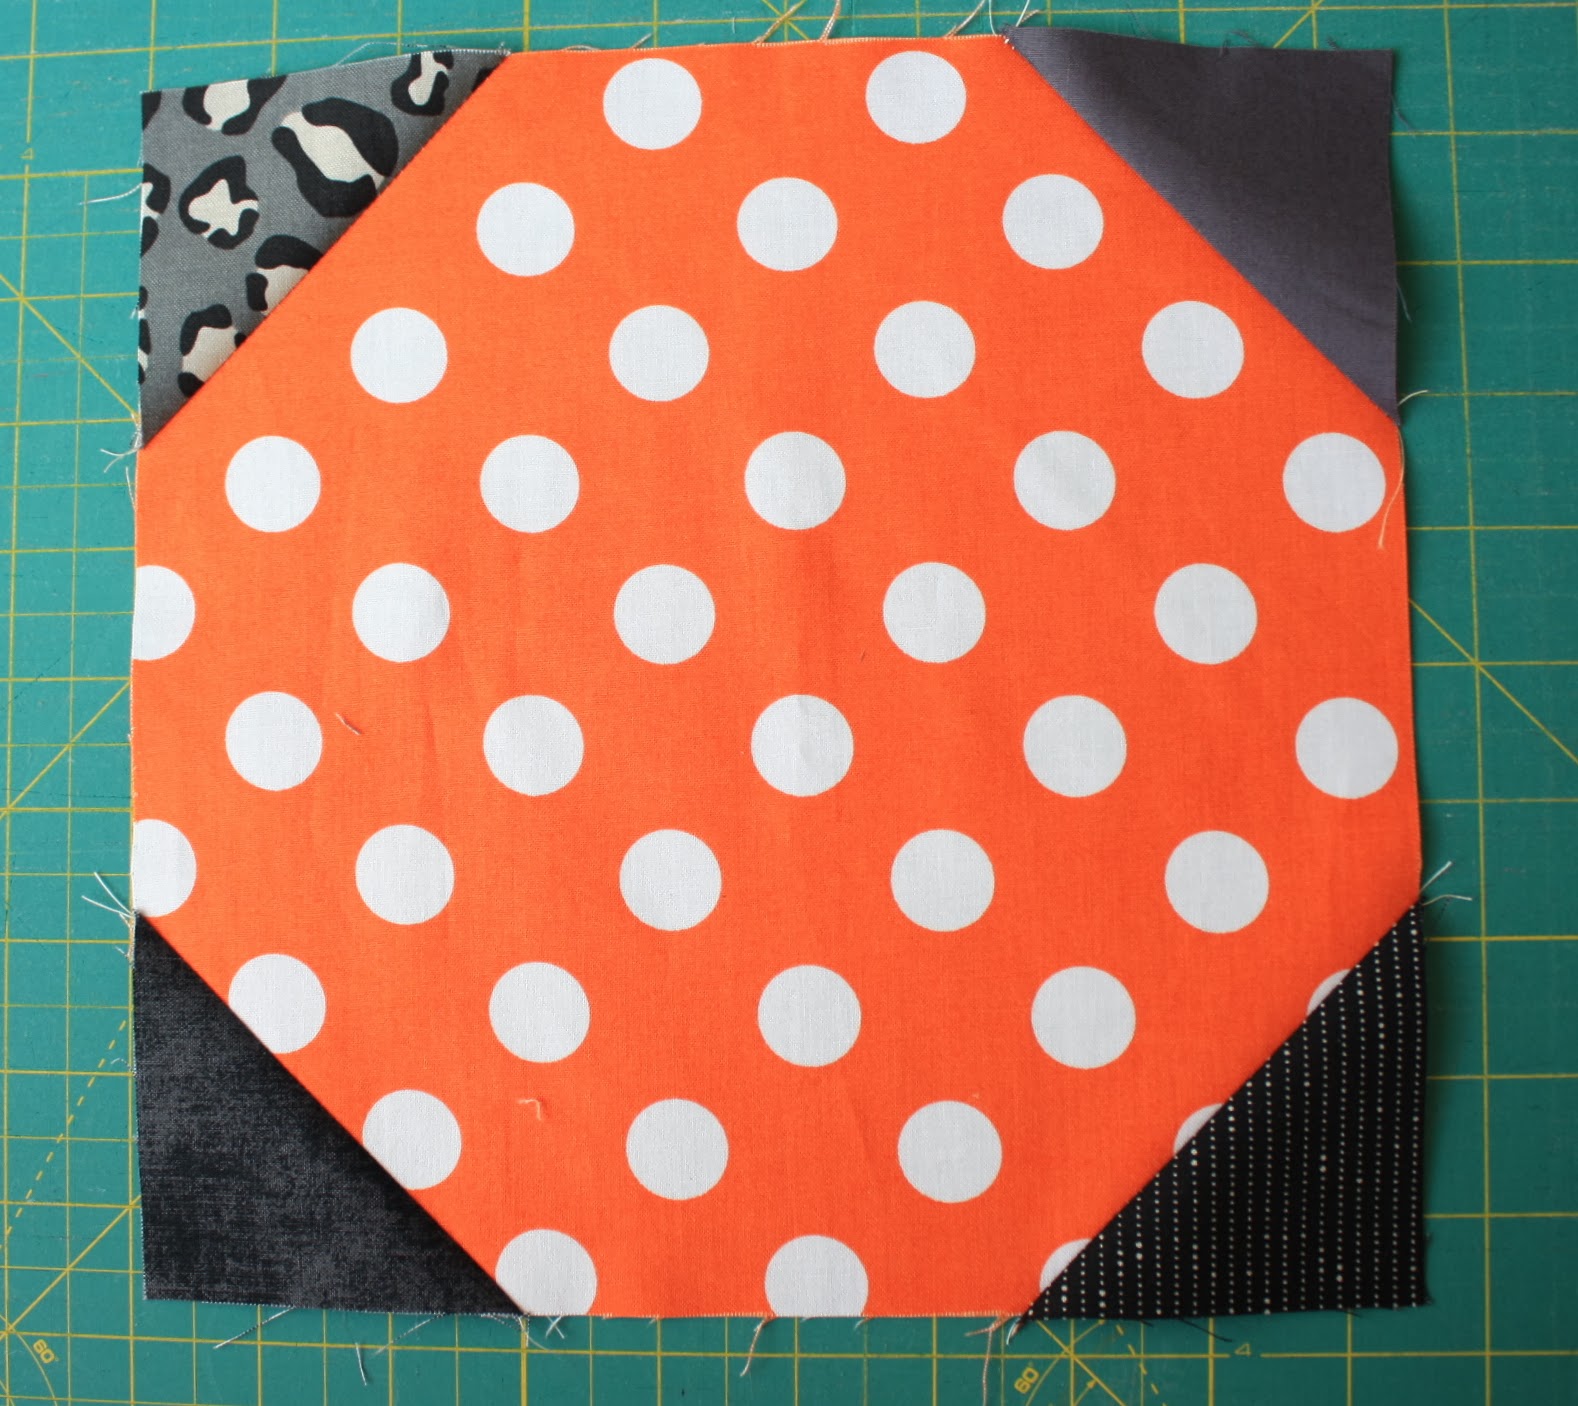
Trim ¼" away and press new corners open, pressing seams toward the black.
Sew 2 four-patch blocks with the eight 5" x 5" squares and add corners to those blocks as well.
To create the 16-patch pumpkin block begin by matching 4 black 2 ¾" x 2 ¾" squares with 4 orange 2 ¾" x 2 ¾" squares. Draw a diagonal line on the back of the orange squares and sew pairs together directly on the line. Trim ¼" away from the seam to create a ¼" seam allowance and press blocks open, pressing seams toward the black.
Layout remaining orange 2 ¾" squares with new half-square-triangle orange and black blocks into four rows of four.
Sew together into four rows, pressing seams in alternating directions, every other row.
Sew four rows together.
To create green stem blocks, match-up a green 2 ¾" block with a black 2 ¾" block. Draw a diagonal line on the back of the green and sew directly on the line. Trim ¼" away and press block open. Match up a 1 ½" square in the corner of the green triangle. Draw a diagonal line and sew directly on the line. Trim ¼" away and press corner open. Repeat four times to make 5 stem blocks.
To create stem row, use 3 other black 2 ¾" squares and sew together into a row of four. Press seams all one direction.
Attach stem rows to the 'top' of each of the 5 pumpkin blocks.
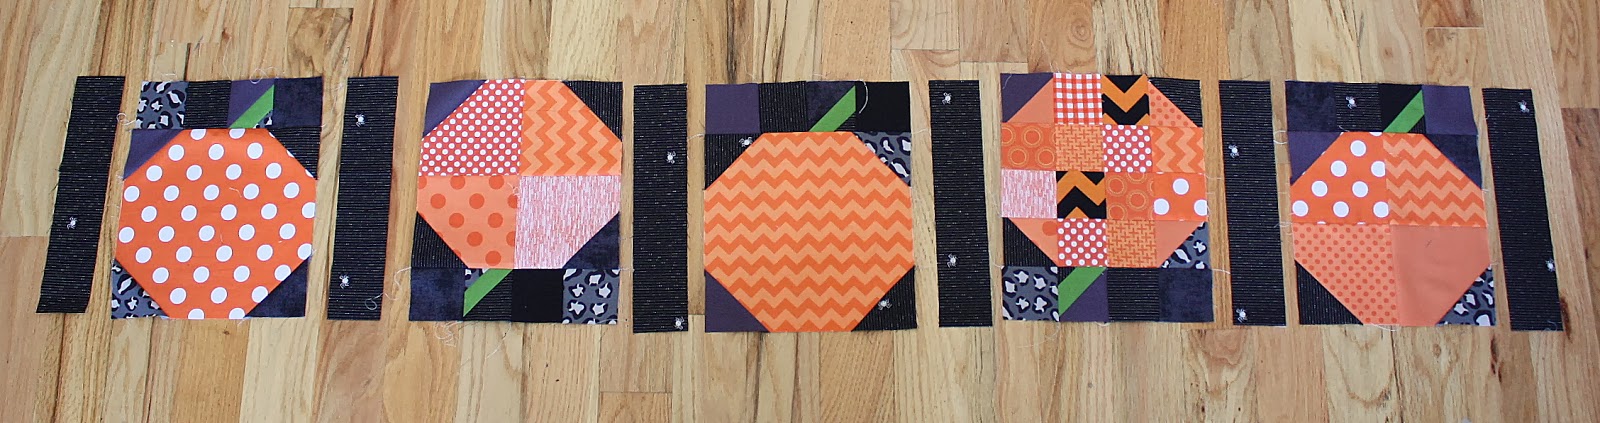
Layout five pumpkins in a row, rotating the second and the fourth the opposite direction. Sew the six 2 ½" x 11 ¾" strips alternating between the five pumpkins and at both ends. Press seams towards the sashing strips.

Add two 2 ½" x 60" strips to top and bottom of row of pumpkins. Press toward the sashing strips.
From backing fabric cut two 20" x 42" pieces and sew them together end to end. Trim backing to 20" x 66". Now you are ready to quilt. Baste top and bottom pieces with batting in between.
Quilt as desired. I used simple straight cross-hatching lines. (For more details about basting and quilting see this post.)
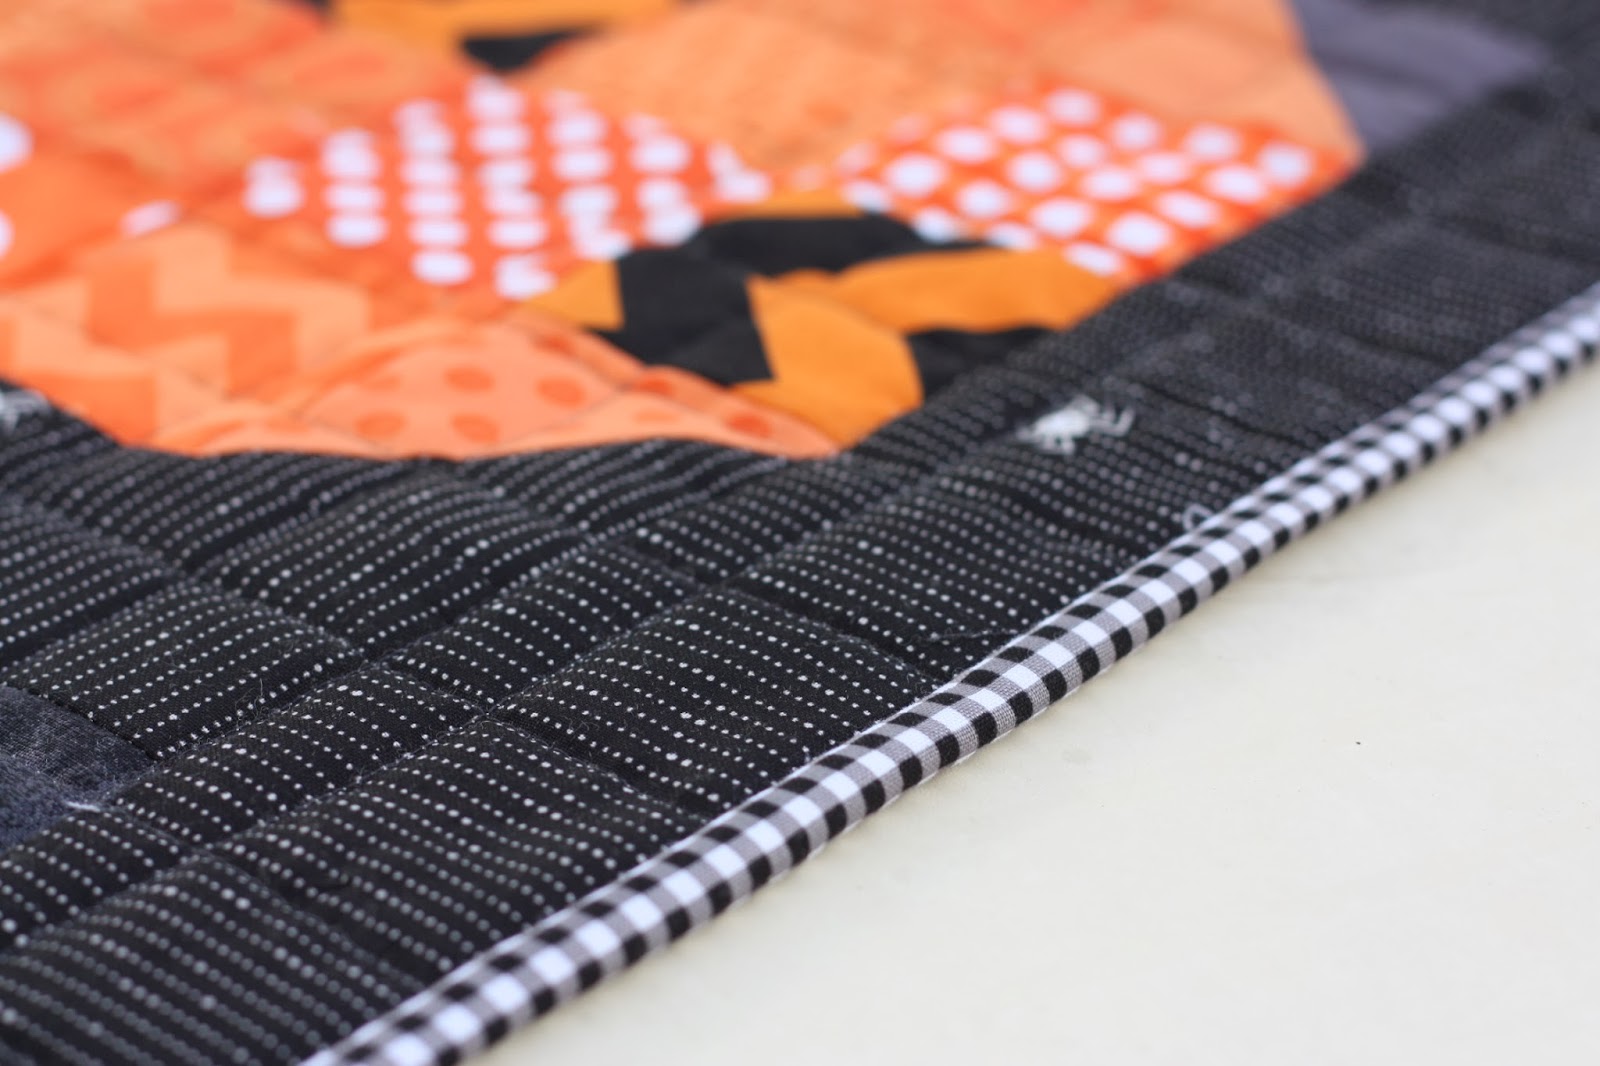
Sew four 2 ½" x 42" gingham strips together end to end to create binding. Binding a quilt tutorial here.
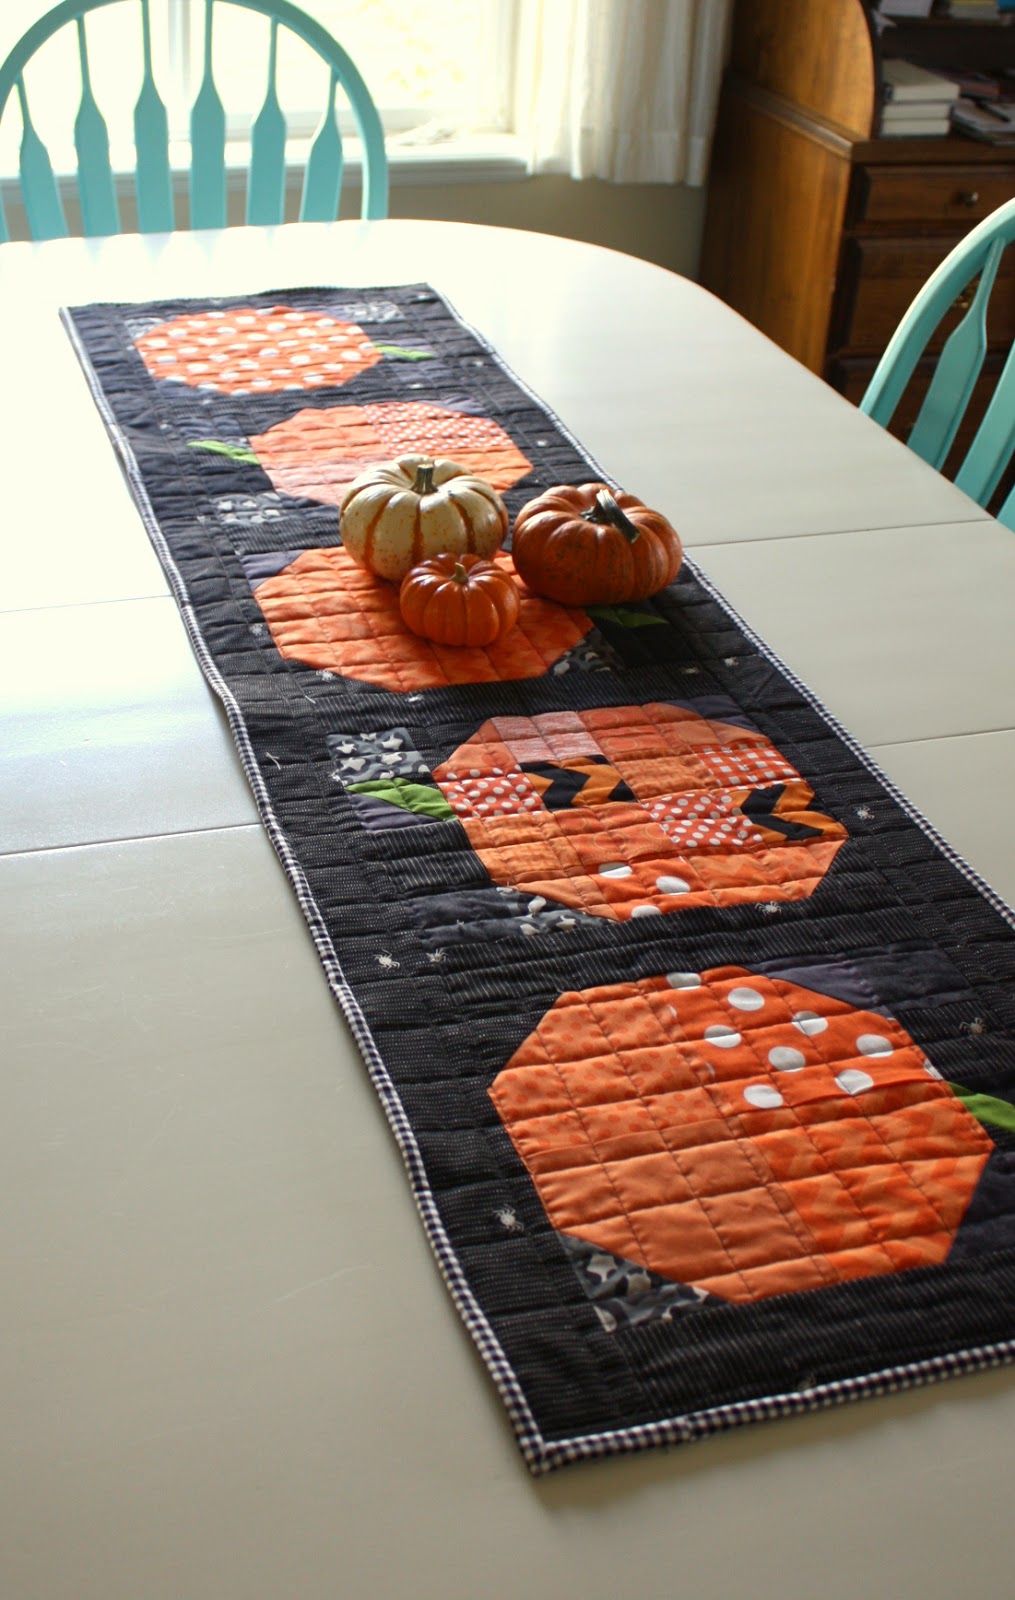
And there you go - a simple patchwork pumpkin Halloween quilt table runner. You could easily multiply this project by six, creating six rows to make a darling Halloween quilt.

Happy sewing and spooking!
If you would like a printable PDF version of this tutorial, you can find one here for $1.50.
If you're in the mood for more Fall and Halloween-inspired sewing projects, click here for a list of over 45 Fall Quilting and Sewing Projects.


Linda
Thank you! Love both patterns and really, really hope I can make myself do them both - no procrastination. 😉 Fabrics are just perfect.
Prima Donna
This is so cute! Thank you for sharing your wonderful tutorial.
Ina
dang! love that backing fabric with the cartoon zombies! ;p
Harrysmum
Thanks for the reminder - I made one of these last year, must go and get it out from it's hidey hole!
Karen
So fun! I love Halloween and need to put my collection of Halloween prints to use.
Teatime Creations
What fun projects. Thank you for the instructions.
Angie
These are just too cute for words---thanks so much for sharing the tutorials with us. 🙂
Sherry
Love the pillow block and the table runner. Thank you so much for the wonderful tutorials.
gibbygoo56
I absolutely adore your pillow cover. The fabrics used are rich and delicious. Thank you for sharing these tutorials. I always appreciate gorgeous inspiration. I love your style. Pamela
Charo
I love it!!!! Thanks so much for the tutorial!
Merrilee
Love! Must make- Halloween is my favorite holiday because it's my birthday too! Thanks for sharing this super cute pattern- very generous of you!
Anne Hayward
Lovely pumpkin table runner such a cute idea quilty hugs
KMSC
Thanks, Amy, for the tutorials! I love both your patterns.
Hilary
Super cute! Now I need to see how much orange I have in my stash 🙂
Irene spiezio
Wow thank you for this great tutorial I will definitely make this table runner.
MaterialGirlQuilts
Amy, this is just so cute!! Thanks for the tutorial and now I need to see if I have enough dark prints for a background so I can make my own...I know I have plenty of orange :)<br />Amanda
Jessica D.
I LOVE all things Pumpkin - cute pattern - I'm saving this one! Thanks for sharing!<br />https://catandrabbitdesigns.blogspot.com/
Billy'sgirl
Love the pillow and table runner! I probably decorate almost as much for Halloween as I do for Christmas! Thanks for the pretty ideas.
Billy'sgirl
I forgot to mention how much I enjoy your blog. I'm a recent fan, after hearing you on Pat Sloan, and purchasing your book, which I love!
Kenzi
Thanks for the cute tutorial! I made the pumpkin top for a pillow that I just need to finish up and it looks adorable! I don't have a current blog to link up, but I did post a pic on Instagram if you're interested. I'm a private user, so you'd have to request to follow to see it I think (kenzimhardy). Thanks again! And I just love your blog!
Lynda (Granny K)
Thank you for this tutorial. I have just the right fabrics to make the cushion, it looks like a fun make!
Carla
That pumkin tutorial is too cute. Thanks for sharing
Pat Cook
I love your patchwork pumpkins, but as I read through your directions, it became apparent that you had inadvertently posted some misleading directions. When you were explaining how to make the half square triangles, you said to put the two squares together, draw the diagonal from corner to corner, and then cut 1/4" on each side of that line. For true beginners that would be confusing because they'd have 4 little triangles with nothing to press open. Didn't you really mean to SEW 1/4" on each side of that diagonal and then cut on the diagonal? If I have misunderstood your directions, please accept my apology, but I thought you might want to correct them for future users who are truly beginners and have no prior knowledge of making half square triangles. Thanks for the very cute pattern!
Pat
Amy Smart
Thanks so much for your comment! I always appreciate eagle eyes to catch errors when I may have been writing/publishing too quickly. (Which is more often than I'd like to admit.)
I went back to double check the directions - I'm hoping I didn't miss it again. This HST block, only makes one block (rather than two at once). So you're sewing directing on the middle diagonal line and trimming a 1/4" away. I added a few words to make that a little more clear. Let me know if I'm still missing the part you are referring to. Thanks for your help!
Amy
vashonhavurah
Love the pumpkins! I'm making a placemat from a single pumpkin block for my granddaughter who turns 3 in October. Thanks so much for this perfect and simple design!
Needle and Foot
Hi Amy: I am hosting Handmade Halloween this week over at Needle and Foot where bloggers are linking all sort of Halloween themed projects. I would love to have you link this post up. (I know it isn't a brand new post but that is fine.) Here is the URL, if you'd like to participate.
https://needleandfoot.com/2016/10/04/halloween-linky-party/
Also you recently wrote a post shariing a round up of ideas and that would be a great one to link up as well. 🙂
Stephanie
Adorable Patchwork Pillow. But I especially love your tablerunner. I love the orange and black chevron fabric that you used, it reminds me of Charlie Brown's sweater and of course, "the Great Pumpkin".
Amy Smart
Yes! The Great Pumpkin is one of my favorites. A classic!
Lavender Dreams
You do such a great tutorial. I'm not a quilter but I think I could figure out this! Thank you so much! Happy Halloween! Hugs, Diane
joannequilts
These are adorable and thanks for the tutorials. I started pulling fabrics last night and think I'll have time to get these sewn well before Halloween. Thanks!
AnnieO
Thanks for the pattern and tutorial! Darling runner and pillow, great way to use up scraps.
Karen
Your pumpkins are sew cute, Amy! I love those orange fabrics...the polka dot and the gingham are my favorites!
Sheryl
I love your darling pumpkin blocks, especially the white one! I think your measurements are wrong for the squares, however (probably just a typo). The HST blocks need to be 7/8” larger than the 2-3/4” squares. I’d just make them an inch bigger and trim them down to 2-3/4” HST. Thank you for the pattern/tutorials!
Sharon
Love this! Thanks. ❣️