
Hello friends! I've been traveling and adjusting to new summer schedules, so luckily for all of us, it's perfect timing for another adorable guest post. This week the uber-talented Nadra Ridgeway of Ellis and Higgs is sharing a tutorial for a darling quilted Strawberry coaster. This little project is perfect for a quick summer project or an adorable hostess gift. I always am inspired by Nadra's eye for detail, but at the same time shows us how simple this project is to put together!
Quilted Strawberry Coaster Tutorial
Hi, it's Nadra here from ellis & higgs and I am so excited to be here guest posting on Amy's blog today! I design fabric collections for Riley Blake Designs and Penny Rose Fabrics, create quilt and sewing patterns which I sell in my Etsy Shop and I love teaching my passion!
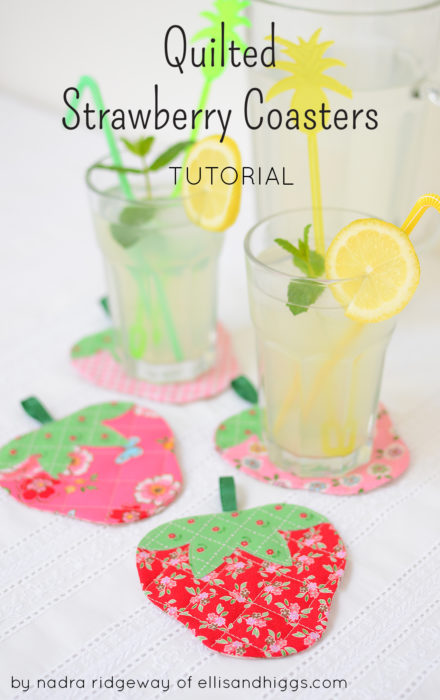
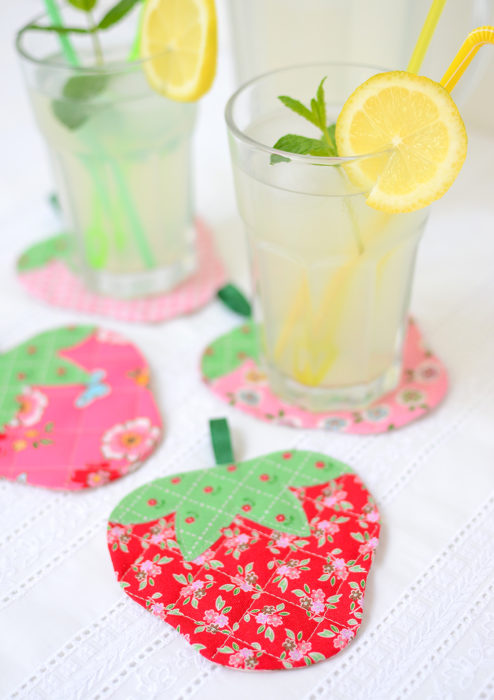
Today I'll be showing you how to make these cute little quilted strawberry coasters – it's strawberry season here in Germany and I just love this time of the year! We've already spent lots of time on the fields of our local farm picking strawberries, and I just made a large batch of jam that will hopefully last until next year!

For the coasters I've used some sample yardage of my upcoming fabric line Mon Beau Jardin for Penny Rose Fabrics / Riley Blake Designs, which is due out in July. The red, pinks and greens in this line are just perfect for this project!
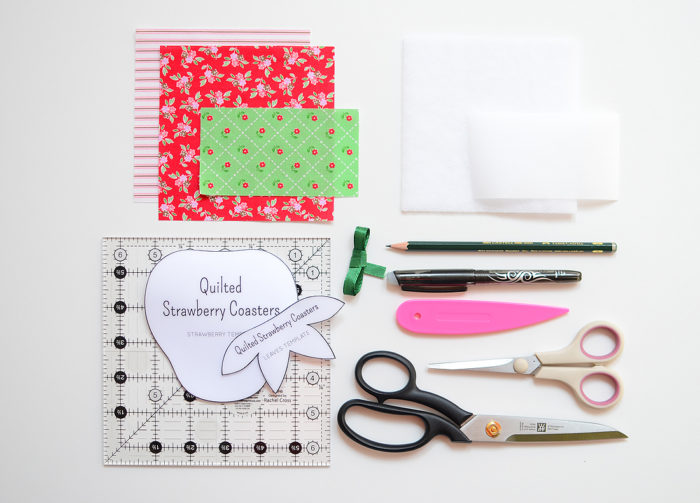
Materials
(1) 5″ print square (coaster top)
(1) 5″ print square (coaster bottom)
(1) 2 ½″ x 4 ½″ print rectangle (strawberry leaves)
(1) 5″ square single-sided fusible fleece
(1) 2″ ½ x 4 ½″ rectangle iron on adhesive
(1) 3″ piece satin ribbon
Quilting ruler, fabric scissors, all purpose scissors, disappearing fabric marker, pencil, edge shaper
Quilted Strawberry Coasters Template – download HERE
(please keep in mind you may not be able to view or download to a phone or tablet)

Instructions
Download the templates, print and cut them out. I recommend printing them on card stock for easy tracing.

- - 2. Place the bottom square with the wrong side on the coated side of the fusible fleece and iron on following the manufacturers instructions.
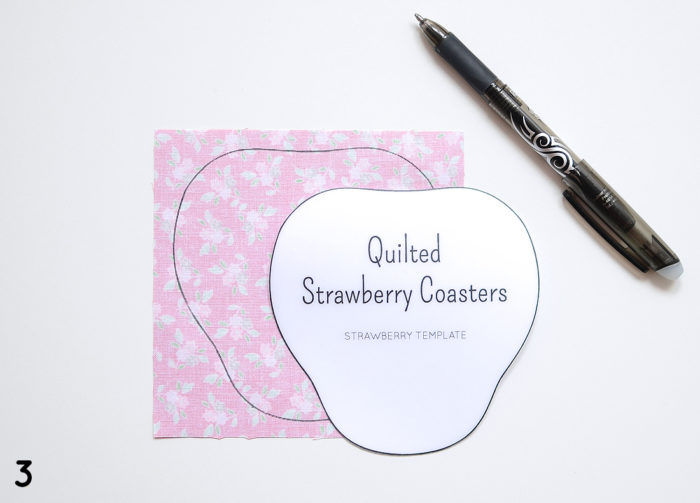
- Place the strawberry template on the wrong side of the top square and draw around it using the disappearing fabric marker.

- - 5. Layer both squares on top of each other, with right sides facing and stitch along the drawn line without leaving a turning hole. Backstitch when you start and stop to secure the seam.

- Next trim the excess fabric fairly close to the stitching line.

- - 8. Draw a ¾″ long line on the coaster top with your disappearing fabric marker, approx. ½″ from the top seam and carefully cut a slit into the fabric. Attention: make sure not to cut through the coaster bottom! You have now created the turning hole.

- Turn the coaster right side out, carefully push out the edges using the edge shaper and press.

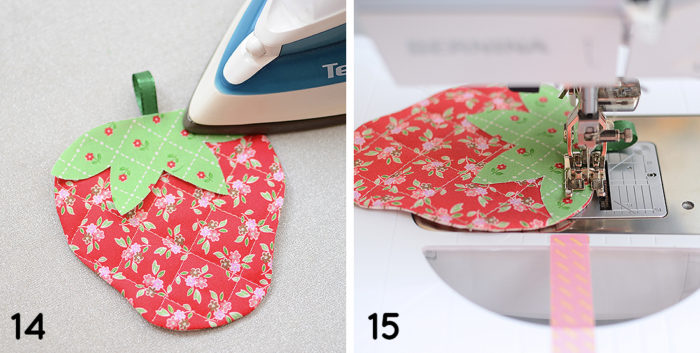
- - 11. Quilt as desired. I quilted a 1″ grid to accent the shape of the strawberry.

- - 13. Place the leaves template on the paper side of the iron-on adhesive and trace around it using your pencil. Roughly cut out the traced piece. Lay the piece, adhesive side down, on the back of the leaves fabric and iron on, following the manufacturer’s instructions. Cut out the piece on the lines and remove the backing paper.

14.- 15. Lay the leaves applique adhesive side down on the coaster as shown and slightly press to hold it in place. The turning hole should be completely covered by the applique piece. Fold the ribbon in half and insert it under the leaves applique with 1″ of the folded end sticking out. Iron on the applique following the manufacturer’s instructions. Sew around the raw edges using a straight stitch.

I hope you've enjoyed my tutorial - thanks so much for stopping by!
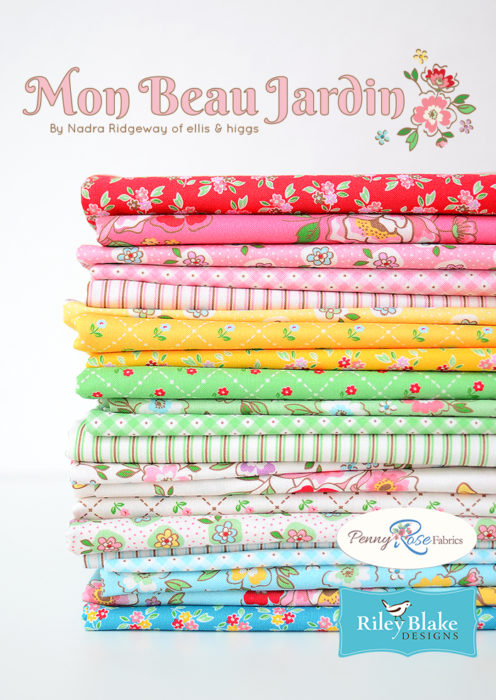
My new fabric collection Mon Beau Jardin that I used in these coasters will ship to stores this July, you can ask for it at your local quilt shop!
Please come visit me over on my blog www.ellisandhiggs.com where I share more ideas and inspiration! You can also find me on Instagram, Facebook and Pinterest.
Thank you SO MUCH, Nadra! Be sure to check out Nadra's other tutorials on Ellis and Higgs. They're all equally beautiful. She also has a gorgeous selection of Quilt Patterns in her shop!


Preeti
Love it. Very cute. Thank you so berry much 🙂
Loriann
oh my ! I just love anything Strawberry and these are adorable!
Gail Mitchell
It's just sweet! And timely. I'll have time to whip up some of these before our strawberries are ready at month's end. Thanks for sharing. I'm going to hop over to your website to see what other goodies you have. Love your fabric..
Linda Douglas
Love these! Cute as a button! Thanks for sharing!
Deborah Werner
Oh my, these are adorable! Your fabric is so pretty, will definitely be looking for it online when it comes out. Your tutorial makes these so doable for anyone. Thank you for your time and work.
kaholly
Very, very cute! Thanks for the tutorial!
Kay
This is so cute, i will absolutely be making some of the this year. x
Lana Stewart
I love these strawberry coasters! Thank you for sharing!!
Karin / Grüner Nähen - Bunter Leben
Thank you very much for this tutorial! I'm looking forward to sew many strawberrys 🙂
Little Quiltsong
Loved this tutorial - and the beautiful strawberry coasters this makes. Thank You!!
Natasha
These are the cutest! I lost my grandmother in March and these remind me of her because she had a strawberry pin holder.
Cara
So cute! Will be a wonderful addition to my holiday table. Thank you!
Rosemaryflower
Amy, these are so cute. Everyone needs coasters
Debbie Day
These coasters are adorable and perfect for summer. Thank you so much! (I did notice an error in the supply list, the item listed as a 5" square of fusible webbing is better known as fusible fleece in this country. This could be confusing to some people. And iron on adhesive is known as fusible webbing.
Amy
Thanks for pointing that out, Debbie! I'm going to make a note of it in the post.
Lea
Oh how cute!! And the fabric is sweet. Thank you. I'm pinning this.
Anorina Morris
These are super sweet. I've printed the pattern and am ready to make some this weekend. Thank you to Nadra for the lovely design 🙂
eileensideways
so sweet, great tutorial. can't wait to make a bunch
Jenny S.
In step 7 it should read "a 1 3/4 inch line." 3/4 inch would be too small.
Ellie
3/4" is correct. I have made these using the instructions provided and it gives you plenty of room to turn the coasters. But if it suits you better personally, you can certainly make the slit longer if you choose to.
Kay
Thank you. Really cute
Bear Creek Quilting Company
These little coasters are a perfect project for little gift items for our upcoming summer family reunion. Thank you for the tutorial!
Debbie
I just made a set of these and they are adorable! Thanks for the super cute tutorial!!
klx1777
Love these mug rugs berry much! Excited to get started on them! Thanks Amy for all the awesome items you post!
Carol E Taggart
The photo shows 1 3/4" on the ruler centered at 7/8". I agree that 1 3/4" is more reasonable.
Susan
Shouldn't there be something like a thin piece of plastic inside these to keep the moisture from going clear through?
Gwen
Just delightful! Thanks so very much.
Jessica Monte
Will be bale to get the fabric in the US I love these prints? I gave made a lot of these strawberry coasters and would love to make more.