
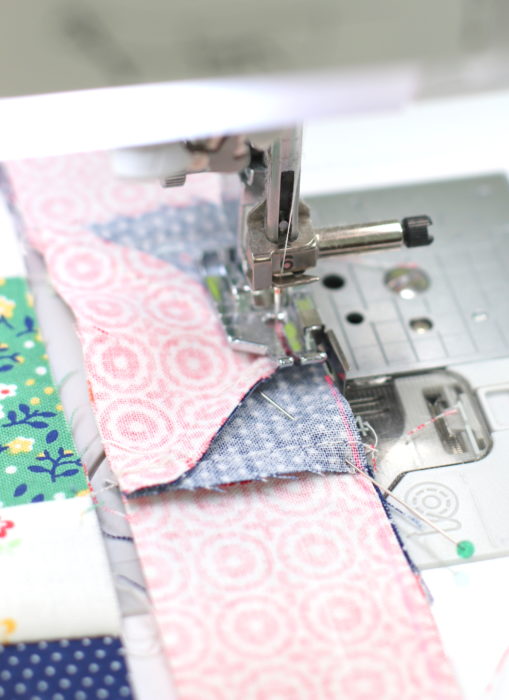
What is a "Scant ¼ inch" and why is it important in quilting? This is my #1 Tip for accurate quilt piecing! Especially when piecing multi-part or complicated quilt blocks. I frequently get emails where people are asking why their pieced quilt block comes out too small. 99% of the time, the cause of the problem is that their seam allowance - or seam width - is too wide. If your pieced quilt blocks consistently come out too small, this tip may help solve that problem. I've talked about this for years, but just updated the post for 2022 with more details and photos.
Piecing with a Scant quarter-inch seam allowance can make a huge difference in the accuracy and appearance of your finished quilt. Here's what it is and why it matters.
As you probably already know (but maybe not if you're new to quilting): a ¼" seam allowance is the gold-standard in quilting. All quilt patterns are written with a ¼" seam allowance built into the cutting and piecing directions (unless otherwise noted.)
Keeping your seam allowance consistent is an important key to all good-looking finished quilts but using a scant quarter-inch seam - especially when piecing individual quilt blocks with a lot of seams - is even better. Let me explain why it makes a difference.
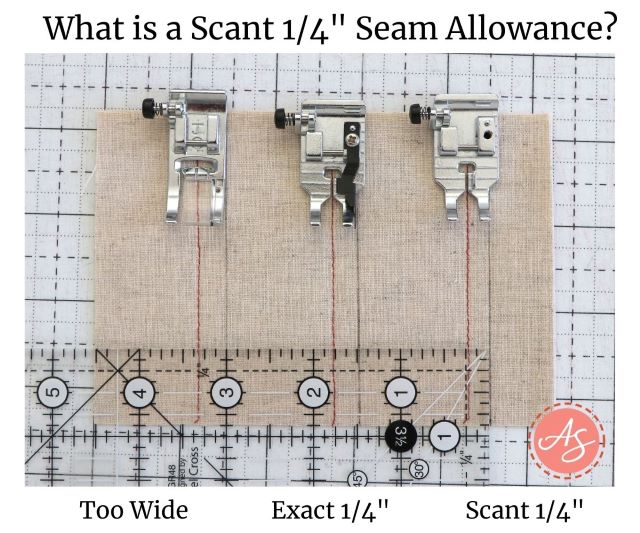
Above is are three different seams sewn on the right side of a drawn straight line. For the seam on the far left I used a generic presser foot with the needle centered. For the seam in the middle I used a quarter-inch foot attachment. For the seam on the right I used a quarter-inch foot attachment and adjusted my needle .75mm to the right.
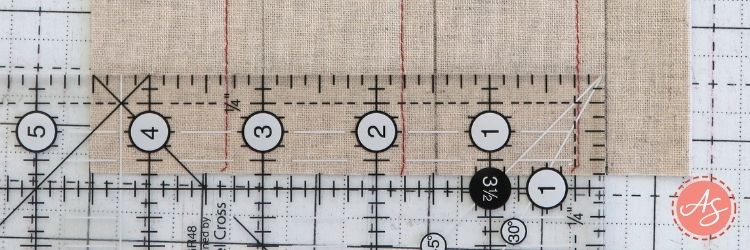
Here is the difference. On the left you can see that the seam allowance is actually slightly bigger than ¼" - it falls outside the ¼" line on the ruler. That may seem "close enough" but actually can have a big impact on a pieced block.
In the middle, the seam is exactly ¼" away from the drawn line. It's an accurate ¼" seam allowance.
On the right you can see that the seam lies just slightly - maybe only a thread's width - inside the ¼" line. This, my friends, is a scant ¼".
The reason this makes a difference is that by the time you open up the pieces and fold one side over (press seams to one side - which is what I recommend) you lose a tiny little bit of real estate with each seam because of fabric bulk, affecting the size of your blocks by making the pieced blocks slightly smaller. Multiply that by numerous seams and a block can shrink as much as a ¼ of an inch let alone an entire quilt.
HOW TO GET A SCANT ¼" SEAM ALLOWANCE
First: Measure the consistent seam allowance you get with the foot you use.
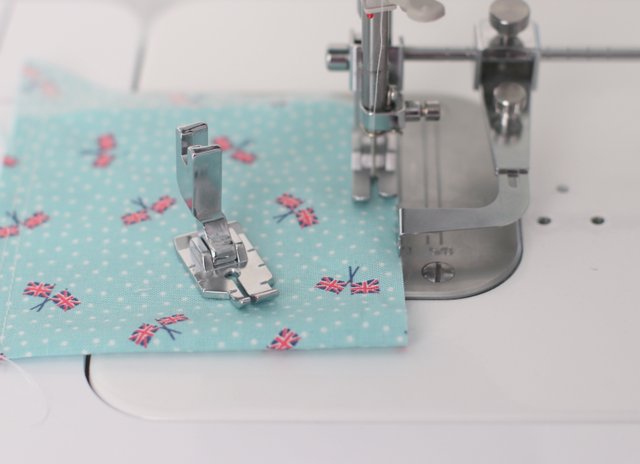
Typically lining up the edge of your fabric with the right side of your presser foot is a good guide for keeping your seam allowance consistent. Some newer sewing machines come with a specific ¼" quilter's foot with a seam allowance marked by the edge of the presser foot being ¼" away from the needle.
If your machine does not have a dedicated ¼" foot you will need to measure where the ¼" seam lines up with your most common presser foot.
And even if you do have a ¼" foot, check how wide the seam is.
Second: move the needle slightly to the right to make it a 'scant' ¼". Measure again until your seam stitching is just inside the ¼" marking on a ruler. This is my preferred method.
That's it!
Word of warning: make sure you are using a foot and a stitch plate where there is room for the needle to move to the right.
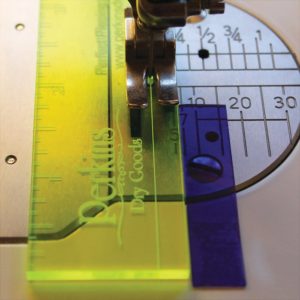
Here's a handy tool for checking your seam allowance width: The Perfect Piecing Seam Guide* from Perkins Dry Goods is perfect for this process of helping you find a scant ¼" seam allowance. (This video demonstrates how easily it works.)
Some people will also use a piece of washi tape or masking tape as a guide.
Another simple and inexpensive option is a magnetic seam guide.
This seam guide is easy to place and remove, but holds steady as a fabric guide.
What about a straight-stitch machine where the needle doesn't move?
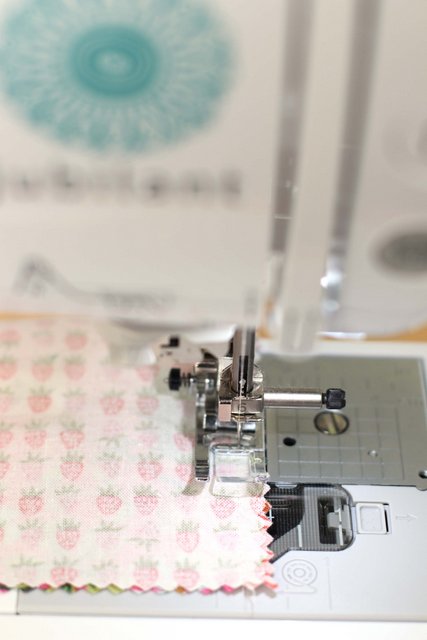
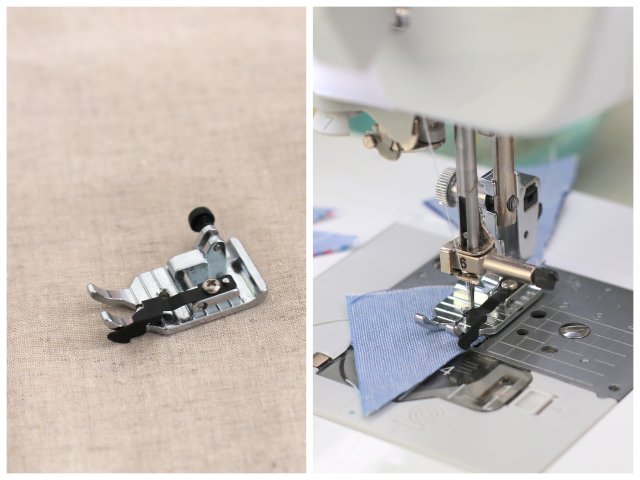
Last year I demo'ed sewing with the Baby Lock Accomplish straight stitch machine. Moving the needle position is not an option for this machine so I did a little research.
The machine does come with a ¼" foot (above on the left), but because the machine sews so fast, it was hard to keep a consistent scant ¼" seam allowance. It didn't matter for piecing long strips or sewing borders, but caused some issues for piecing intricate quilt blocks. After some training from Baby Lock, I decided to use the general purpose straight-stitch foot paired with the adjustable seam guide (above on the right).
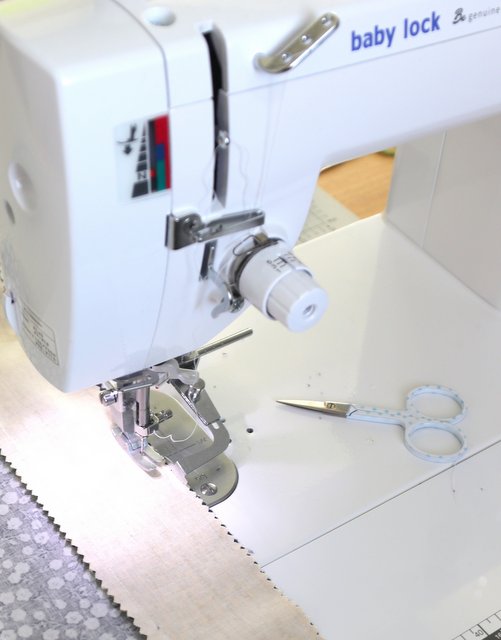
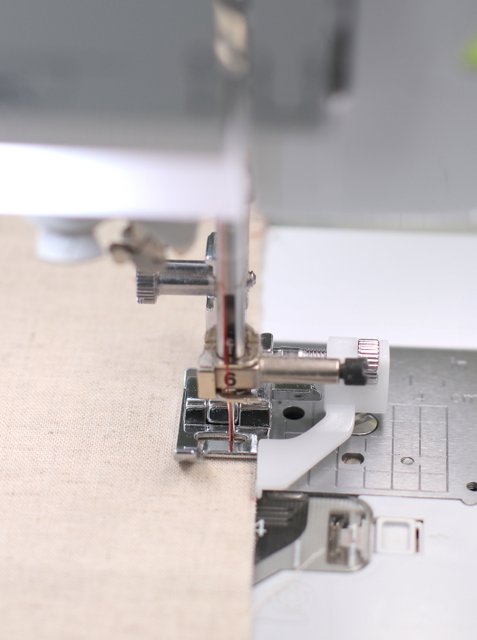
Here's another view. I used the attachable seam guide that comes with the machine and set the guide just inside the ¼" mark on the metal needle plate (see photo above). This gave me a great scant ¼" and made piecing blocks really easy and accurate. And I actually really like that the seam guide sticks out farther ahead of the foot and is easer to line up my fabric next to it well before it heads under the foot and feed dogs.
Sewing Machine Feet for ¼" Seam Allowances
There are a variety of ¼" quilting feet available these days. Check and see if one comes with your machine, and if not, if a new foot is available for your model.
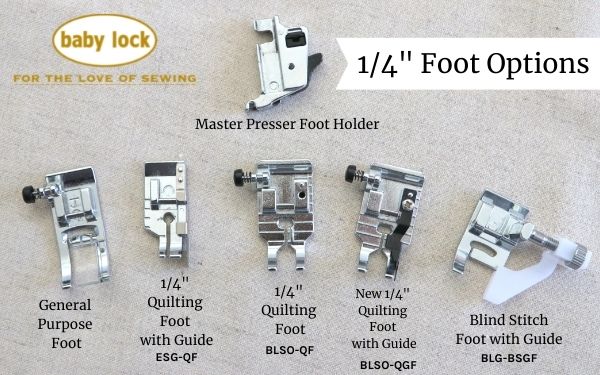
Here are some ¼" quilter's feet options from Baby Lock. I love the detachable snap-on feet made by Baby Lock - they're sturdy and well made, yet reasonably affordable. AND they are interchangeable with all of my Baby Lock sewing machines. Including the Accomplish - which is a mechanical straight-stitch machine. To use these on the Accomplish you will need to buy a Master Shank attachment (part BLQP-MB)
My favorite and most often used foot is the new ¼" Quilting Foot with black Guide (BLSO-QGF). This guide is curved so it doesn't catch on other seams or corner points. It's also a heavy duty enough for sewing through multi-layers and has a wider needle hole, making it easy to move the needle to get the scant ¼" seam allowance.
Keep in mind - you don't have to have a specific ¼" foot to get an accurate ¼" seam allowance. For years sewing on my old 1979 metal machine I only used the basic foot the machine came with and adjusted my needle close to the edge of the fabric.

Some newer high-tech Baby Lock machines also have a Quilting Stitch that is set ¼" away from the edge of the General Purpose J foot. I only just recently learned this!
You might even try an unconventional foot - like this Blind Stitch Foot with adjustable guide!
So check your machine model - or ask at your sewing machine dealer about how to get the best ¼" seam for your machine. There may be built in tricks and tips that you don't know about your model!
Times you don't want to use a scant ¼" seam allowance:
- when you are supposed to sew directly ON a line or guide - such as when foundation paper piecing.
- You also don't need to worry about a scant ¼" seam allowance when you are piecing one-block quilts - like simple patchwork quilts - where all of the blocks are cut to the same size.
- I would avoid a scant ¼" if you're sewing with flannel or other loosely woven fabric that might fray.
So go get out your ruler and measure your seam allowance. Making adjustments may be as simple as moving your needle one notch to the right. This simple adjustment of sewing with a scant seam allowance will make a big difference in your piecing. Especially if you're piecing smaller, detailed blocks.
Give it a whirl and let me know if it makes a difference for you.
This post is sponsored by Baby Lock Sewing Machines.
Check out more of my favorite quilting tips here.
There are so many smaller tricks, tips and techniques that will help with accuracy and make your quilt blocks look perfect!

Lurline
Nice of you to draw the 'scant' to attention - I've just recently started using it and is much more successful - very accurate!<br />Hugs - Lurline♥
creationsbymimi
Thank you for this. I am learning. ?
Rie
This makes sense to me - amazing - I'm gunna give it a go! Thanks for the tip!
Crafty Newbie
Thank you. I have always wondered what that meant. Being a new sewer, I've never really had to come across anything that required it, but I have heard/read it in passing. :)<br /><br />You're so good to us! Thank you for sharing.
mascanlon
Yep...it took me many years to figure that out...one little move of the needle over and it's amazing what a difference it makes!
pinksuedeshoe
Hrrrmmmppph. My needle doesn't move to the right. Just one giant step to the left for zippers and whatever else you sew all the way over there. I do have a 1/4" foot, but I don't think I am as consistent with my seam allowance with it. But my regular foot is a little over 3/8" seams... which ends up being really big! Hmmm... must find a new solution!
Wanda
Measure out 1/4" from your needle. Then place a piece of tape on your machine bed, so that guiding fabric along the edge of the tap ewill allow you to achieve a seam that is just slightly less than the 1/4".<br />
Sew Create It - Jane
Excellent advice! Once I worked out the difference my piecing skilled improved 10 fold. Good piecing = a happy quilter :o)
Ann Marie
This works out great because when you have to press, that scant part is the fold from the seam to the top over the seam allowance bulk. It works really really well when you have lots of points you don't want cut off as well.
Annabella
I`ve just bought a new machine and the quilter`s kit came with a quarter inch foot - is this the same as a scant seam? Before, I used to use a line of masking tape on the machine as I wasn`t able to move the needle right or left.
Wanda
No, chances are it will give you a regular 1/4" seam or maybe even a bit more than that, just as the author of the blog found when she tried her's out. Just move your needle to the right a notch. That should do it. Move the needle over and test your 1/4" foot with it. If you end up with just slightly less than 1/4", you will have the 'scant' 1/4" seam.
Stephanie Clarke
I have just recently purchased a Singer Heavy Duty as my Brother broke ( someone else broke it ) . Anyway after my purchase & trying to get used to this new machine which I patchwork to quilt and cushion and other homely crafts I have picked up my craft after some time away. I noticed the difference between the Brother & Singer on 1/4" allowance which has frustrated me ,( so the work I had done prior to Brother breaking I was correcting ...BUT , some of my patches are not the same size on seaming ( the middle one for example is under 2.5 inches, which now means I am going to have cut again to correct the works ) - so I am to move my needle to the right ? And if that doesn't correct then rule at 0.6mm ?
Sorry for all questions, hopefully someone can help xx
Elisa Black
Thank you for this tip-- I think its a great piece of advice that I'm going to try!
Katy Cameron
I discovered this recently (and actually have it on a post-it stuck to the machine, I'm that much of a dork) and it works so well!
Jill
Thanks for this tip, I'm just about to start working on a block for a block of the month and was reluctant because I didn't love home my Farmer's Wife blocks looked! Will definitely try this!
jlamanna
I have been sewing for about 45 years- but only quilting for about 4 months. Talk about the "aha!" moment...it never occurred to me to move the needle to get the scant 1/4 inch!! Thanks for the tip!
Michele
I have a 1/4" foot that came with my machine and I couldn't live without it. It gives me the perfect seam allowance every time. For those who don't have one, it is definitely worth the investment.
Wanda
Unless you move your needle position, it probably still will not be a 'scant' 1/4". I used to figure that as long as I was consistent, it was OK. But using the scant 1/4" seam really does make a difference.
Jenny
My 1/4" foot was only $5 -- and well worth it because I can't move my needle either (a Janome mechanical). BUT . . . you have to check your seam regardless, because the first 1/4" foot I bought was defective -- nowhere NEAR a scant 1/4". I had to exchange it for one that was right.
Lynn Brown
I SO wish I had known this before I started the quilt I'm currently working on. I had no idea what it meant and was just eyeballing it, so now I've got wonkiness. Thank you for clearing that up for me!
Missy
Thanks for this info! I used to use the right side of my foot, then I switched to the inside of the right side of my foot which was a 1/4 in. That'll be so much easier if I just move the needle. GENIUS!
amy smart
@Annabella - I don't have a return email address to respond to your comment, so I'm hoping you'll see it here:<br /><br />So nice that your machine came with a 1/4" inch foot. I would just sew a seam and measure it with a ruler to check and see if it's a scant 1/4". If not, the masking tape is definitely another good option.
Elena
Thanks Amy! I love the idea of just moving my needle over a bit, instead of putting my fabric along a different seam line. Great idea!
Kristen
It's amazing how that smidge helps when you sew!! Good advice!!
amylouwho
yes! this is genius!! I have a 1/4" foot but I don't think it's genuine bernina because it doesn't fit my machine well and it's super slippery. I think i'm going to ditch it and start doing this. you just changed my life!!<br /><br />PS - do you have an Bliss laying around?
amanda
I think you just solved all my problems and made all of my wildest dreams come true. Move the needle! *smacks forehead* Now why didn't I think of that? ('cause I'm not you, that's why!) THANK YOU!
Thimbleanna
My blocks are always much more accurate if I use a scant 1/4" -- I love it!
L'amore del fare
Only yesterday the exhibition of the hobby of Rome, I discovered the basics of quilters. It 'nice to see how much passion and love are created these masterpieces. Congratulations you are very good! I follow you always with pleasure. Hello!
Linda
You know, I have read so many blogs that talk about using a 1/4" seams and I really didn't get it until I saw your visual. I had been trying to figure out exactly where is the scant? lol Thanks for the visual!
kendascrafts
Wow, I just had an 'aha' moment. I've heard people talk about scant 1/4" seams but never really got it. Thanks so much for the visual, that's exactly what I needed!
sunny
Thanks for sharing this! I know that's it's better to use a scant 1/4", but it never occured to me how simple it would be to achieve it. duh.
theygrowuptoofast
Thanks for the tip- I'm going to measure mine and see how accurate it is.
Sarah Kay
THANK YOU!! I spent SO much time last quilt measuring twice over and STILL not having the seam allowances right. I can't wait to try this tip!
Kim
OMG!!! I'm so glad I read this before I started my new project... it's my 3rd quilt and I did as best I could with the first two... just wanted to tell you that I'm 2 blocks in and I can tell the difference in how the pieces are going to fit together. Thanks for the explanation and hint... although my needle only moves to the left so I feel backwards. :o)
AnneMarie
You know, I've been quilting for 6 years and it took going to the Summit for me to FINALLY measure it up and resign myself to adjusting my needle position every time I turn on my machine to get the scant 1/4". WHAT a Difference!! Funny you should post this like 3 days after I finally saw the light!
Kell
Thank you for the visual! I have a new Janome that comes with a 1/4" foot. I checked it before I started a new quilt & still is bigger than a 1/4" if I go by the guide. I had to move my needle over to the right & I'm going by the 1/4" mark on by extension table for right now.
Erica
Thanks for the tip! I've been using the edge of my foot and some of my blocks aren't turning out correctly. Maybe this will help me.
kait.
It's good to hear you say this Amy! I recently realized that my Singer's 1/4" measurement is more than that! I'm working on the Swoon quilt right now and find my HST aren't quite large enough so I'll definitely be switching to the scant measurement. Thanks!
Tanyia
I just found this and wanted to thank you so much for explaining it so perfectly ... I didn't even know I could move my needle! Now I know the exact number to program it to to get the perfect seam!
Marie Atkinson
Excellent advice! I have used a scant 1/4" for years and it does make a difference.
JBeez63
Thank you for this explanation. I have been quilting for about a month, sewing forever and a day. I have a brand-new Singer H74 (bought on clearance for a song) and it came with every foot in the catalog, including a 1/4" piecing foot. My question is, if the thing is intended for piecing, and everyone in the industry knows a SCANT 1/4" is the gold standard, then why is a Quilter's Piecing Foot set to a NON-scant 1/4"? If I use it, I get a regular 1/4". Because it has a tiny hole in the middle, I'm leery of shifting the needle a notch to the right. I'm sure the high-end Janomes and Berninas have exact scant 1/4" feet, but WHY don't they make a piecing foot the right size? Irritating and mind-boggling, and my first two toppers are a scant bit too small because I did not KNOW this.
Amy Smart
I'm totally with you on this! If it's any help, my 1/4" foot is a straight stitch hole as well, but I am able to move the needle over just slightly. Check it manually (using the the knob on the side of your machine to drop the needle, not the pedal) just to check it out.
Jeanne Berry
Thanks, Amy. After much experimentation, I've found that if I use my all-purpose foot, line up the fabric with the edge of that, use a 4x4 ruler as my "guide", and move my needle position to 6.0, I get that scant 1/4 AND a straighter seam to boot. (Who wold have thought that getting the right seam allowance would--so far--be the hardest part about quilting?)
Amy Smart
Haha! Good job!
Beth Aitken
Thanks for the great teaching tip. It is saving me from binning my work....Beth
Vickie
That's an important tip. However not all machines can move the needle to the right of center. Most quarter inch feet give you an exact 1/4 or even more. None of my current machines can move the needle one notch. Mine either don't move at all or are limited to center, left and right options. It's time for manufacturers of machine feet to make them a scant 1/4 inch with needle in center position.
Vickie
Use your blind stitch foot and turn the wheel until you get your scant 1/4" . I bought a second one, set it and then glued the screw so it wouldn't move.
New quilter
I have a VERY basic machine. I tape a thin piece of cardboard on the plate to keep my seams consistent at ¼”. But every time I sew jelly roll strips together I get a 1 ⅞ strip, not 2”. I’ll try to adjust so I get a scant ¼”. Thank you for the info. This should help.
Teresa Thrush
This makes more sense instead of using a #10 sewing needle and 60wt. thread to achieve the elusive scant 1/4" stitch. There's so much information about this stitch but this one post makes it clear and easy to understand (with pictures) why and how to do it! Thanks so much for posting this!
Phyllis Jones
Thanks for this great tip Amy! This is something I have struggled with for years and this will be a great help
dianne61
Since I use my walking foot to piece I have to use a point on my plate and move my needle but I've been quilting for almost 50 years and learned on my own about scant 1/4" measurements. This tip will help a lot of pieces find accuracy so thanks. Enjoy your posts.
Candave
measure over with one of your rulers and put a piece of tape there and go by that line. or you can buy sick on seam guides
Amy
Yes- that's a great way to do it.
Janice
Wouldn't you think with all the modern technology and expensive machines they could tool a scant 1/inch foot?
Amy
You'd think, right? 🙂
Ava
That works, but even easier than a piece of tape: tape a card at the "scant 1/4" measurement - something the thickness of a credit card if you have it. It'll physically rather than just visually guide the fabric.
Amy
Yes! Great suggestion
karen
Why not just cut with the full ruler line on the fabric so you can use your 1/4" foot without having to play with needle position? That's what I do. Once you move the needle over, you often need to change out your foot and you can't use a single hole throat plate. Plus, you have a teensy little extra fabric in your seam which means the seams are less likely to rip out over time.
Ruth Caisse
Not all machines presser feet are 1/4” with the needle in the center position. I have a janome 6600 and I have to adjust my needle to 6.0 for a scant 1/4” or 5.0 for a 1/4” seam. I do have a 1/4” presser foot with the guide and I still have to move the needle over to 5.0 - 6.0. I don’t know why........ can you help?
Amy
I don't know that I can help with your specific machine without seeing it - every machine is different. Just play with the foot and the needle settings, running test seams and measuring them to make sure you get the desired scant 1/4" seam for your machine. Just takes a little tweaking.
Susan
Thank you for posting this great suggestion. I never thought of it. Also, others posted suggestions and thank you to them also.
Rhonda Mullins
I'm confused about the scant thing. Is the scant the line u draw or the move of the needle? I'm not a learner by words and dont understand them alot. Im more hands on learner.
Amy
The measurement of the seam allowance is the distance from the seam (stitching) to the edge of the fabric (or drawn line). You want it to be just slightly narrower than a 1/4".
katechiconi
My Janome needle doesn't move, and my quarter inch foot is just that, exactly 1/4 inch. Plus the thin metal 'blade' that lines up to the edge of the fabric bends outwards over time, another interesting lesson. However, my all-purpose foot is partially clear plastic, and I have drawn a Sharpie line on it to show *exactly* where to line up the fabric for a scan 1/4 inch.
Amy
Smart!
JoAnn
I read this article and now I am confused. I have never used "scant" unless I am sewing a block from a drawn template, that was drawn with a pencil.
I was taught the reason for a scant has to do with how sharp the pencil lead is. Meaning, keeping the lead sharp. A dull lead makes a wider line, and you will have to use guess work to decide where the needle is placed on the line. That guess work is scant.
When the rotary cutter and rulers all but eliminated the inaccuracies that a pencil lead caused, the only thing that a piece quilter needed to learn was how the rotary cutter's ruler is used, or placed on the fabric. The placement inaccuracies of the ruler dictates where the accurate 1/4 inch seam allowance line is.
I have tried to remember to press the seam allowance to one side. But this bulky seam fabric makes quilting extremely difficult, and painful if you are hand quilting. And a lot of long arm sewing machine quilters find that bulky seam causes irregular quilting stitches. So, I continue to press my seams open.
I am planning to read your entire blog. It's very interesting.
Genia
I believe this is one of the most important gems of quilter knowledge. I am pretty new to quilting and couldn't understand why my blocks were not the right size. I was so frustrated. I bought some seam guide tape and it has helped quite a bit. Your explanation made me go "aha". I get it now. I will try to make scant quarter inch my new sewing mantra!
Amy
I'm so glad it helped!
Taos Sunflower Martie
Thanks for this, Amy. I made a real mess out of the Delilah blocks in a QAL a couple of years ago and I am pretty sure this is a big part of what happened.
Ledine
Thanks for the post! We should create a SCANT 1/4” foot!!
cori
Ummmm, here I am asking for and receiving a 1/4 inch foot for Christmas and all I needed to do was move that needle. It was like a light bulb moment and I feel quite silly for not thinking of it. Thanks for the amazing tip.
Bea
Thank you so much! I’m a new quilter and have been wondering why my blocks are “off.”
I found that adjusting my needle to 1.3 on my new Viking gives me an accurate 1/4” seam when I compare it to my Omnigrip ruler. Can’t wait to try it on my next block.
Amy
Great!!
Becky
Thank you for this post. I am working on a quilt that basically all HST and I noticed my seams are wonky when I was cutting the 8 at a time blocks down. I am going to go back and recheck my seams before pressing and squaring up my blocks, using a scant 1/4".
Mimi
I just made a quilt top and was shooting for scant 1/4" but many of my seams are even smaller. Some are as scant as 1/8inch. I plan to do a quilt design that is rather tight and hoping that the quilt does not fray apart on the first washing.
Lisa A Fish
I just did some pillows with flannel. I did the scant 1/4 seams and some pulled apart when I washed it. I had to start over. Maybe because of the flanbel it happened.
Jenny
I’ve been sewing with a scant 1/4 inch seam allowance for years (just by moving my needle over) and it’s made all the difference for me in the accuracy of my piecing. When I started quilting I would get frustrated when my blocks wouldn’t turn out the correct size. I wish more beginner quilt patterns would talk about the scant 1/4 inch and how to achieve it.
Sharon
I bought a new Janome Memorycraft machine a few years ago and was using the 1/4" foot that came with it. I was finding that my blocks were always coming up short by about a quarter inch. I did some experimenting and moved the needle as far right as it could go and the blocks were still coming up short. I put on my regular foot and set the needle to the 1/4" setting and voila, the blocks come out perfectly! I'm not sure why, but I think the guide on the 1/4" foot was just not working for me. So glad I figured it out because I was about to ditch my machine and get a new one.
Amy
Great job! It's amazing how just playing with a different foot and adjusting your needle can make all the difference!
Barbara
So why don't they make a scant 1/4" foot? Could be generic for any machine or specific brand.
Amy
Great question and suggestion.
Marty
This post is exactly what I needed today. I've been quilting for over 35 years, and only have been quilting again after a move a few years ago. I'm not using my regular Bernina 1090 but a Babylock Crafters Choice that was my nieces' where I can't adjust the needle placement. My blocks are coming out 1/4" too short! I'll try your tips and get one of the guides I don't have.
Pam
Really great article! Thank you so much.
Amy
You're welcome!
Audrey Moore Perry
Tada! Thank you very much. I’m piecing one of those pinwheel blocks and couldn’t get the middle points to match. Did a scant 1/4” and I’m there. Great article. Thank you!
Amy
Hooray! I'm so glad!
Kathryn
Thank you so much for this tip on scant 1/4 inch seams! I've read so many explanations of this concept in the past but still didn't quite understand how to do it successfully. I think it was your detailed picture as well as the explanation of the various machines that led me to have an epiphany. I pulled out my machine's user manual and figured out how to move my needle. I'm going to give this new setting a try to see if my blocks finally come out to size. I am so happy I found your blog!
Amy
Excellent! I'm so glad!
Deb Tilton
Thank you for showing the different widths with a ruler. I have been quilting for years, but now it even makes more sense. I like to see how things work, not just hear instructions. Now I have to practice. Thanks!!
Karen Y
Thank you so much for this comprehensive explanation of the scant! It is perfect and helped me figure out how to use my Brother foot to achieve the desired result - after MUCH fiddling around, your explanation had me sewing in a couple of minutes!
bill allen
Thanks very much for the tips.
I also have a machine where you can’t adjust the needle position (an old Toyota), and am frustrated that my 1/4″ foot with a guide is exactly 1/4″ and not scant (as you recommend), as by the time it’s sewn and pressed the seam it’s bigger than 1/4″.
Can I ask a question please? If all the seams are the same (even if the same is a fraction too big) wouldn’t the only negative repercussion be to make the overall quilt size a little smaller?
Amy
Great question! If you're only sewing one-block quilts (like patchwork squares), seam allowance won't matter as long as it's consistent. It's when you're piecing more complicated quilt blocks that it will have an impact.
Another simple option is a magnetic seam/fabric guide that you can place at a scant 1/4" on your machine. They're simple and inexpensive. You can find them on Amazon: https://amzn.to/3pdvoR6
Lucie
Quite a common problem with many of us, I see. 🙂 I have taken 6 blocks of the month classes over the years and every single one of my blocks is smaller than they should be. Whenever I questioned this, the response was always "As long as your blocks turn out the same size, it will work out okay". Unfortunately they didn't but I solved my problem by putting sashing around every block then squaring up my blocks this way........it's worked very well for me but now my goal is to work on the scant 1/4" using your techniques - my needle does move, thankfully. Also, I see that some have recommended the magnetic seam guide. I was seriously considering buying these but then worried that the magnet might be too strong & might do some harm to my computerized machine. Any thoughts on this?