
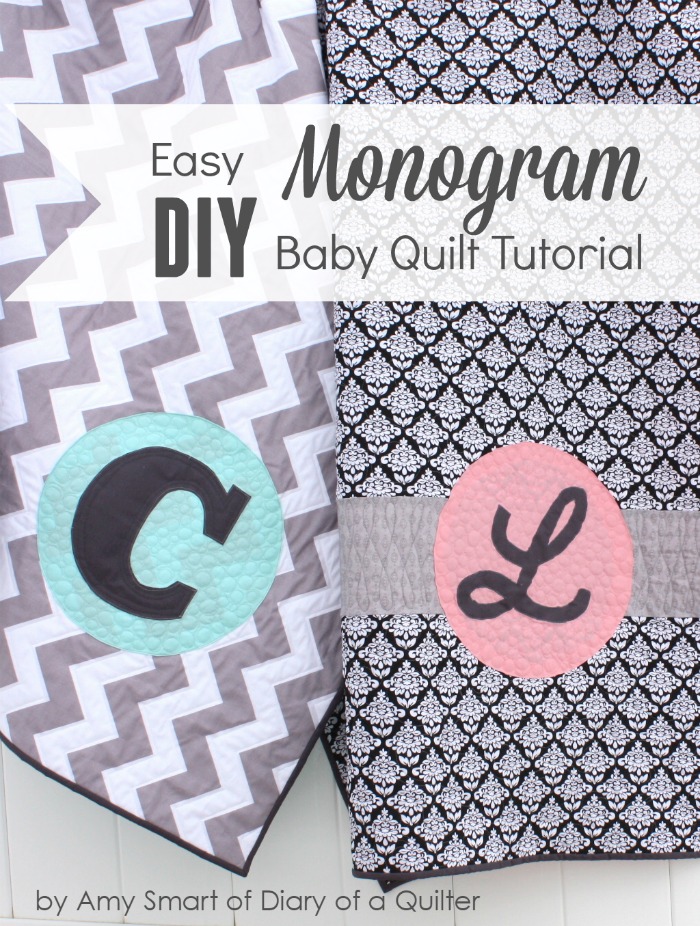
This is a quick and easy tutorial for making a monogramed baby quilt (or any size quilt!) Use whole cloth with a fun print for a fast, personalized handmade baby gift.

I suddenly have had a lot of friends and family have babies in the past months, and I feel very behind on my baby-quilt-giving. But I do seem to have an (over)abundance of adorable fabric on hand that needs a loving home and someone to spit-up on it. So rather than get further behind, I've been creating very simply-pieced panel type quilts using strips of fabric to create a simple embellishment.
With so many great large scale fabrics available, you can create a simple baby quilt, letting the design motifs do all the work for you. Or by adding a simple monogram embellishment you can both personalize the quilt and give the quilt added design detail.
This tutorial will show you two variations on this design to create a 41" x 54" crib-sized quilt.
![]()
Supplies for Monogram Quilt 1:
- 1 ½ yard of fabric for front (I used Riley Blake's large Gray Chevron)
- 1 ⅝ yard for backing (I used Aqua Marine)
- fat quarter for circle (I used Aqua )
- fat quarter for letter (I used Charcoal)
- batting (I used Pellon Legacy White cotton batting)
- ½ yard for binding (I used Charcoal)

Supplies for Monogram Quilt 2 (with stripe):
- 1 ⅜ yard fabric for front (I used Mystique Black Petal)
- ⅙ yard fabric for stripe (I used Mystique Gray Stripe)
- 1 ⅝ yard cotton fabric for back (I used 60" wide minkie and needed 1 ⅜ yards)
- fat quarter for circle (I used Peony)
- fat quarter for letter (I used Charcoal)
- batting
- ½ yard for binding (I used Charcoal)

Cut a 15" circle out of thin cardboard. (Cereal boxes work perfectly.) From your circle fabric, use the 15" template as a guide and cut a circle at least ¾" bigger than template all the way around. (Hint: If you are working with a light colored circle fabric that will go on top of a dark, patterned background fabric, you may want to use interfacing so that the patterned fabric will not show through when you applique the circle to the front.)
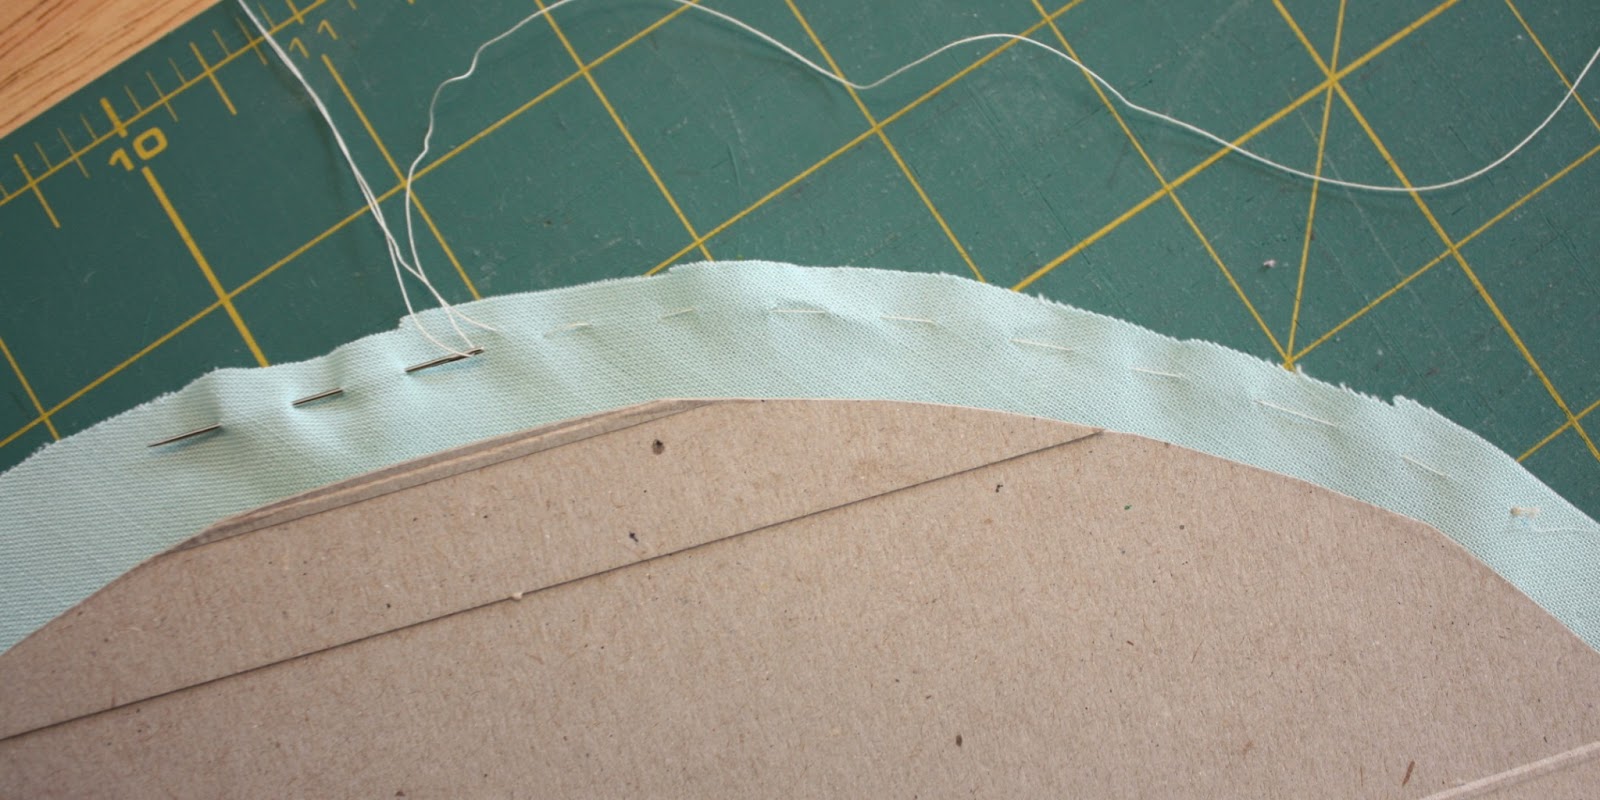
Using a needle and sturdy thread, sew a large running stitch all the way around the circle, about ¼" away from the edge.  Carefully pull thread to gather edges around the cardboard edge.

Bring circle to your ironing board and spray edges with starch. (You may want to put a dish cloth on your ironing board so your cover doesn't get gucked up with starch.) Press the edges so that you have a nice, clean edge all around your circle. Don't remove cardboard yet.

To create your monogram, choose a font on your computer and increase the font size so that it's about 10". Print the letter. (Hint: using a bold, chunky font is easier to work with. Ask me how I know this.) Using Wonder Under (the thinnest, lightest kind), trace the letter onto the paper side in the reverse. (You might want to tape your letter backwards to a window or light box and then trace letter backward.) Fuse Wonder Under to the back side of your monogram fabric.

Cut out monogram and peal off paper side of the Wonder Under. Carefully center letter on top of your circle and iron into place. Remove card board and take monogram to your sewing machine to either top stitch or satin stitch around the raw edges.

Take your pressed monogram circle and place it where ever you desire on your top fabric. (I chose about ¾ of the way down and ¼ of the way from the right side.) Carefully pin in place.

Carefully top stitch around the outside edge of the circle.

To create the quilt top with the "stripe" you will cut your main print into two pieces: One measuring 36" and the other measuring 13". From your "stripe" fabric, cut a piece 6.5" (6" if you only bought ⅙ yard - either is fine). Sew the stripe fabric between the 36" and the 13" piece using ¼" seams.

Use the same method as above to create the circle monogram. On this one I satin-stitched around the letter because it was thinner and needed more reinforcement.

Once your monogram is in place, square off the selvage edges plus about ½" of the front side of your quilt. This will help when you go to create your quilt sandwich with the front, back and batting, the backing fabric will be visible from the front on all four sides.

Then quilt the top as desired. These two quilts were quilted for me by Melissa Kelley. We decided to use the chevron as a guide for the quilting on this one, but changed the look in the circle to reemphasize the monogram. I love the pebble quilting she chose.
When the quilting is done, square off the batting and binding fabric to prepare the quilt for binding. Cut 5 strips 2 ½" wide from your binding fabric and sew them together end to end. Binding tutorial here.
And there you go! A quick project for your new favorite baby. And as pictured above, you could just use pretty fabrics from your stash and create a simple, quilted baby quilt without the monogram. Easy peasy. Put that fabric to work!


Kaitlin @ Wunderbar
I really love this! I've been making your nursing cover for all the new moms in my life, but maybe I'll kick it up a notch with this.
More Than A Mom
Great tutorial! I never knew how to make the circle 🙂
Melia Mae Quilting
Just beautiful! I needed something like that because a lot of people are having babies and this would definitely symplify my time! It would even force me to learn hand applique which I have wanted to try! Thanks for the great tutorial.
Katy Cameron
Like how you did the circle for these :o)
Live a Colorful Life
Super cute!
Di~
Great quilts, Amy. Thank you!
Mary on Lake Pulaski
Great ideas and cute quilts Amy!
Jésabelle B.
Looks great!<br />I HAVE TO make one for sure... 🙂
dolores
I love making quilts like that highlighting fun prints! <br /><br />I have several quilts that need their binding hand stitched but it is going to be too warm soon! <br /><br />Right now while the weather is nice it's outside yard cleaning time!
Casandra
Wonderful project tutorial. Can't wait to make this for the new nephew! I'm following you now.
Rebecca Grace
This is so much fun! I especially love the "L" -- it reminds me of Laverne. Which instantly announces to the world how OLD I AM... 😉
Thimbleanna
I LOVE, LOVE those quilts Amy! I think they make the perfect baby gift!
Claire Jain
This is super cute 🙂 I will have to give it a try! Thanks for sharing!
Kris Davis
Do you have any tips for quilting the blanket with a Minky back? Minky can be very stretchy and difficult to work with. I realize you sent it out for the quilting, but I'll take any ideas you may have for me to try. <br />Thank you for such an inspiring, yet easy enough to conquer tutorial!!!!!<br />
amy smart
I've never done it personally - I usually put someone else though that. 🙂 But I did find Allison's helpful post that has some good answers: <br />https://www.cluckclucksew.com/2012/11/quilting-with-minky.html
online florist
Very nice site and article. Amazing one, I appreciate this work.... This is a wonderful post Hey I see smart blog; I love it greatly because I cannot find anything better than your authors. Thanks, I agree that this will be a great help for me...<br /><a href="https://www.dpetals.com.sg" rel="nofollow">florists online</a>
bethanndodd
This is just perfect for a simple back I wanted to add a personal touch to. I look forward to making many different variations in the future. Thank you for sharing your talent with us. Smiles~Beth
SC Nonni
Great tutorial and a stylish way to dress up the back of a quilt. Love this idea!
Anita Jackson
Great quilt idea, I may have to use this to get some of my large print yardage used up!