
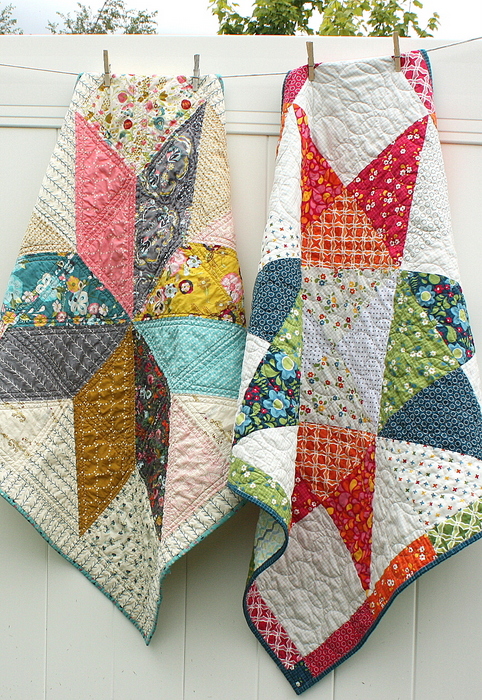
Here are the tutorials for two variations on a very simple star baby quilt featuring the traditional Lone Star (or LeMoyne Star) and Morning Star (or Ribbon Star) quilt blocks that can be made quickly and easily. It's a great beginner project as well. (This post was updated in 2022.)
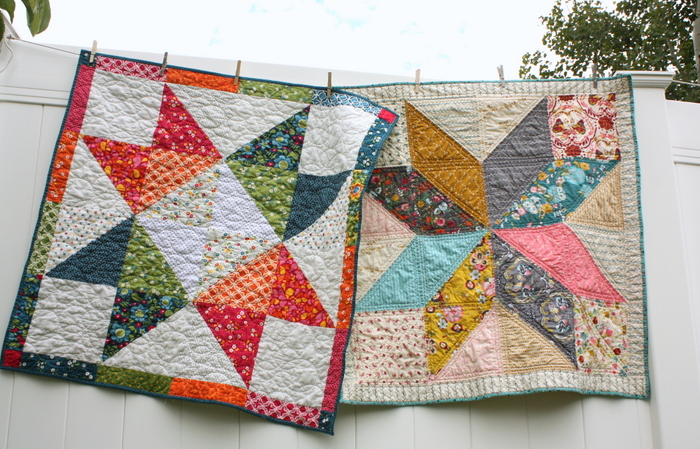
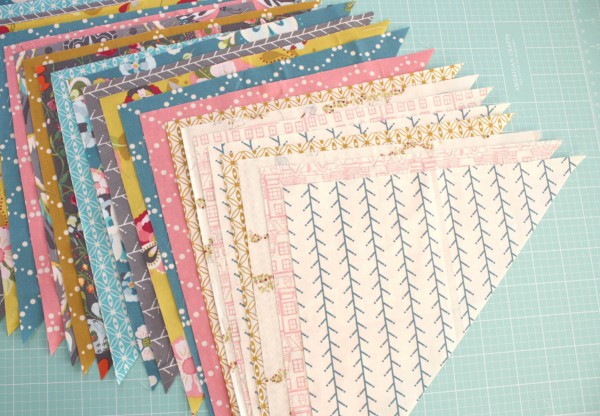
I love a simple, classic star quilt block. They're timeless and traditional, but can easily be given a modern, graphic look because of its simplicity and by enlarging its size. These two versions are very similar in construction and look, with a few minor variations. Both patterns are designed for using precut 10" x 10" squares - perfect for Layer Cake precuts, especially if you have leftovers from other projects.
If you would prefer a printable PDF version of three of these star baby quilts in one place you can find it here for $3.00.
Lone Star Baby Quilt Tutorial
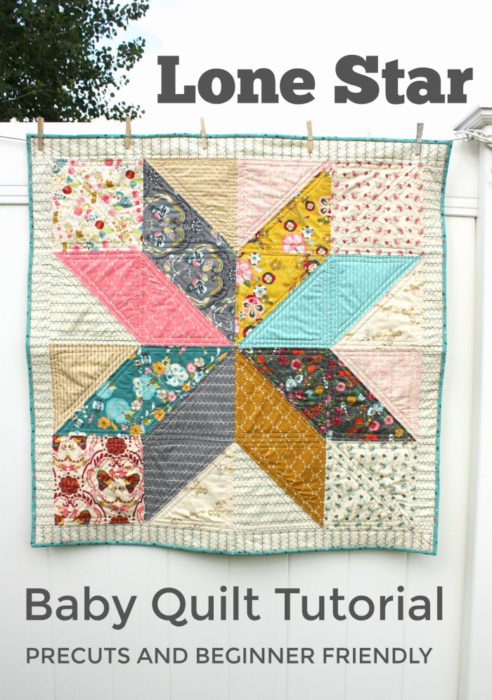
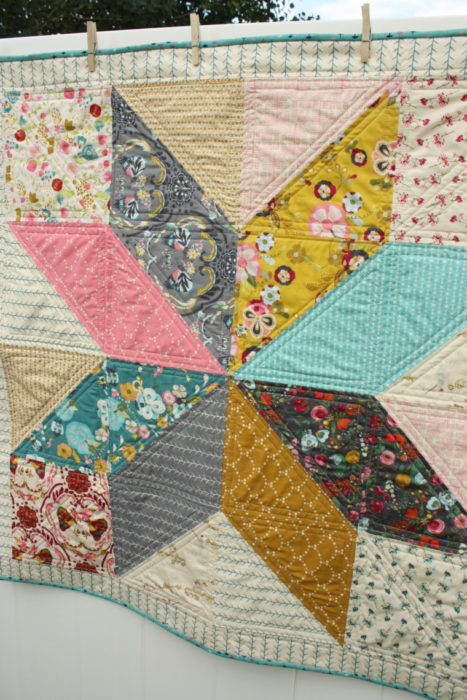
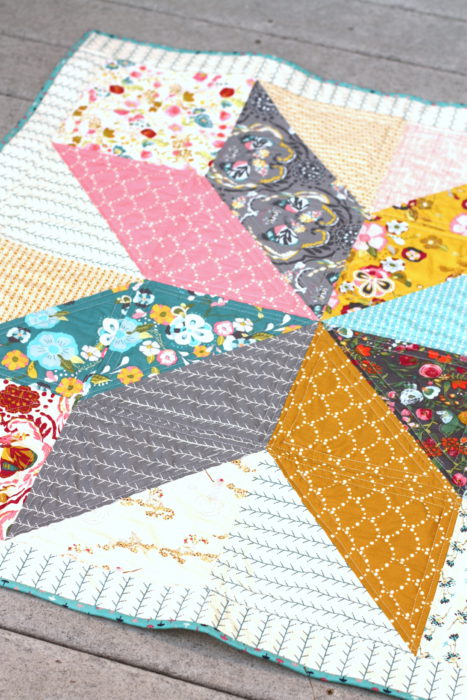
The first variation is the Lone Star (also called the 8 pointed LeMoyne Star) baby quilt. This quilt finishes at 39" x 39".
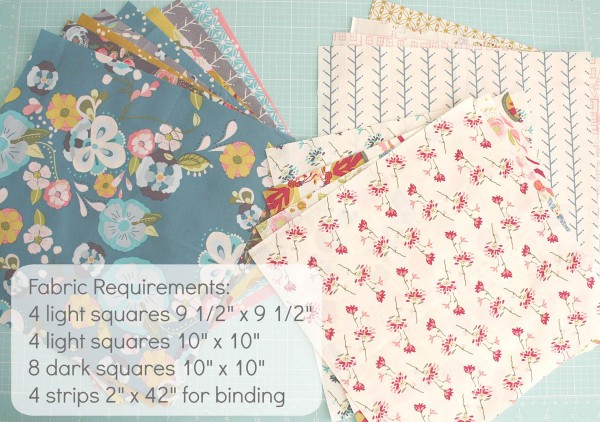
Fabric Requirements for your Lone Star Baby Quilt:
- 4 light squares 9½” x 9½”
- 4 light squares 10” x 10”
- 8 dark squares 10” x 10” (the quilt looks best if these are a variety of different prints)
- 4 strips 2” x 42” for borders
- 1 ¼ yard for backing
- ⅜ yard for binding (cut four strips 2 ½" x Width of Fabric)
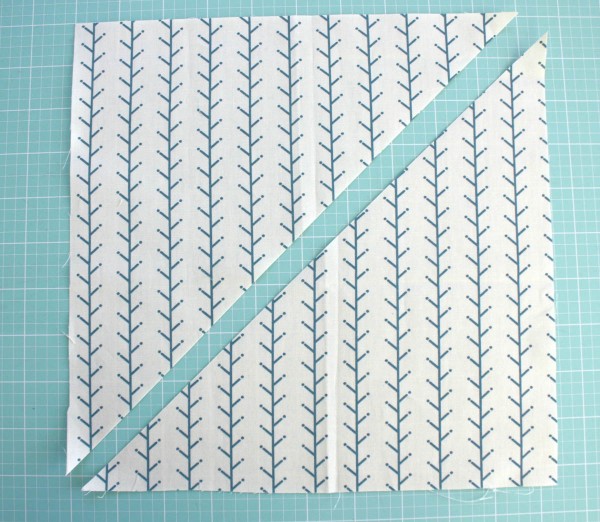
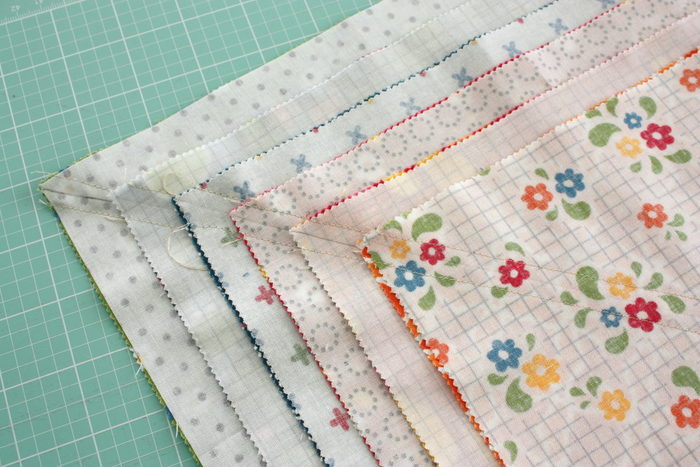
Start this project by taking the twelve 10” x 10” squares (4 light and 8 dark) and cutting them in half once on the diagonal.
This will give you a total of 24 triangles - 8 light background triangles and 16 dark triangles to make the center star motif.
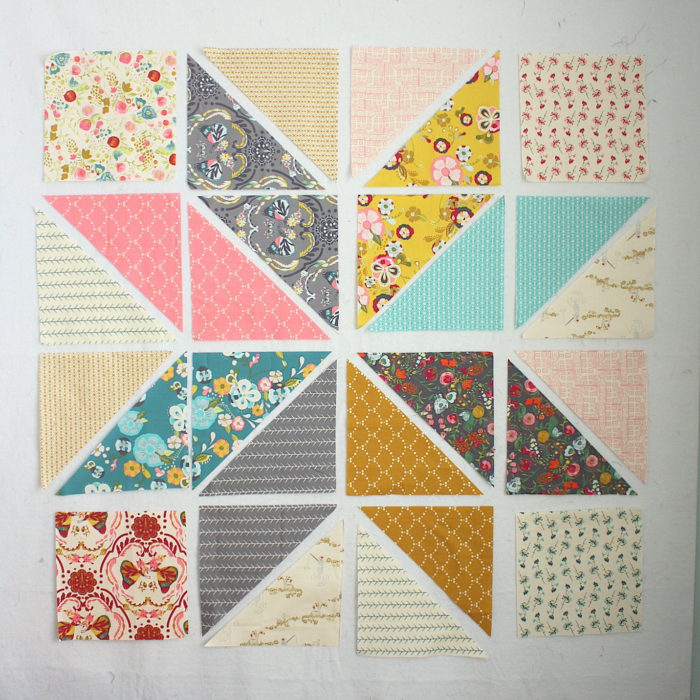
Before you start sewing, use the diagram above to lay out all of your pieces - 4 background 9½” x 9½” squares, 8 background triangles, and 16 dark triangles. This gives you the opportunity to play with color and get your eight star points well balanced.
Sew the triangle pieces into twelve half-square triangle blocks. Match up the long diagonal edges and sew them together carefully using a ¼” seam allowance. As you sew these bias edges, carefully guide the triangles through the machine without pulling on the fabric so that you don’t stretch the bias (diagonal) edges.
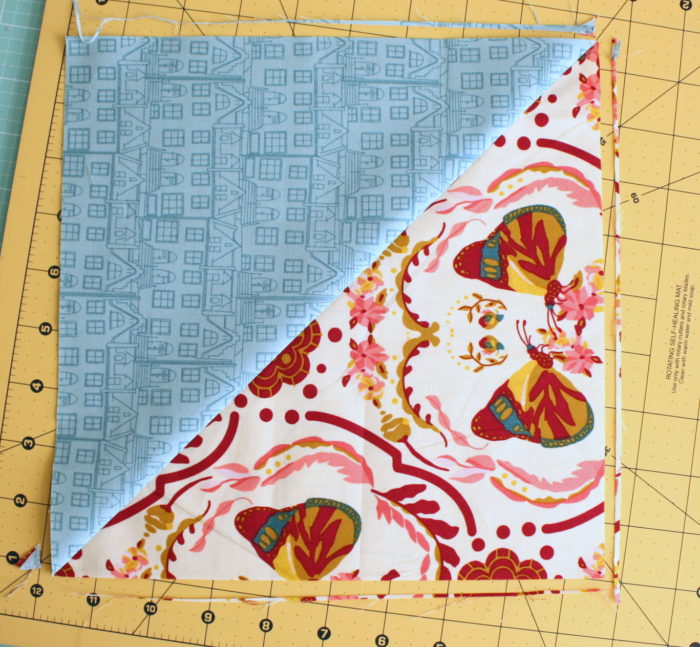
Press seams to one side. Then square-up your blocks so that they are all an accurate 9½” x 9½” square. (This is an important step, or your quilt top could get misshapen.)
Then sew the blocks into four rows of four blocks. Press seams to the left on rows 1 and 3 and press seams to the right on rows 2 and 4.
Sew rows together to get pieced quilt top. Opposing seam allowances should match up and nest together, helping points to match up as well. Press row seams all the same direction.
Add borders to your Lone Star Baby Quilt:
Trim two of the 2” x 42” strips to 2” x 36 ½”and pin the strips to opposite sides of the quilt and sew in place using a ¼” seam allowance. Press seams toward the border strips.
Trim the remaining two strips to 2” x 39 ½” and sew them to remaining sides. Press seams toward the border strips.
Finishing your Lone Star Baby Quilt:
You can see the steps I used to baste, quilt, and bind - all of the finishing process for this quilt here.
For my binding I cut four strips of fabric 2 ½" x the width of the fabric (42"). Sew them together end to end to create one long binding strip. This tutorial shows how to bind - or finish - a quilt.
Morning Star Baby Quilt Variation
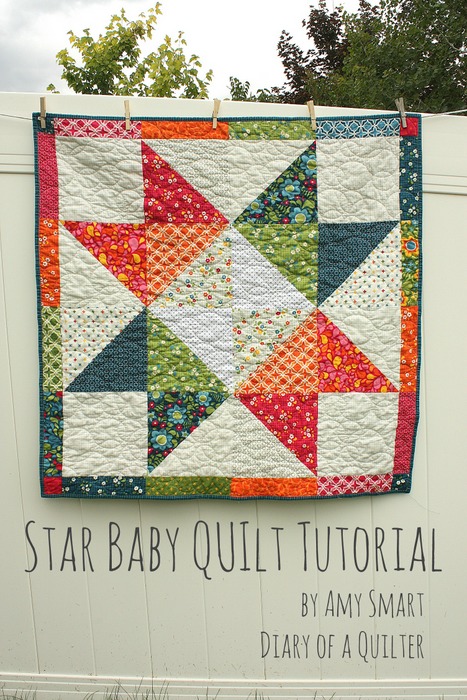
This Morning Star baby quilt variation finishes at 40" x 40". This is another great project for using pre-cut 10" squares (or Layer Cake squares), calling for at least 21 10" x 10" squares. It could be made very clean and simple or super scrappy - lots of room for variations on a classic quilt block. This quilt also shows a different scrappy border variation that would also work for the Lone Star variation.
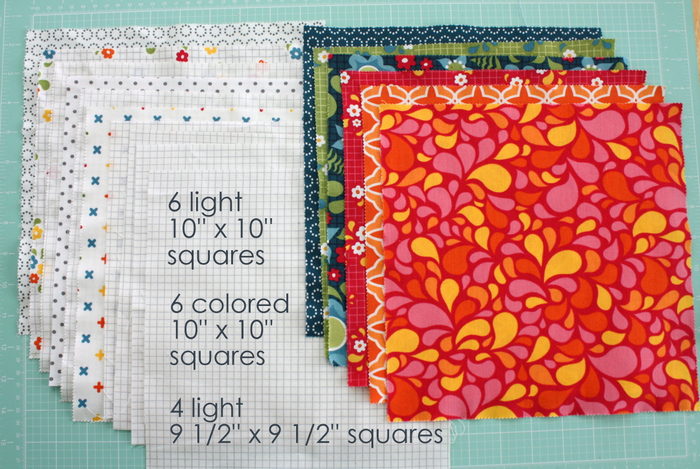
Fabric requirements for your Morning Star Baby Quilt:
- 6 light 10" x 10" squares
- 6 colored 10" x 10" squares
- 4 light 9 ½" x 9 ½" squares
- 16 strips 2 ½" x 9 ½" and 4 squares 2 ½" x 2 ½" for borders (cut these from yardage or from remaining pre-cut 10" squares)
- 1 ¼ yard backing
- ⅜ yard binding (cut into 4 strips 2 ½" x width of fabric)
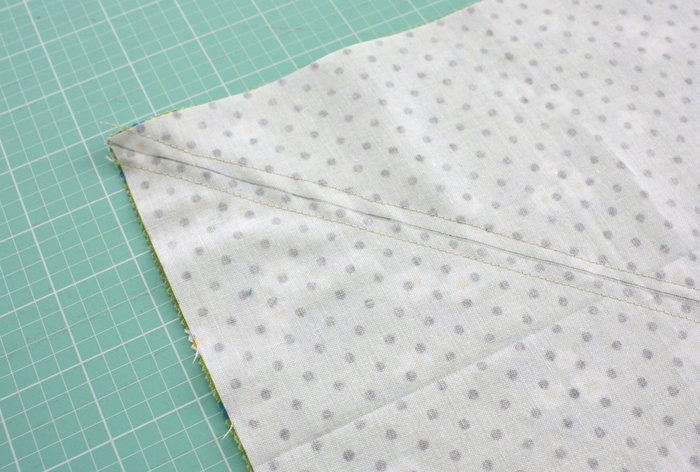
Draw a diagonal line on the back of the six 10" x 10" light squares. Match them up with a colored square and sew a ¼" seam down both sides of the drawn line.
Repeat with all six pairs.
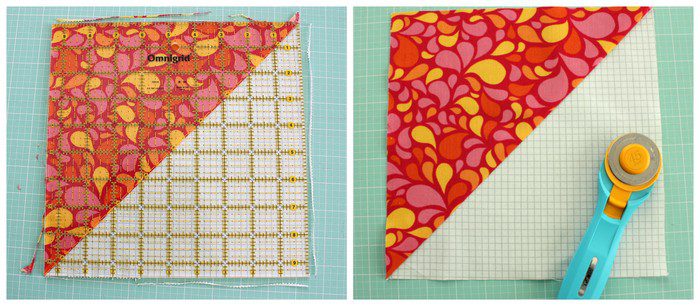
Using a ruler and rotary cutter, cut all six pairs on the drawn line to create 2 half-square triangle blocks from each pair, for a total of 12 half-square triangle blocks. Press seams toward the dark fabric. Square up each block to 9 ½" x 9 ½". (Don't skip this step!)
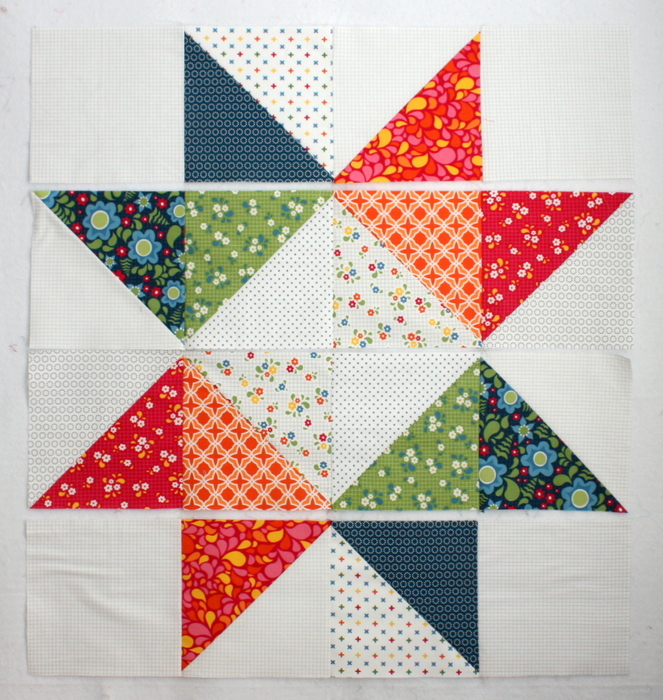
With solid light 9 ½" x 9 ½" blocks in the four corners, layout 12 half-square blocks in a star motif - 4 blocks across by 4 blocks down. You can use this layout or create one of your own. There are lots of options and variations.
Sew blocks into four rows Press seams alternating directions for each row. (For example press all seams to the right on odd rows - 1 &3 and press all seams to the left on even rows 2 & 4.) Then sew four rows together, pressing seams all the same direction.

To add borders, sew two sets of four 2 ½" x 9 ½" strips end to end. Decide which side of the quilt you want to sew them to and press the seams in alternating directions from the seams on that side of the quilt. Sew these two borders to opposite sides of the quilt. Press seams toward the borders.
For final borders, sew two more sets of four 2 ½" x 9 ½" strips end to end and sew a 2 ½" x 2 ½" square to either end. Repeat the process of pressing seams alternating directions from the seams on the quilt side. Pin border at seams and sew final borders to quilt. Press seams toward the borders.
If you would prefer non-pieced borders cut four strips 2 ½" x the width of fabric and attach them Here is a simple quilt border tutorial.
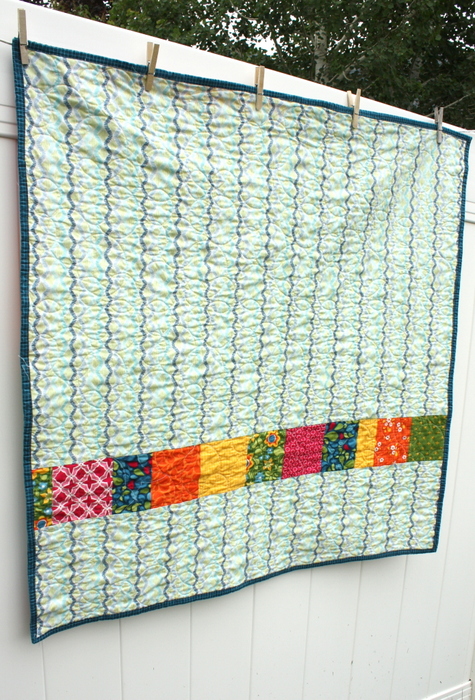
This Morning Star baby quilt calls for a 1 ¼ yard piece of fabric (roughly 42" x 42"). This is the most economical size for backing the quilt, but will be just slightly larger than the quilt front. If you baste carefully, it should still be big enough all the way around with excess backing fabric on all four sides before you quilt it. If not you may want to piece a larger back.
I extended my backing fabric by using remnants from my layer cake to make a fun pieced strip through the back of my quilt. There are lots of options for quilting your quilt. Here is a simple quilting tutorial. Big thanks to Sew Shabby Quilting for the quilting on this one.
For my binding I cut four strips of fabric 2 ½" x the width of the fabric (42"). Sew them together end to end to create one long binding strip. This tutorial shows how to bind - or finish - a quilt.
Fabrics used for these star baby quilts: (left) Emmy Grace by BariJ for Art Gallery Fabrics (available here) and (right) Best Day Ever by April Rosenthal for Moda.
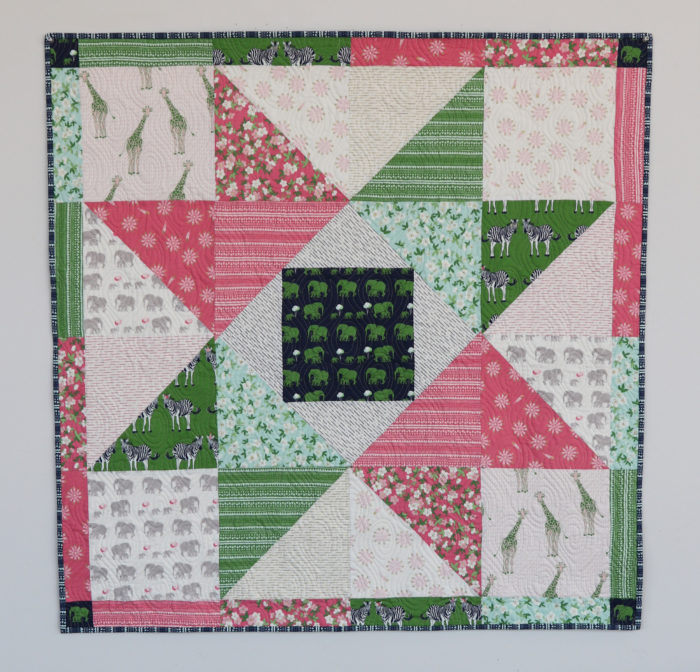
I've since added a third variation of this giant star baby quilt. You can find this Safari Party versions here.
If you would prefer a printable PDF version of three of these star baby quilts in one place you can find it here for $3.00.
Crib Size Sawtooth Border Lone Star Variation:
If you'd like to make a slightly larger baby quilt variation - just add and extra border! And might as well make it extra pretty with a sawtooth border.
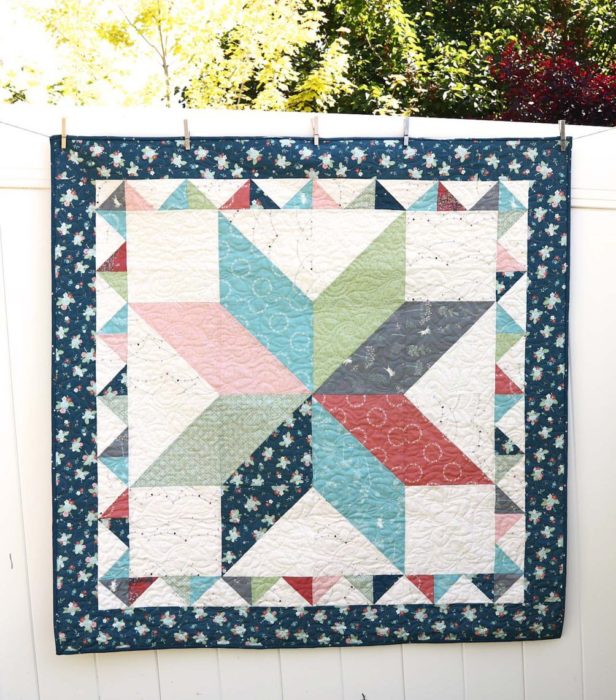
You can find the tutorial for the 50" x 50" Sawtooth Border Variation of this same pattern here.
Throw Size Lone Star Quilt

And for an even larger variation on this design, check out Jeni Baker's Giant Vintage Star Tutorial for a 70" x 70" variation.


Patricia Cash
Love this quilt, thanks for the tutorial
amanda
thank you for this tutorial! i would like to make birthday gifts for some babies, but i am running out of time! so this quick baby quilt is perfect timing!
Elsie Pop
This is the first quilting tutorial that I've read which makes me think I could do it! Thanks! xx
Amy Smart
Yay! You can!!
Karen H.
How do you go about making the baby quilts mush bigger? Large lap?
Lauren Deel
I love this! The two variations are just great. Just goes to show: it doesn't have to be time-consuming and complicated to be beautiful. 🙂
Amy Smart
Amen! 🙂 Thanks Lauren!
Janie
Beautiful colors and great tutorial, thanks for sharing!
Sandie @ crazy'boutquilts
Cute and easy~ I love it!!
Louise
I'm just finishing the echo quilting on a giant star (size of Jeni Baker's) as a wedding gift for a friend of my daughter. She is getting married on Pioneer Day and her theme is western. I made a large blue and red star with light and dark of each. I have no idea how to show you, but trust me, it is awesome. I love, love, love big stars!
Amy Smart
OH that sounds amazing! What a great gift!
Mary
These quilts are awesome! Thanks for sharing the tutorial. I'll certainly be making one for my grandbaby due in January.
Buffy
Excited to try these out. I just made my first quilt that incorporated a star last week and i am in love with it. I'm not great at HST and matching up my points but i find the more I do it, the better I get. Somehow, precuts are helping that issue too. Love these 2 designs.
Sigi G
Love your tutorials with the two versions. Will have to try these quick beautiful quilt patterns. Thank You Amy!
Jen
This is adorable. Love the colors.
robin
Thank you thank you. Your design and colors are wonderful.
Looking forward to trying this. I have only made 2 quilts so this appears to be on my skill level. (I hope)
Amy Smart
Yes! I think you can do it! It's a great beginner quilt!
Anne
I love all the collections pictured.
Patsy
Thank you for the baby quilt tutorial! It is perfect for a baby gift. Love it!
Kate
I really like the big star pattern, thank you for sharing
ClaudIa Dunitz
Made up the top today - thank you SO much for the awesome tutorial! I didn't have a layer cake, so I cut all the squares from my stash. It took five hours, from selecting fabrics to photography. It looks fabulous!!! Thanks again. I will most likely make another out of some Kaffee Fassett florals I have left over from another project.
Amy Smart
Yay! That's so awesome!
Marie wilde
I have a gorgeous layer cake of reproduction flannels and would love to make this quilt. I know flannels can be difficult when multiple seams are involved at one point. Amy, do you think this would work with flannels? Thanks for your advice.
Amy Smart
I think this would be a great quilt - and beautiful - with flannels. The blocks are bigger so there aren't quite as many seams. There might be a little bit of bulk in the center, but that's it. I say go for it!
Marie wilde
Thanks for the encouraging words. Will send a pic when done.
Joyce Kay
Our Women's Club with the local Elk's Club made a bunch with the Lone Star in 2 colors with the same background, then backed them with flannel, no batting. These were then folded in 3rds and rolled to go into backpacks for officers to keep in their cars for when they have to remove a child from their home. The backpacks have other items also but they wanted a snuggly blanket for comfort. I figured up yardage and made kits up so some of the ladies could take them home to make.
Amy Smart
That is so awesome! What a great cause. I'm so glad to hear!
Lynn Douglass
I'm in charge of a small group of quilters here on the Central California Coast. I decided to use your tutorial for an online QAL, giving the group until the end of September to complete their quilts. Everyone got so excited, most of them already have their tops done! I'm still trying to choose fabrics! LOL! We're on Facebook as the Central Coast Modern Quilting Friendship Group, if you want to check out the quilts. Thanks for such a great tutorial!
Arleen
Love it
Alicia O'Brien
Hi there, what do you mean about pressing seams in one direction or another? Buying fabric tomorrow !! So excited!
Thx Amy!
Amy Smart
Basically it means that you're pressing your seam allowances over to one side (rather than pressing them open). Most patterns will tell you which direction to press your seams (right or left, toward the dark, etc). This will play a role later when you assemble the blocks so that you avoid as many overlapping seams as possible.
Alicia O'Brien
Also! If I were buying this in metres how many metres would I need of both light and dark fabric? Thx!
Deborah
Is this baby quilt a crib quilt size?
Amy Smart
THey are 40" x 40". So probably more of a baby size.
Lucy
Hi Amy,
Just a note to let you know that I have featured this beautiful Star Baby quilt on the By Your Hands blog today. Would love to have you stop by http://www.byyourhands.com!
Jenn
Love this, but I have no baby. Would you just double everything in size to make it an adult size?
Amy
Here's a similar tutorial for a large version: https://www.incolororder.com/2011/08/giant-vintage-star-quilt-tutorial.html
Mary
Classic and beautiful.
BeagleMom
Cute quilt. Why charge $3 for PDF pattern? Other bloggers have a "PDF" link for their free patterns.
Amy
Yep- every blogger is different. Sometimes I offer free PDF's and sometimes I charge a nominal fee because I this is my work. I create a lot of free content and the small charge helps me earn a living. And it's optional. All of the content for this tutorial is still free if you don't want to buy the PDF.
Sharon Umpleby
I appreciate this pattern, I needed a baby gift in a hurry and this fit the bill. Used the "Little Engine that could" by Riley Blake fabric.
Amy
Awesome! I do love this for an especially fast finish. I bet it turned out so cute.
Laurie
Thank you for posting. I have always loved this quilt when I see it on Pinterest.
Nanette Jernigan
Thank you so much for the star patterns! One question, why is Lone Star sewn from cut triangles and the other sews squares that are sewn together and then cut in half? I would like to make the Lone Star but prefer the second way, just wondering if both can be sewn the same way or is there a reason why not?
Amy
Great question. It's about fabric placement. It's slightly faster to sew two squares together on the diagonal and then cut in half and this method prevents stretching the bias/diagonal edges of the triangles. Then the outcome is you get two identical half square triangle blocks. Works great when you need identical blocks.
But with the Lone Star quilt each of your triangles match up with different prints - you don't need two identical triangles. (Unless you are using only 4 prints for your lone star - then you will have repeats, so use the two squares method above.
I hope that helps?
Barb
Thank You Amy! I love that they are fast quilts I need this right now and they are so cute. Again Thank You. Barb
Molly
Amy, I can't tell you how much I love this quilt! I've been making it for years now, any time someone in my life has a baby or has a friend who has a baby etc. It's such a quick, fun, cute quilt and I love choosing rainbow fabrics with crazy prints — so fun to pick out things that are wackier than I'd typically pick for a non-baby quilt. Thanks so much for sharing this pattern!
Mickey Price
I just purchased and downloaded the Morning Star baby quilt. All I got was gibberish and I dont know who to contact now to get the pattern