
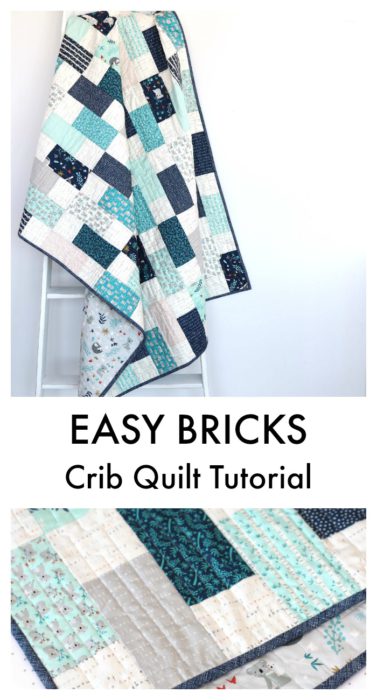
I'm excited to share a new, simple baby quilt tutorial! I love simple quilts - especially because they are a fun way to show off cute fabric as well as pull together a great baby gift in a relatively short amount of time. This one is Fat Quarter friendly or perfect for using stash you've already got on hand.
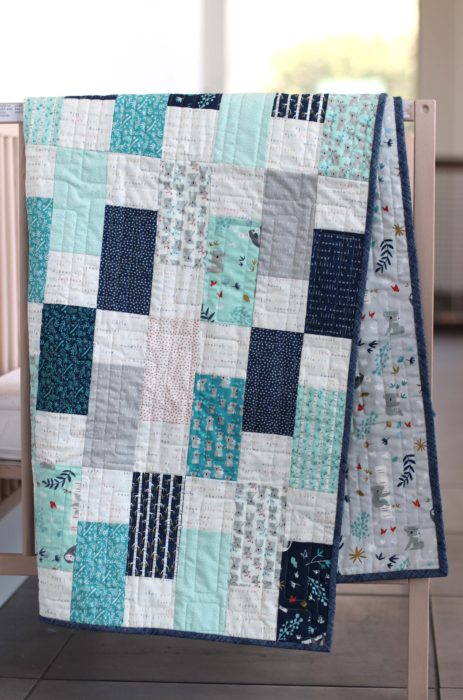
This quilt is based on my popular Bricks quilt tutorial, but scaled down for a smaller size quilt. The information in this tutorial contains affiliate links.
This crib size quilt finishes at 42" x 54", but it's very easy to modify the size by adding or removing bricks. 🙂
Baby Quilt Tutorial
Fabric Requirements:
- Bricks: 7-8 Fat Quarters OR 8 strips of fabric 6 ½" x 42" (Width of Fabric - WOF)
- Background fabric: ¾ yard
- Binding: ⅜ yard (if you're cutting bias strips like I did you may want ½ yard)
- Backing: 2 ½ yards for a pieced back OR I used 1 ¾ yards + left over front fabric bricks to piece my back (see below).
[If you would prefer not to piece a back, and you are careful when quilting, you could leave off a row of bricks and get away with 1 ¾ yard piece for a 39" x 54" quilt.]
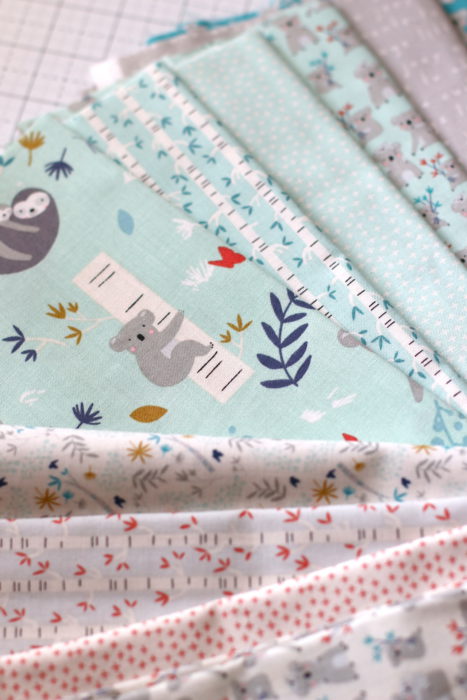
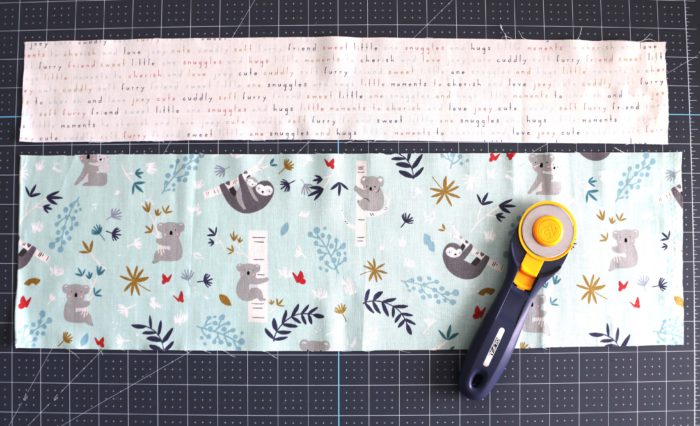
For this quilt I'm using Deena Rutter's latest collection, Joey, from Riley Blake Designs. I love the color palette - perfect for a boy quilt - and the Koalas - and even a few charming Sloths - are so cute.
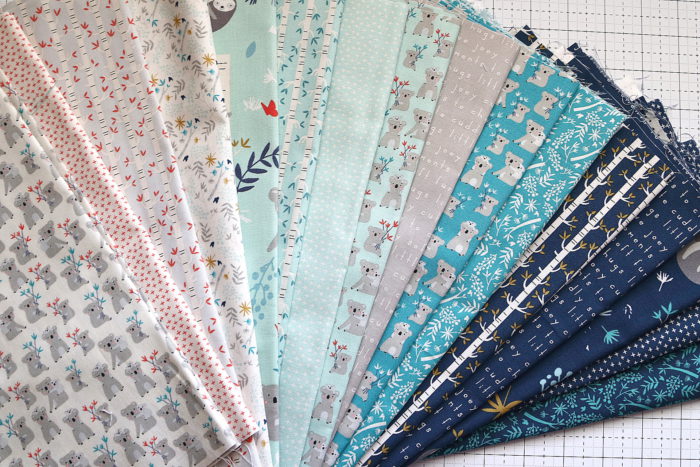
For this design to really pop, I suggest using colors that have a lot of contrast - so I mostly went with the darker prints to contrast with the cream colored text print I used as my background fabric. But, as you can see, I still threw in a couple of the light prints - or at least they read light when I stepped back and looked.
One of the reasons I love this design is that it's really easy to strip-piece and cut multiple blocks at once.
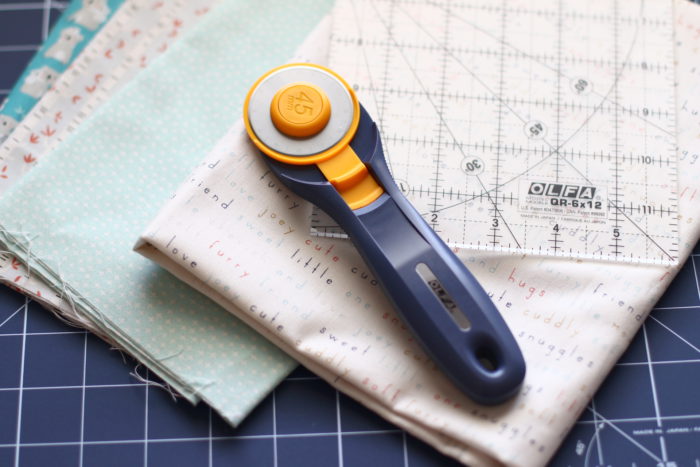
Cutting Instructions:
From the assorted prints: cut 14 pieces 6 ½" x 21" - you can easily cut two from a Fat Quarter, or cut them from assorted yardage. (I used 14 different prints in this quilt and cut them from regular ¼ yards)
From the Background Fabric: cut 7 strips 3 ½" x WOF (width of fabric). Cut them in half on the fold to get 14 strips 3 ½" x 21". (I used the cream text print for my background fabric.)
Piecing the quilt:
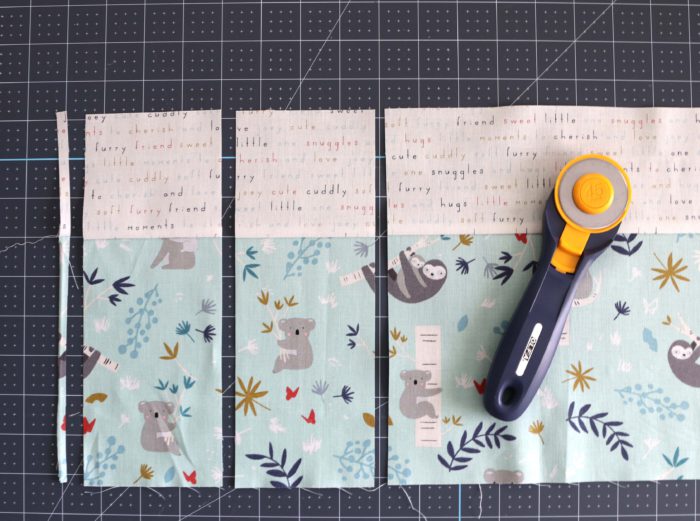
Sew a 3 ½" x 21" background strip to the top of a 6 ½" x 21" print strip. Press seam toward the print strip. Carefully trim off the end to square-up the outside edge. (This Strip Piecing Basics post has helpful tips on accurate strip piecing and cutting if this is new to you.)
Measure over 3 ½" and cut a 3 ½" x 9 ½" Brick Unit from the strip set. Continue cutting 3 ½" units. You should be able to get 6 units per 21" strip set.
Repeat with 13 remaining strip sets to get 84 total 3 ½" x 9 ½" Brick Units.
A note about directional prints: This fabric collection contains multiple directional prints, including the text print I used for my background. Using this strip piecing method, you will be rotating fabrics and they won't all face the same direction. I chose to not worry about that.
If you want all of your prints to line up the same direction you'll need to cut individual 84 individual 3 ½" x 3 ½" squares and 84 individual 3 ½" x 6 ½" bricks.
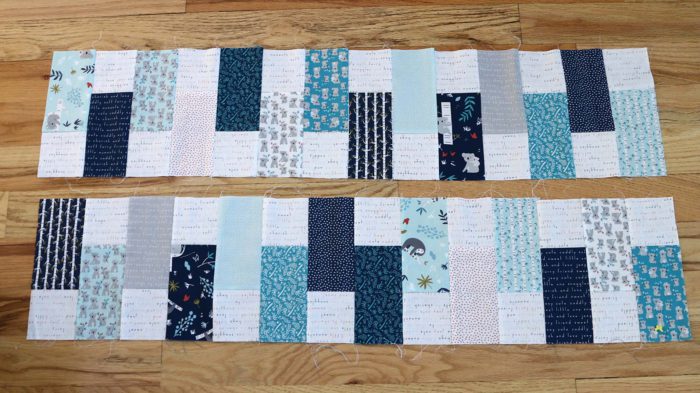
For each row, layout 14 Brick Units, alternating directions. You will make 6 rows of 14 Brick Units. I recommend laying out the whole quilt so you can play with the overall color and pattern.
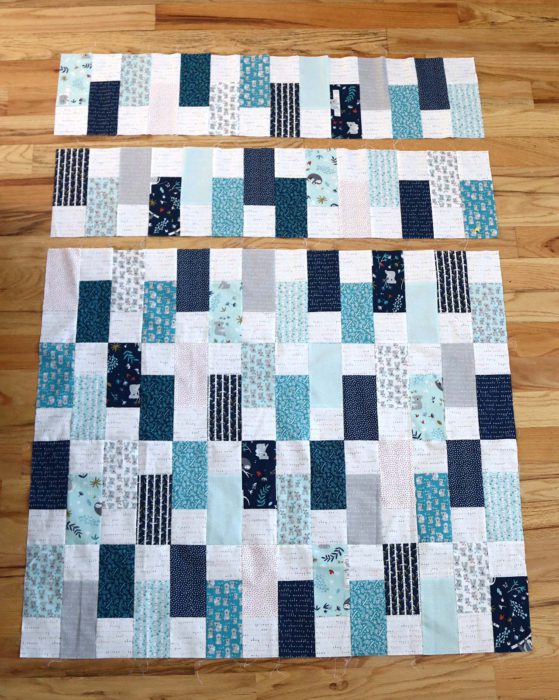
Sew 14 Brick Units together to make each row. Press seams to the left on the odd rows (rows 1, 3, 5) and to the right on the even rows, (rows 2, 4, 6) 
Pressing the seams in opposite directions on adjoining rows will make the seams allowances but up against each other, helping to match up corners and keeping rows straight.
Sew six rows together and press seams one direction.
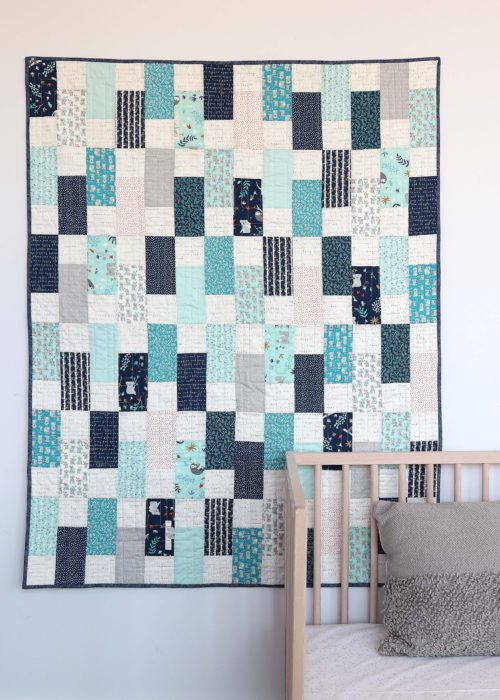
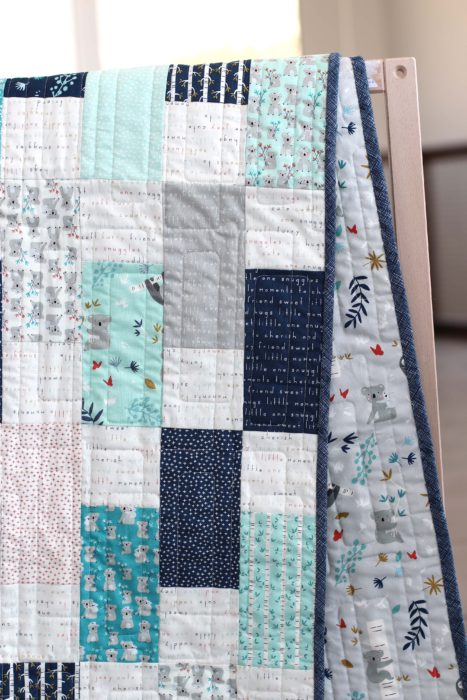
And that's it, folks! It's such a simple quilt. But I love what a great modern variation it is on tradition patchwork.

If you're interested in help to finish this quilt, check out this post for how to quilt your own quilts and How to Finish a Quilt for tips on Binding a quilt.
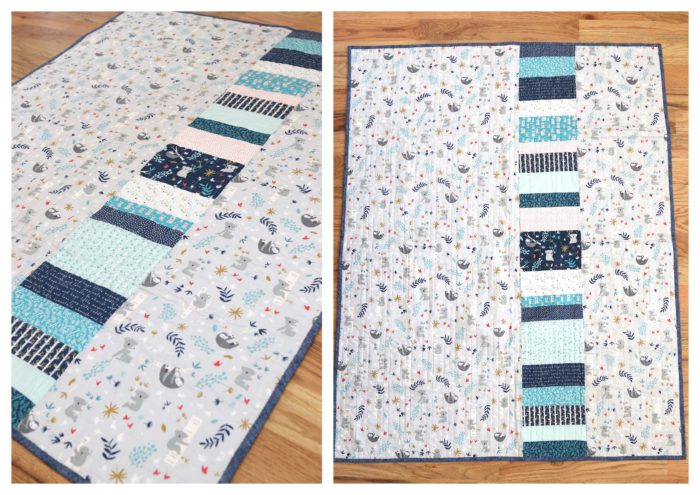
Here is how I pieced my quilt back. I had a 1 ¾ piece of yardage and leftover remnants from the fabrics I used for bricks. So I made one vertical cut in the yardage about 20" from one side. (I wanted it slightly off center). Then I cut the brick fabric remnants into strips 8" wide x a variety of different heights. After that I sewed them together into an 8" x 63" long strip and sewed that strip between the two pieces of yardage. I love a pieced back for using up remnants from the quilt top.

I had Melissa from Sew Shabby Quilting quilt mine using the modern Apartment Windows pattern.
For my binding I used another fabric designed by Deena Rutter - this Edie Jane navy sketch plaid.
You can find Joey fabrics available on Etsy.
And there you go! Feel free to Pin this image to help you easily find this tutorial any time.
I have created a printable PDF version of this baby quilt tutorial pattern, combined with the Throw Size Easy Bricks Quilt pattern as well. You can find it here for $1.50.

Pam
Just checking.....you said you would show the pieced backing and I didn't see a "back-of-the-quilt" photo! Would love to see it! And LOVE the quilt....I have one more "Grandma's house" comfort quilt to make for my last grandbaby and I think this is the perfect pattern. Thank you for sharing!!!
Amy
Thanks for checking, Pam! I just added the pictures of the pieced backing. (Sorry, I didn't realize I'd forgot to take those until I was writing late last night.) Thanks for your patience and the reminder!
Little Quiltsong
Love this pattern - thank you so much for sharing Amy. My scrap baskets are overflowing - especially my 3.5 one. I just might have to make a scrappy one first :)!
Amy
Ooo! I'd love to see it!
cindypete8
I love this! Thanks for the great tutorial. This one is definitely on my to-do list. The sloths are the cutest!
Susan
Very cute! This is perfect foe a fat quarter bundle that I won a few years ago. Thank you for sharing your pattern.
Mary Bee
Thanks for this sweet, simple baby quilt. The Joey fabrics are precious - I ordered some of each fabric in the collection in anticipation of your tutorial. Your photos are so helpful, especially to illustrate light/dark placement. I can't wait to get started!
hopflower
What a charming little quilt! Love the attention to the little sloths as well. This is a great simple project for a new baby; or anyone who needs some lovely new fabrics to wrap up in!
AshleyP
Hi Amy,
Thanks for this pattern! I just finished making one for my niece. I appreciated your notes on pressing the seams and squaring of top.
I took a suggestion and did a pieces back (one of your other posts).
Thanks for all the photos- they were very helpful!
Patricia Hanna
Lovely! Thanks for this quick-to-piece project. I actually have a boatload of 3" strips left over from a previous project, and I can easily adapt this pattern to make good use of those.
Amy
Perfect! Don't you love putting leftovers to good use?
Karen Seitz
I've made your bricks quilt and love the idea of scaling it down for a baby quilt. I also love the Joey fabric! Thanks for sharing this project.
Christine Sherman
So great, thanks for sharing! I hadn’t seen this fabric yet, so cute!
Vicky
Very cute baby quilt! Is the fabric used for the backing the same as the one used for the top? The backing looks gray and the fabric used on the top looks mint colored. Thank you!
Amy
Good eyes - that print comes in both gray and mint green. The backing is gray, but the print in the cutting photo is mint green. 🙂
linda ehrhardt
Thank you for sharing Amy. I made this (my first quilt) for a friends daughter's baby shower. It turned out great. It's not perfect but it's perfectly adorable.
linda ehrhardt
Thank you Amy..... I made this quilt for my friends daughter's baby shower. It's my first quilt so it's not perfect but its perfectly adorable and I hope she loves it for years to come.
Linda
Rebecca TomanRebecca Toman
Amy, love this quilt. It’s hard to tell on the computer. Is this fabric you used flannel or quilting cotton? Thanks.
Amy
It's quilting cotton. 🙂
Amanda Elam
I’m making this for my next baby with all my fabric from my stash, my husband said I couldn’t buy more fabric, guess I have too much. This will be the third one and everyone have been an inspiration from your tutorials. They are the best and easy to follow!
Suzie
Hi Amy I loved your design and used it to create a beautiful quilt for my grandson Theodore. Your instructions were clear and very simple to use - great for a novice like me (with one hand) Im very pleased and proud of my finished quilt. Thanks for posting your design and instructions. Suzie
Amy
I am so glad!
Coralee
Love your quilt! I may have missed it, but what are your seam allowances?
Amy
Good question, I should state that more clearly on tutorials. The standard seam allowance on all quilting patterns is 1/4". 🙂
Lorraine
If the pieces are 21 inches and then you trim the end, how can you get 6 pieces that ate 3.5 inches wide? After washing, my fabric is slightly less than 42 inches wof so am tight with yardage to begin with so can't afford to trim. Looks like I will only be able to get one 21" piece from the wof (ugh). Thanks for the tutorial!
pdxsimmons
I was just reading through the comments because I ran into the same issue. My background fabric was EXACTLY 42'. Once it was washed and the selvage cut off, I was left with a 20" piece and a 21" piece. I wasn't sure what to do so I have just made 5 bricks on the 20" strip. Not sure how it will work out, but will update when it is done.
Tina Lilly
Hi Amy, I pinned this so long ago and I just finished it! This was a great project. Thank you so much for the pattern and inspiration.
Amy
Awesome! I'm so glad!
Nancy White
I am using some jelly rolls for this project. Would you think adding 2 more rows would be enough or should I add in more? Thanks for your help
Amy
Without seeing what you're doing, it's hard for me to say. I'd recommend sketching it out on paper so you can get a visual of the finished size you want. That always helps me a ton. 🙂
Jena C.
Hi! I love this pattern and have this pieced together for a baby quilt. I know someone else quilted it for you but I love the quilting design from what I can see of it in your pics. Any chance you have a link to the quilting pattern as I cant find it anywhere based on what you called it - modern apartment window. Thanks!
Amy
Here is a link to the digital pantograph: https://www.urbanelementz.com/city-windows.html
Suzanne
Hi! I found your blog through Pinterest, and after years of quilting blankets that didn't look quite right, my latest creation looks professional thanks to you!! I got the right tools and followed your post step by step. I can't believe how good my project looks and wanted to say a big heartfelt thank you. I can't wait to choose my next quilt 🙂
Amy
Hooray! I'm so glad and excited for you!! ❤
Wendy
I made this today for a new baby boy coming soon! One of the best quilt tops ever!!! Thank you for the free pattern!
Paula
Looks like I'm a little late to this ~ I love the Joey collection but can't find it available anywhere. You don't happen to have a stash you'd like to sell?
Amy
Yes, you're right. It's out of print. I might have a few random pieces here or there. I'll see what I can find. Email me at amy@diaryofaquilter.com if your are still interested. 🙂
Joyce
I have been searching for the printed word fabric you used in the baby brick fabric….where can I purchase it or has it been discontinued?
Amy
Yes, it's now out of print.
Samantha Kwasney Blaylock
i just cut out all my pieces, but didnt pay attention enough to realize that the stripes were going vertical, and i cut my longer pieces so the pics would go horizontal....do you think it would still look ok? seems off to me.
Amy
Yes, I think it will be fine.
Lesa Borninski
I would like to shrink this to a 42" x 42" baby quilt. Width is easy but when shortening the length what would you recommend? If I do 6 rows the length of each brick 7" finished. Thinking the background would be reduced to 2.75 and the rest of the reduction should come from the decorative fabric? ANy suggestions?
Sher
I like your quilt and my daughter is a beginner quilter. We have read thru your directions and the one thing you forgot to mention is that you need batting. You need to state the size needed. Or is this quilt without batting???
Amy
Great question. Yes, I used batting in this quilt. I recommend using a piece of batting about 3" bigger in length and width of the quilt top. This will make it easy to see when you are quilting the layers together. Then you will trim the excess. Here are my tips for choosing and using batting: https://www.diaryofaquilter.com/choosing-batting-for-a-quilt/
Cortney
My son’s friends are having a baby and I thought about asking a friend of mine to make a quilt… but then this post on Pinterest caught my eye and I decided I would try! I dusted off my sewing machine that I haven’t used in 15 years, reread the manual, oiled the parts, picked out fabric, and gave it my best shot. Your directions were helpful and easy to follow. I just finished it today and I’m so happy with how it turned out!
Amy
Way to go! I'm so proud of you. 🙂