
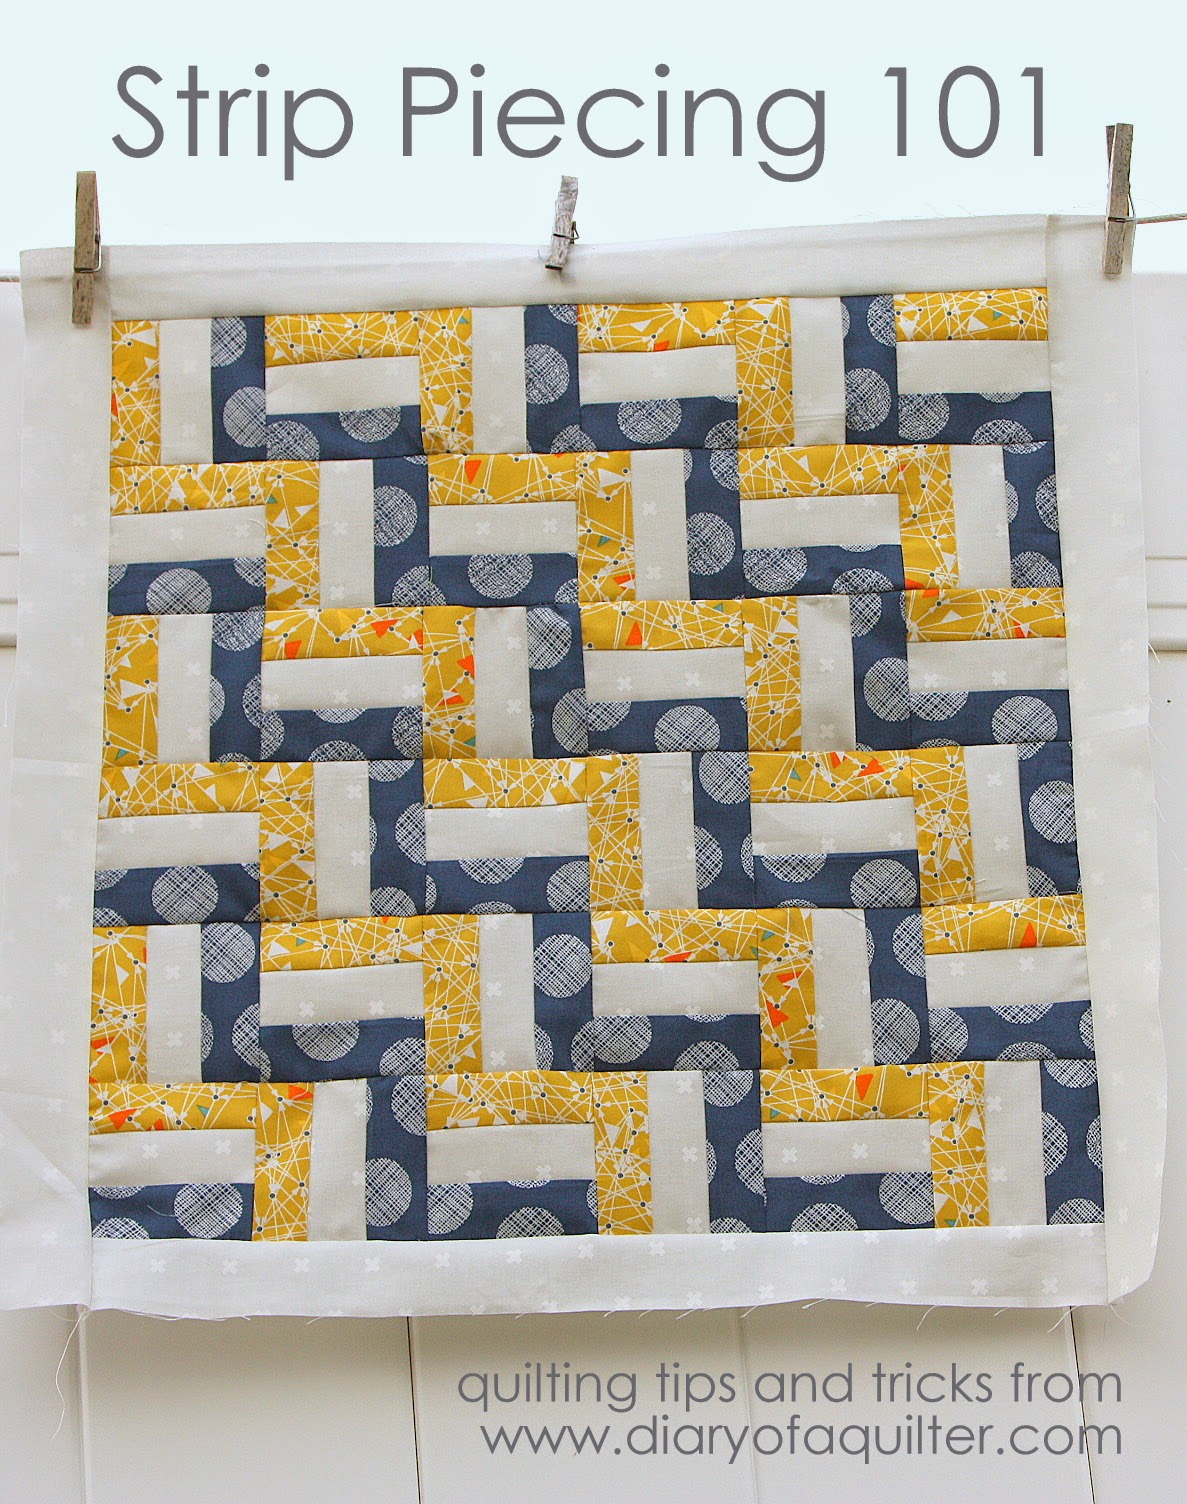
One of my favorite tips and tricks for faster and more efficient quilt making is using Strip Piecing. This process consists of sewing long strips of fabric together side by side and then rotary cutting across the strip set to create smaller units that are already pieced. Strip piecing is one of the best time-saving methods when it comes to quilting. I hope these tips will help you learn some simple basics to make piecing quilts with fabric strips most effective.
At the bottom of the post I have a YouTube video about strip-piecing techniques where I walk through and demonstrate many of the tips I describe in this post, if you would like a video visual.
Best practices when sewing strips together
Strip-piecing is a great time saver when making quilts. But there are some important cutting and sewing tips that will make a big difference with the success and accuracy of your piecing.
Using a consistent ¼ inch seam allowance
This is an important one. Keeping your seam allowance accurate and consistent will make it so that sub-cut units are come out the right size - especially if you're mixing them with other sub-cut units. If you're sewing smaller strips together, you definitely want to make sure you're sewing with a scant ¼" seam allowance.
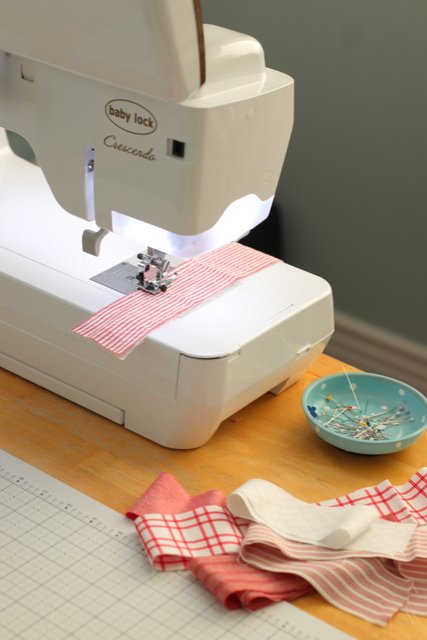
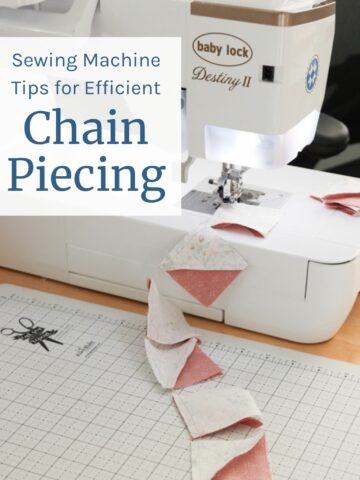
Since one of the pro's of strip-piecing is speed, it's also easy to start feeding strips through your machine and get careless about the consistency of the seam allowance. To help with this I recommend using a sewing machine foot with a guide edge - that way you can easily keep your fabric lined up against the guide. In the above photo I'm using the new Baby Lock snap on ¼" Quilting Foot with guide (part BLSO-QGF).
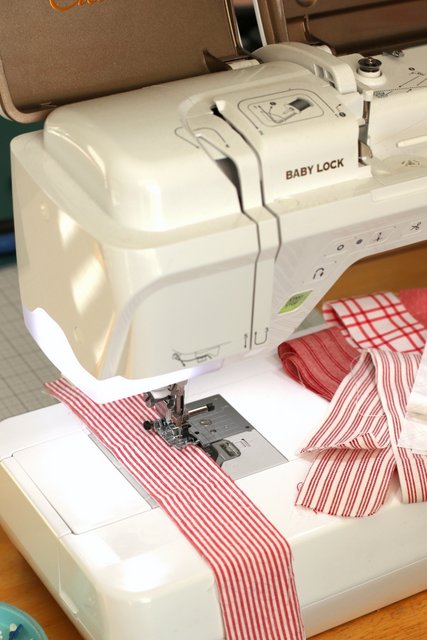
I also love using an adjustable seam guide that attaches to and extends out ahead of the foot itself. It's easier to keep an eye on how the fabric is feeding through the machine. (This attachable guide comes with the Baby Lock Accomplish straight stitch machine, but you can also buy separate attachable guides for your machine model. Check with your machine dealership.)
Sewing methods for strip piecing
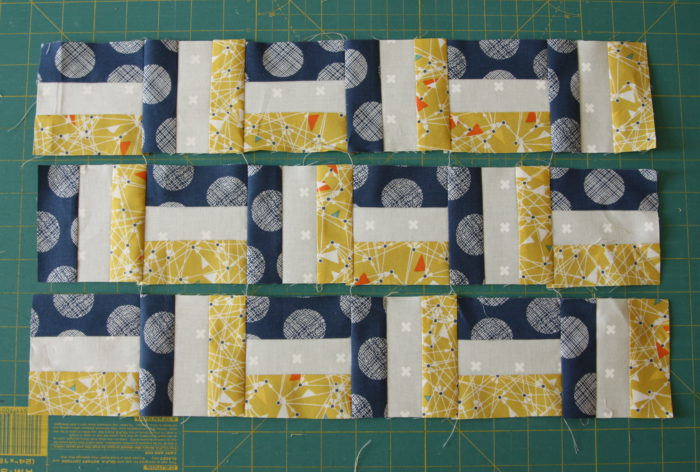
Most strip piecing projects begin by sewing a set of strips together side by side. As you sew multiple strips together, they will begin to arc or “bow” slightly if you sew them all starting at the same end. This is because the sewing machine feed-dogs will pull the bottom piece of fabric differently than the top strip that glides with less resistance under the presser foot.
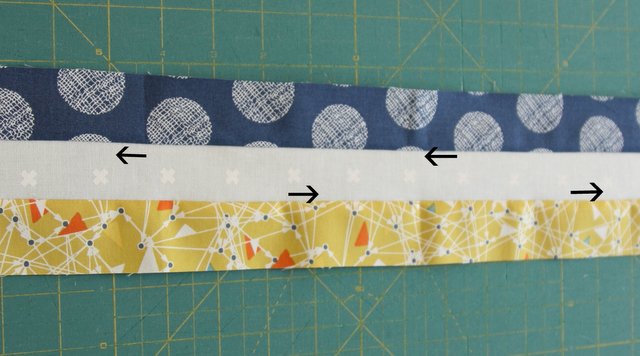
One way to minimize this “bowing” is to alternate directions the seams are sewn. For example, sew the first strip to the middle strip going one direction, then change and sew the third strip to the middle strip starting at the opposite end. If this is confusing or hard to visualize, check the video demonstration below.
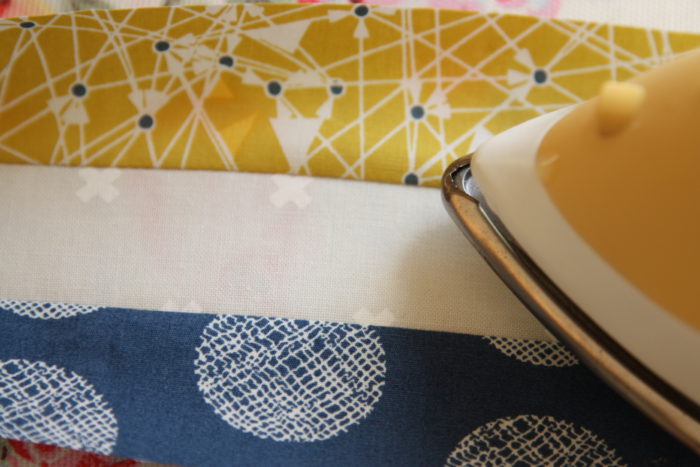
After the strips are sewn together, press seams to one side. (I’m a side presser.) Press seams from the top and use the point of the iron to make sure the fabrics are fully open and the seams are flat. I like to use a hot, dry iron so I don’t distort my strips.
Accurate strip piecing using precut fabric strips
Quilt patterns using 2.5 inch precut strips are very popular. These strips are typically 2 ½" wide x Width of Fabric (40"-42") and are sometimes called Rolie Polies or Jelly Rolls.
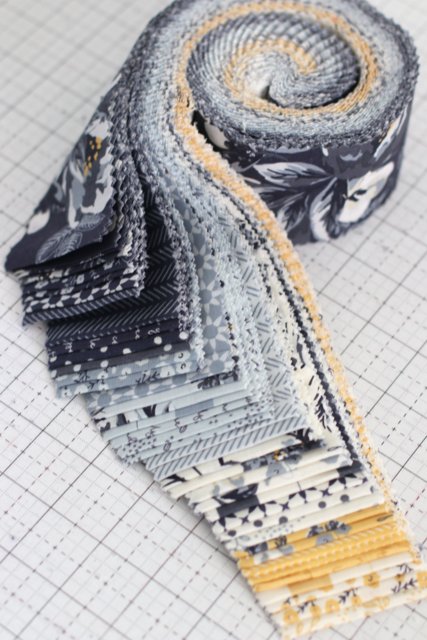
The one challenge they have is that not all precut strips are created equal. And they typically have a 'pinked' edge to prevent fraying.

Before you start sewing these precut 2.5 inch strips together, measure the width of one of the strips to find where the 2.5 inch edge officially lies. Is it at the peak or the valley of the long edge of the strip. (You only need to measure one per roll as they'll all be the same. But if you open up a new roll, make sure to measure the width of one of those strips too as it may be different.)
Then you know what part to use as your guide for your consistent seam allowance.
Tips for cutting your own straight strips
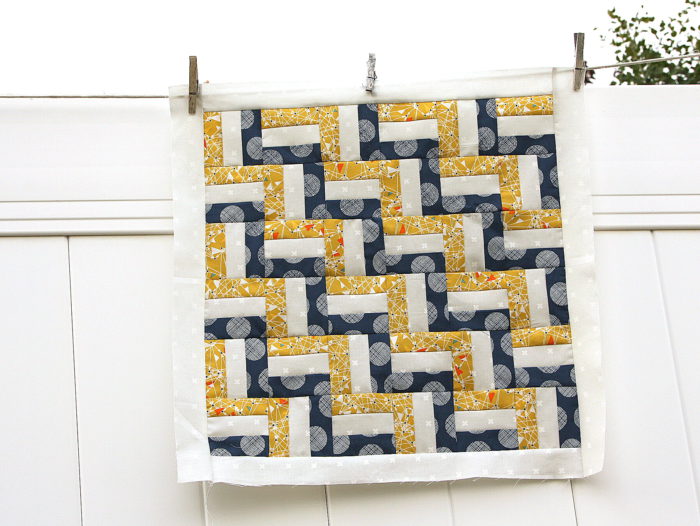
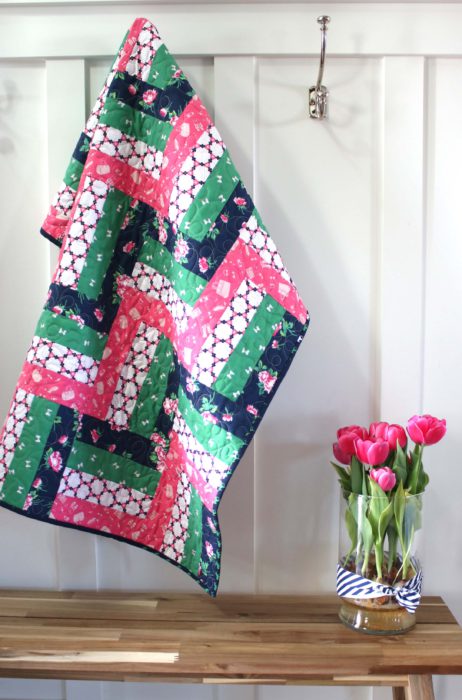
You also have the option of cutting your own strips to a variety of widths. Here are my tips for squaring up your fabric to accurately cut straight strips. In the process I will demonstrate a simple rail-fence 21" x 21" mini quilt project. This quilt uses the very traditional Rail Fence block, a super-versatile quilt block that can be laid out in multiple ways to create many different designs. It’s as traditional as they come, but depending on the fabric choices it can look very modern at the same time. And it's great practice if you're trying strip piecing for the first time.
Here are some important steps to take if you are cutting your own strips from yardage. The first important step when it comes to cutting straight strips is to square up the fabric edges. Skipping this step can result in a V-shaped strip instead of a straight one.
Don’t just start rotary cutting strips off the yardage. Often the yardage can become distorted on the bolt, or perhaps the busy fabric-store-worker has just cut your yardage without time to see if the edge is straight or square. The first thing to do is to make sure the edge of your fabric is "square" - meaning there's a 90 degree angle from the selvage edge to the yardage edge.
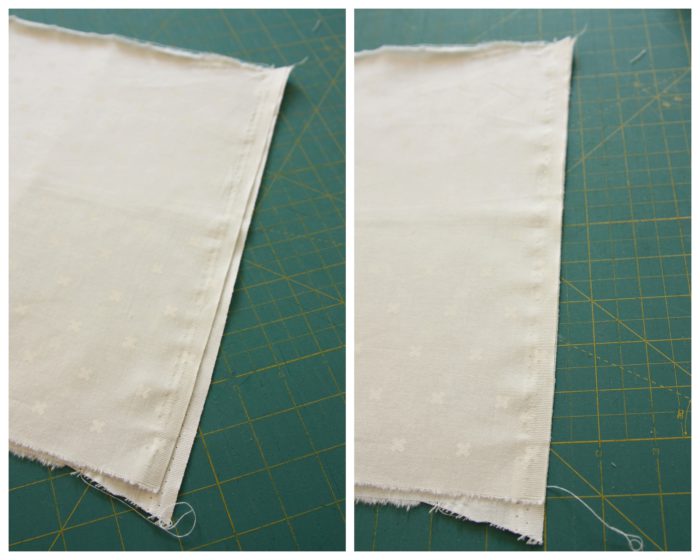
Begin by matching up the selvage edges. You can see in the photo on the left that the edges are not matched up. After you match up the selvage edges you may need to re-press the center fold.
When your selvage edges are matched up, lay the newly-pressed center fold on the cutting mat with the fold closest to you and lined up along the bottom straight line marked on the cutting mat.
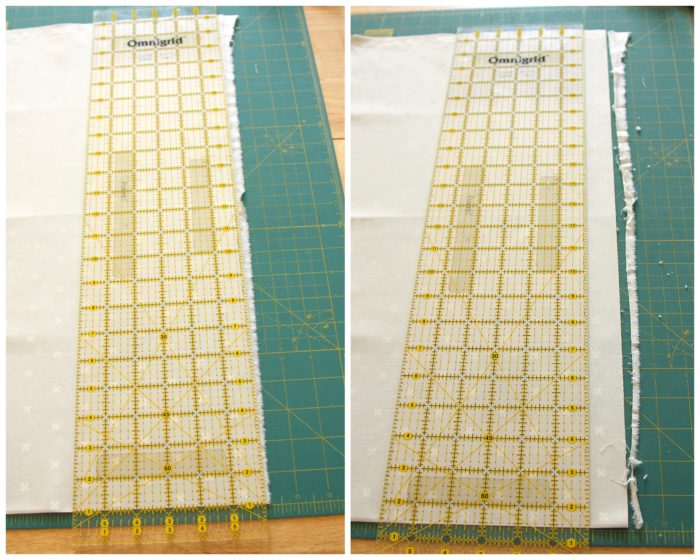
Put the edge you are going to trim on your right (if you are right handed… Opposite if you are left handed). Lay the long ruler over the fabric, again lining up a straight line on the ruler with the bottom fold. Using the rotary cutter, trim the un-even edge off the right side of your fabric, creating a straight edge at a 90 degree angle to the selvage edge. This is how you “square-up” your yardage.

Now you can cut straight strips from your yardage. Turn the fabric so the newly trimmed edge is now on your left side. (Right side if you are left-handed.) Again make sure the fold is lined up with the bottom straight line on the cutting mat. Lay the ruler over the fabric to measure the width of the strip you want and cut - this helps with accuracy. Measuring the strip’s width with the ruler, rather than the mat, is the most accurate measurement.
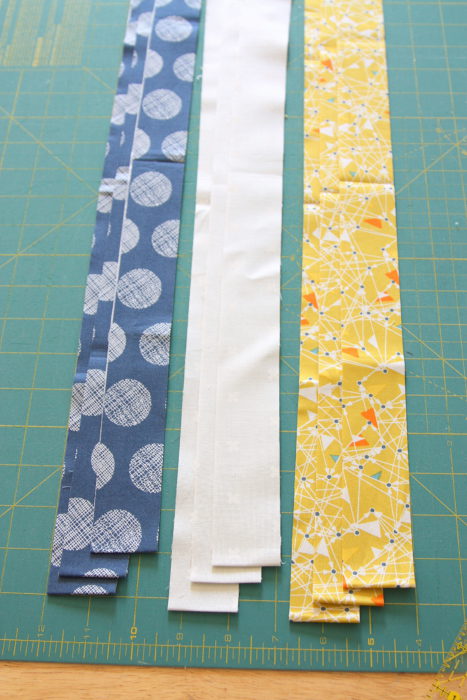
For this little 21″ x 21″ Rail Fence mini-quilt cut three strips 1 ½″ wide x the width of the fabric from three different fabrics. Using the sewing techniques I mentioned above, sew three different identical sets with one blue, white, and yellow strip in the same order. 
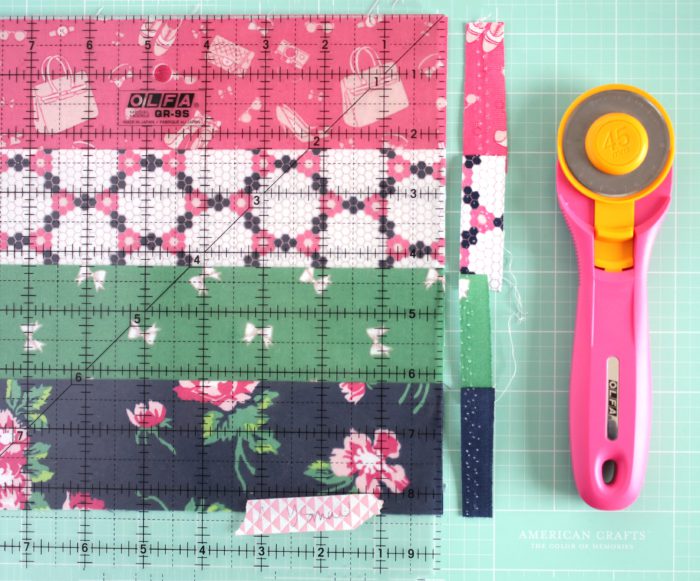
When strips are pieced and pressed, return to the cutting mat. Trim the selvage edges. Again, flip the newly squared edge to your left (or to the right if you’re left handed) so you can use your ruler as your guide to get your new units cut accurately.
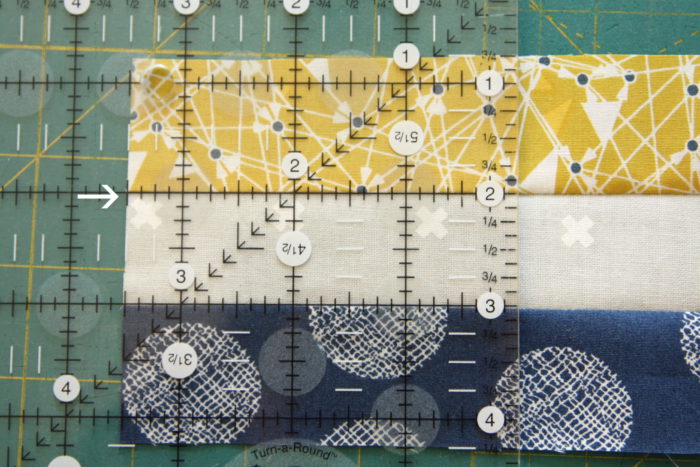
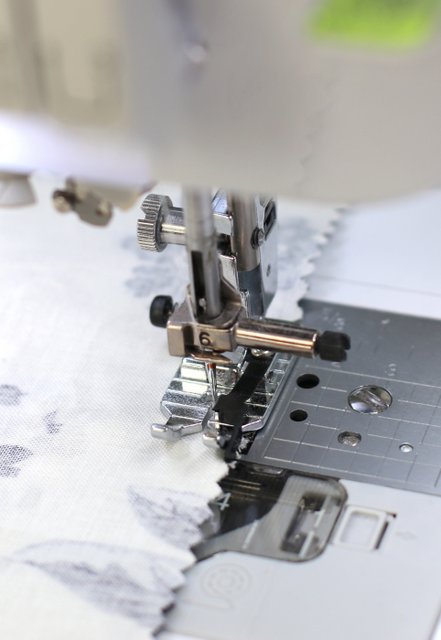
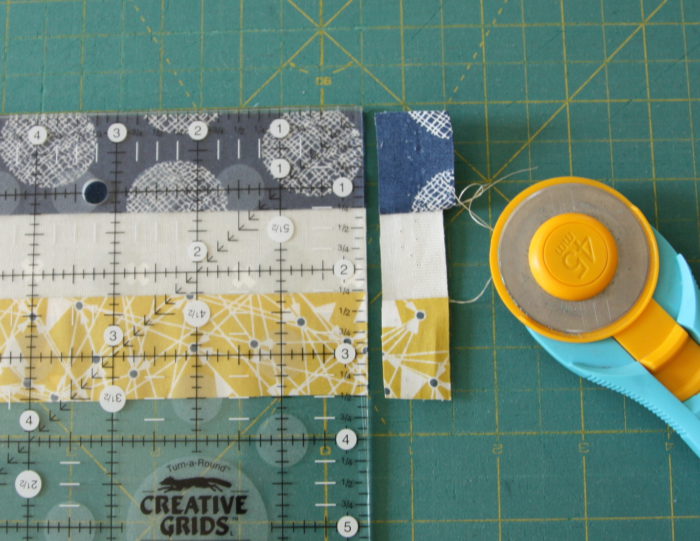
When you go to cut your units from the strip-set, place the ruler over the top of the strip-set and measure the desired width you want to cut. Lay a straight line on the ruler directly over one of the seams (see arrow in photo) to keep your strips square in the new unit. (Don’t use the top or bottom edge of the strip-set as your guide as these edges will still bow slightly.)
Cut your units off the strip-set (in this case cut squares 3 ½″ wide). You will get 12 squares from each strip set, for a total of 36 squares measuring 3 ½″ x 3 ½″.
Important piecing tip: If your seam allowance is even just slightly wider than ¼", the height (measurement across your strip set) will be slightly smaller than 3 ½". If this happens cut the width of the unit to the same measurement as the height of the pieced-set.
This works when making any Rail Fence block or other one-block quilt, but will become more tricky if you are piecing together multiple different units (like in a nine-patch block - see below). So measure your seam allowance and keep it consistent!
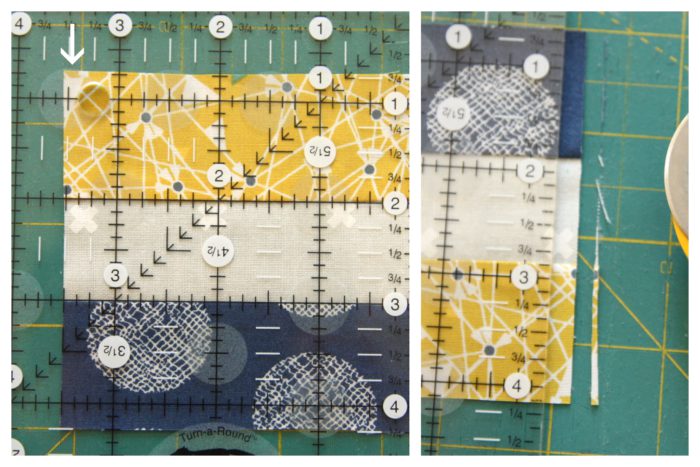
As you cut units from the strip-pieced set, keep the straight line of the ruler lined-up on one of the seams. Because of the slight bowing of the strip-set, you will need to square-off the edge again after every few cuts. It’s worth it to keep your units square!
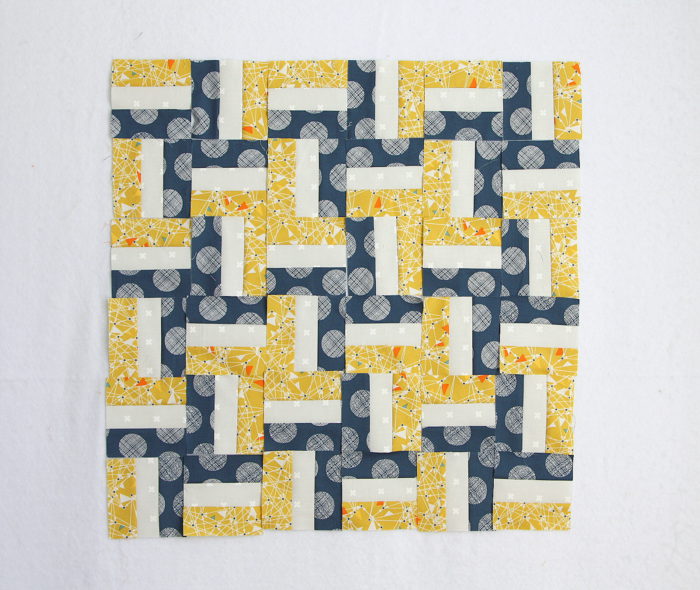
After you’ve cut all of your units, lay them out six across by six down. By rotating the blocks, you can get a variety of designs.

This is the design I chose. Sew the squares into rows of six blocks each.
Press the seams toward the vertical blocks. This will help the seams to nest together when you sew the rows together.
For the borders, cut two 2″ x width of fabric strips from your yardage. Sub cut them into an 18 ½″ and a 21 ½″ strip from each strip. Sew the 18 ½″ strips to opposite sides of the pieced portion. Press seams to the borders. Add final 21 ½″ strips to the top and bottom of the quilt and press seams to borders.
Free quilt patterns using 2.5 inch strips
Here are a couple of modern and scrappy strip-piece quilt patterns using precut (or cut your own) 2.5" strips:
Rail Fence Tutorial Baby Quilt Tutorial
This free quilt tutorial will walk you through the process of making a strip-pieced Rail Fence baby quilt. (There is also a printable version with instructions for multiple sizes from Baby - King.)
You can find the quick Rail Fence strip pieced baby quilt tutorial here.
You can see more variations and options for strip-pieced Rail Fence-inspired designs on this Rail Fence Pinboard.
Using Strip Piecing for Nine-Patch Blocks
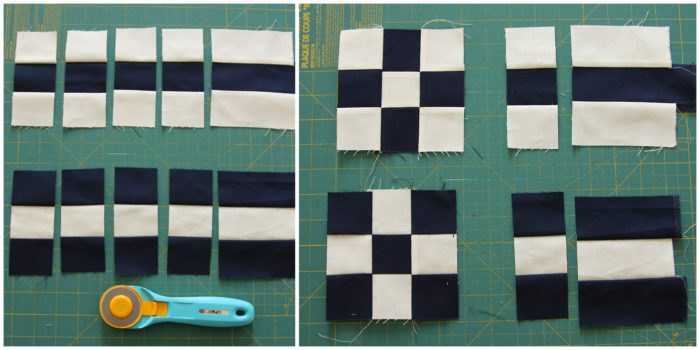 Strip-piecing can also be used to create smaller units that can then be sewn back together to create new blocks such as traditional 9-patch blocks.
Click here for instructions to make a 9-patch Irish Chain baby quilt.

Another favorite strip-pieced block is in this easy, but eye-catching Pinwheel tutorial.
The options for using strip piecing are endless, but knowing these basic tips like keeping an accurate seam allowance, how to square-up your fabric before you cut strips, etc. will make a huge difference in the accuracy and efficiency of your piecing.
As I mentioned, I'll also walk you through all of the cutting, measuring, and strip piece sewing techniques demonstrated on the video above. And if you're ready for some more advanced strip-piecing projects, check out the full Strip-piecing class on the Riley Blake YouTube Channel.
 This post is sponsored by Baby Lock Sewing Machines. I am a proud ambassador for Baby Lock and love sewing and creating with their machines.
Melanie@Crafty Cupboard
Dang, that was an awesome post! I always got so frustrated by the bowing when strip piecing. Great tips and really, you are a wealth of knowledge!
Elizabeth
I needed a new block to try for my next Project Linus Quilt and you've just shown me what I will stitch next - Rail Fence it will be so thank you. Happy stitching and thanks for the tutorial.
Irene spiezio
Thank you!
Shawn Tanner
How and where can I get this fun modern basket pattern?
Amy
Shawn - good news! I just updated the post with the original pattern!
Theresa DeBon
Thank you so much for your clear instructions and pictures of each step. I am just learning to quilt and consider these posts my "classes". What a thrill to see my first two quilts complete.
Mary M
Amy, I came to this page from your Easy Bricks Baby Quilt tutorial (Thanks for sharing!) which suggested these helpful tips on accurate strip piecing and cutting. Your prose is clear and helpful but it seems to refer to photos I cannot see. Is it just me or did your pictures fly away to web never-never-land?
your longtime follower,
MaryM in upstate NY
Amy
Hi MaryM!
Thanks so much for your comment. Oh dear! I don't know why they aren't loading the way they are supposed to! (Sigh. I hate technical issues!) I will get this to my tech gal and see if we can figure this out. Thanks so much for letting me know!
Patti
Really good tutorial. Thanks!
leisaval
The Creative Grids Stripology ruler (I use the XL) is a must have (in my view) for efficiently cutting strips. Though expensive it makes for quick cutting of subsets of strips
Amy
Great suggestion!
Sonnie
Great post and spot on instructions. Thank you!
Dorian
Thank you for the great tips Amy. I am wondering what is the name of that awesome gray and yellow jelly roll fabric? Have a great day.
Amy
Isn't that collection great? It's called Gingham Foundry by Riley Blake Designs. 🙂
Shirley Clark
This is so good! Thanks for taking the time to give tips.
Gemini Jen NZ
Fantastic tips, thank you!
Kay Losh
Well, this tutorial proves old dogs can learn new tricks! Thanks to you, Amy!
eastskye
Thanks, Amy for your careful and detailed tips. I have been teaching myself to quilt during the pandemic, and this is all new to me. Great advice!
Amy
I'm so glad it was helpful!
Rebecca Grace
Hi, Amy. I used strip piecing techniques for my first ever Roman Square quilt in 2002 but have done regular cutting and piecing and/or FPP or template cutting and piecing for my projects after that. I tried to "whip up" a bunch of 3" finished 9-patch units today from 1 1/2" strips that I cut with the AccuQuilt strip cutting die, and I am having a horrible time. For one thing, the AccuQuilt die cuts skimpy strips compared to my habitual rotary cutting (including the ruler line in the cut to accommodate for the thread's width of the seam) so my usual 1/4" seam is resulting in the strip sets finishing too small. Secondly, I am finding it very difficult to press these 42" long, super skinny strips after piecing them together. It's hard to get the seam all the way open and flat, all the way down the length of the strips, without causing any distortion with the iron. Am I missing something obvious here or is strip piecing just not the best method when you need things to finish exactly the right size? These 9-patch units are part of larger, more complex blocks that aren't going to fit together if my 9-patches are all 1/8" too big or too small.
Arielle
Hi Amy! I have a warp and weft fabric that I want to strip piece. Do you do anything different when working with a more open weave?
Thank you for all your tutorials—you are how I learned to quilt.
Amy
Great question. If it's a looser woven fabric, I would starch (or use a starch substitute) the fabric well before cutting your strips. If it's a woven design - like a plaid - I would recommend opening up the fabric - no folds - and use a line in the design as the guide for cutting your strips.