
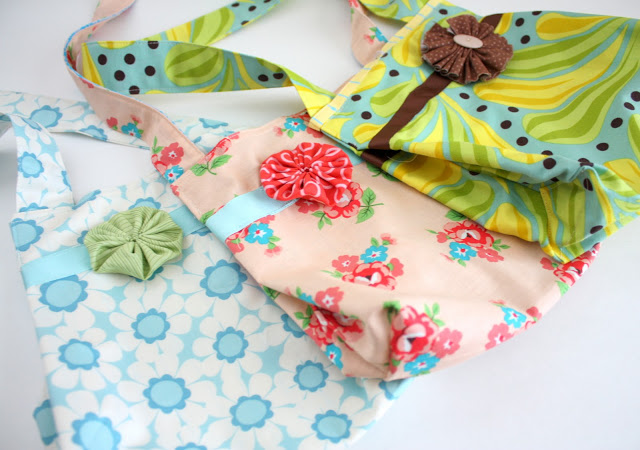
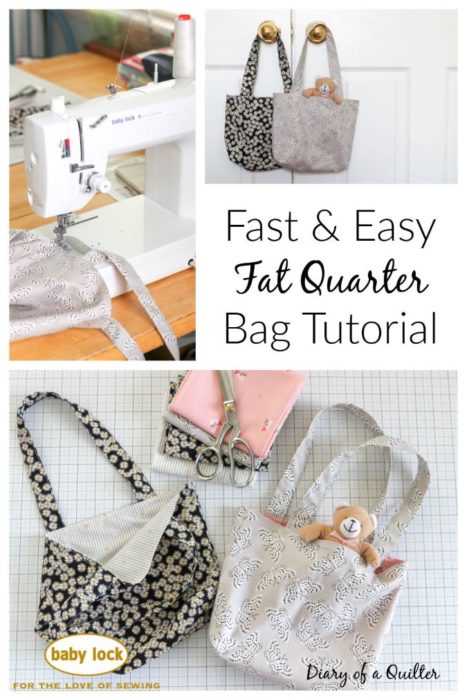
Today I am going to share a tutorial for a quick and easy lined bag. This is a great beginning sewing project. Each fat quarter bag uses the equivalent of one Fat Quarter + material for the handle(s). I've also got a few different modifications you can make to give your bag personality and added style including embellishments, appliques, or a crossbody strap.
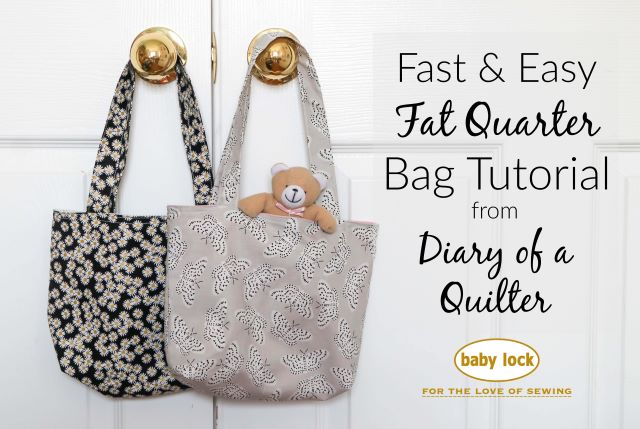
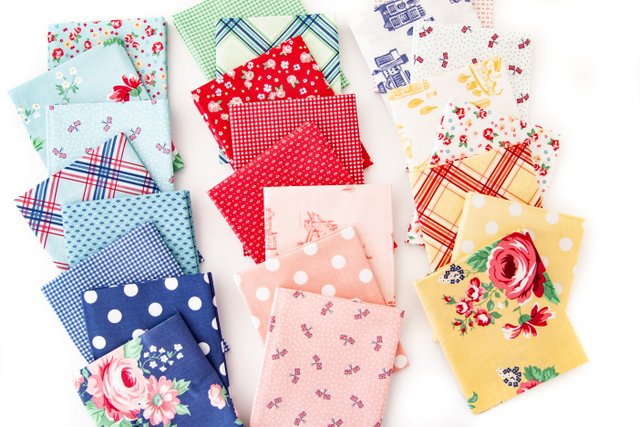
I love using Fat Quarters because they're precut and easily available at sewing or craft stores. If you're wondering "What is a Fat Quarter?" this post will answer your question. 🙂 This project can make use of a whole fat quarter with no waste!
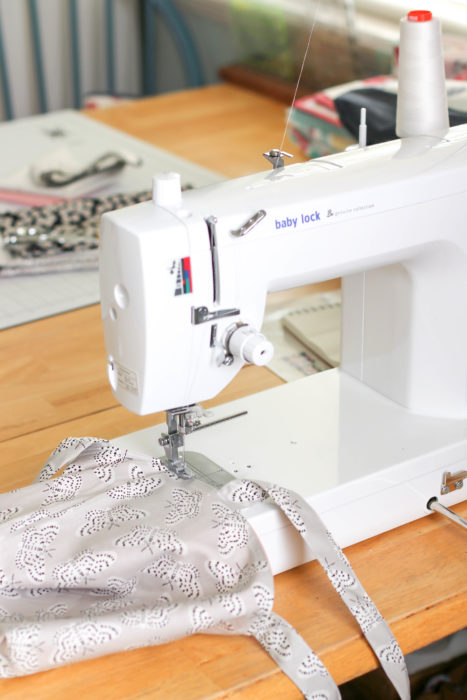
This project is sponsored by Baby Lock sewing machines. Making these bags I used a Baby Lock Accomplish machine, which is basically a high-speed, straight-stitch industrial machine. It's great for sewing through multiple layers like you get when making bags. There are so many sewing machines on the market - it's easy to find the right one for your needs or skill level. I have more information about sewing machine options here.
Fabric requirements:
Bag: One bag can be made with with the equivalent of 1 Fat Quarter.
Handles: ⅛ yard of fabric or sturdy ribbon, webbed handle material, etc. Or you can cut two 18" straps from unused portion of Fat Quarter if making a version with contrasting lining.
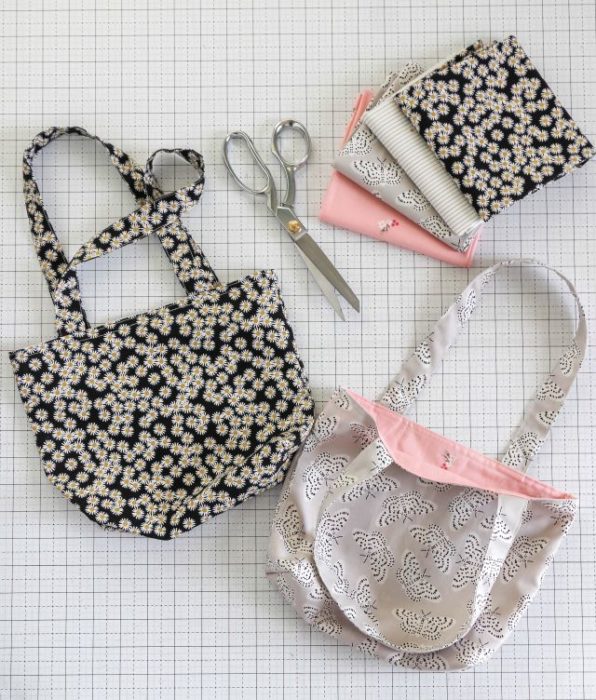
(To make the bags above I used two different fat quarters for outside and lining fabric and one set of bag handles.)
How to Make a Fat Quarter Bag - a Step by Step Tutorial:
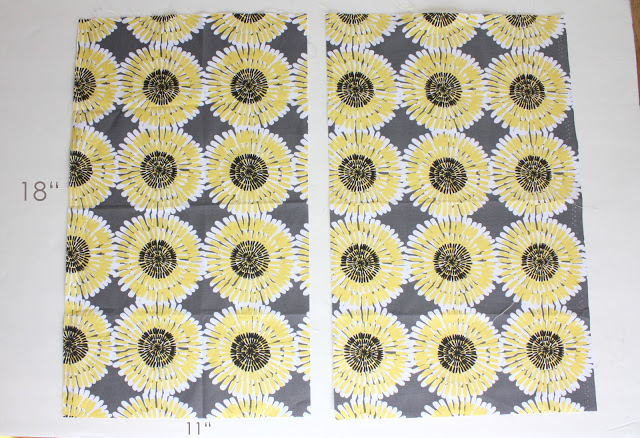
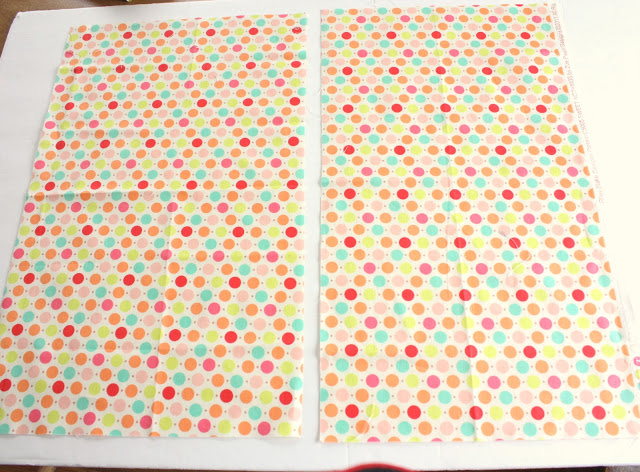
Step 1: Cut your Fat Quarter (hereafter FQ) in half to create two 11" x 18" pieces. (Roughly-might be slightly narrower depending on the width of the FQ - it doesn't matter if it's exact, as long as your two pieces are the same size.)
You can use the second piece as the lining of your bag or cut a coordinating piece the same size for a contrasting lining and save the second piece for a second bag.
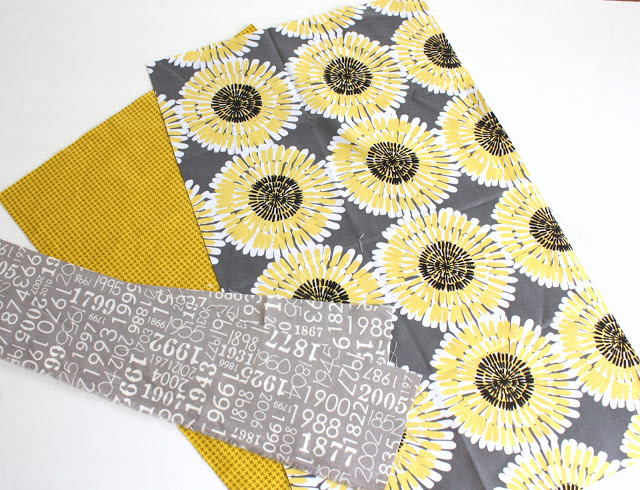
For this bag we are going to make two short handles. Cut two 4" x 18" pieces of fabric. These can come from a ⅛th yard piece of fabric, you could cut them from one of your FQ's or you could find them in your scrap bin like I did.
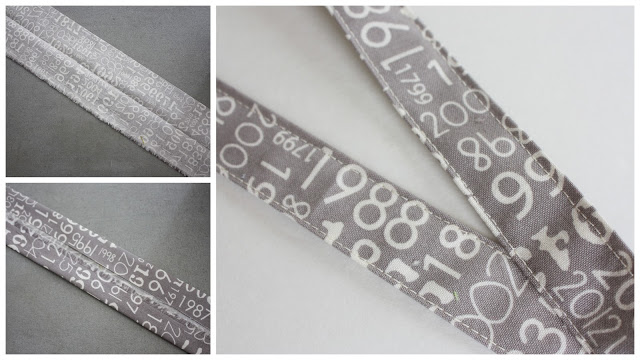
Step 2 - Create the handles. Fold both handles in half lengthwise and press. Open up the handle and press both sides in, meeting at the half-way crease. Press and fold in half. You should have a handle, 4-fabrics-thick about 1" wide. Top stitch down both sides of the handle piece right at the edge to make it sturdy and to give it a nice finished edge.
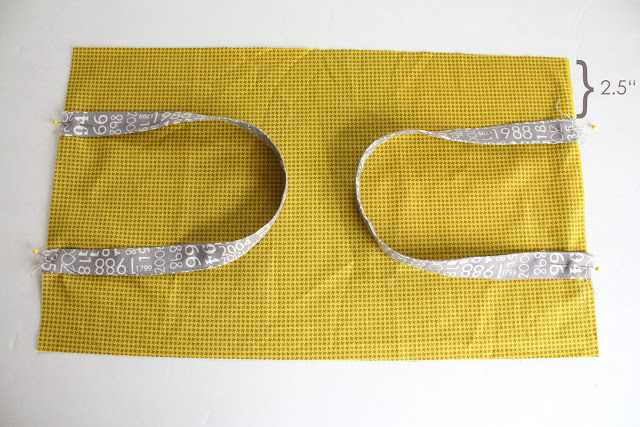
Step 3- Pin both handles to the short sides of the lining piece of fabric. Measure in about 2.5" from each corner and pin the handles to the the fabric.
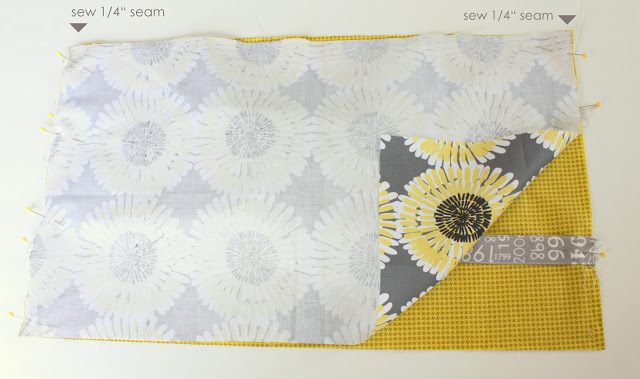
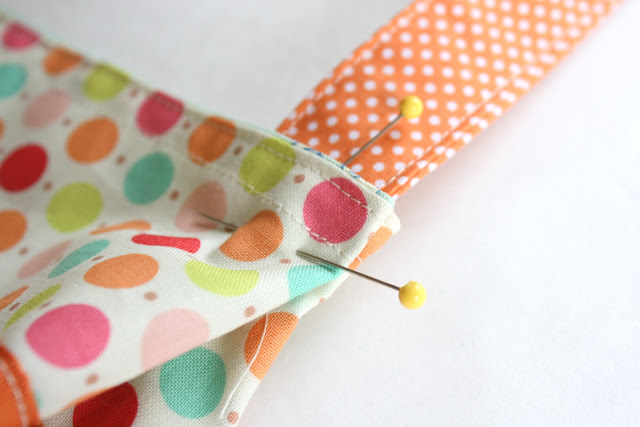
Step 4- Place the outside fabric right sides together on top of the lining piece and handles. Pin short sides and sew ¼" seam allowance down both sides, over the edges of the handle straps, careful not to catch any other part of the handles in your seams.
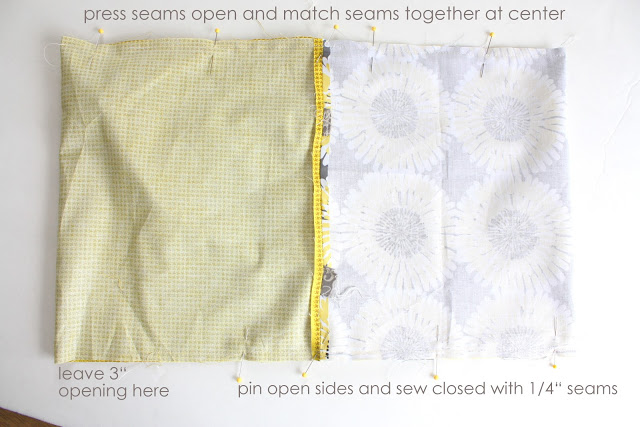
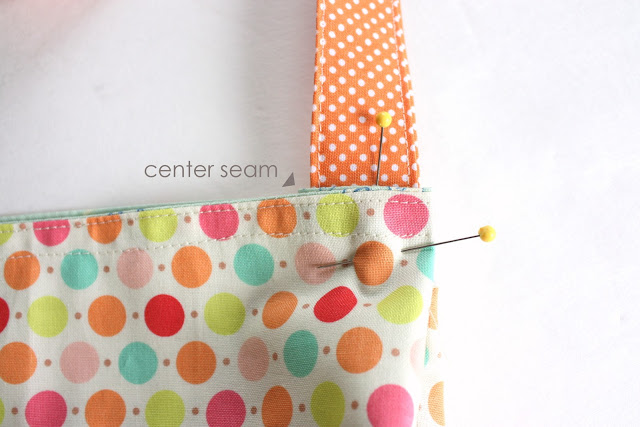
Step 5 - Press seams open and bring seams together, matching them up at the center. The bag's outside fabric and lining fabric should be folded on top of itself, right sides together. Now pin the long, open sides together. Sew a ¼" seam along both sides, leaving a 3" opening in the lining to turn the bag right-sides out.

Step 6 - Pull the bag right sides out through the 3" opening and top-stitch the opening closed. (This doesn't have to look pretty because it will be inside the bag.)

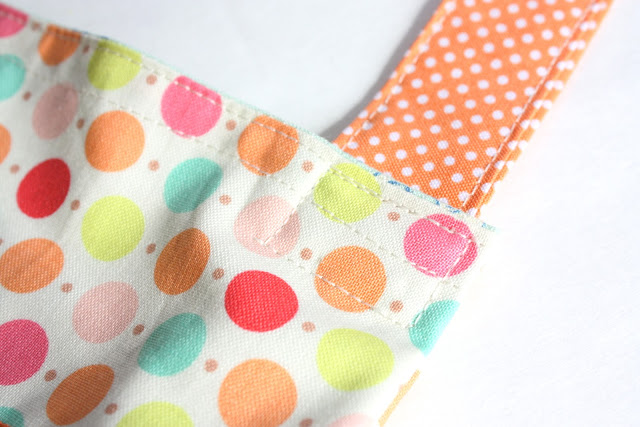
Step 7 - Tuck the lining inside the bag and press the bag carefully, paying extra attention to the seam around the top of the bag. Make it look nice and crisp.
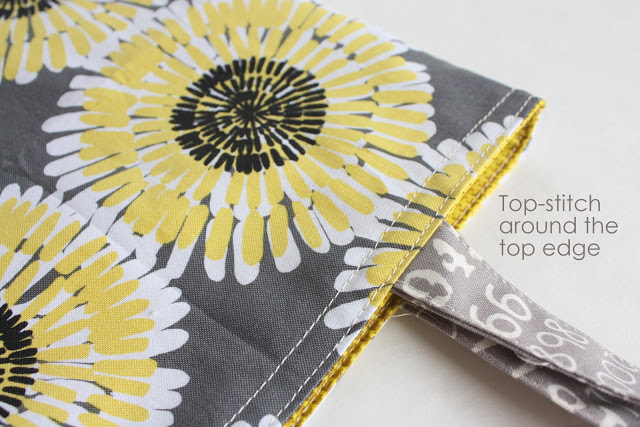
Step 8 - Top-stitch around the top edge of the bag. This will help secure the handles' attachment and give the bag a finished look. I did it twice.
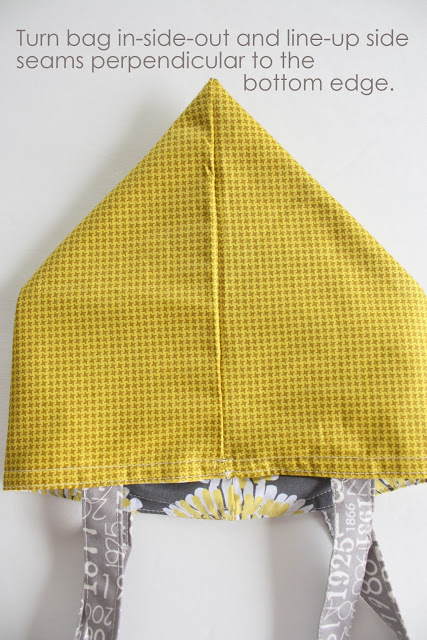
Step 9 - Now to give the bag a nice boxy bottom, we are going to add something called a gusset. Don't stress, it's much easier than it looks. Turn the bag inside-out and line up the side seams perpendicular to the bottom edge, creating two triangles at either end of the bag.
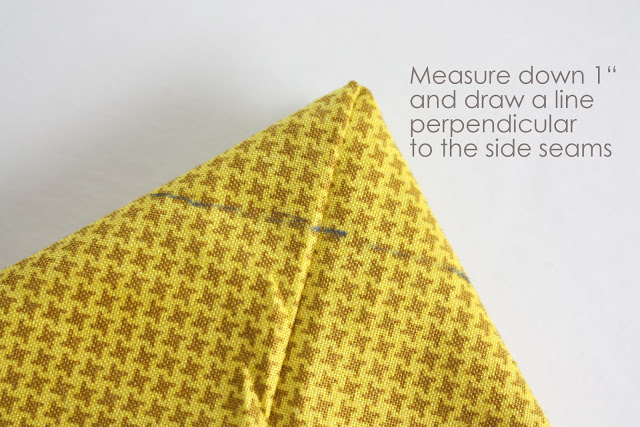
Step 10 - Measure down 1" from the point and draw a line perpendicular to the side seam.
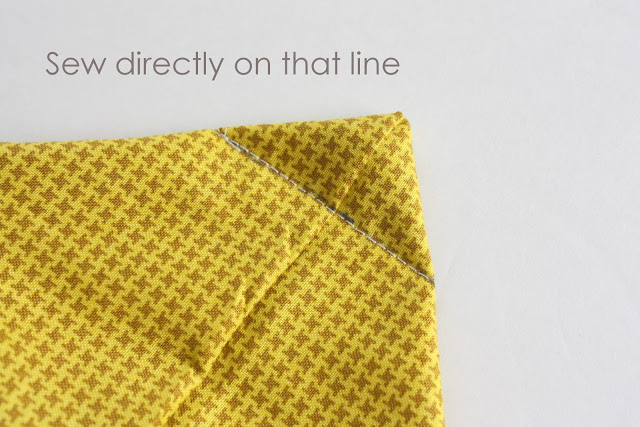
Step 11 - Sew directly on the line, back stitching at both ends. Repeat the same process with the bottom corner on the other side of the bag. You could hand-tack down the gusset flaps if you're picky, but don't have to worry if you're not as they will be hidden in the bag.
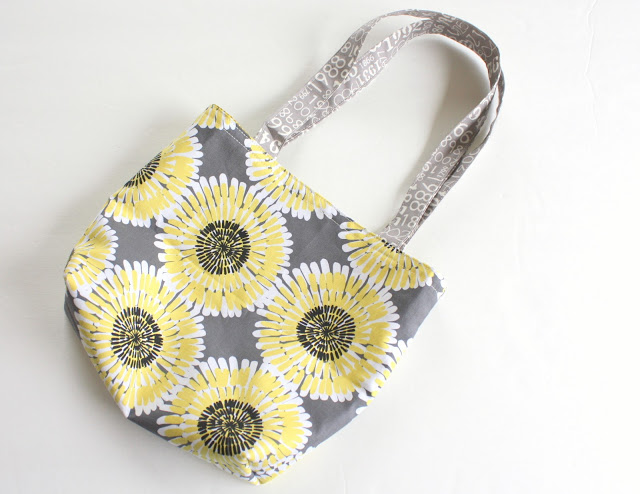
And there you have a quick finished fat quarter bag!
Once you have made one, it's very quick and easy to mass-produce a lot of them.
Now here is a slight variation to create a fat quarter bag with a longer strap and a little more of a 'purse' shape.
Repeat Steps 4-8 above to create the body of the bag, leaving out the handles.
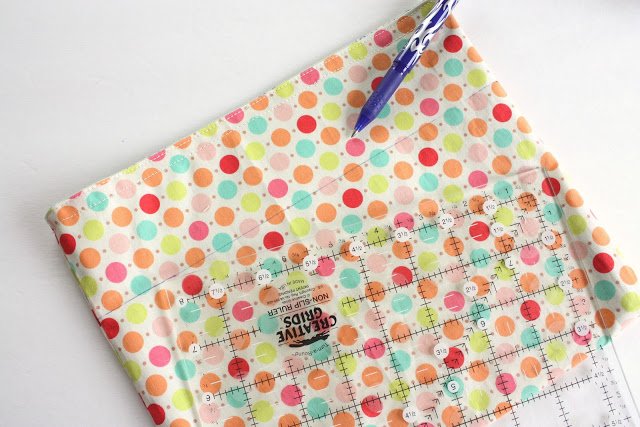
To add a decorative ribbon or trim I measured down 2.5" from the top and drew a line with an erasable fabric pen.
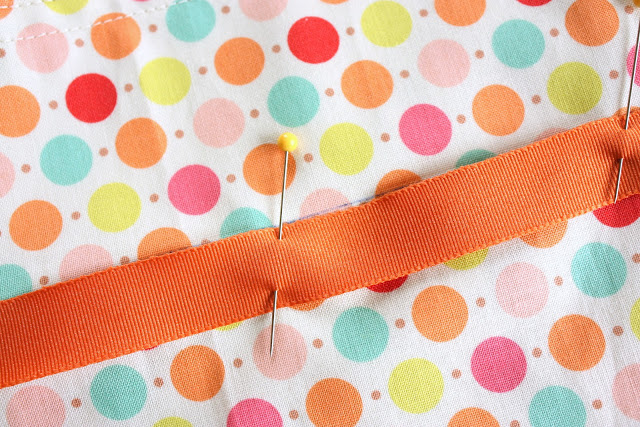
Line up the trim along the drawn line and pin in place.
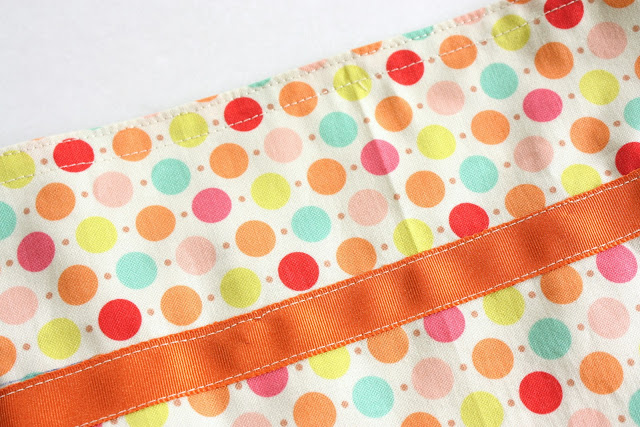
Topstitch trim to the bag.
Repeat Steps 9-11 to add the gussets to the bottom of the of the bag.

For the handle of this purse, use a 4" x 42" piece of fabric. Use the same method as above to create one long purse strap. (Fold in half and press, open up and fold edges toward center, press, fold in half again and topstitch both sides.)
Trim the strap to the desired finished length. I think I trimmed mine down to 38" for a tween-y girls purse. Tuck bottom raw edges inside the purse strap.
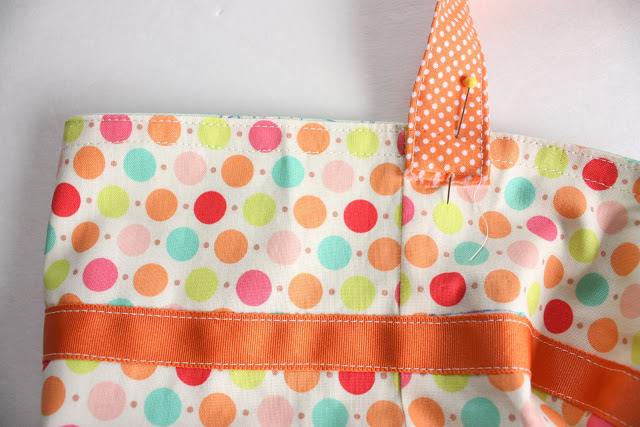
Pin the end of the strap about an inch down and directly next to one of the side seams on the outside of the bag.
Fold the side of the bag on the opposite side of the seam on top of the purse strap.
Seam should be on the inside edge of the strap with equal parts of the bag holding the strap end in place.
Sew a square holding two sides of the bag with strap end in between in place. Repeat the same steps on the other side of the bag, with the other end of the strap.
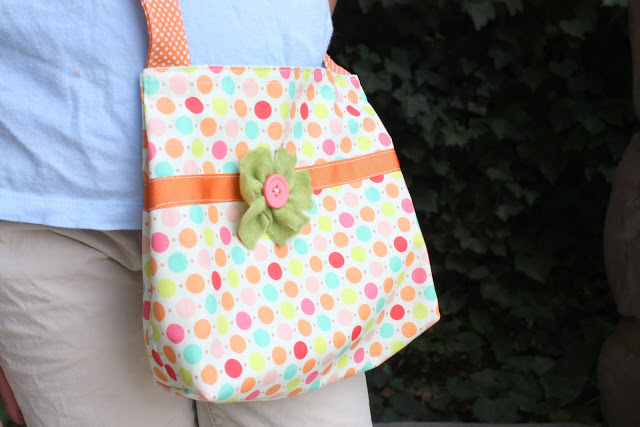
When your fat quarter bag is done, you can always add a cute embellishment of some kind to 'bling-it-up' if you want.

Or you could add simple fabric appliques like I did in these Valentine bags. (This appliques are stitched on with raw edges showing.)
And that's it! Again, once you've made one, you can whip out a bunch more in no time. They're great gifts to have on hand for all those little-girl Christmas or birthday gifts. (Or you could make a 'satchel' version for boys too!)
This fat quarter bag sewing tutorial is inspired by some purses I made for my daughter's friends for Christmas a few years back. They were so quick and so cute. They were inspired during a Christmas when funds were a little tight from buying a new house that year, and I needed to use resources already on hand (i.e. a giant fabric stash) to create Christmas gifts.
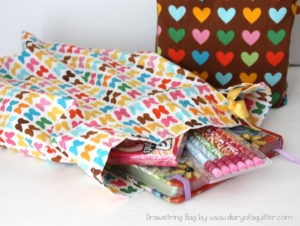
I've got another variation on a simple drawstring fat quarter bag. Tutorial here.
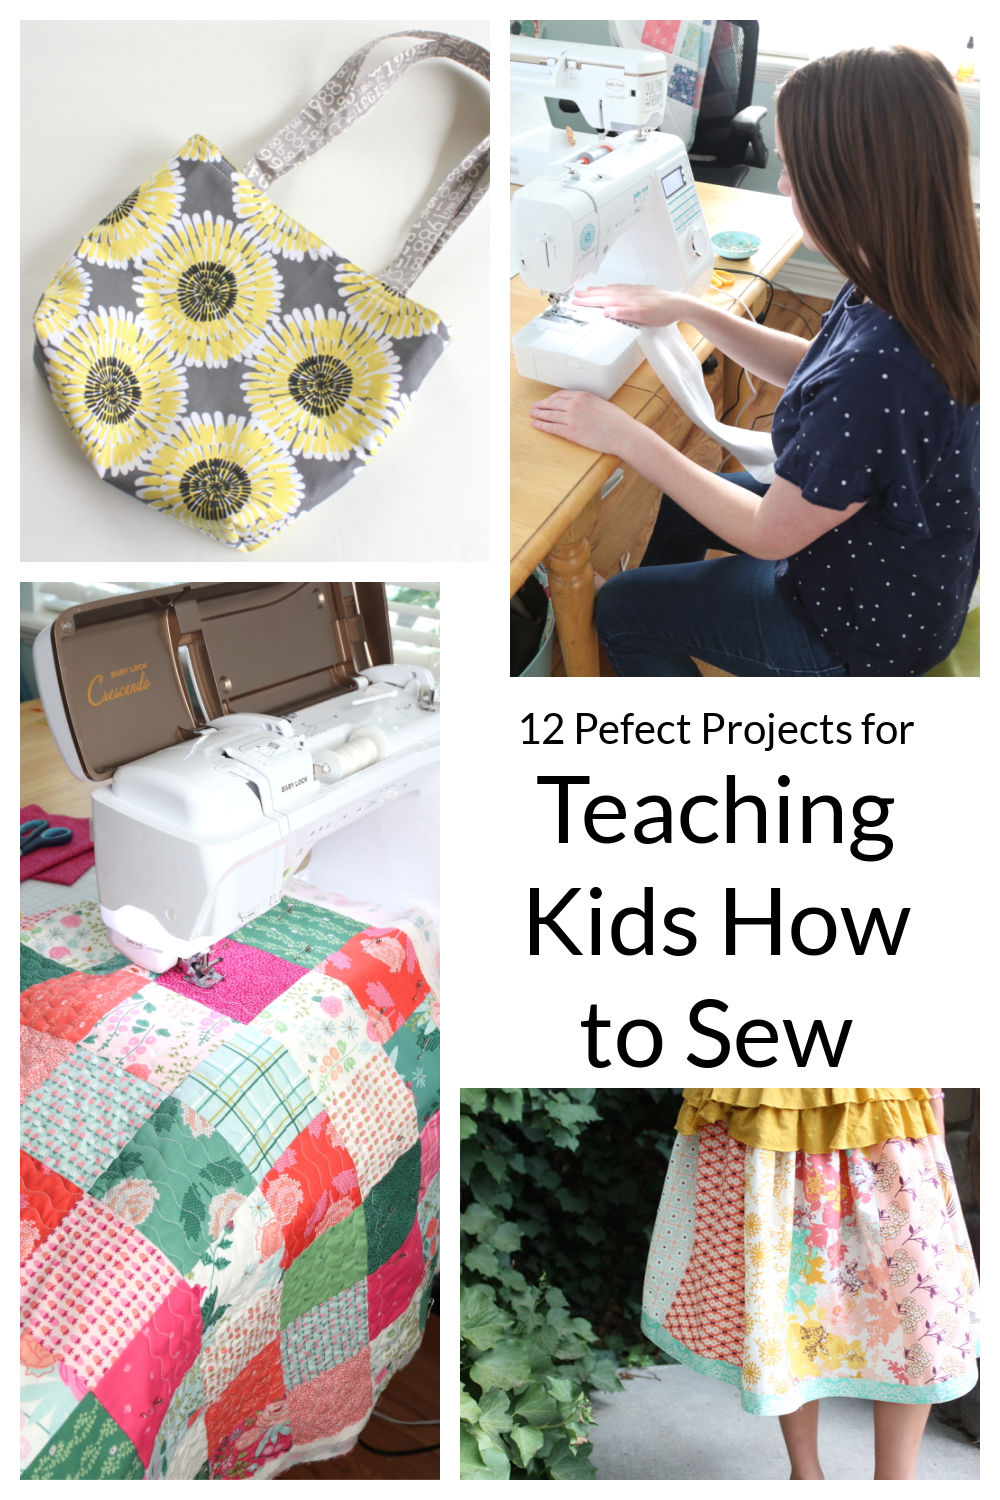
If you're looking for other good beginning sewing projects (especially ones that are great for teaching kids how to sew), check out this post here.
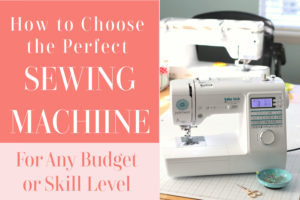
If you're looking for an entry-level sewing machine, I recommend the Jubilant. You can read more about my recommendations for how to choose a sewing machine here.


Sandi K.
Thanks so much for the tutorial! They look so cute, and I bet they will sew up in no time. What a great idea! Hmmm... I think I have some fat quarters in my stash calling my name 😉
Pippa Parsons
Im hoping to make a big long pillow with winterkist fabric for xmas
Dorian
I really enjoy making bags. Thanks for the great tutorial on a cute little bag! I think I'm going to be doing kitchen things for C gifts this year 🙂
Lisa Marie
I am working on lap quilts for Christmas gifts and yesterday made a bunch of potholders as little extras. Now that I've seen your bag tutorial I think I'll make some of those too! Thanks for sharing!
trish
Hi Amy. :o) What a cute idea!<br />I am making pincushions for some of my Christmas presents. :o)<br />I actually posted one yesterday (for my etsy shop).<br />Have a wonderful week. Trish xo
Dr. CH
Thank you for this tutorial! These bags seem like a good Christmas idea.
Jamie Lee
Great tutorial! Your stitching looks so perfect!
VickiT
Cute bags. I like that polka dot one you made and love the flowers you added to each one. Very cute. Thank you for the tutorial. <br /><br />I'm hoping to get Christmas stocking done for a number of family members this year. There are a few other things on my list but we'll see how far I can get on my list of things I want to make as gifts.
Laura
Love your bags! I may need to make a few of those! I plan to make some sets of placemats, too.
Heidi [Grizz-n-Dove]
I love the way you attached the strap to the purse version! Thanks for the tutorial!!
Johanna
What a great bag! My daughter was just looking for something like ths. She caught the sewing bug this summer!
Sara Bracht
Love the little flowers on the purses!
Toohey
Great tutorial! Cute bags. As for Christmas gifts, I've tried for several years to get enough Christmas fabric coasters made for friends, but never finished. Now I think I'll change to the slightly larger "mug rugs" I've been seeing on blogs. Thanks!
Cheryl Gomez
what a cute little bag!
anorthowife
very cute! I'm hoping to do homemade vanilla for my SIL and mini quilts for the nieces and car rolls for the nephews...
Gigi
I'm definitely making these bags for Christmas! Thanks for the tutorial!!!
Katy Cameron
Both very cute bags, great idea!
DonnaM
You can never have enough bags! Thanks for the tutorial.
Sallie
Thanks for the tutorial and giveaway! I'm making table toppers.
Ginette
Love this idea! I am definitely gonna make some of these for my girls!
Deb
I'd love to make a Christmas quilt this year to bring out at Christmas and to decorate with. I have the fabric--just have to find the time to do something for ME instead of someone else!
Elsa
What a great bag ~ the tutorial is well done and so easy ~ thanks so much for sharing!<br />I'm going to be making a few things as gifts for Christmas. I always make a few bags and will be doing this one for sure!
Zelda
I really appreciate the fabric -- the dots are very cheery. I started making a couple of table runners for Chrismass gifts for family and friends.
beckyallen5
Fantastic bag... I love the simplicity of it! I cannot wait to use this for some friend gifts!
Carolyn S.
Cute and simple bags! Thanks for the tutorial. I am not sure what I want to sew for Christmas yet. I'm in a charm swap, so I'll have a bunch of 5" squares of Christmas fabric. Hopefully that'll inspire me.
cakegirl
Love the bags. Thanks for the great giveaway.
Jane
What a wonderful tutorial! It fits with the old saying that "Necessity is the mother of invention"!
Courtneysews
I would like to make my first quilt for my BFF for Christmas.
Mom2RyandSis
Very cute bag! I have 6 little girls on my list I think they would be perfect for!
Rosa
Love your bags.They`re just wonderful!!<br />I`m making a BOM called Reinder Games designed by Carol and Barb Here is my latest block:<br />https://moramargaritaster.blogspot.com.es/2012/07/garden-stepsreinders-gameguardatijeras.html<br /><br />Also I`d love make a tree skirt.Thanks for the chance!
gccmom
What awesome bags. I would like to make some totes for Christmas.
Needled Mom
Those are so cute. Thanks for the tutorial. They would make a cute gift bag for a special present too.
Three Sisterz
Such a great tutorial! I'm going to use it to make bags with my daughters!<br /><br />Thanks Amy!<br /><br /><br />Courtenay
freakadoodles
I love fat quarter bags, and this is one of the cutest I've seen. The way you attached the longer strap is so clever! I will definitely be trying this out. Thanks for sharing!
Jayme
Thank you for this!!! I've been wanting to make a library tote for my kiddo but couldn't wrap my head around it! Thx!!! And thank you for the giveaway!
B Greene
Thanks for the great tutorial! I am planning to make some Loyalty card wallets and key fobs for Christmas gifts.
RSHudson
Thanks for the tutorial; I'd love to make a Christmas-y quilt; thanks for chance to win! (EMAIL: marshudson at comcast dot net)
Sonia B
This is such an awesome tutorial. Thanks for taking the time to create it.
Gill
Thanks for a great tutorial! <br />Last Christmas I made damson gin for the adults! and gift bags to put the bottles in!
supersara20
This bag is adorable. thanks for sharing.
Nancy
Hooray! Thanks for the tutorial and giveaway. I'd really like to make a dress for my daughter for Christmas this year, but I'm not sure it will happen. We'll see.
A.J. Dub. (Amy)
Cute! I was going to make a little tote for a soon-to-be 3 year old's birthday gift and I really like your alternate handle style. Thanks!
Gisela Suski
I really really needed this tutorial, I make totes for WOCS World of Cross Stitching charities and they never come out the way I wanted. I made your tote this morning and it works great. I have to do 3 more.
Haley
I'm planning to make a couple ornaments this year (for my use, everything else turns into gifts).
SnuggleBunnie
Thank you so much for this. I really needed this. I had no clue what i was going to give as gifts. I so want to learn to quilt like you but my problem is i need someone here to show me then I can take off on my own:( I love your blog and I am going to keep reading and learning. Thanks again..
Sheila
I love your bag tutorial. Good pictures and easy to understand instructions. I can see my granddaughters making this one. Thank you.<br />I usually make pot holders, hot pads and pillowcases for Christmas presents. So I'm always looking for new gift ideas.
Joyce
What a great idea...who can't use a tote bag! Thanks for the chance to win!
Jess
Great tutorial. Thanks! I've been wanting to make myself a new carry-all bag for work, and this seems perfect.
DeniseMarie
How adorable! I love tutorials - I learned two new things from yours - thanks!
Kimberly Cassie
I love the bag and your tutorial. I have only made one bag before and it was totally wonky...I think I could actually follow your directions and make a pretty good bag. You've inspired me to put it on the to-do list. Thanks!
Zoe
Those bags are adorable. I know a lot of people who would love them, so I might make a few for Christmas. 🙂
Diann
I'm making a wall hanging for this Christmas but I also want to get started on some gifts.
andri.
Thanks for the tutorial! I will make pouches for gifts because they are small n quite simple to make:)<br />andri_chama(at)yahoo(dot)com
Jeanne W.
Great Tutorial! I love the flowers! Any suggestions on where to find a tutorial for them?
Lori
I love your bag. So simple yet pretty. Thanks for the tutorial.<br />quilting dash lady at comcast dot net
Karin
Love the tutorial! Sounds fantastically easy!!! I pinned it so I can come back and make some later!
Linda
HELLO! LOVE THIS LITTLE BAG!<br />THANKS SO!<br /><br />msstitcher1948@yahoo.com
Laurie Parrack
Love the tutorial. I will have to make a few of these. I have a niece who loves purses and bags. I am going to be making dish towels and wash cloths sets for christmas this year. I will probably be making a few clothes for my nephew and niece too.
MimiQuilts
Great little bag! I think I will try one for a birthday gift for one of my daughter's friends! Thanks for the tutorial and the giveaway!
mary
I've made two of these bags from your tutorial last summer. My kids really liked them. For Christmas I would like to make some clothes for my kids or maybe a quilt. Haven't thought that far ahead yet.
bruinbr
Great tutorial! I will have to whip a few of these up for my nieces 🙂 I'm hoping to finish a quilt for my sister for Christmas. Thanks for the giveaway!
Emily C
I always make ornaments for christmas. Sometimes i crochet, sometimes i felt. Still deciding on this years medium.
Heidi Staples
I've got a lot of things in mind to make for Christmas, but nothing definite yet. Darling tutorial! Thanks for the giveaway!
Donna
Nice tutuorial! Thanks. I'm hoping to make quilted table runners for the family for Christmas this year...I think? Thanks for the giveaway.
Annabanana
I'm hoping to make some bags and potholders and a table topper for gifts this year. Thanks for the giveaway!
Gwen
LOVE your tutorial-- those totes are so nice! I need to make a few=== they'd make wonderful little gifts!! For Christmas this year, I hope to find time to make a potholder set for all the cooks in my family.. and I'd love to make a stack-n-whack quilt for my Mom-- as she so loves that pattern! Thank you so much for the chance to win this wonderful giveaway!! Gift certificates are the
Karen
This year I'll be making cosmetic bags for all my female friends and relatives.
Mary
I love these bags! Thanks for the tutorial! I'd love to make some for my 4 daughters for Christmas! Maybe I could use them as gift bags! Hmmmm!
Shawn Marie
Money is super tight for us this year so I'd like to make everything handmade!!! Every year I do a little more and this year these bags are going on the list. Hooray!<br /><br />Shawn Marie<br />www.rickrackkitty.com
Mariel
Love these bags, might have to make some for Christmas. I don't have any plans right now, hopefully I'll find something fun before then.
KatieQ
I would like to make my daughter a messenger bag for Christmas. She loves dragons so I would like to use my embroidery machine to place a dragon on the flap.
Judith
Thank you for the tutorial. I am lucky to have 3 daughters and 1 daughter in-law. They do love bags. This will make a wonderful gift bag full of goodies. Judith, Texas
tusen
I'm thinking about making some zippy pouches.
Linda
Thanks for the chance to win! I made aprons last year but not sure what I will do this year.
Anita
Love to win the gift certificate! (I am making girly things for my granddaughters for Christmas.)
felicity
What a beautifully simple bag - an absolutely fantastic gift! Thanks for sharing and for the giveaway Amy (and Elizabeth)!
Marcia W.
Thanks for the tutorial -- like the boxy bottom instructions. For the first time ever, my brother told me that he liked the color of a fat quarter I had and wanted me to make something out of the fq for him. So, for Christmas thought could make a pillow that says "Papa" -- to go in his chair.
Homemaker Honey
Darling bags!<br /><br />Deborah<br />homemakerhoney @gmail .com
SpartanBabe
Thanks for the tutorials! I want to finish the two quilts I have, a mother and daughter quilt, for Christmas. They've been hanging around my sewing room for a year now. Might just have to whip up a bag or two with the scraps to go with. Thanks again!
Jo
They are a wonderful idea for Christmas. I am hoping to finish a Christmas quilt I am making in a QAL. It should happen! Thanks.
Bonnie58
Love the bags. They are cute<br /><br />Bonnielarson58@gmail.com
Jenn M
Oh so on the list to make for Christmas!!
vgneal
Thanks for the great tutorial. I may make a few of those forChristmas. I have lots of fat quarters for sure.<br /><br />Vail in tn
LeAnne
I can see those making great gift bags for Christmas.
Melissa
Those are adorable! I'm working on cloth dolls for my nieces for Christmas and am still deciding what to make for everyone else.
Judith Blinkenberg
My daughter in law has been after me to make some small bags for ballet shoes for a long time. My granddaughter has danced for 5 years and I have yet to make her a bag let alone the other girls that attend this dance studio. And what about other goodies for girls like doll brushes and doll clothes or whatever. You are so sweet to share this idea and I thank you more than you know!
Sandie @ crazy'boutquilts
Thank you for the tutorial!~ love this little bag! My DD would want one in every color. LOL
Jane S.
What a nice tutorial! I've always been a little intimidated by those "box" bottoms that people do on their bags, never understood exactly how to do it. You showed it very well though. I like the fact that this tutorial uses a fat quarter and you get a cute bag out of it! Thank you. 🙂
Carla G
What a cute bag!! Thanks for the tutorial!! 🙂 I would love to make a quilt for a gift, but that might be stretching it... so I'm aiming more for table runners and bags. Thanks for a chance to win! 🙂
Unknown
This comment has been removed by the author.
ivyworis
thank you for the easy-to-follow FQ bag tutorial. i've been wanting to make one but too scare to try. now i've read and looked closely at the pictures, i think i have the confidence to start my first bag. thanks again....<br />ivyworis(at)yahoo(dot)com
CathyK
Fantastic tutorial!!! The directions are so clear! I am making several quilts and some wall hangings for Christmas this year!
Sheila
The embellishments really make those bags! Very cute!
Joy
This is a great idea - thanks for posting the tutorial. Right now I'm working on my first Christmas tree skirt. If I like how it looks I'll be making one for my mom as a gift.
Sharon
Cute bags. Thanks for the instructions.
Jodi - usairdoll
What a cute bag! Thanks for a great tutorial and this one is going on the to-do list for sure. I have a tablerunner and some zippered bags I want to make this year. <br /><br />Thank you and Pink Chalk Fabrics for a super giveaway and a chance to win.<br /><br />usairdoll(at)gmail(dot)com
Carmen Nuland
I just learned to knit socks and am hoping to make some for my friends this year
Bj
Very cute bags 🙂
Melanie
Thanks for the cute bag tutorial! I don't know if I'll make them for gifts, but I think I might need one...<br /><br />For Christmas I want to cross stitch stockings for my sons. I know I won't have them finished in time for this Christmas, but I have started to work on them. Maybe next year?<br /><br />Thanks again!
Di~
Great bag, Amy. Your tutorials are always the best. Love the dot fabric! Thanks for the chance to win
Sewgirl
What a clever idea for a fat quarter. Thanks for the tutorial. I would like to make a quilt for our bed for Christmas. I have made them for both of my boys but every year, our bed goes undecorated..maybe this year is the year!
Jenelle
I am currently working on a Christmas quilt, so I hope to have that finished by this year! 🙂 Thanks for the chance.
Mila@Rimbun
cute bag.. great bag idea. thanks
Terry@ iluvmybugs
What a great tutorial...love the bags! I plan on making some table runners as gifts for Christmas. Thanks for the sweet giveaway!
Cindy
I haven't ventured into bag making yet but I do believe this post just convinced me to give it a try!
Christine M
Lovely bags. They would make nice gifts for Christmas.
Georgia
Beautiful BAG! Nice fabrics ;)<br />Georgia.
Julie
These are so cute to grab and go! AND easy to make. Thanks for the tute!
There was finally time...
I would like to make table toppers as gifts. Now, whether I have time....<br />I am at chickenfolks@hotmail.com Thanks!
Rhonda D.
I am plannng on making some bags and fabric Christmas cards this year. Thanks for the chance to win!<br /><br />wigglypup2(at)yahoo(dot)com
supermomnocape
What a quick and easy gift! Thanks for the tutorial.<br /><br />And thanks for the giveaway and chance to win.<br />(supermomnocape at yahoo dot com)
Sam
I love these bags. I will be whipping up some of these for the holiday season! I also plan to make everyone on my list a christmas ornament.<br />samkaydesigns(at)gmail(dot)com
Fignie
LOVE the bags! This would make a great lunch bag for the girls! 🙂 I'll be making quilts for Christmas ... 3 of them. (I'll be starting rather soon on these as well! ick!)
Jeanna
Wow, look at all these comments! That is a great/quick/nice idea for a Christmas gift - it would make a great church bag to carry scriptures to church!!
teachme2sew
Hi, thanks for the fq bag tut. I made one last night, I plan to make the variation style today. I am new to sewing & for Christmas I want to make at least one small quilt and some small accessories.<br />Teachme2sew(at)gmail(dot)com
Margaret
Thanks for the chance to win. I am hoping to make some cute Christmas outfits for my two grandkids for their Christmas card photos this year. It will be my first time sewing for a little boy.
Zuzan
Even I think I can make that bag after following your tutorial. Thank you for the clear instructions and the fantastic give away from the wonderful Pink Chalk fabrics...just love their fabrics.
╰☆╮ Barb ╰☆╮
I'm planning on making an apron for my grown daughter. It's to go with a hand-written cookbook of all the favorite recipes she grew up with. She's been trying to cook on her own now, and struggling a bit, so this may help!
Debbie
What cute bags! I will be making a bunch for gifts for sure! thanks for the giveaway.
Amys Crafty Shenanigans
Lovely bags - thanks for the instructions. I've made a few thinsg so far but my next Christmas project is a quilt 🙂
Carrie P.
great gift idea. I have made some bags for gifts too but I like how quick your idea is. thanks for sharing.<br />I am working on a table runner for my DIL for Christmas.
reubenandemily
Cute bags! Thanks for the chance to win!
Cathy
Thank you...very cute bag and the pattern looks fun and simple to make!!
Laura Burns
What a quick and adorable project. Thanks for sharing!
Gwen
These bags would be great for a trip down to the market! 🙂
Gwen
These bags would be great for a trip down to the market! 🙂
Mom C
I was in the middle of a comment when the power went out! But during that time I remembered that I have actually started a christmas present for my BF. I'm making her a bunch of Renaissance hats for her grand kids. They love being knights and having wonderful hats with feathers a la 3 Musketeers. I hope I remember them long enough to get them done! Thanks. THe bags are great.
Kate Brown
I am really hoping to make a Christmas tree skirt this year. I love the bag, great tutorial!
Anda W
I would love to make a quilt for my brother made from my late father's shirts, another way to keep the memories fresh....awolk at rogers dot com
Karla
A girl can never have too many bags, and these are adorable! Every Christmas I tell myself that the price of gift bags is outrageous and I should really make my own. This pattern is perfect for me to do just that! So many possibilities. Can't wait to try out the tut! karla356 at yahoo dot com
Nati
I would love to win this as I have a few quilts to make as Xtmas gifts this year!
Anita
Nice tutorial and cute bag!
mtnquiltr
I've made a Christmas cushion cover, but now it's going as a thank you gift, so I still haven't made a Christmas gift! I'm going to make a baby quilt and hang on to it until Christmas!
mtnquiltr
I've made a Christmas cushion cover, but now it's going as a thank you gift, so I still haven't made a Christmas gift! I'm going to make a baby quilt and hang on to it until Christmas!
Suzette
Love these bags! Just two nights ago I was thinking about trying my hand at making some bags to put little gifts in for co- workers ,etc, and then found your blog! Perfect.
Cheryl
wow, you got a lot of posts here!<br />I hope you have the opportunity to read this one too. I just wanted to thank you for doing this tutorial. So many times I have wanted to put lining in a bag, but in many tutorials I get lost because they don't show step by step pictures. I now know how it works because of your generosity and patience. You are a blessing to all us visual learners out
Jocelyn
Thanks so much for this tutorial. The bags are so cute and look easy enough to try (I'm a beginner)! I would like to make rag quilts for my niece and nephew for Christmas.
Leslie
Super cute and your tutorial makes them seem super simple. I love you fabric choices
Sabs
Lovely tutorial. I'm not sure what I'll make for my in laws this Christmas...Maybe one of these bags for my mother in law?? Last year I made a patchwork, quilted Scottie dog cushion for my aunt in law who loves Scotties so I'll have to top that this year!
bee
I'm working on a Christmas quilt now that will be finished by the holidays! What cute bags.
april
Cute bags! Could see making those for my nieces this Xmas. I need to make the tree skirt that never made it to the cutting table last year before Xmas arrives this year:). Thanks fr a giveaway!
hiddencourage
I love these adorable bags. They'd be so much more awesome than wrapping paper at Christmas!!
Francine
What a great giveaway for my birthday! wohoo! I'd make something for ME finally.. that never happens
Karrie S
Awesome tutorial! I love what you made. They are perfect! Thanks for the chance to win.
Rachel
Thanks for the tutorial -- you make it look very quick and easy!
Maythe Dirkzwager
Thanks for the tutorial, I would love to order me some lovely fat quarters to go make a bag or 2
Carolyn
I love these bags! They're adorable. For Christmas, I have a ton of easy quilts waiting for me to finish and also, a couple of stuffed animal blankets (a plush toy split in half with a small blanket in between). Sounds terrible cutting up a stuffed animal, but they're just so cute! 🙂
Rachel Booth
Love the bags! Definitely going to be trying one! For Christmas, I'm making stockings for my little family, and hoping to make a quilted table runner to layer over my tartan Christmas tablecloth!!! 🙂
Michelle Hudak
Cute bags....I'm a fan of place mats for Christmas gifts. They're quick and easy and who can't use some pretty holiday place mats?<br /><br />shel704 at aol dot com
Jeanne Gwin
I am making quilts for Christmas gifts for the sons and wife's, the grandkids, and ME
Geet
Hey there,<br /><br />Just absolutely love your blog. Your tutorials are really good. It is my first time making a quilt and I made one with your tutorial. I would like to try the tote bag but it seems quite small, if I want to make a slightly bigger version, would you happen to have the measurement ?<br /><br />Thank you and keep up the wonderful work. God Bless...
Forte Accessoriez
hi, i want giveaway fabric!! I loved to do Christmas tree fabric to hang on the wall.
deanna
This is so cute and looks quick and simple. It would also make a cute little bag for a toddler. Just big enough for a toy and a snack. Thanks for the opportunity to win some fabric.
Vcuisine
Thanks for the detailed post. I tried and it came out nicely. Have a wonderful day. Viji
Ana Sullivan
I found you from Brassy Apple link party. I loved the detailed description of this bag. I see that I could easy make this a bit bigger using my "stash". I have pinned you onto my Pinterest- DIY Grocery Bags:<br /><br /> https://pinterest.com/thelostapron/diy-grocery-bags/
LisaD
Found your tutorial on pinterest. Tried this one tonight and I actually made a bag! I'm so excited, lol. Not sure I'm ready to crank em' out but I feel confident that I can make more of these. Thanks so much for such an easy to follow tutorial.
Kaci Blue
This comment has been removed by the author.
jayciMay
Thank you for this easy to understand tutorial! Just what I have been looking for! I found you at Pinterest!
Lindsay
Thanks for the great tutorial! Had such fun making these! Posted a link on my blog to your tutorial!
Crafty Cupcake
Thank you for your VERY visual tutorial! I cannot WAIT to make bags for the first time.
Stephanie
Thank you so much for this tutorial! I had bought the fabric knowing I wanted to make a few small totes to use as gift bags, but had no idea where to begin. I was able to make the two bags I needed this evening in less than 40 minutes. THANK YOU!
Felicia Price
I just made a tote tonight following your instructions. Thank you. It is a fantastic way to make these. Fast and easy.
trixi
love your bag tutorial thanks for sharing!!
Gwen Walker
HI Amy, I love this bag pattern, I have made several of these with added special touches. I made one with special water proof lining for a little boy to carry his grapes in, ( his favorite food). Thank you so much for sharing. Fun, fast and easy. Happy Creating.<br />
Alyssa Krueger
Thanks for the great tutorial, here's how I tweaked your easy bag!!<br /><br />https://www.squidlegsfabrics.com/2013/12/even-more-tweaked-bag.html
Crystal
I had fun doing this tutorial! I made mine bigger, but used your general pattern. I got too excited about being nearly done, and messed up on the gussets. Still a great project, linked back to this tutorial in 2 placed within the post.<br />https://www.AThymetoStitch.Blogspot.com<br />
Claressa Hagy
made one and it was very easy. my little girl loved hers.
Stacie Mounts
Thank you for the detailed step by step instructions. I just made my first bag and it is adorable. I'll be making more for my Operations Christmas Child shoeboxes. Blessings!
Judy Lewis
LOVE how easy this little tote bag is to make. I am making up a bunch for the Chemo Patients at our local Cancer Center with snacks, puzzle books, candy, etc. in them.
Stephanie
Finally got a sewing machine and wanted a relatively easy project to use up a couplw of fat quarters I'd had for a year. Made two of these bags last night and they turned out great! Bless the lady at the sewing store who cut us some muslin to practice with....didn't have to measure and cut the handles. Just ripped it right down! Of course there are a couple crooked places but I feel like a couple more and my technique will be much better. I was so excited I made something I went running around the living room with them:) What I love about sewing is that it doesn't matter if this is from 3 years ago. You can use a tutorial or pattern from 10 years ago and it doesn't matter! It's not like it can get outdated or obsolete. Thanks for making my first big sewing project a success!
Amy Smart
Good for you! I'm so glad. Don't you love that feeling of finishing! 🙂
Michelle
A great tutorial, I have just finished making a bag to use for taking lunch to work. Its very cute. Thank you for the inspiration.
Natalie
Thank you for the detailed instructions and taking the time to write this tutorial. Making a bag right now.
Beth Bird
This is so cute. I made two last night. I am planning this to be my daughter's sewing project.
Yaz
Thank you for all the details and pictures. I was able to follow exactly even with the help of my 7 year old who wants to learn to sew.
jgoebbel
Thank you for an easy to follow and adorable tutorial...from a beginner sewer, my daughter LOVED it!!!!
Linda Gilpin
I have made hundreds of these. One change I made was to leave and opening for turning in one of the ends between the handles instead of in the lining. Since I like to topstitch the top anyway this takes care of closing the opening and saves a step and looks neater.
Amy
Great suggestion!! I'm going to try it that way myself. Thanks!
karabayleaves
Awesome idea! I am going to try that for the next one I make.
abrick
Great bag- as a beginner it was a good project. I only wished that after I cut my material that it was so small. I will use the pattern again to make a bigger bag! ^_^
Michelle
Love this tutorial!!
karabayleaves
I loved this tutorial. I made the purse version today, but I am going to make the tote bag version Friday. I did up the size a little bit, and when I make the tote, I'm going to make it even bigger. Wish I could share a picture of the adorable bag I made using your instructions. Thank you!
Conniecrafter
These are so very cute!!
Amy O.
I just want to thank you for this wonderful tutorial! I love the bag and the second variation. I'm making three for my great nieces and will tuck a book inside the bag. It's so generous of you to share your time and instruction!
Barb Clough
Love this!! Your instructions are great and also really like Amy O’s suggestion to put a book inside as a gift idea!!
Gail Fancher
Can you comment on the difference in the FQ bags if you use interfacing? What are the advantages? and disadvantages?
Amy
Interfacing would give it more weight and stability for sure. Just a personal preference on how structured you want your bag and how much time you want to take. THere is no right answer.
Barbara
Thank you for sharing this project, I love it!
When sewing the gussets are you sewing the outside fabric and lining together as one?
Amy
Yes, I sew them together. It'll create a little flap inside the bag, but I just tack those back after as that's easier.
Beverly62
I love this idea. I presently make sail cloth and designer totes but now with Covina-19, I was thinking what I could put the fabric masks in to hand out to my neighbors. I want them safe too👍🏻 Thanks for the tutorial it’s just what I needed.
Rona
Thank you for the easy to follow tutorial. I’m new to sewing & with the quarantine I have limited materials. I did happen to have some coordinating fat quarters. I made 3 of your bags today & I love how well they turned out! Thank you! I’ll be using one to carry my water bottle and snack at work when the quarantine is over.
Diane Scranton
Thank you so much for your pattern/tutorial for the fat quarter bag. I modified the width and placement of the handles and made it into a walker/wheel chair bag. It's a quick and easily put together bag and the perfect size to fit over the bars of a walker or the armrest of a wheelchair. I originally made this as a walker bag for my friend while she was in rehab after an injury. It got such rave reviews from the other residents that I have continued to make the bags and donate them to nursing homes and assisted living centers. Thank you for sharing!!
Amy
I love it! That is so awesome. And so generous of you to make more to donate. Thank you so much for sharing! It's such a great idea.
Sharla Anderson
Thank you very much for this pattern and tutorial! I love your emails - always great inspiration❤️
Amy
Thank you, Sharla!
Karen
What a great bag! And so much easier than most of the bag tutorials I've seen in the past. Thanks for sharing.
Amy
I'm so glad it was helpful! Thanks, Karen.
Renee Hester
Very cute! I'm thinking this bag with a longer strap would make really cute bags Halloween.
Amy
Yes! That's a great idea!
Karen Davis
The valentine bags are very pretty and innovative design. If you don't mind my asking, what is the price (assuming it is for sale)?
Amy
Unfortunately I don't make any for sale. (The original bags were sent to my nieces for Valentines Day presents last year. 😉 ) But you may find crafters making similar products for sale on Etsy?
Denise in PA
Thanks so much for sharing the pattern and options, Amy! These are great and I can think of all kinds of uses for these little bags!