
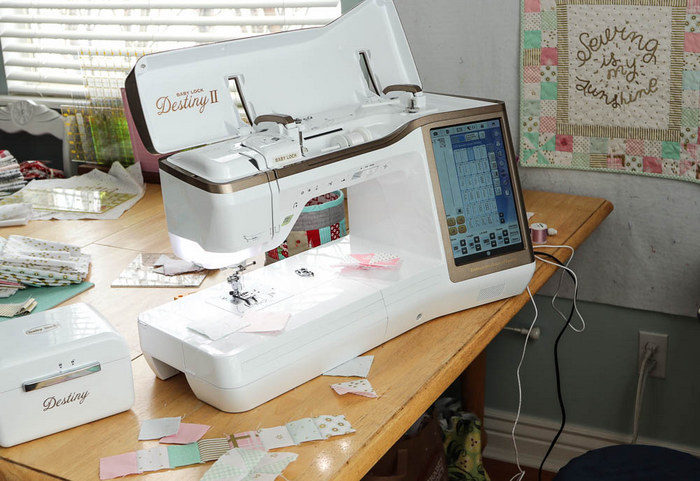
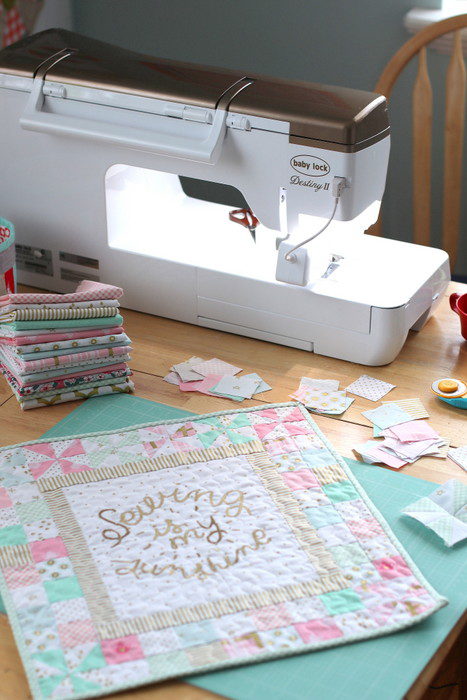
Welcome back to the Love of Sewing Challenge, hosted by Baby Lock and featuring the brand new Destiny II sewing and embroidery machine. In this post we're going to talk about piecing quilts and using foot options to get an accurate ¼" seam allowance as well as finishing the mini patchwork quilt from part 1.
Let's talk about using sewing machine feet to get an accurate ¼" seam allowance (which, as you know, is the gold standard for quilt-piecing). Even if you don't own this specific machine, many of these tips are universal for machine piecing.
First of all, let's talk ¼" seam allowance, the universal seam allowance for piecing quilts. If you're coming over from a garment-sewing background, a ¼" seam allowance can feel really narrow, but in the quilt world, it's standard for patchwork piecing. Another difference from garment sewing is that most seam allowances are pressed to one side, rather than pressed open. This is to help with wear and tear on the quilt, keeping seams from splitting over time. There are times when pressing the seam open is more practical, depending on the piecing techniques, but this will usually be addressed in the quilt pattern or instructions. Most patterns will also have pressing instructions, telling you which direction to press your seams, but if not, when in doubt, press toward the darker fabric.
Accuracy in your seam allowances is important when piecing quilts - especially when there are a lot of little pieces and seams coming together. It's very important to keep that seam allowance a consistent ¼".
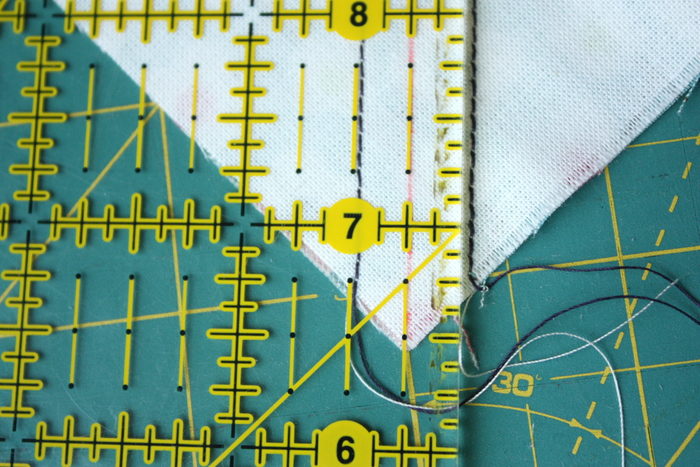
A scant ¼" helps a lot with accuracy - especially when piecing small blocks, or blocks with multiple pieces. A scant ¼" is just what it sounds like, a seam allowance that is just slightly narrower than an exact ¼". Use a ruler to find out if your seam allowances is a scant ¼". The seam for an accurate ¼" seam allowance should run right under the ¼" line on a ruler. (You can see the seam on the right is slightly wider than an exact ¼"). This will affect your piecing and the finished size of your block if you are putting multiple parts together. The seam for a scant ¼" seam allowance is a couple of threads over and should run just inside the ¼" line on a ruler when lined up next to the edge of your fabric (see seam on the left). The majority of the time when I am piecing quilt blocks, I sew with a scant ¼".
If you are simply piecing patchwork squares where all of the blocks are the same size, a ¼" vs a scant ¼" doesn't make a difference.
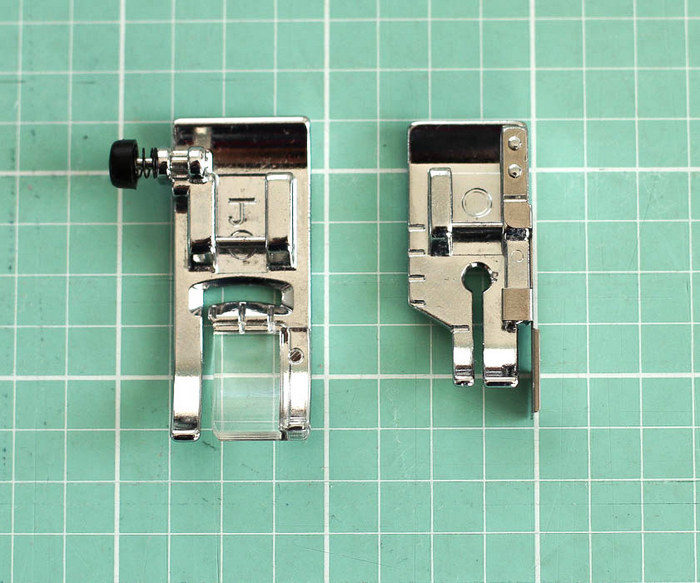
Learn about your sewing machine and what foot and setting options you have to help you get that consistent ¼" seam allowance. The Destiny II comes with two feet that I use most - the J foot is the basic all-around foot attachment. The foot on the right is the ¼" Foot with Seam Guide.
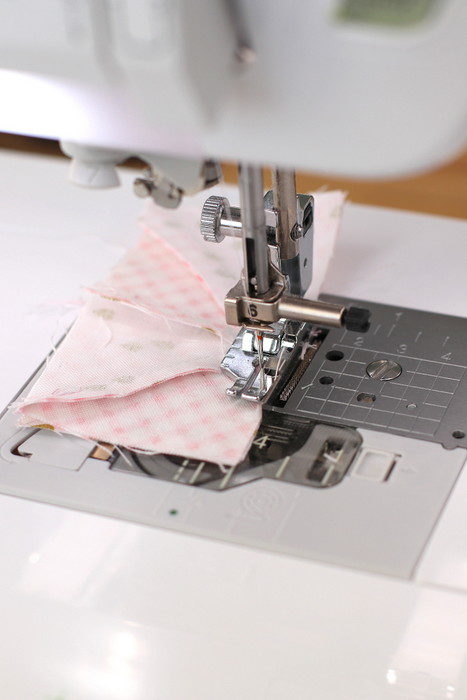
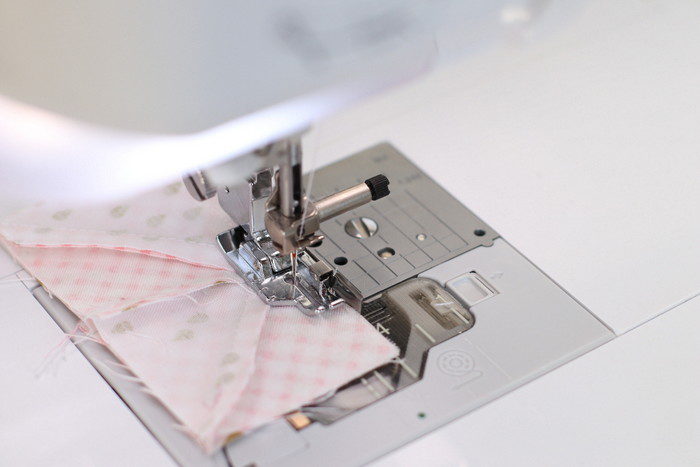
Using a ¼" foot with a seam guide will help with the accuracy of your seams because as you run the edges of your pieces through, the metal flange will serve as a guide to keep your seams from getting too wide. Even though this foot is a "straight-stitch foot" (meaning there is a single narrow hole for the needle to pass through - not a wide opening for decorative stitches) there is enough room to move the needle one or two notches to the right to give you a scant ¼" seam. This will bring the needle just a thread or two closer to the edge of the fabric. (Always test by manually rotating the needle through the foot before using the pedal, just to make sure the needle isn't over too far and will hit the metal foot.) This foot is also available (to purchase separately) without the flange where you can use the side of the foot as your guide. One thing I love about Baby Lock machines is that the foot attachments are reasonably priced, making it easier to add to your foot capabilities and selection.
I like to use the ¼" foot with seam guide when I'm piecing blocks - especially for small or complex patchwork where the accuracy of the seam allowance can make a big difference in how the corners and pieces match up.
The J foot is the utilitarian foot that comes with the machine. It is a wide foot with a wide opening for the needle to cross back and forth for decorative or zigzag stitches. Because the foot is wide, the distance from the needle to the right edge of the foot is larger than a ¼" inch. That makes it really helpful for seeing the space surrounding your needle. However, using settings within the machine, you still use the edge of the foot as an accurate guide. First of all, you can adjust the needle closer to the right edge of the foot to get a ¼" seam allowance. (Use a ruler to double-check the accuracy of your seam.)
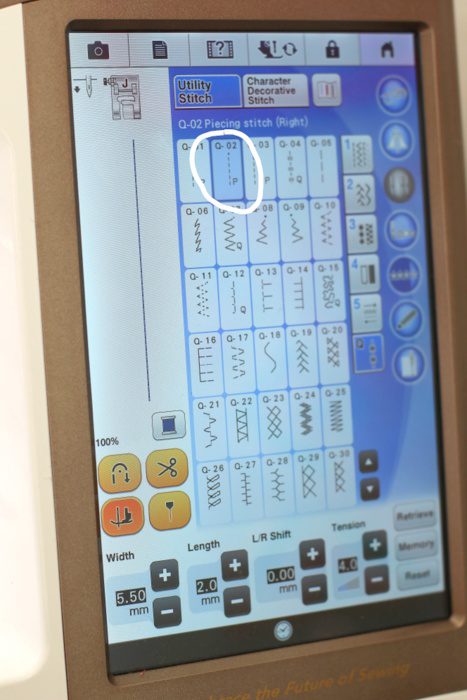
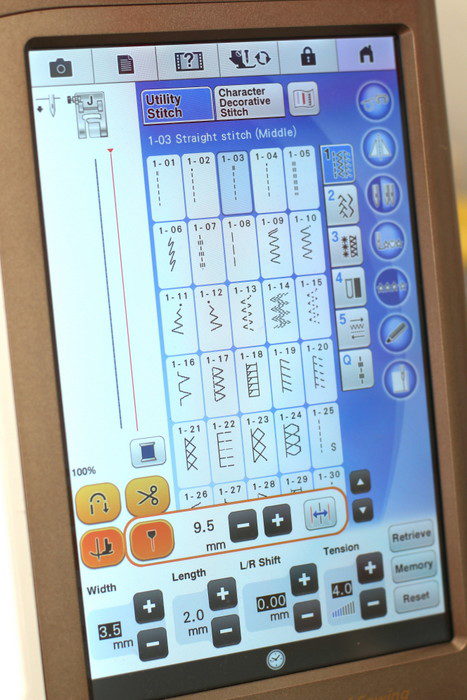
There are also settings within the Q-stitch menu where the machine will automatically adjust your needle position to set it ¼" away from the right side OR left side of the J foot. Circled is Q-02 - this will automatically move your needle ¼" away from the right side of the foot. This is super handy for times you don't want a foot with a flange or guide, such as when you're sewing over lots of seams that could get caught on the guide or sewing over bulkier fabrics.
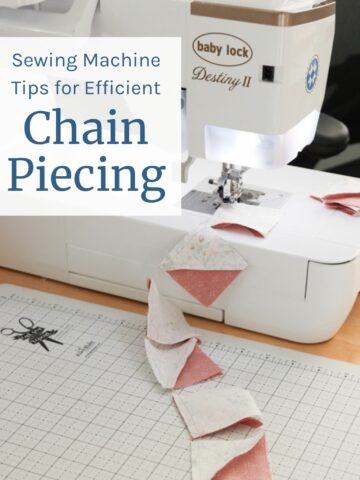
Another feature I love for chain-piecing is the square on the bottom left that is highlighted in orange. When this setting is on, the needle drops and the foot lifts automatically when you pull your foot off the pedal. This makes it super easy to slide the next pieces, ready to sew, up against the needle. When you press the sewing machine pedal, the foot drops and you can continue to sew.
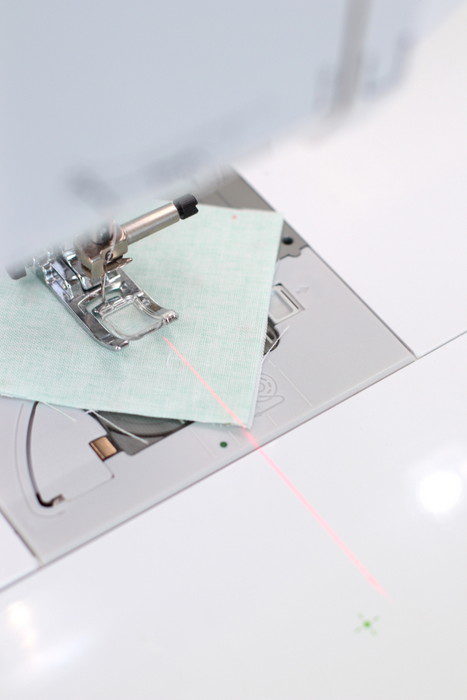
Another time I prefer the J foot is when I'm sewing across my pieces, rather than using the edge as a guide, such as when I'm making Half Square Triangles (HST's). Also, see that fancy laser beam projecting out in front of the presser foot? That comes in super handy for piecing HST's and I'll be talking about it below.
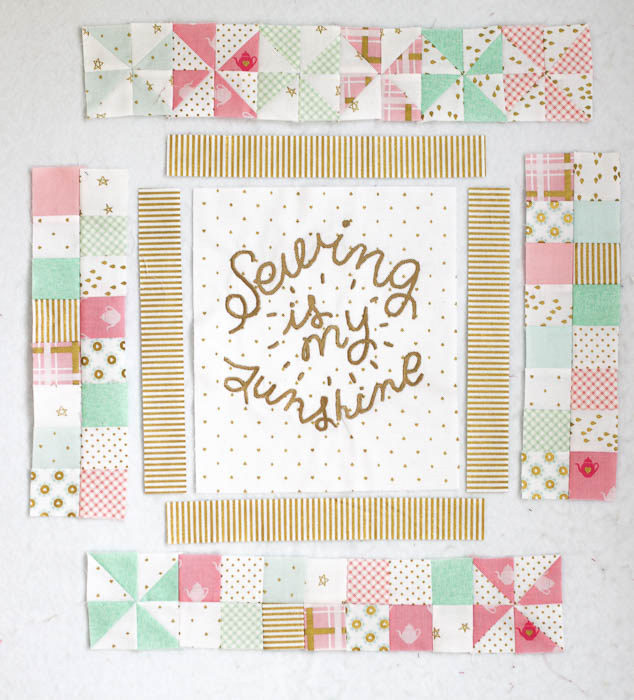
Let's talk about basic piecing. For the project I introduced in part 1 we'll be piecing three sets of 2" x 2" patchwork squares - first into 3 sets of 2 rows each for the side and bottom borders. Then we'll be piecing 8 pinwheel blocks made up of half-square triangles. I'll be showing another feature on the Destiny II that make half-square triangles a snap.
For this project you need:
- center embroidery portion squared up to 9 ½" x 11"
- 46 2" x 2" patchwork squares
- 32 2 ½" x 2 ½" squares (16 light and 16 colored) to create pinwheel blocks
- 20" x 23" piece of batting
- 22" x 25" backing
- 2 strips 2 ¼" x 42" for binding
(more info about the fabric I used in Part 1)
From 2" x 2" squares make two sets of 8 squares x 2 rows and one set of 7 squares x 2 rows.

In each row, press all seams to one side. For each row, alternate which direction the seams go. This will help you match-up all the points of the patchwork squares when you sew the two rows together because the seams will butt-up against each other. This also helps reduce bulk.
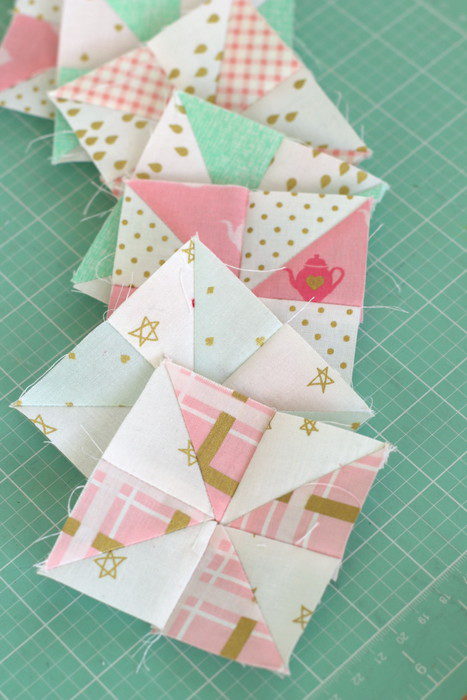
Pinwheel blocks - Make 8 blocks using this method:
Match-up two sets of matching print 2 ½" x 2 ½" squares with two white 2 ½" x 2 ½" squares. I traditionally make two half-square triangle (HST) blocks at once matching two different squares right-sides together.
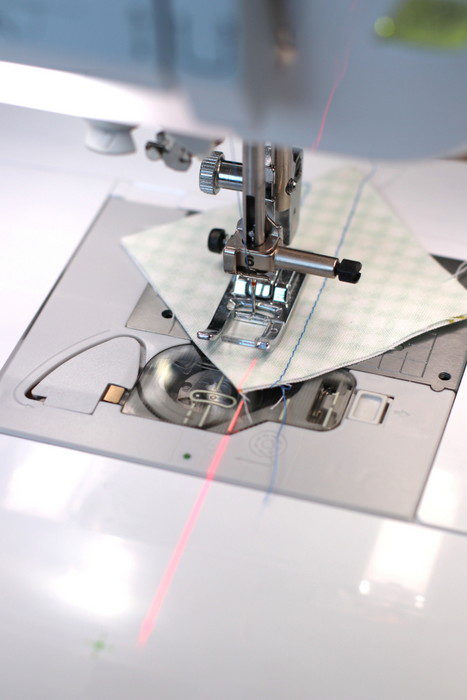
Typically, to make two Half-Square Triangle blocks at once, I would draw a diagonal line on the back of my half my squares and sew a seam a ¼" away from both sides of the drawn line. Using the built in laser-guide beam, I can project that beam onto my fabric and use it as a guide, running the bottom corner of the squares up along the guide. The laser beam is centered when you first turn it on. But like the needle, it has the capacity to shift left or right.
If I was sewing one, centered diagonal line down the middle of my matched-up squares, I would leave the laser guide in place. Since I am sewing two seams ¼" away on either side of a center line, I will move the guide over to the right ¼". (See orange circle on diagram above.)
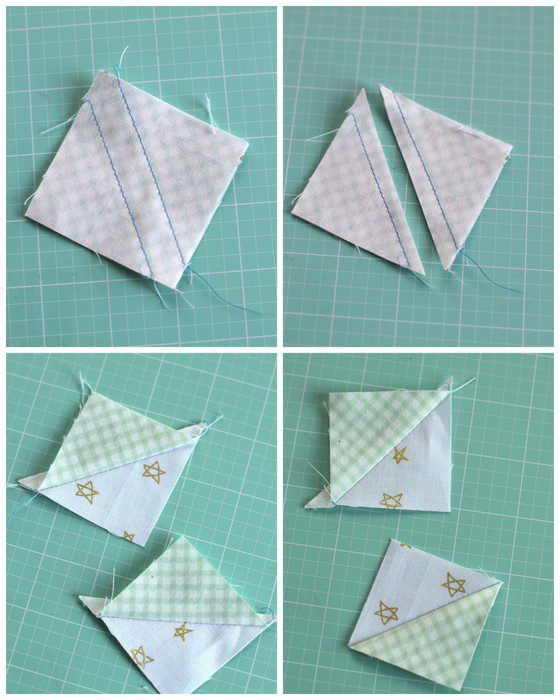
After both seams are sewn, cut the half-square triangle on the center diagonal. Open up and press seams toward the darker print fabric. Now you will have two identical Half-Square Triangle blocks. At this point it is important to trim the triangle tags and square up the blocks to 2" x 2" - assemble into sets of 4 HST blocks to create the pinwheel. It seems tedious, but it's so important for accurate piecing. Here's my favorite short-cut for squaring-up Half-Square Triangles.

Once you have four 2" x 2" HST blocks, rotate them in a pinwheel design. Sew into two rows and press seams in opposite directions. Then sew two rows together to finish the pinwheel block. This should measure 3 ½" x 3 ½" unfinished (3" x 3" finished, once they're all sewn into the quilt.)
Sew 6 pinwheel blocks to create one row. Sew remaining pinwheel blocks to either side of 2 x 7 patchwork strip.
Final Assembly
Square-up center embroidered panel to 9 ½" x 11". (More on creating embroidered panel in Part 1.)
Sew 2 gold-stripe 1 ½" x 11" strips to left and right sides. Press seams away from center panel. Sew 1 ½" x 11 ½" gold-stripe strips to top and bottom. Press seams away from center panel.
Sew two patchwork 2 x 8 units to either side of the center panel. Press seams toward gold-stripe.
Sew patchwork sides to center portion - press toward center.
Sew top and bottom rows - pinwheels and pinwheels + patchwork. Press seams toward center panel.
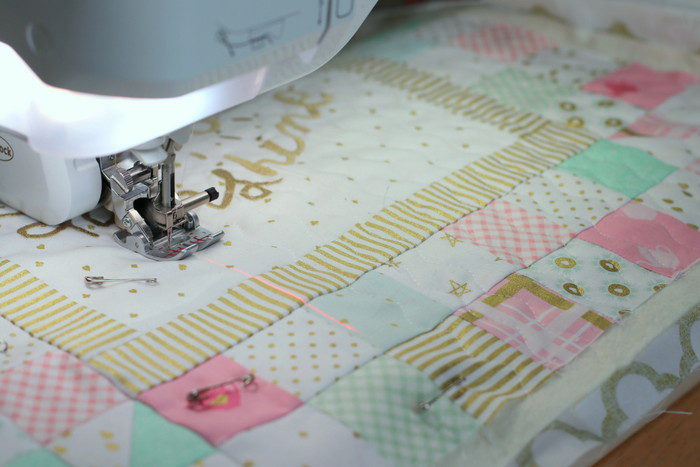
Layer pieced quilt top, batting, and backing. (Here are some tips for prepping a quilt sandwich.) Quilt however you prefer. I used the Dual-Feed foot attachment and quilted int wide, wavy lines. (See Pat Sloan's post for more information on preparing and quilting.)
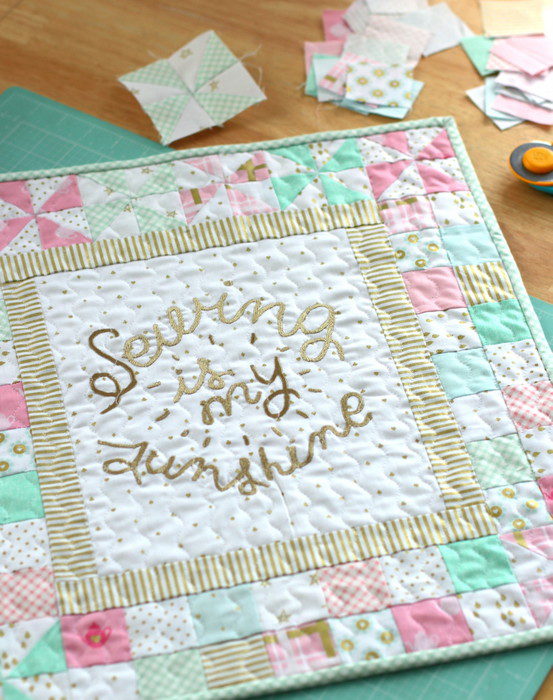
Once you're finished quilting, trim and square-off the edges. Info on finishing and binding a quilt here.
For more helpful tips on maximizing your stitching as well as visuals of some of the processes mentioned above, check out this video:
It has been so dreamy to get to work with this machine and learn more about it's features along with the other posts that are part of the Love of Sewing challenge. That said, I know it's a "bucket-list" machine (it was for me!). If you're just getting started in the world of sewing or looking for your first upgrade, check out the range of other Baby Lock machines. My honest review is that I can't say enough good things about my experience using Baby Lock machines. And they run the full gamut from entry level machines right up to the deluxe Destiny. If you're just getting started, check out the Rachel. For mid-level upgrades, I recommend checking out the Jazz and Lyric. This post by Dana is really helpful talking about how to pick a sewing machine. Definitely visit a local dealer to find out which machine is fits your needs and budget best. The best part about buying from a dealer is that not only are they super helpful with maintenance and helping you learn how to get the most out of your machine, but they're also willing to exchange your current machine when you are ready to upgrade!
Thanks so much for playing along. Hopefully you've learned some new piecing tips today and other helpful tips and techniques along the way. Thanks for letting me be part of the challenge Baby Lock!

LINDA
This is such a cute choice of pattern+colors>Love it! Thanks for your hints too!
Barbara McDonald
You're a natural! A star is born!!
Amy Smart
Aww, thanks Barbara. xo
Rosemaryflower
Sweet pattern, Amy.
I love this machine!
I sew on two old Singers. The machines they have now are magical. I do love Babylock the very best.
Mrs. B
Have you ever done a post on your switch from Bernina to Babylock? It seemed a sudden change, I remember you being a huge Bernina fan
Amy Smart
Good question. I never did a specific post - mainly out of respect for Bernina. I still LOVE my old 1979 Bernina sport, but the new machine I tried out was really frustrating to me for a few specific reasons. It was just not a machine that I felt I could encourage people to go pay a big price for. I can email privately if you want more details. I had already made the decision to return the loaned machine to Bernina when I was approached by Baby Lock. I had worked with them at a few conferences and workshops and decided to try one of their machines on loan. I had a totally different experience when I sewed with the Baby Lock Crescendo and I've loved it! No issues or frustrations whatsoever. This is a machine and company that I can confidently recommend to my readers. It's been a very different experience. I feel really lucky to get to work with them and be one of their ambassadors.
eileenkny
Amy, I have a Brother; it's very similar to the BabyLock. I just finished paper piecing a huge block and used the J foot for the whole thing. I liked being able to see the lines behind the foot.
Amy Smart
Good point! I should have thought about paper-piecing. The J foot is definitely best for that. Thank you!
Marek Susan
Hello Amy,
your recent post was really great. i am really grateful to you for the tips and tutorial you made for me. the machine feet option really got mesmerizing to me and really hard to control over it. and sometime i can not understand what pressure foot to use on a specific time. thanks for the help
Jennifer Glover
Your sewing machine is really great! I started to want it too.
Julie Kemp
I have the Destiney 1 and a Crescendo. LOVE them both.Very easy to operate. Lots to learn. I learn new uses everyday. I also own the Baby Lock Evolution serger. Just finished 2 baby blankets usung my serger. First time doing that and loved the finish. Will do it again.
Tina Deaton
Hello and Thank you for this info! I am a Baby Lock girl of many years (LOL! I've only owned 2, they last!) and have always used the J foot with the "P" adjustment. I recently got out all of the feet that came with my Lyric (bought 2018) and discovered I have a 1/4" with guide foot! So I Googled stitch length and saw this. Thank you for showing pictures of your machine's settings. That helped as well.
Amy
Awesome! I'm so glad!