
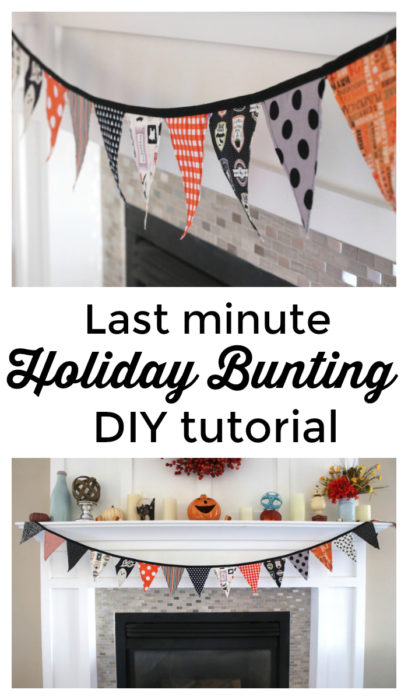
Have you ever wanted to spice-up your holiday decor at the last minute? This fabric pennants/bunting tutorial is the perfect last-minute holiday decoration that you can whip up together super fast. And it's easy!

A sewing machine is required, but technical skills are not. And because we'll use raw-edge sewing, the bunting comes together so quickly!
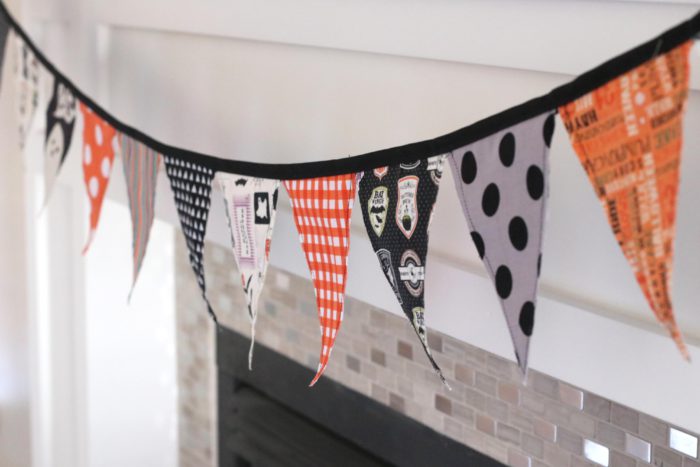
A quick word on fabric choices - I used some leftover Halloween prints from my Halloween Bunting quilt, but you don't need speciality prints to make holiday-themed decor. Just use patterns and colors (such as orange and blacks) from your stash! Or stock up on one or two prints during end-of-the-season sales a future bunting.

Project requirements: about 15 pairs of 5" x 6" pennant triangles (you can use less/more pennants if your space is smaller/bigger) and a package of pre-made Bias Tape (Extra Wide) Double Fold. (Make sure you get the Double fold!) I chose black to go with my fabric, but there are a variety of colors available. You can find this in the sewing notions section of big box stores like WalMart as well as places like JoAnn Fabrics.

To cut my triangles, I took some of the fabric left over from my Halloween Bunting quilt and ran it through my AccuQuilt Go Cutter die cut machine*. (I used the Isosceles Triangle die.)

Don't worry if you don't have a die cut machine - these triangles are really easy to cut on your own! Print out the triangle template here - preferably on to something heavy like card stock. Or cut out and trace onto template plastic.
Cut a 6" strip of fabric and use the template as your guide for cutting triangles. (I like to still use the edge of a ruler to guide my rotary cutter and so that I'm less likely to trim down the template.)

Then just rotate the direction of the template to cut multiple triangles from the same fabric.

Once all of your triangles are cut, match them up into pairs, wrong sides together. Bring them to the sewing machine and sew them together along the diagonal sides about ¼ - ⅛th of an inch away from the edge of the triangles. (You don't need to sew the top edge.)
As you can see, I put in one pin on the second side so that the triangles don't slide around too much.
But honestly, I don't stress about this part at all. This is quick and easy, no fuss!

And if your edges don't match up perfectly once they're sewn together, just trim off the excess.
To be honest, you don't HAVE to make them double sided, but the reason I prefer to do it that way is because the two layers will give your pennants more stability and help them hang better.

Once your pairs are all sewn together lay them out, play with color and pattern, and put them in the order that you want them to go. Then stack them up in that order and bring to your machine. Open up your package of Double Folded Bias Tape.

Starting about 4" away from the end of the tape, open up the fold and insert your first pennant, closing the top layer of the bias tape. Bring to the machine and topstitch over the bias tape and pennant flag.

Stop at the end of the flag, drop the needle and open up the folded tape to insert the next pennant flag in your pile.

Continue to topstitch over the layers of flag and bias tape folds, repeating the process to add the next pennant from your pile.
Continue to add the number of desired pennants until you have finished your bunting!
It's seriously that easy. If you want to sharpen up your pennant flags, especially when you pull them out again for the next season, give them a quick spray of starch and press.

And there you go! Seriously SO quick and easy. They also make a quick and easy festive gift for a friend!
*FTC Disclosure: some of my posts contain affiliate links. If you purchase something through one of those links I may receive a small commission, so thank you for supporting Diary of a Quilter when you shop! All of the opinions are my own and I only suggest products that I actually use. ?


Katy HD
Very festive!
Kelly Johnson
Adorable Amy! Your Tutorials are always so easy to follow and you share so many ideas free for us!!! Have a great day!!!
Karen
I sincerely enjoyed this quick project. Enjoyable and no stress!
Spanish to English
Perfect last-minute holiday decoration!
Mabel
Thank you Amy , you the best ! For you instructions and easy way to do it!????
Mia
Great project. Thank you for the instructions!!!!!!!