
Half Square triangle blocks are one of the basic elements of quilting. The design options are endless. At the bottom of this post is a link to a Half Square Triangles pinboard where you can get all kinds of half-square triangle inspiration.
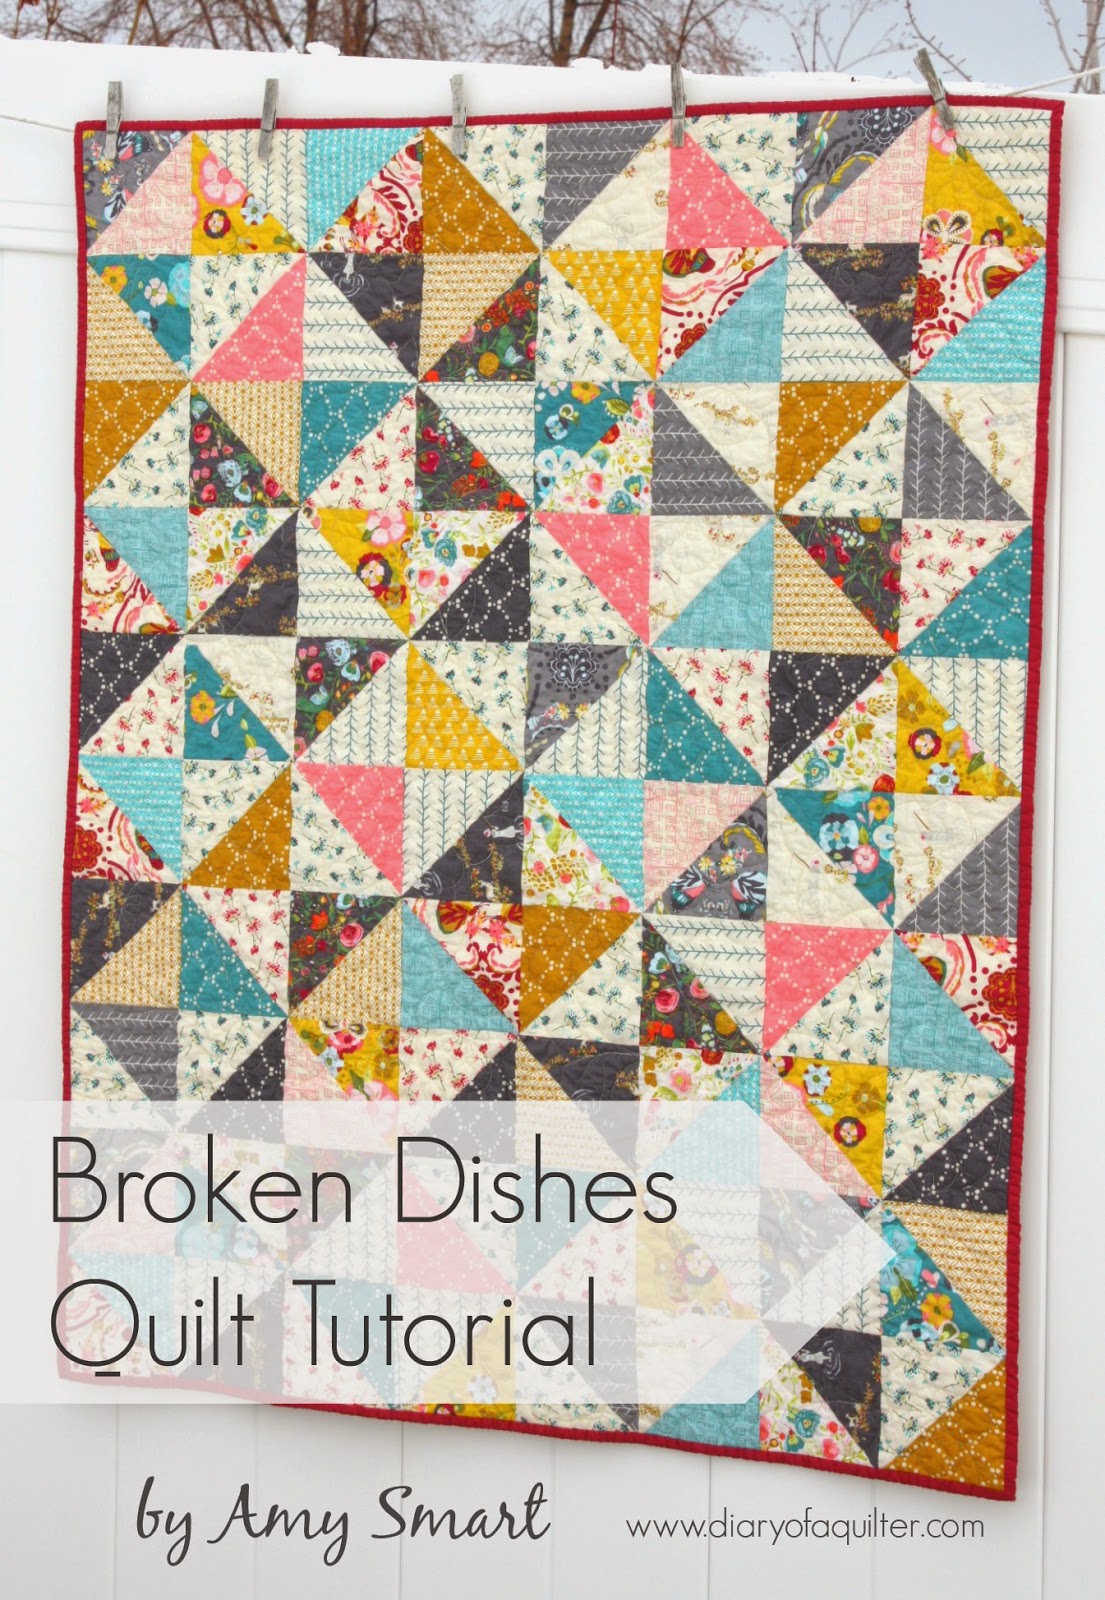
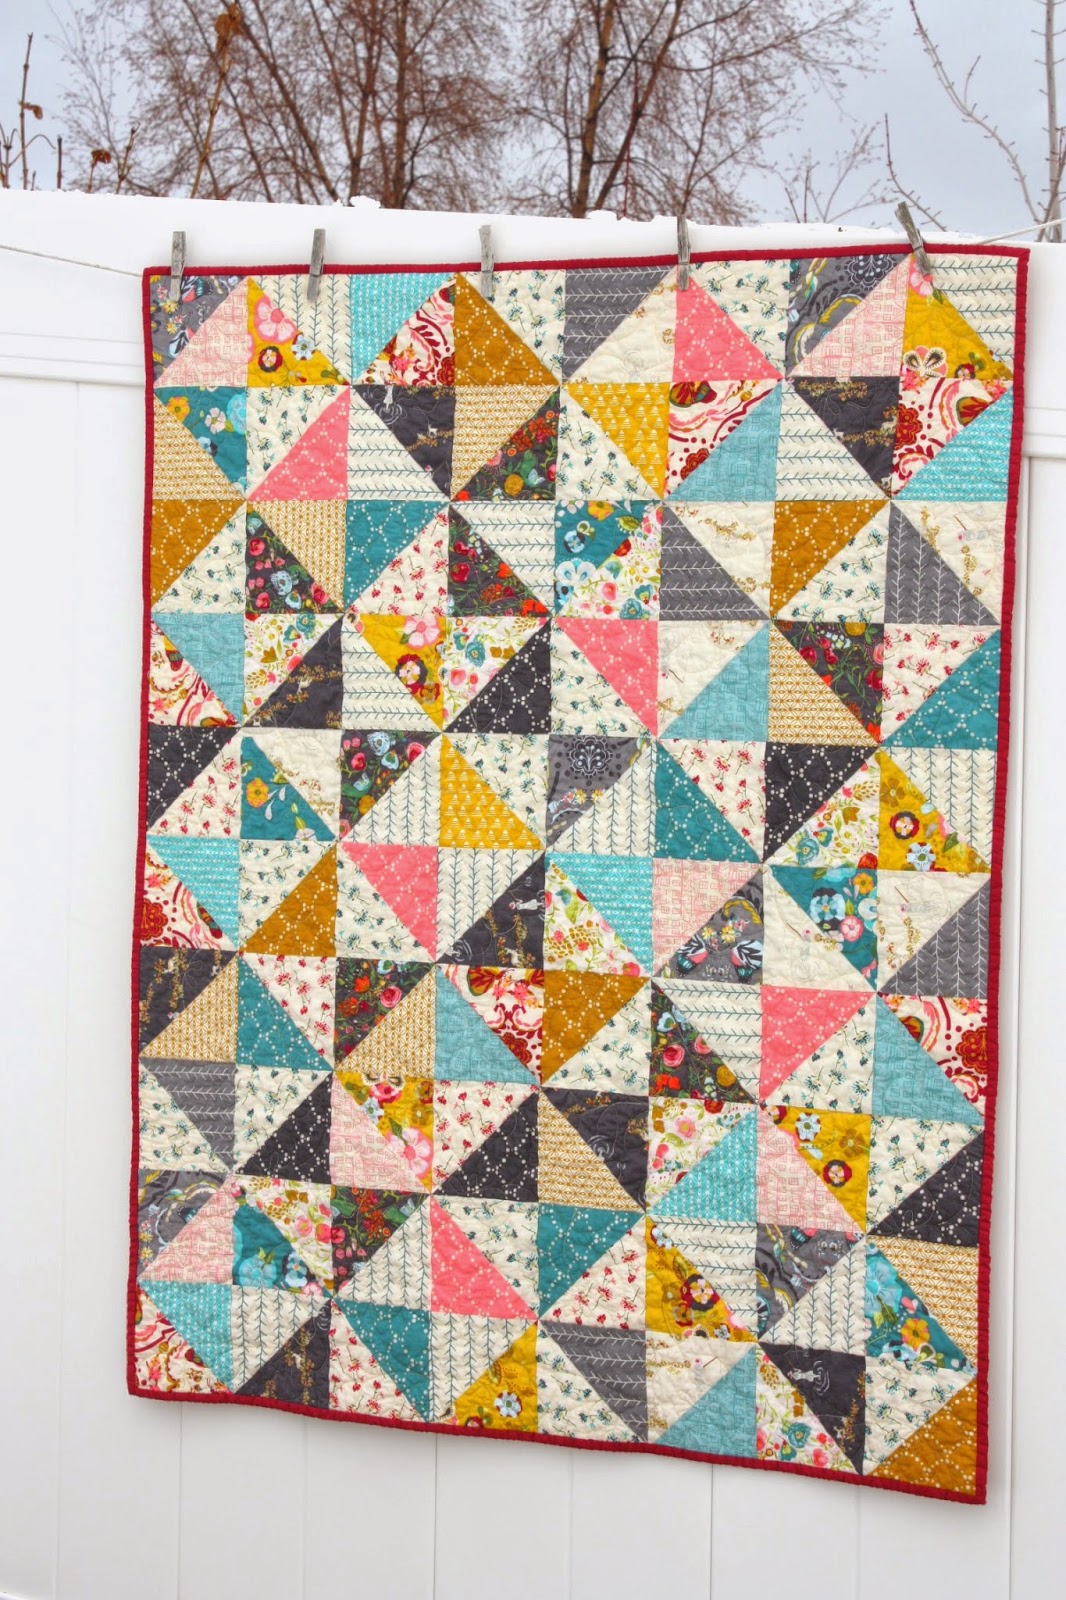
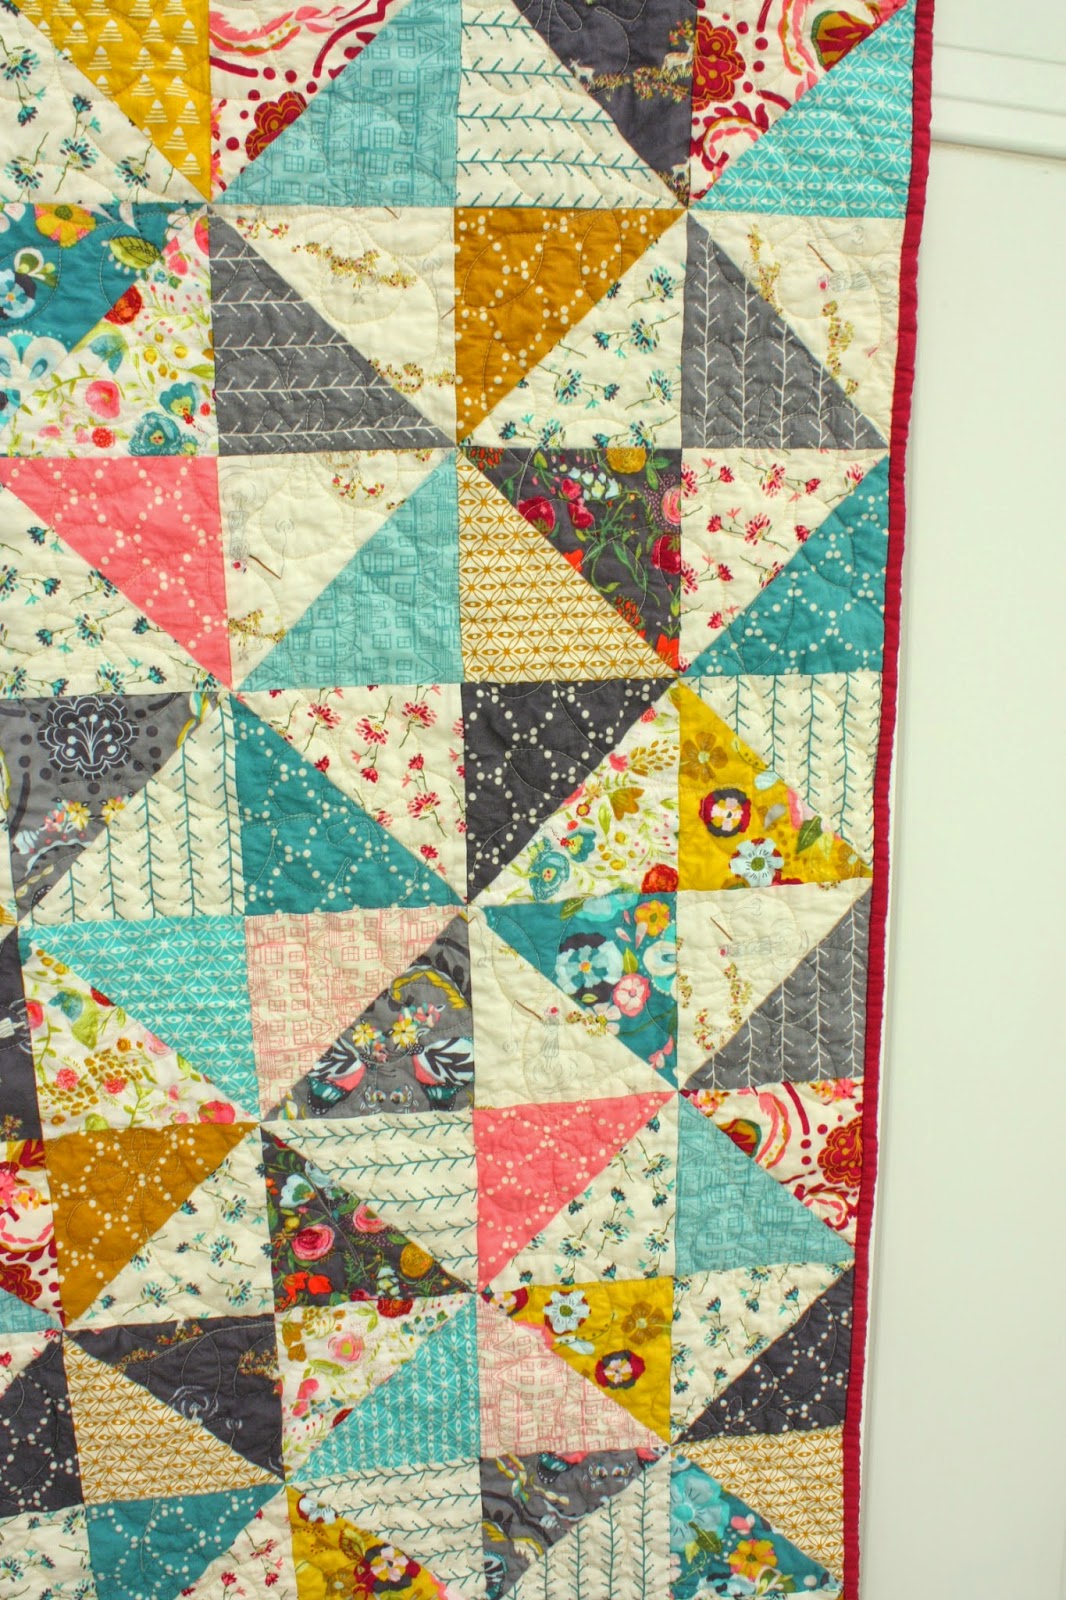
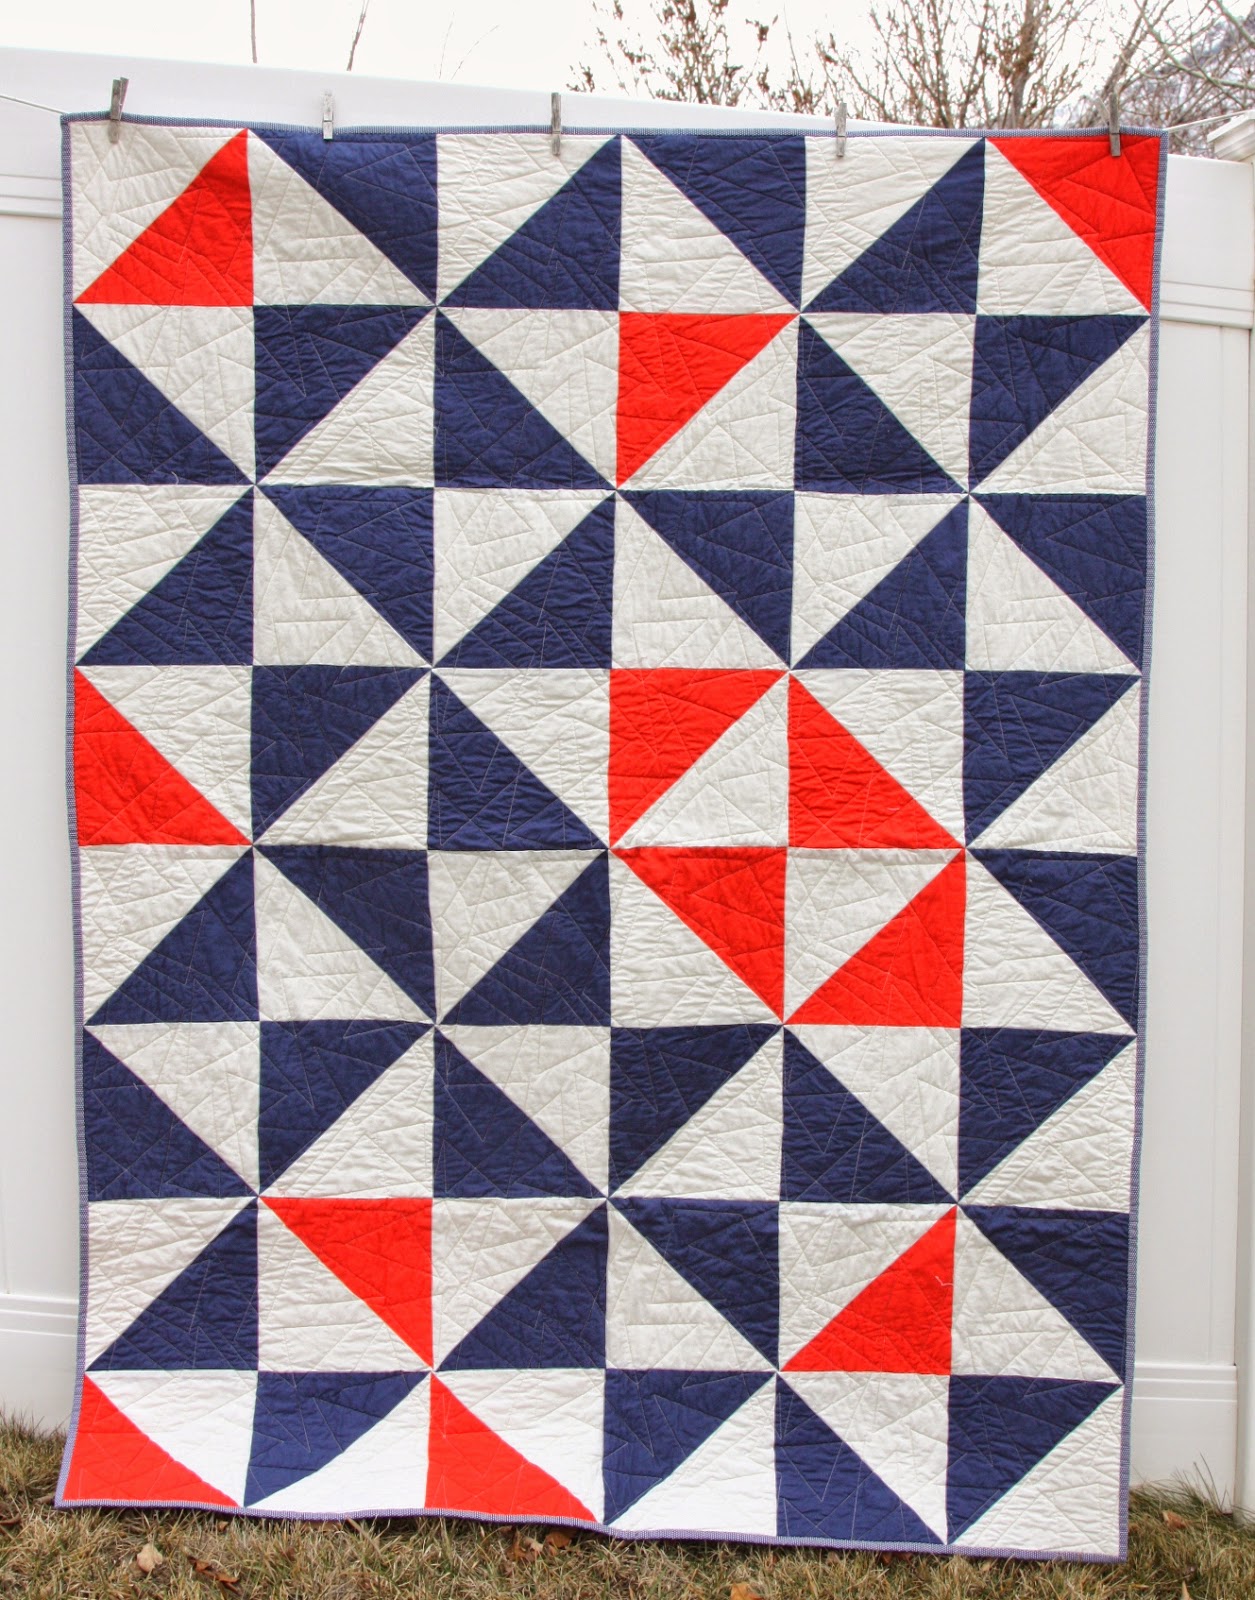
For this tutorial I'll be sharing the traditional "Broken Dishes" layout of half square triangle blocks. It's such a simple pattern - perfect for showing off pretty fabric like the quilt above (more details here). It also works well for a simple, graphic design like this example using only solid fabrics.
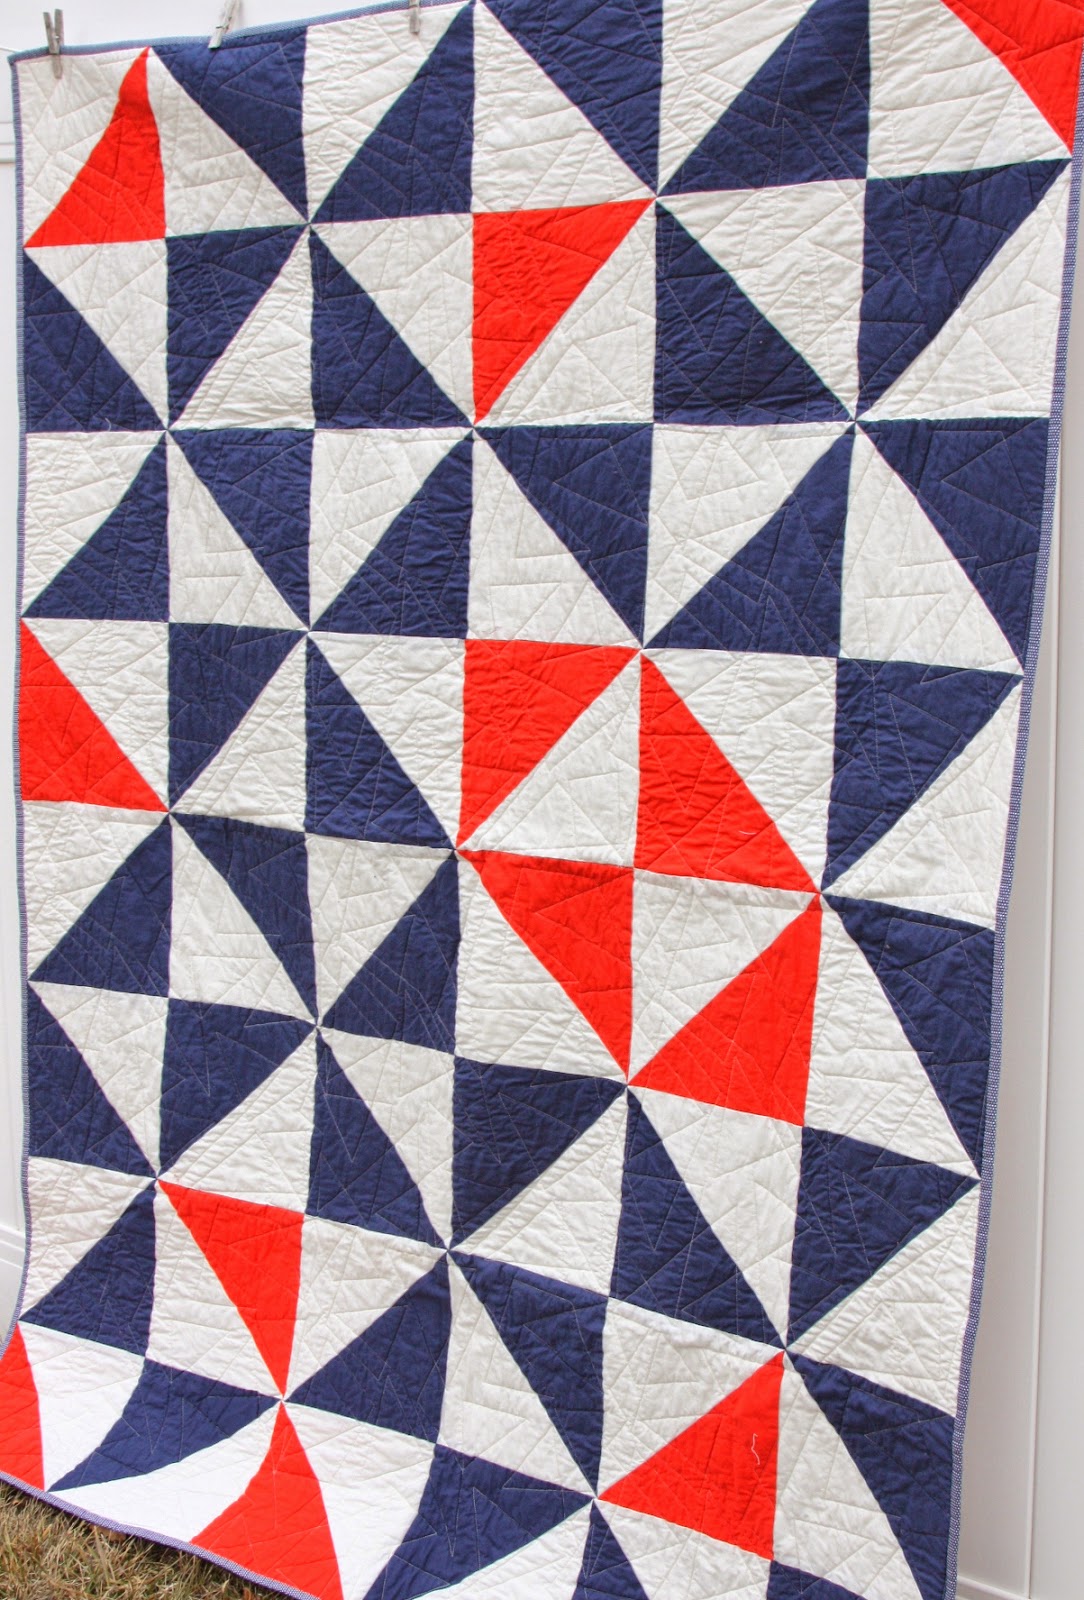
The design works well when there's some contrast between light and dark fabrics. You can see in my solids version of this quilt, that the contrast is more stark between light and dark. In the crib-size version I used a variety of prints as well as different colors for my 'dark' fabrics and I like the over-all scrappi-ness of the finished look. You don't have to use 'lights' and 'darks' - just an overall random selection of fabrics would look equally great.
Fabric requirements for 40" x 50" crib quilt (prints quilt):
- 40 light' 6" x 6" 'squares
- 40 'dark' 6" x 6" squares
- ⅜ yard fabric for binding
- 1 ⅝ yards for backing
- 42" x 54" batting
Choosing fabrics:
There's no right or wrong - just different options. You could use a commercial collection - like I did on this one - or just pick out fabrics and colors that you like. This design is very forgiving and embraces a wide-variety of looks! So don't over think your fabric - just go for it.
Let's start with the crib quilt using the 6" x 6" squares:
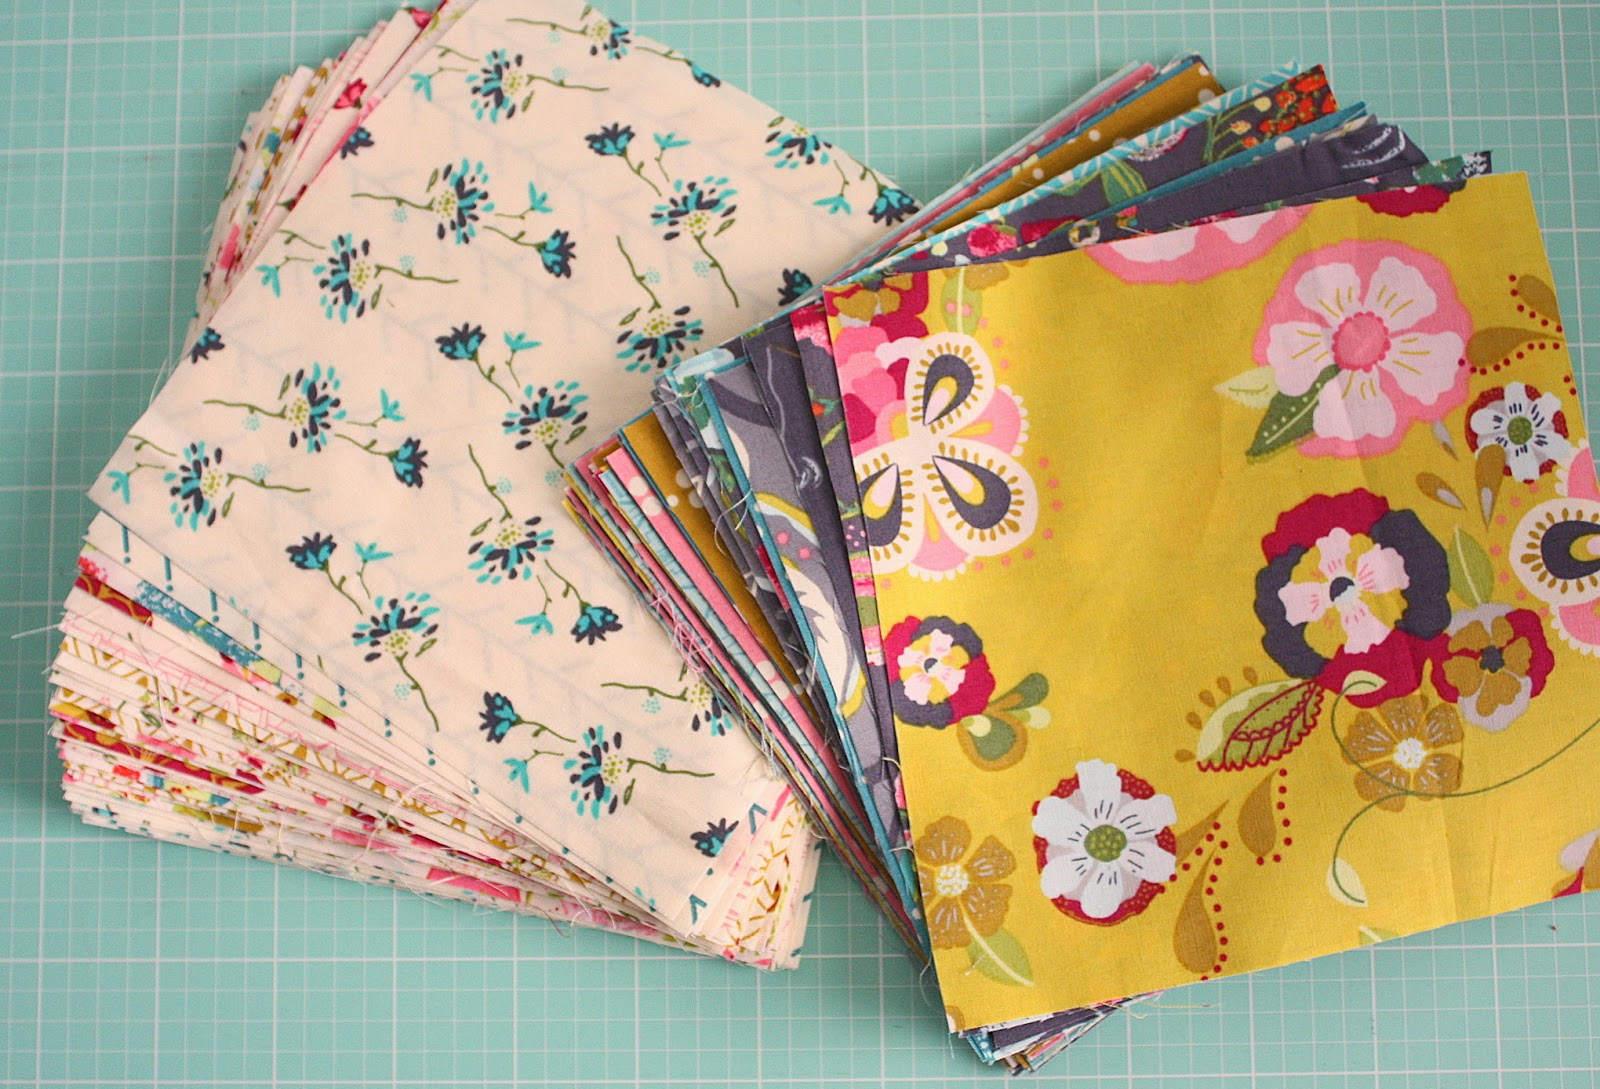
I cut my squares from fat quarters. 7 light FQ's and 7 dark FQ's will give you a nice variety of fabrics. If you are cutting from FQ's, you'll get the best use of your fabric by cutting two 6" x 18" strip from the 18" side of the FQ, and then cutting them into six 6" x 6" blocks.
You could also buy ⅙ yards of fabric (if your fabric store will cut ⅙ yards) for this quilt - 7 light fabrics and 7 dark fabrics. ⅙ of a yard is going to be 6" x about 42". Cut at least six 6" x 6" squares from each ⅙ yard. (You'll have a little extra fabric left over.)
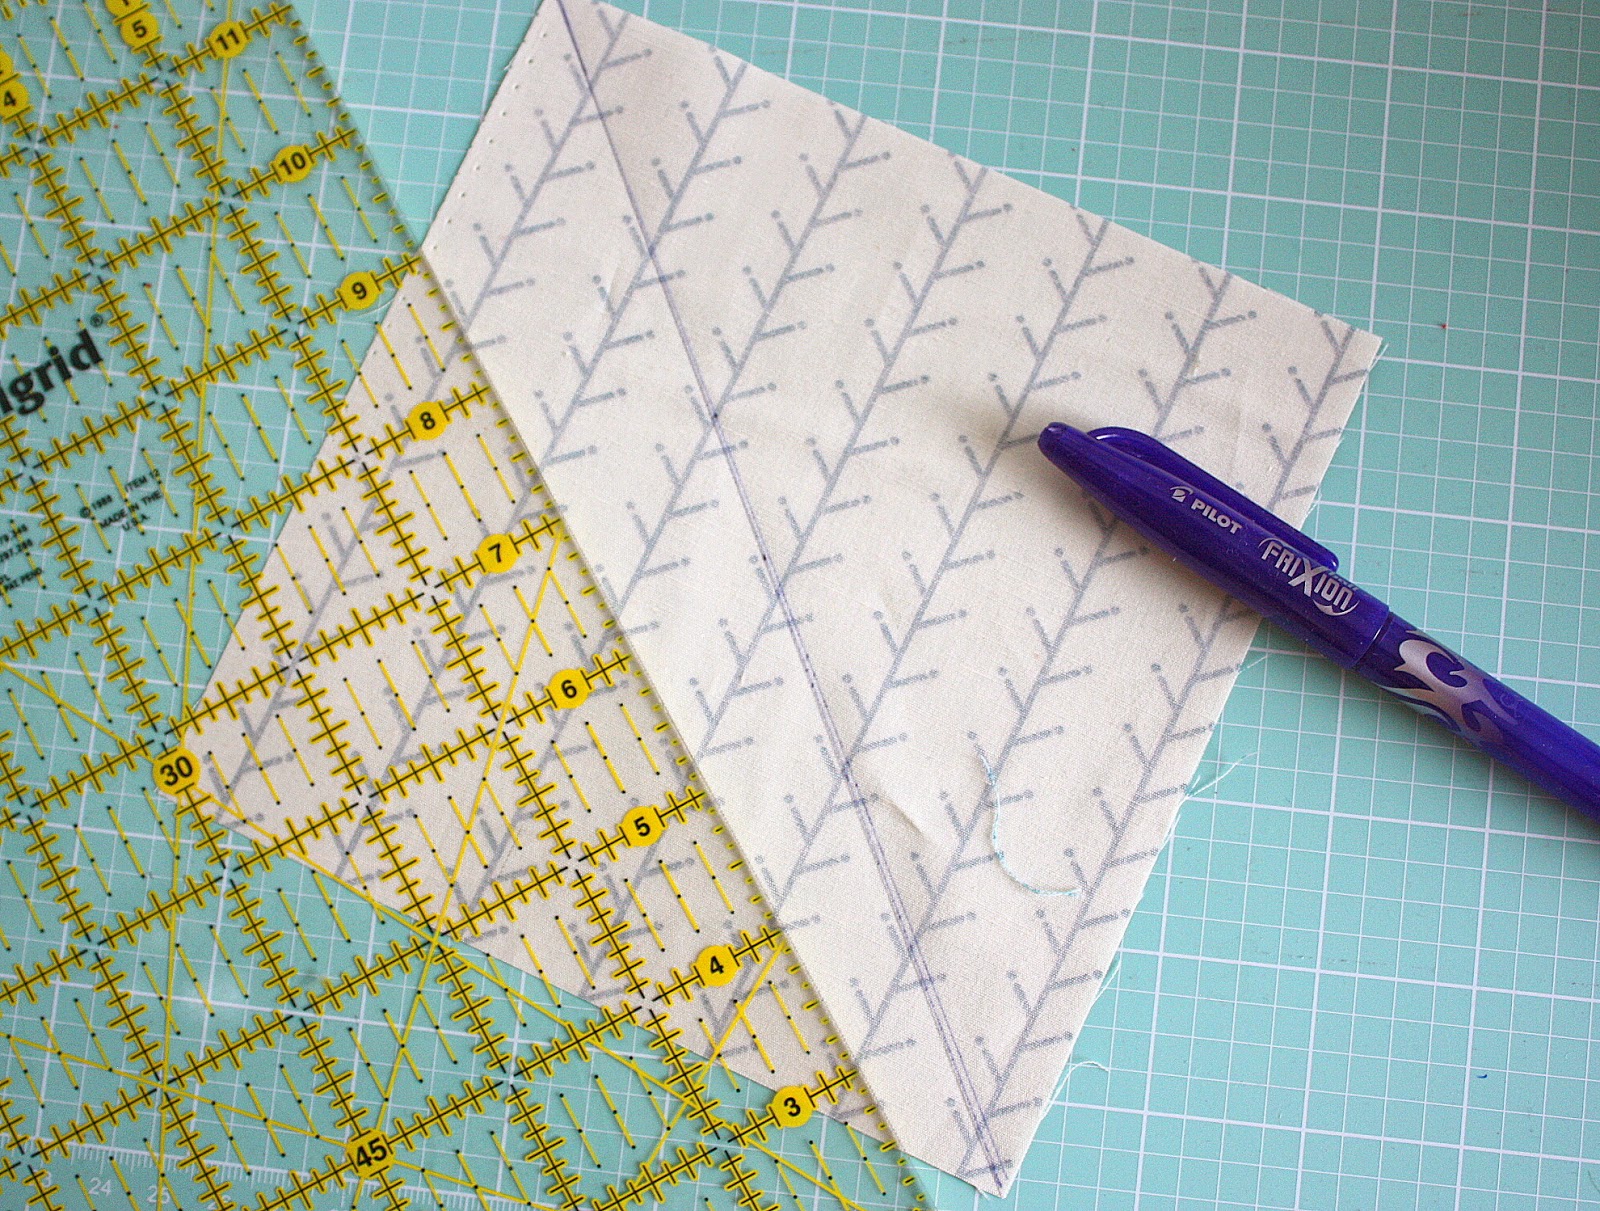
How to make Half Square Triangle Blocks: Match each light 6" x 6" square right sides together with a dark 6" x 6" square. Draw a diagonal line on the back of every light square.

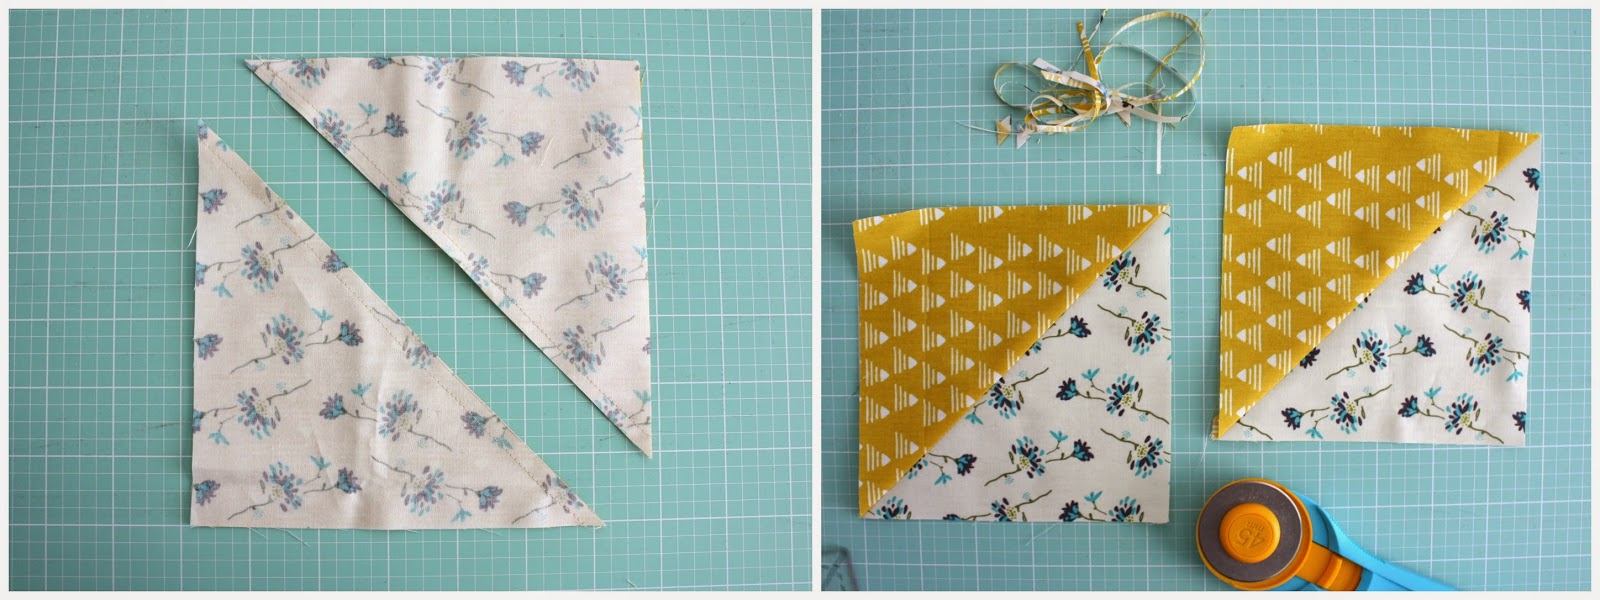
Rotary cut directly on the drawn line to create two separate blocks.
Square up each block to 5 ½" x 5 ½''. This step can seam a little tedious, but it makes a big difference when it's time to assemble the blocks. Here is the traditional method to square up half-square triangle blocks (HST's) but this is my favorite quick square-up method.
Press blocks flat with seam allowance toward the dark fabric on all blocks. (This will come in handy when you assemble your rows.) You will have 80 total HST blocks.

Starting with the first row, layout 8 HST blocks with dark triangles rotating like this. Repeat this layout direction for all odd rows (rows 1, 3, 5, 7, and 9). Press seams to the right on all odd rows.

Starting with the second row, layout 8 HST blocks with dark triangles rotating in this pattern. Repeat this layout direction for all even rows (rows 2, 4, 6, 8, and 10). Press seams to the left on all even rows.
(I recommend laying out the entire quilt before you start sewing blocks into rows so that you can play with colors and prints and get an overall picture of the finished quilt. Then pick up rows, keeping blocks in order, one at a time, and take to the machine to sew them together. Label each row (1, 2, 3, etc.) so that you can keep the rows in order once they are assembled.
Pin and sew rows together in order. By pressing the seam allowances in opposite directions on odd and even rows, your seams should but up against each other, helping your triangle points to match up.
Press row seams in one direction.
For more information on finishing a quilt, go to these tutorials on Choosing Batting, Quilting, and Binding a Quilt. My quilt was machine quilted by Melissa from Sew Shabby Quilting.
You could make twin size quilt with blocks this size (5" x 5" finished), if you like, using 238 squares 6" x 6" (119 light squares and 119 dark squares.)
However, I would recommend using 10" x 10" squares (which are easily found in pre-cuts) for a larger size quilt. This will simplify the number of squares you have to sew, piece, and square-up and the scale works well for a bigger quilt.
VERSION USING 10" x 10" squares:
FABRIC REQUIREMENTS:
Fabric requirements for a 54" x 68" lap-size quilt (solid orange and navy quilt):
- 24 'light' 10" x 10" squares
- 24 'dark' 10" x 10" squares
- ⅜ yard for binding
- 3 ¼ yards for backing
- 55" x 72" batting
Fabric requirements for a 68" x 85" twin-size quilt:
- 40 light 10" x 10" squares
- 40 dark 10" x 10" squares
- ⅝ yard binding
- 5 yards backing
- 72" x 90" batting
Use the same method for creating the half square triangles: matching up two squares, sewing on both sides of diagonal line, cutting into two units, etc. When squaring up, square up these blocks to 9" x 9" (8 ½" x 8 ½" finished).
For the 51" x 68" quilt (shown) sew the rows into 6 blocks across by 8 blocks down. Use the photo here for direction placement.
For the 68" x 85" quilt, lay out the 9" x 9" blocks 8 blocks across by 10 blocks down. Use the same placement guide as the 40" x 54" crib quilt.
Now that you know the basics for sewing half square triangle (HST) blocks, your design options are endless. I'm constantly updating this pin board with HST designs and layouts if you're looking for inspiration.
Follow Amy Smart's board Half Square Triangle Quilts on Pinterest.
If you're looking for other simple baby quilt ideas check these out:


Maggie
This is fab! Thanks so much for the tutorial and all the links. I will be pinning this and following your board. X
Tanichiwa
Amy, thank you very much - great tutorial! xxx
Kate
Thank you for sharing your fabulous tutorial! 🙂
Cindy
This is just beautiful!! Thank you so much for sharing!:)
Rachel
Thank you, thank you, thank you! I bought the fabric after seeing your quilt and wanted to make one just like it. I appreciate you taking the time to do the tutorial, especially for those of us newer quilters that are afraid to just start cutting into fabric with no direction!
jenni
This is sooooo helpful, thank you for taking the time to show me! I am in love with the Emmy Grace line too!
Gemini Jen NZ
Oh dear...I was only going to work on current WIPs and UFOs for a while but...I think I have a precuts in my stash that could be ideal for this...sigh... (thanks for the super tutorial!)
Judy
Thank you for this tutorial. It will help this confident beginner, and I have been selling f/q bundles on eBay to use precuts instead! Now I can keep them.
BillieBee (billiemick)
Such a cute quilt!
Susan Tidwell
I Googled quilt blogs and yours came up first! Love your colorful quilts and tutorials. I have been blogging for many years and am just getting started advertising, I see you have LOTS! Have a wonderful day.
CherylB
THANK YOU!!!!
Sherry
Thanks Amy for the great tutorial and the helpful links!
T
Thank you for the tutorial - you always explain things in a way that makes me believe I can do it! This pattern is so simple, and yet so interesting - love it!
Carla
Your quilt is really cute. Thanks for the tutorial.
Tina
How easy peasy is this Amy, thank you so much! Got lots of fabric cutoffs to get rid of and this one will do for the Old Folks home down the road, they are called Old Age Concern! I use all my stash to make them and they really appreciate it and show the photos once they are given away! Makes me feel good!
Eulalia Rider
how can I print this ? other patterns have a print friendly so you just get the pattern and not the other stuff on page.
Amy Smart
Probably the easiest thing to do is copy and paste into a word doc.
Thomasina Taylor
I want to make one of the lap size quilts for Christmas for my mom (my first quilt ever). I already have fabric that I would like to use for the backing, but I know that it is too small, 42x70 inches. What size would you suggest for backing for the lap size. I can make a scrappy panel to add, I just want an idea of how wide to make it. Also, is the height of the piece large enough or should I add to that as well. I am so excited to do this, but I want to get it right the first time. Thanks!
Amy Smart
What is the finished size of the lap quilt you are making? I like to make my dimensions at least 6" bigger (some people suggest 8") in both directions, so that you have lots of visible backing when quilting. So for example, if your quilt is 42" x 70", I would make a backing at least 48" x 76".
I hope that's helpful! Let me know if you need more specifics. 😉
Amanda Elam
I am making the crib size quilt for my baby due in 5 weeks, oops I put this off too long. I have it all laid out and with the eight rows like it shows in the instructions, it is square, and your picture has ten rows and is rectangle. Should it actually be 10 rows and not 8?
Amy Smart
You're right! It should be 10 rows of 8 blocks each for the crib-size version. Thanks so much for catching that and letting me know! I've updated the post. Best wishes with your new one coming soon!
Linda Curtis
I got a 36" quilt at my shower and thought I wouldn't use the small, flannel/cotton friend-homemade square, but it was the most used for my newborns, four times, 5.8# to 8#!
Jennifer Mallare
I have a question about the red, white, and blue quilt. I made a similar one with just red and white and loved the boldness of it when it was pieced but struggled when it came time to quilt it. Did you use white thread to quilt the whole thing? I can't tell from the picture. I was concerned that the white would look funny/disrupt the boldness of the red... Yours looks awesome!
Amy
Great question! Try using a softer neutral thread like beige or light gray. Those thread colors will blend into the background a little better than white.
Jennifer
Thank you for your quick response. Just curious- what did you use on yours? And what kind of fabric did you use for the back?
fenosfamily
Thanks for the great, easy to follow pattern. Made a great lap quilt for MIL. Not sure how to upload a photo to go with my comment...
Jessica Colvin
Amy, I love this quilt, what brand is the fabric and was it a pre cut pack??? I want the exact one lol
Amy
Hi Jessica! Isn't that fabric great?! I made this quilt using fat quarters from a collection called Emmy Grace by Bari J produced by Art Gallery Fabrics. I made it four years ago (I can't believe it's been that long!) but you can still find some of the prints online. I saw some listed here: https://www.stashfabrics.com/collection/emmy-grace, here: brandcycle.shop/795yg and on etsy: https://www.etsy.com/search?q=emmy%20grace%20bari%20ja
Sarah
Thanks so much for the great tutorial. I was wondering how to adjust this pattern for a full size bed.
Amy
I would recommend graph paper and a calculator and count the number of finished 5" x 5" blocks you'd need for the size quilt you want to make. Then cut that many 6" x 6" squares.
lynn
Is it advisable to wash fabrics before starting to sew them? This step wasn't mentioned so I wasn't sure.
Amy
Hi Lynn! I don't wash my fabrics ahead of time. Most quality quilting cottons are colorfast, so I find the extra step unnecessary. I do wash them after they're quilted. They shrink minimally, but I don't mind because I like the crinkly look it gives them.
Meg
Using only your tutorial, I did it!! It isn’t perfect, but it’s really pretty. Thank you for an easy to follow but full of helpful hints tutorial. I can’t wait to finish this quilt and keep making more.
Amy
Way to go!!
Joyce Gronenthal
Great tutorial . Can I make a crib size using larger blocks, maybe 7 1/2 "
Amy
Yes! You can use any size block you want! I think that sounds great!
Olivia
I just finished my first quilt using this pattern! I'm 25 and had never even touched a sewing machine before. I decided to hand quilt it and it took a while, but I love how it came out. I can't wait to see my mom open up her gift this Christmas! 🙂
Amy
Awesome! That is wonderful to hear!
Shannon
Love this quilt. My grandmother is making me a similar one. We’re just at a loss of what quilt pattern to use and what type of fabric to use on the back. She’s only made a handful of quilts. I would love to see or know what you used on the dark light quilt. I couldn’t tell on the photo. Thank you!