
I am excited to share some very beginner-level steps to making a quilt. We’re going to move slow and simply through the quilt-making process from beginning to end. There will be a 10 week series, dissecting how to make a simple patchwork quilt. We’ll start today by talking about basic quilting supplies.

Basic Quilting Supplies
This is part 1 in a 10 part Beginning Quilting Series.
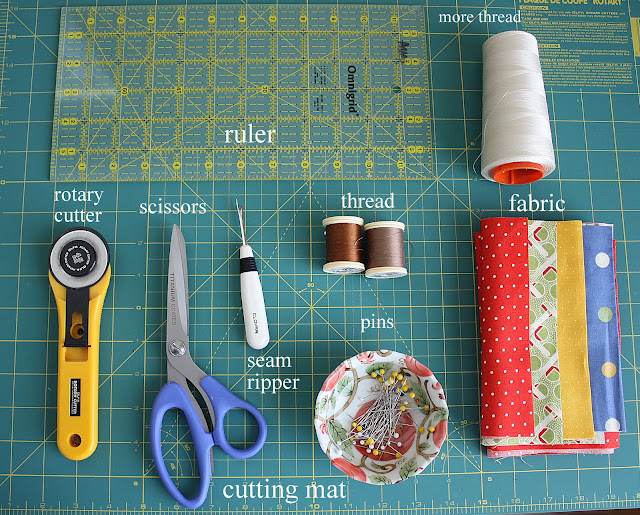
One look at the quilting aisle in any of the big fabric stores and it would be easy to feel overwhelmed. You don’t need every tool on the market for a successful quilt-making experience, but there are a few that will make a significant difference. (some of these include affiliate links to Amazon where you can buy the item directly.)
- Rotary Cutter – this tool is like a pizza cutter for fabric. The blades are very sharp and cut fabric quickly and accurately. There are many different sizes. I use the medium-sized cutter most and recommend this one for any beginners. My favorite is the Olfa Splash.
- A Self-healing Cutting Mat – allows you to use the rotary cutter for cutting fabric. A printed ruler-grid can also help with measuring fabric pieces. Mats come in many different sizes, but an 18″ x 24″ mat is a good size to start with.
- Scissors – sharp sewing scissors are helpful however, most quilt projects are cut mostly with a rotary cutter so fancy, expensive scissors aren’t necessary. (I love these Elan scissors - inexpensive, but stay sharp.) Do try to keep a pair of scissors purely for cutting fabric/thread so they won’t dull as quickly cutting paper.
- Seam Ripper – no shame here! Even the best of quilters/seamstresses stand by their seam ripper. I have at least 4 located strategically throughout the house because I use them so often. Any seam ripper will work, but my favorite is this Clover seam ripper.
- Fabric - we’ll talk about this more in the future, but 100% Cotton is best. If you're looking for a variety of good places to start - any of the sponsor buttons on my right sidebar are links to great online shops. I'd recommend any of them.
- Thread – again, use 100% Cotton thread for quilting. Some thread is better than others. Cheaper thread will break easier and could create a lint farm in your machine. I don’t buy the most expensive thread, but I don’t buy the cheapest either. Because I use so much thread, I started buying in bulk – hence the big cone in the top of the picture. (My favorite is Aurifil 50 wt.) One neutral color works well on most piecing projects – cream, tan or gray.
- Pins – I like the longer straight pins with plastic heads, or even better, glass heads. They’re much easier to grab while working and to find when I drop them into the carpet. Safety pins (not pictured) also come in handy in the finishing stages later on.
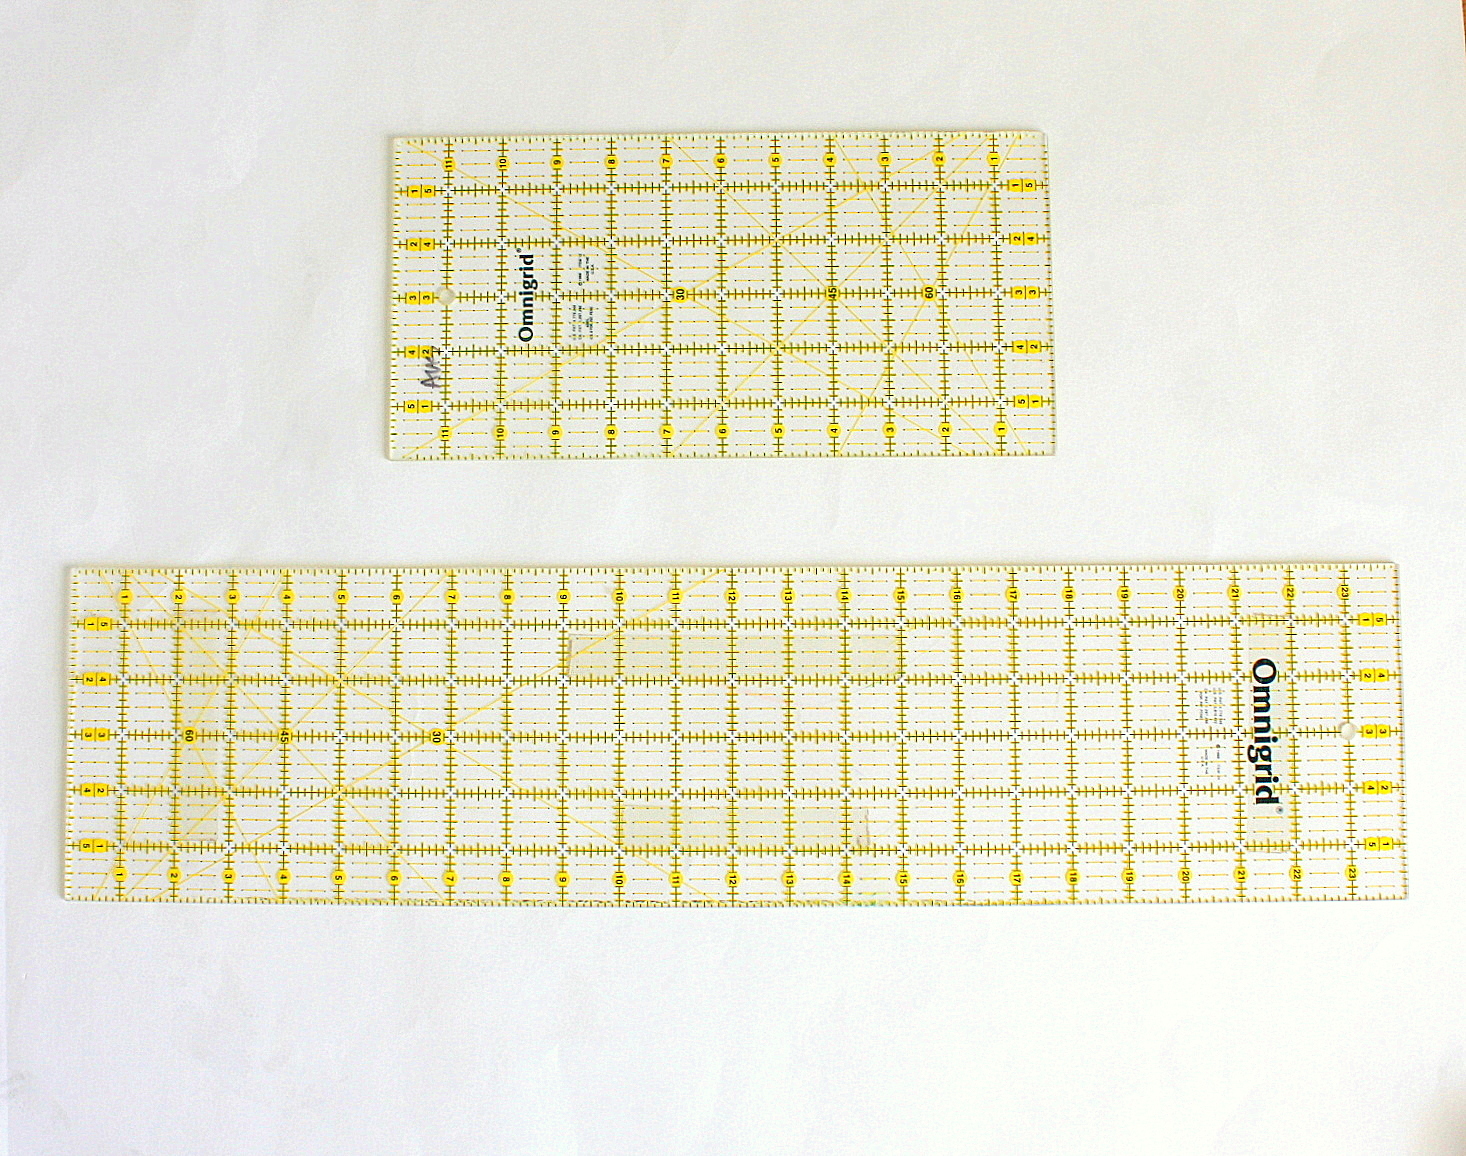
- Rulers – Quilting rulers are an important part of the quilting process. They help cut pieces quickly and accurately. I suggest starting with a longer ruler 5″ or 6″ x 24″. This allows you to cut efficiently across the width of the fabric. I also recommend a smaller ruler (5″ or 6″ x 12″) to make it easier to cut smaller pieces. As far as brands, I have a lot of Omnigrid rulers, but I like Creative Grids and Olfa Frosted because they grip the fabric better and are less likely to slide.
Now, I know you are thinking that this is going to add up fast, and it definitely can. I suggest using those 40-50% off coupons for the larger chain fabric or craft stores to get your supplies. That can save you a ton of money. And remember that these tools are investments you will use over and over again. (I have had my rulers for almost 20 years and have used them almost every day. I even use them for paper crafts – including one of my old rotary cutters!) If you’re not sure you want to invest in something until you know you enjoy the task they’re for, ask a friend if you can borrow theirs to try them first.

Finally, a word about irons and sewing machines. Neither of these need to be fancy or expensive. Almost any iron will do, but one that gets hot is important. Steam is an extra feature to have. Some of my favorite irons are one’s that I’ve found at thrift stores for very cheap.
If you have a sewing machine that will sew a good, straight line, you are ready to go! The machine pictured above is almost as old as I am and I love it. If your machine is giving you trouble, take it in to get serviced. It’s like a car – a little maintenance and some oil will keep it running well for a long time. If you are looking for advice on buying a sewing machine I have a post with lots of great input from other sewers in the comments. Melissa Mortenson also has an excellent post on how to pick a sewing machine.
You can buy sewing machine needles specifically for quilting, but don’t have to. Most of the time I use Universals. Changing the needle regularly makes a big difference. In fact, if your machine is skipping stitches or not sewing well, try changing the needle before you do anything else. It’s often a simple, and cheap, solution.
Lesson 2: Choosing Fabric

Jennifer
Needles? Marking pens/pencils?<br /><br />What a great series! I wish I had had something like that when I started quilting...<br /><br />Jennifer 🙂
Sally
If you're talking about making a whole quilt (not just piecing the front), you probably should also include batting, backing fabric and something for basting (whether that is pins, spray adhesive, thread, etc).
Dree
I always have a measuring tape handy--I find it a lot easier to check things with it. Especially pieces that are longer than my cutting mat!
Katie
Well, if you've got a rotary cutter in there...band aids! Maybe also a notepad and colored pencils for sketching out ideas and colorways?
Trudi
Great idea! Shame we all didn't have this all those years ago!
Jen T
I'm just beginning, so I'm not sure what to include. But, I'm super excited to learn from you!
pinksuedeshoe
Snacks. Definitely add some snacks. But nothing that is too melty. Skittles are my favorite.
Quiet Quilter
You know, I was going to be a smart aleck and say, sewing machine. Then I realized that, although it is nice to have one, a quilter can also quilt by hand. So I can't think of anything else....
anne
You forgot chocolate, music and a nice chair in a great sunny spot.....thank you sharing this great idea, wish it was around when I started...ok I will be serious a template/pattern/magazine.
The Paisley Abbey
I will have to check out your posts on the basics, I am sure I will learn some new things. I just posted on how I organize all my quilting/sewing stuff in unique and thirty ways. Once I had all the items you have pictured, and many more, I was becoming overrun and needed to do some major organizing! LOL<br />:)<br />Courtney<br />ThePaisleyAbbey.com
Tamera
I agree about the tape measure. Also, a small ruler (1" X 12" for example) to keep by your machine to measure seams while you're learning to get a good 1/4" seam and to check to make sure the piece that you're adding to your block is the right one, lol.<br /><br />Also, I cannot sew without my stiletto, but that's a personal preference.
Pamela
Awesome!! Can't wait to tune in, I know I will learn a ton.
Layne Bushell
I've been following your blog for a while and I LOVE it! I teach a beginning quilt class. Your list is the same as mine! I did suggest if they could afford it to get the 4x14 ruler for smaller cuts, and the 6x24 when they're trying to cut larger pieces of fabric. Just easier! Good luck to you!
Lori Holt
i'd say a paper and pencil for notes along with graph paper....<br />and of course m&m's:)<br />xx<br />lori
Sarah Craig
I'm so excited to see this series - I teach a beginner's class also and this will so help me to organize my thoughts - plus I'm going to refer them all to this series to bookmark for future reference! <br /><br />I would recommend rulers with a lip on them that hook on the edge of your cutting mat - I find them very easy to make accurate cuts with, because they are less likely to
Amelia
I was going to say an iron, but I see that you have got it covered over at Make and Takes. Being new to quilting I'll definately be following along to check if I can do anything better. I love your blog!
Cheryl
I have been quilting for a while now. Like the others, I was going to suggest paper and pencils or pens.<br />Do you mind if I link this up on my blog?
ohiostar5
CHOCOLATE, CHOCOLATE, and more CHOCOLATE!
searchfamilies
A Pattern or instructions for an easy block if it someone just getting started<br />Hugs Janice
Christine
I am so excited by this series I can't wait! But I was wondering how do you use the large spool of thread?<br /><br />Thanks!
nikki
perfecto! i'm definitely in. thanks, amy!
Anita V.
What a good idea! As a beginner I'm always looking for good advices. I do like the chocolate-one :)<br /><br />Thanks!<br /><br />Anita (tryingtoquilt.blogspot.com)
Katrina
My retractable chalk marking pen is indispensable! A must have...
Mary
Ahhh! I love my quarter inch foot!
Anonymous
My granny sewed with a spool of thread, a pair of scissors,a pin cushion and a little ruler, maybe a pencil for making a cardboard template and she did just fine !
Meagan
I agree with the addition of the tape measure & needles (for hand or machine). If you're hand stitching, it's nice to have a needle threader & thimble, too. I also keep a pencil of some sort in my kit at all times, for paper &/or fabric markings.
Karin
Hmmmm, if you add in chocolate, lotsa chocolate and a big bottle of PATIENCE, you've got it covered!
Dnowhat
I am ready to start and glad there is someone who will help me get started.
Michelle
Thank you for putting together this Quilt: start to finish series. I can't wait!! 🙂
Rebecca Sills
Amy, you are amazing! i used this tutorial for my very first quilt. I have added a link to your blog on my blog. I hope that is ok? thanks for all your posts! here is a link to my blog if you want to see:<br /> <br />https://littlepinkseamripper.blogspot.com/
Debra Hartzel
I have been putting off quilting due to my lack of time and concentration...this is exactly what I need to help me along. I talked with a friend of mine who quilts and just having her share with me some of her knowledge....I was totally overwhelmed....so so happy for a place to go for help and directions that keeps it simple!! Thanks!
ivy ramayla-mercado
i love it....<br />
Chellie
I just wanted to say thanks for this tutorial! I just made my first quilt and I don't think I would have had the confidence if I hadn't found your instructions! Here is a link to my post about the quilt if you want to see. I think it is beautiful!<br />https://nateandchellieison.blogspot.com/2013/01/my-first-quilt.html
Rebekah
Thank you so much for posting this series! I found it extremely helpful and featured it on my blog! https://rebekahsramblings.com/
judyscakesandtreats
Thank you so much. Your blog has inspired me to start on a quilt. Thanks for the inspiration - God Bless You for being so generous-hearted. Am based in UAE and this will surely help me to keep busy and my mind free from all the troubles of the world.
Tessie
Just wanted to say thank you for this great series! It is so helpful for someone like me that wants to start quilting.
Susanne Bender - Constantino
I just read "Basic Quilting Supplies" and wish I had know about this website six months ago, when I started my first quilt ever. <br /><br />No matter where I went or who I asked about basic supplies for quilting, I never got a straight answer. I did eventually figure it out though.<br /><br />Well, three sewing machines later, and a lot of ripping out ... Yes, I did finally finish my
Sassy Kassy
Sooo excited to take on my first quilting project! What is the finished size of the quilt?
crimon java
very creative at all , very nice when it can take advantage of thrift become a valuable commodity<br />salam <a href="https://www.infokarimunjawa.com" rel="nofollow">wisata karimunjawa 2014</a>
Tammy Palestro
Commented but got knocked off the interwebs ;P... Wanted to say THANK YOU for such an amazing tutorial! I'm just beginning to learn to sew and am so excited to start my first quilt. I'm really grateful that there are people like you out there willing to share their experience and skills with others. Good stuff! 🙂 <br />
Bear Creek Quilting Company
We love that you are teaching the art of quilting from start to finish for those who don't know where to begin! It is great to have this knowledge as a refresher for those who haven't quilt in a while or the beginners. Thank you for taking the time to make these blog posts and making them so easy to follow along!
Amy
Thanks, Bear Creek QC!!