

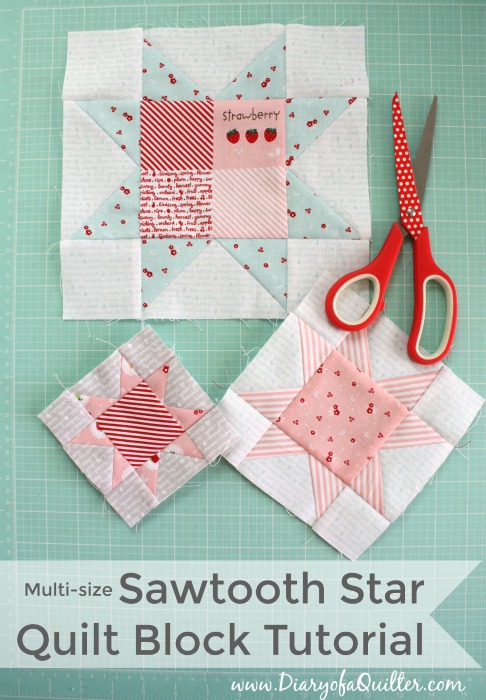
Today I'm sharing a tutorial for one of my all-time favorite quilt blocks - the classic Eight-pointed star - sometimes called the Sawtooth Star quilt block (and probably many other names.)
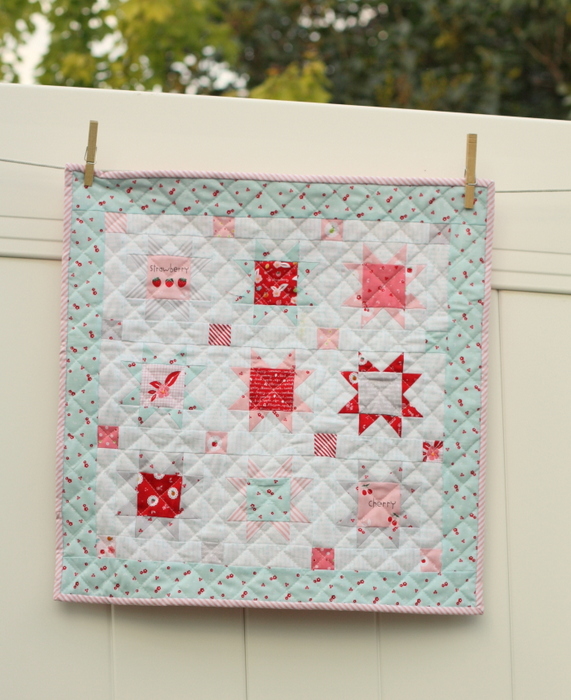
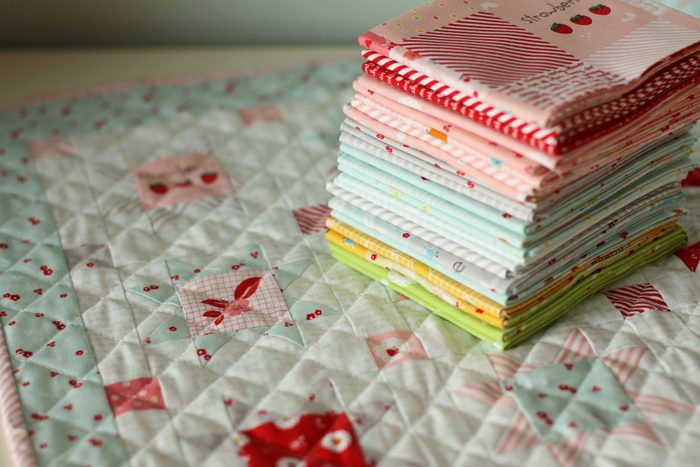
You may remember the little star mini-quilt I shared last week. I had multiple people ask for instructions for making these stars. It's been something I've wanted to write a tutorial about for years and I figured now was the time.
This classic 8-pointed star is probably one of the most traditional quilt motifs there is. I think the reason it has so much staying power is that it always looks sharp. Plus, depending on the variety of fabric and color choices, it can be so versatile!
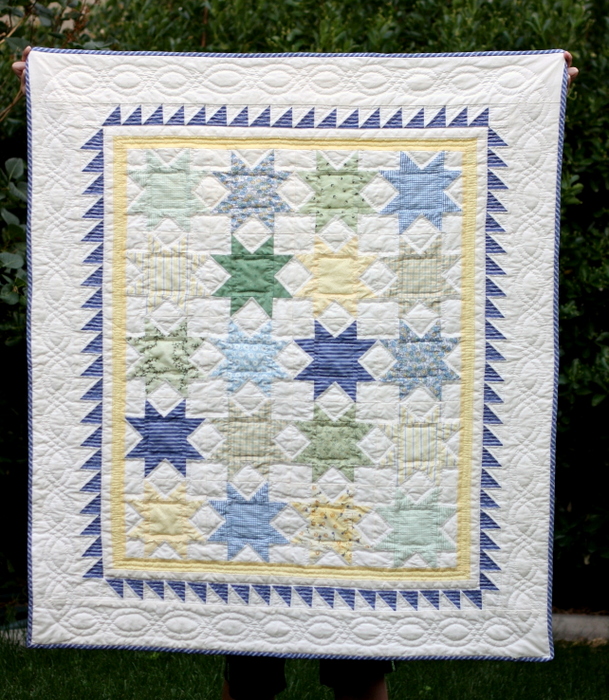
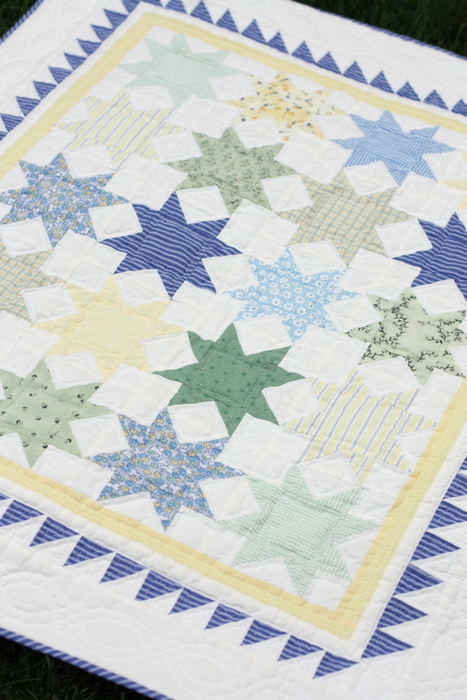
This quilt using these sawtooth star quilt blocks is one of the first quilts I ever made. I made it 16 years ago - I even hand quilted it! - and it has hung above my bedroom dresser ever since. I still love it (which I can't say about every quilt I made that long ago.)
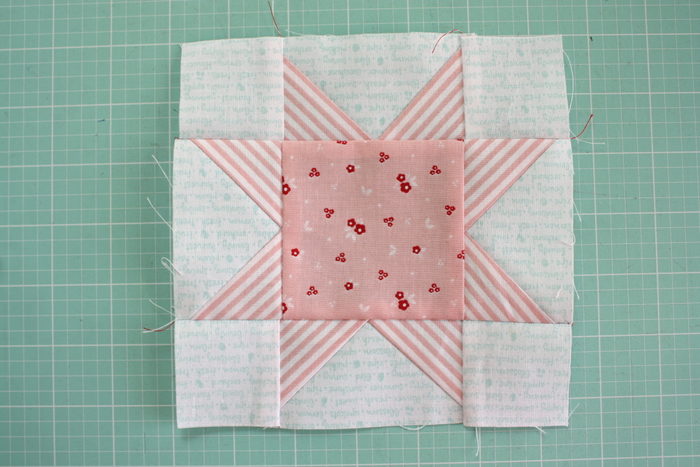
As you can see in this sawtooth star quilt block version, I made the stars "solid" using the same fabric for all of the pieces of the star. If you look at the mini version at the top of the post, you can see where I used different fabric for the star centers. So obviously this block gives you a lot of variations.
This sawtooth star quilt block can be constructed using half-square triangles for the points. But I personally prefer to use Flying Geese units for the points as it eliminates an unnecessary seam (between the points), reducing extra bulk and leaving larger pieces of fabric design intact.
I also love this method because there is a GREAT no-waste method for creating four flying geese units at the same time - perfect for the Sawtooth Star block.
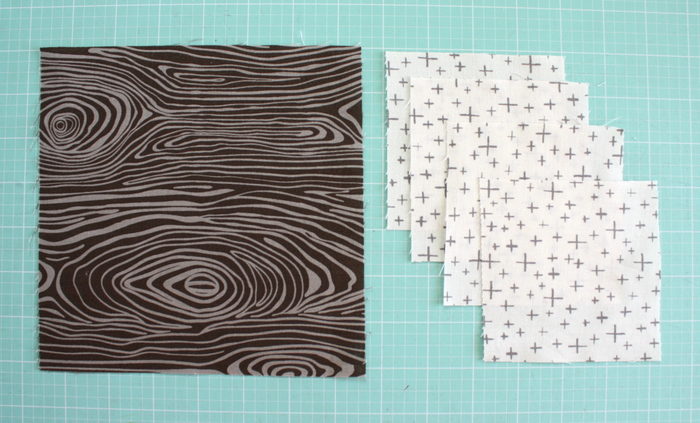
Here's the basics of the Flying Geese units: you will need one large square that will always be your "goose" (middle triangle) and four smaller squares that will always be your "sky". Or, when making these blocks to use as star points, the "sky" triangles become the points of the star. Are you with me still?
FINISHED Flying Geese blocks are always twice as wide as they are tall. (i.e. 2" wide and 1" tall, or 5" wide and 2 ½" tall.)
Let's walk through the steps to get from the 1 large + 4 smaller squares to the four finished Flying Geese blocks. Don't worry about the measurements at this point. I have two free printable charts for you to use to make these blocks (both Flying Geese and Sawtooth Stars) in 9-10 different sizes below.
The first step is to cut out all of the coordinating pieces for your block. I like to do all the cutting at once for multiple blocks. Then I can play with the variety of colors and combinations while all the fabric is out. I put each set in a pile and take them all to my machine at once. Just keep track of which pieces are what.
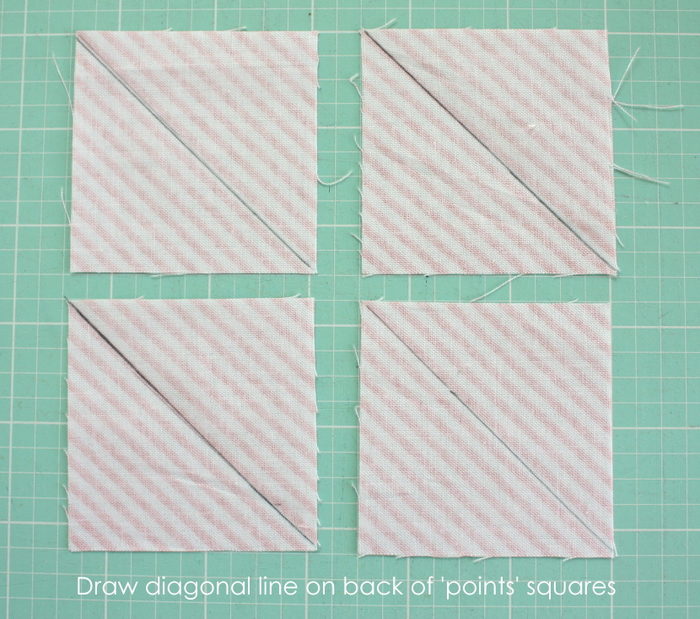
Next, draw a diagonal line on the back of the four "sky" or "point" squares.
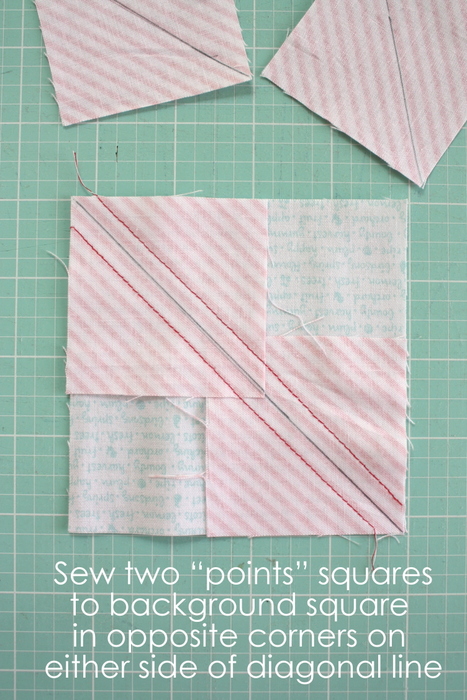
With the large "goose" square (or background square) right sides up, place two "sky" squares (or points squares) face down (remember, right sides together) in opposite corners, lining up the diagonal lines. The two squares will overlap corners in the middle. This is good.
Pin the squares to hold them in place and sew a scant ¼" seam on both sides of the drawn diagonal line.
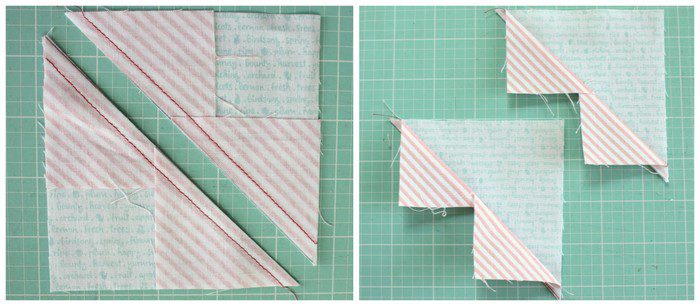
Cut this unit in half right on the drawn diagonal line. Press the seam allowance toward the smaller triangles. You will have two units that look like this.
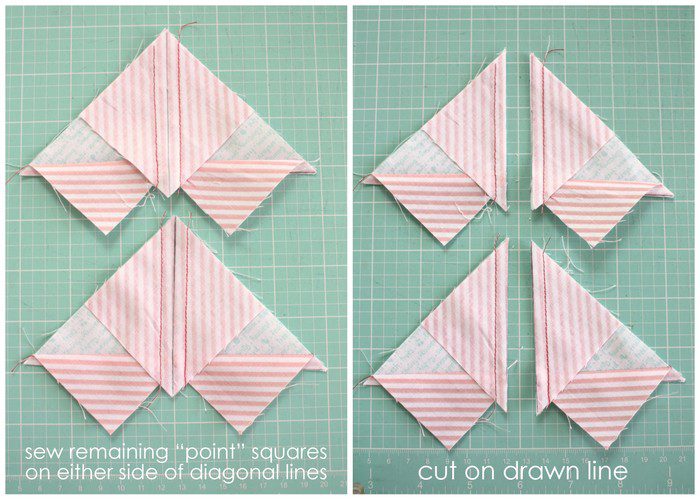
Place another "sky" square in the corner of each "goose" unit and sew scant ¼" seams again on both sides of the drawn line. Cut on the line and press seams toward the smaller triangles.

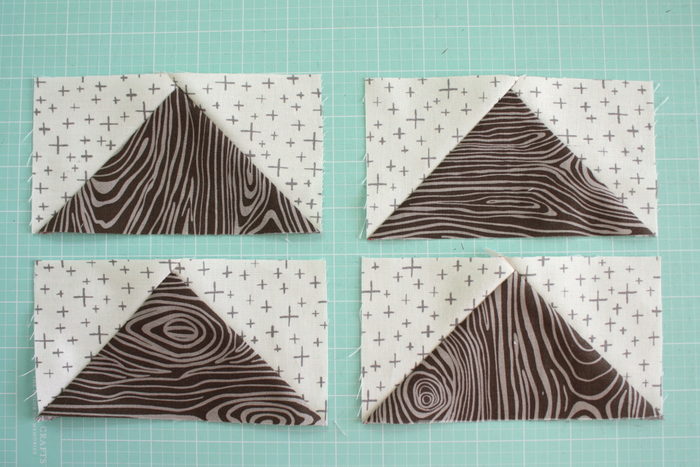
You will now have four Flying Geese units. But you're not done. Because of sewing and cutting on diagonal/bias edges, they can be a little mis-shapen. It's important to square-up your blocks. (Also, with the measurements I've given you in the printable guide, you have a little extra fabric built in so you can have excess to give you a nice square edge.)
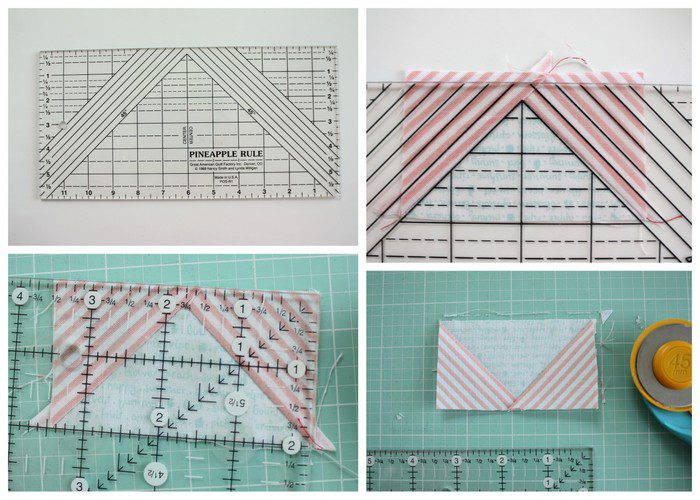
I really like to use a ruler like this Pineapple Ruler (or this Flying Geese Ruler) that has a 90 degree angle on point with a ¼" above for squaring-up the goose "point". Place that guide right on top your point to square-off the excess. This will give you a nice clean, straight edge with a perfect ¼" seam allowance. Then square up the rest of the block to the appropriate unfinished size. (Post Edit: sadly, I think that specific Pineapple ruler is out of production. I have since seen this Flying Geese Specialty Ruler from Creative Grids that is useful for squaring up multiple sizes of Flying Geese blocks.)
(You don't have to use a specialty ruler - just make sure there is ¼" of seam allowance at the top of the point so that you don't cut off the point when you sew it to something else.)
I know that squaring-up seems like a lot of extra work, but in the long run it's so much easier to assemble blocks with clean, square edges.
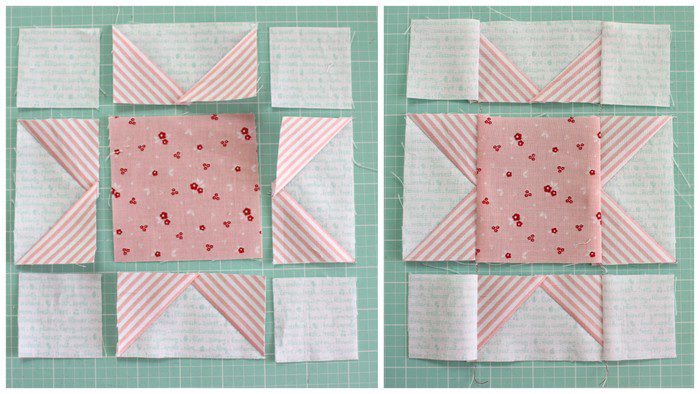
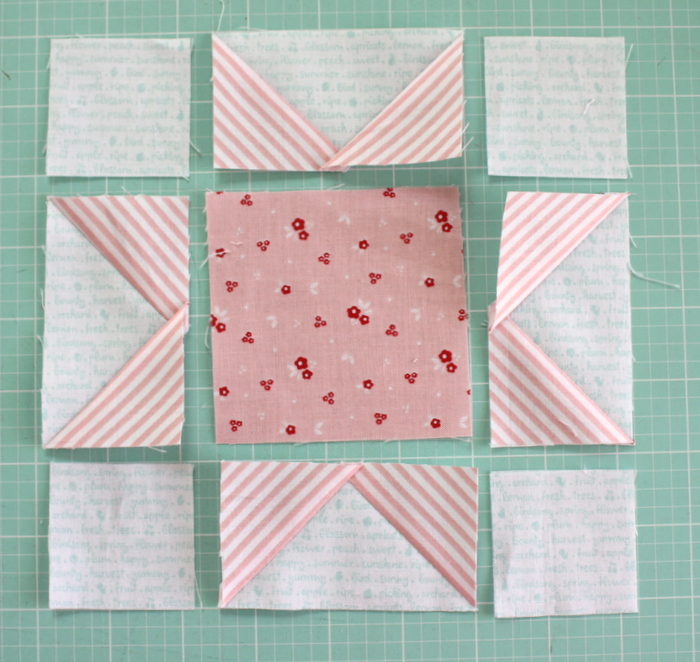
Once your four "Geese" units are finished, lay them out with the coordinating center and corner squares. Sew the units into three rows. Press seams away from the "goose" unit. This will help seams to nest when you sew the three rows together to finish the block.
And there you go! I make no claims of coming up with this sawtooth star quilt block method on my own. Minds far superior to mine figured this stuff out and have shared it before. I just love passing it on to others who might not have heard the word yet. Especially the part about saving time and no-fabric-waste. Because I'm kind of OCD about those two things.
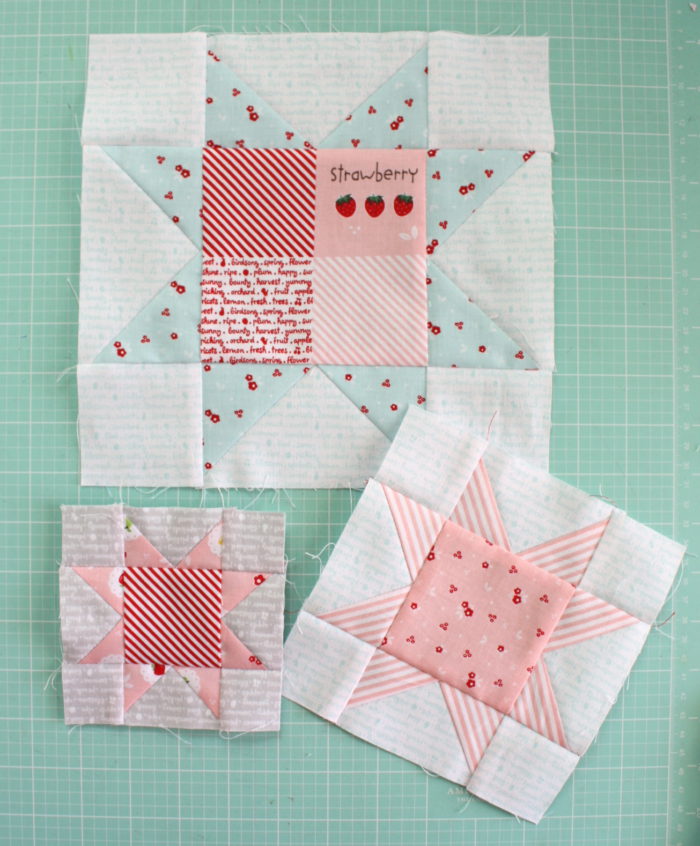
As I mentioned, this sawtooth star quilt block is SO versatile and easy to scale to mini or make nice and big for a larger quilt. Once you know the technique, you just plug-in the piece sizes and you can make this block in many common sizes.
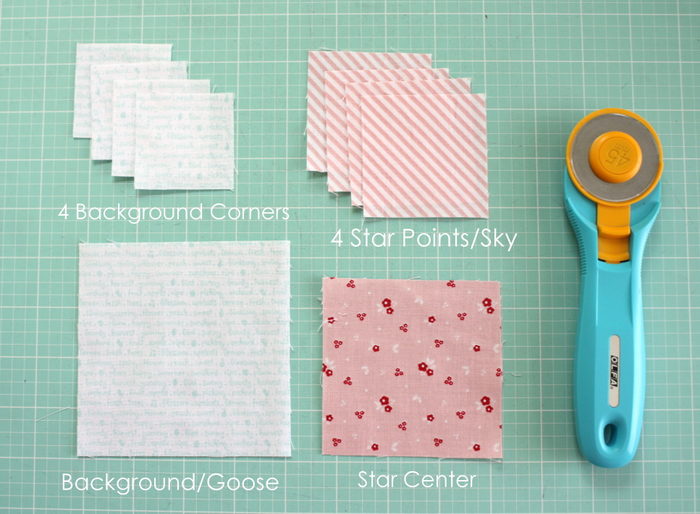
(FYI: the stars in my mini quilt featured here are 4" x 4" finished - 4 ½" x 4 ½" unfinished. Sashing strips are 1 ½" x 4 ½" and the cornerstone blocks are 1 ½" x 1 ½".)
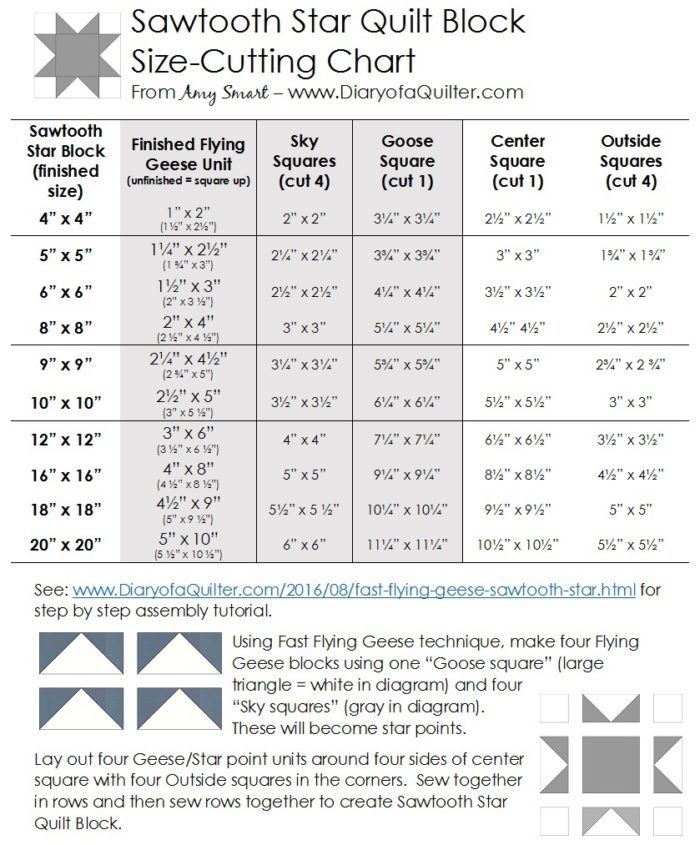
I've created a free printable with the measurements for piecing a variety of star sizes:
CLICK HERE TO DOWNLOAD THE FREE SAWTOOTH STAR QUILT BLOCK PRINTABLE CHART
I've done the same if you just want to make Flying Geese. Flying Geese themselves are also SO versatile. Here's a pinboard of Flying Geese quilts for your inspiration.
CLICK HERE TO DOWNLOAD THE FREE FLYING GEESE PRINTABLE CHART
Thanks for stopping by!


Kimberly
I love this tutorial.
Becky
Your stars are so great - mine always end up wonky so I can't wait to try your tutorial!
Rebecca Lamont
Such a great way to make flying geese and stars. I have vowed to use this method exclusively .... because life is too short to have "pointless" stars!!
Sandy A in St. Louis
I love sawtooth star blockd, too! I have tried this method to make flying geese blocks in the past, but the turn out too small. Maybe if I use your measurements I will have better luck!
Paula L
Love this block and have always wanted to make it.....and now I can!! Thank you! I also love this collection...so soft and pretty!! Thanks for the opportunity to win some!!
Ami
I still love your old star quilt too! I like 'em solid. 🙂
Meg Tison
I made hundreds of geese this way at a retreat last weekend! It does take more time, but they turn out so nicely it's worth it.
nancy
I love your tutorial for flying geese. I am going to pin it to my pinterest account. I wish I had know this last week, would have made my quilt look so much better!!
Little Quiltsong
Thank you for your tutorial Amy, and for the downloadable charts. These are great! Thank you for the giveaway chance. Love this 'Sweet Orchard' Fabric and the lovely little quilt you made with it. Your 'old' quilt is a treasure - love the colors you chose!
Georgia
Thanks for the charts and tutorial! The sawtooth star might be what I need for some novelty fabric.
Linda
I used this several years ago, and revisited again for a refresher. Still awesome! Thank you again.
Amy
I'm so glad!
Pat D.
I will certainly try this. I always have trouble nipping off the points of the star.
Love, love, love the fabric!
Trish
I've tried this method before and it's amazing how easy it is but when you're not used to making them this way it's a little confusing at first. Thank you for the tutorial. I love the colors you used.
Trish
Not sure if my comment got posted, but wanted to thank you for the tutorial. Love the colors you used and thank you for the charts!
Allison
I love this method for making flying geese 🙂 thanks for hosting a giveaway! Have a lovely day!
Elke Scharmer
Just in time for my christmas-quilt.
Thank you so much.
Elke
Sharon Malone
I want to try your method of making the flying geese blocks oversized since I seem to have trouble getting the correct size when patterns give instructions for the "correct" size before trimming. Thanks for the printable chart!
Cheryl barnes
Your tutorials are always so understandable! Thank you once again Amy for your ability to teach.
Your blog is my fav.... Inspiration
Nancy Pascoe
Thank you for the clear instructions! I want to make this for my granddaughter! What a nice giveaway!
Christy Hinkle
Beautiful quilts. Thanks for the tutorial. I can't wait to try it.
Sherry Bridwell
Thank you so much for the clear instructions and printables!! I am going to do some scrap busting! You are the best! Sure do hope I win the giveaway.
Laura
This is such a darling little quilt.
lindamae
I also love that method for flying geese units and using Deb Tucker's Wing Clipper for the trimming.
Mel
Thank you for the tutorial. I tried these once using this method and failed horribly. I know it was because the instructions did not leave room for squaring up the fabric, and I was too tired to figure out the maths. I am printing out the instructions right now and pinning them to my wall by my cut table. This way I am prepared when I do these again! :o)
Pam
Thank you for the tutorial and the cheat sheet. The sawtooth star is one of my all time favourites! Thanks also for the giveaway.
carolyn montgomery
i have always loved the flying geese and saw tooth star. thanks for the great tips and printables.
Dede Bliven
You are so generous Amy! I love the tutorial and it was your mini quilt that encouraged me to purchase Sweet Orchard in the first place! Thank you so much!
Gayle Moret
I've been reading your blog for almost a year. Love all your quilts. Thanks for the printouts - they are going right into my 3 ring binder.
Donna Murdock
The chart is worth gold! How did you ever figure it out? I stand in awe. Sweet Orchard must be in the all time standings for the sweetest lines in quilting fabrics ever. I know you hate that your children are growing up so quickly. I also hated that mine did. There are years ahead with tears from the mother, but as you see your children become independent, you will be glad they can be so confident. Then you get the reward of grandchildren. Seeing my children become such excellent parents was such a thrill. I'm glad you are enjoying all these great family times. No fabric is worth family time!
Diane W
I dont think Ive seen Flying Geese done like this. I hope to try it sometime. I really think your blog is one of the most informative blog around. But then, maybe its because you use such pretty fabric!!
Jan O
This is my favorite method of making Flying Geese units. You're so right about how versatile this star block is. I really like your older quilt - it still has a fresh modern look to it.
Lori Lindhatsen
Very Nice Tutorial and giveaway! Thanks.
Susan Conner
i really need to get a ruler that trims flying geese. Yours look perfect
sorchagirl
Thank you for the charts, Amy and the tutorial using the "no waste" method. I love stars in a quilt and will try this technique. The fabric bundle looks so tempting. Thanks for a chance in the giveaway.
Hilary
I love this idea! I can't wait to try it out. Also, thank you for putting all the measurement info together for the printable, love it!
Nena
Oh Holy Cow!!! I've quilted forever and have never seen this method...Wonderful! Marvelous! Fantastico!!!!! Who knew!?!? (Not me, obviously). You Made My Day.Week.Month! I am crazy nuts about fabric conservation - I use it to the last 1" square - I strip sew strings - this is Awesome! Thank You So Much Amy - for all of your terrific ideas and tutorials and concise pics and charts. Man. Rocking Good.
Mary K.
Your tutorial is perfect - thank you! The fabric would make a sweet quilt for a sweet little girl.
Tracy W
Thanks for the great tutorial - as always, your clear step-by-step instructions make it seem very do-able! Love those stars!
susan margeson
Thank you for quick reference charts. Me and Flying Geese do not have a good relationship, they always turn out a bit whack-a-doodle. I love Riley Blake fabric... great in quilts of all kinds.
Joni H
Thanks for the tutorial, I've never seen this method before, and it makes it look so much easier than one by one!
Anita McKay
Thank you for this great tutorial - I love stars! The chart is brilliant - I'm sure I will refer to it often.
Christy N
PERFECT way to make flying geese - can't wait to experiment. I may even make a quilt exactly like yours!!!
Deborah
This is the method that I use to make flying geese and they turn out great! I love star quilts and I would definitely make one out of this fabric for my little girl.
Mary
I have never made Sawtooth stars or flying geese, but you make this look very easy! Thank you, Amy! And thank you for the giveaway!
from the Bellfry
Such a helpful tutorial on such a cute mini! Thanks for this post, your helpful charts, and for the chance to win lovely fabric! I so want to make something out of this fabric!
Jenni
Well now you have me dropping everything, I have company coming and my house is a wreck, to try these flying geese! I'm going to do pink and turquoise because ?! I guess that means cleaning in the middle of the night! Thanks though!
susiesioux
Thanks for a wonderful tutorial and the size chart. This block is terrific.
Brooke L
Thank you for your tutorial Amy, and for the downloadable charts.
quiltingtn
Sawtooth Star is one of my favorites also. I tried this method of making the flying geese units last week. I love it fast and accurate. Thank you for the ccharts . They will come in handy.
Sherrye B
LOVE this tutorial and love the fabrics too! Have a almost 4 month old granddaughter and the soft colors remind me of her.
Tina
I agree with you. I hate waste and this flying geese method helps with my aversion to wasting fabric. Thank you!
Connie
Thanks for the great tutorial. Can't wait to try it!
And the Riley Blake fabric looks so fun!!!
Kellie Warren
We do our stars the same way. I like to use flying geese too. I make my geese the same way too as I dislike waste, making them just a smidge larger so as I like to be able to square them up afterwards just perfect. I find that taking the time to square up my pieces AND my blocks makes for a much much prettier quilt. I have learned to relax and enjoy the entire process. Its not a race after all. 🙂
Alison Wood
Amy, if you have never tried the Bloc_loc ruler for squaring up flying geese, can I strongly recommend you have a look at their website (https://blocloc.com/)? I adore their rulers which take a LOT of the pain out of squaring up. They have great rulers for trimming HSTs too. Changed my life! I don't get paid to say this and I don't generally buy specialist rulers. Cute quilt and thanks for the tutorial.
Cathy O
I really like your color selections in your first star quilt. You are a natural with color!
Chris K.
I just used that method for a quilt, and I found that just about every flying goose had an extra flap of fabric in the point--two extra layers of fabric. It was a pain removing them. I plan to go back and test whether I just oversized my squares too much or what. I don't know why they call flying geese a beginner block; I think they're quite hard unless you're paper piecing.
texasmomquilts
Thanks for the handy flying geese tutorial & chart! d I need that aqua fabric with the adorable cherries in my life. So perfect!
Sue
Thanks for the charts, the give away and for just being you.
Tammy Jones
I love your quilt!! The charts are fantastic, thanks so much!!
Sharon Coleman
Great tutorial! With your permission I'd like to share with my local quilt shop. Thanks so much for sharing your wonderful creativity!
Amy Smart
Sure. Feel free to share!
Liz S
Thank you for the super cute mini! This is going to the front of my very long to do list. (This fabric is also going on the to buy list! )
Crystal
The stars are so cute, and it's so nice to have charts for so many sizes!
Kelli Hogan
What fabric is that that looks like wood? I love it!
Mary Ann
Thank you for the tutorial and amazing chart Amy! It's the last day of August and Monday is Labor Day. I can start getting out those pumpkins cause it's Fall!
Diana
Great tutorial~love the bundle...ME PLEASE 🙂
Susie V
thanks for much for the chart! would love to make a baby quilt with the smaller stars!
Brenda Ackerman
Great tutorial! I am doing a quilt right now with flying geese and half square triangles. My daughter is getting married in October and I had to push that aside to make Bridal Shower gifts for September. Thank you for sharing this great tutorial and for the chance to win these gorgeous fabrics! Have a fantastic creative day!
Tina Blasdell
Thank you for the charts on how to create these blocks. I can't wait to try them out!
Beth
How cool! I will have to try this out for my next mini quilt. Thanks!!
Karen Weidler
Thanks for the tutorial and charts. The fabric is sweet. Thanks Amy for the chance to win.
Lindsay R
This is a great tutorial, two blocks in one, Saw tooth and Flying Geese! Thank you!
Tamie
What a pretty little bundle. Thanks for the giveaway.
Linda Edwards
Thank you for the tutorial and chart and for the opportunity to win some of that yummy fabric. You make it look so easy and simple.
Kelly Paulson
Thanks so much for the tutorial. I love these stars!
Quilting Jeannie
Thanks for the giveaway. This bundle is so sweet, I'd love to make a quilt with it. Really nice job with the tutorial and charts. Your creations are adorable. Thanks for sharing.
Mui
Appreciate your tutorial and chart. Thank you!
Becky S
Your mini star quilt is adorable! Thanks for the tutorial and the cutting chart.
Patricia Anderson
Thanks for the tutorial!
Amy Adams
Love those blocks! Thanks for another great tut! ❤
Ellen Vandruff
Your tutorial makes this classic block look simple. Thanks for the multiple size instructions.
Terri Karasch
Thank you for the handy charts; those will be very useful. Pretty, pretty fabrics; I just want to pet them!
janice lashley
I love this method for making flying geese and thank you for the mini star tutorial. I've had my eye on the Sweet Orchard fabric for a while so I'd love to win this bundle and make a patchwork quilt. I especially like the little word blocks like the "cherry" one. Thank you for hosting this giveaway! janicelashley@gmail.com
Karen Cooper
Thank you for the great tutorial!
Debbie Fuentes
I love the sawtooth star pattern also. They are easy to create and really stand out. I love how they look in the sweet orchard fabrics! Would love to play with this collection as well! (Daydreaming as we speak!) lol.... ??❤️️
Lu
Thank you Amy for the great tutorial. I love the look of stars quilts and your size chart will be handy to have around. Your mini quilt is very cute with the fabrics used. It would be a great win! Thank you for the chance to win.
Nancy O'Neel
Great tutorial. I see a new quilt top in my future!
Kristal
I always love turquoise in a quilt. Thanks for the tutorial!
Emily K
Love the tutorial! And love the Sweet Orchard fabrics they are just too sweet! 🙂
Kathy Henderson
I just started making flying geese this way recently and it's now my favorite method. I love that you made the pieces in your tutorial a little bigger for squaring up - mine always seem to come out a smidge small when I cut them exact size. Thanks for the info!!
Janie
Thank you so much for the chart! Your tutorials are always so detailed. I appreciate it. Thank you for the giveaway!
Lisa Marie
I like your method for stars better than with HSTs, so much more efficient. The star quilts look lovely, thanks for sharing!
Linda H
I love your projects! This fabric line is soo cute!
Wendy
I love star quilts! A big thank you for the tutorial and the charts, they are always so helpful.
Elizabeth A Rehrauer
Every one of the projects on this blog tour are just the cutest things ever. I LOVE this fabric. Great tutorial, and I appreciate the chart for the different sizes of flying geese. That is so helpful. Thank you.
Jonni Lewis
Love this!
Sharon Watkins
Thank you so much for this tutorial. I can't wait to get started.
Natelen Cushing
Love your site. Always fun inspiration. Love this tutorial.
anna Brown
TYTYTY i need to make a table runner with these and you helped me out alot..... Ps love this fabric and your scissors are cool........ happyness04431@yahoo.com ..................
Rosemary
Thanks for this tutorial. You're always helping me!
Elaine Loughlin
These charts are wonderful. I know I will get good use from them.
And free fabric give-away-----who could ask for more!
Mama Bear Draper
This tutorial was awesome! I've been struggling with the patterns that waste so much fabric. Thanks for posting such great instructions!
Mara
Love this fabric and such a great way to show off the prints.
Cara
Cute! Love this fabric.
JoAnn
Love the technique and chart!!!
Ellen
Wow I feel like I have won already - that was a great tutorial that I will use often. I feel like the chance to win the fabric is the icing on the cake.
Jamie Pearson
I have always wanted to make the sawtooth star block but couldn't find a good tutorial. I have been quilting for several years and have been intimidated by the flying geese, but it looks like that was unnecessary stress. These look totally doable.
bonjourquilts
Great tute - I'm a bit fan of oversizing and cutting back too. So accurate!
Bess
My favorite block! Thanks for the tutorial. 🙂
Dana Harris
Cute fabric. Thank you for the chart guide and tutorial, I had seen it explained before but never could rap my head around it until I read YOUR instructions. You are the best!
Judi Smith
I cringe every time I have to make flying geese! Thank you for this tutorial! Things will be better now.
Jashmin
Thanks so much for that great tutorial! I'll definitely need to try it out soon!
Linda in PA
I love your quilt and the fabric. Thank you for the tutorial and the charts.
Anne Goff
Thanks so much for this! Especially the chart! Makes it much easier to figure size...
Tamrey Davis
Thank you for this tutorial! I like the fabric!
Diane' Oubre
Thank you for all the time you put into helping us. I love your site
Sue Marshall
Love this technique. Stars are the best! Traditional, but with a mix of modern fabrics - they can be timeless! Glad to see that you square as you go...I was always taught that if you have a good foundation to your project, the finally result will be amazing! I always square as I go.
Jen
Lovely tutorial! And thanks for the giveaway! Fingers crossed!
Julie
I am just taking up quilting and would love a little fabric "stash". Thank you!
Linda M
Such a great tutorial. Thank you very much.
Leslie K.
I have never made these stars but now I will give it a try. My first try with flying geese didn't go very well. I really appreciate you taking the time to write this tutorial. I have learned so much from your blog and tutorials and I just want to say: Thank you so much! I always love your choice of fabric also; I have a difficult time deciding upon fabrics for my projects and it's so nice to see the fabrics you choose.
Sharrieboberry
Very lovely stars. Thank you for taking the time to post all the pics and all the info. It is greatly appreciated!
Janice
I love this tutorial! Can't wait to try it! Thank you!
Jennifer
OMG, I never knew I could make them this way. I love the no waste technique. Will definitely be trying this. Thanks for the charts.
Susan
I've been making Flying Geese blocks this way for a long time. The old way of making them by sewing two small triangles to a larger triangle was always so tricky because of all the edges being bias, I just decided I was never doing that again. Thank you for the very clear tutorial. It will definitely help a lot of people!
Patti Rogers
Thank you! I had forgotten about this method. Thanks for sharing!
Pam Kauppila
Love this! So glad I stumbled upon your blog!
Nadine
Thanks so much for the tutorial! Can't wait to try it:)
Jean Soderberg
Your work is beautiful. Thanks for the tutorial!
Cindy
Thanks for the tutorial! I hate wasting even a little triangle of fabric! I can't wait to try this!!! ❤️
Donna Lee
I'm just getting started in making quilt blocks for the first time in 40+ years of sewing. This tutorial is just what I need, something step by step and with great photos to illustrate. Thank you so much! I want to try this to make a potholder first.
April
Love everything you do! Thank you so much! ❤️
Katy M
Thanks so much for the tutorial - I can't wait to try it!
Kim
I'm excited to try this method for flying geese! I just finished a quilt with lots of flying geese and they drove me crazy!! The printable is awesome too! Thanks
Katrina johnson
I love this fabric! Thanks for the tutorial!
Becca
Great tutorial! I've been wanting to make some of these blocks.
K
Love the tutorial. Printable chart will give a lot of options. Sweet orchard fabric is very sweet!
Charlotte
I've been looking for a sawtooth star tutorial and here you are- thanks soooo much!
Lynette Reed
Love your advice and the fabrics!!
Britt-Inger
Thank you for the printable to the stars. Your old quilt is a little cutie. I love it.
Beth T.
Thanks for this, Amy! The printables are so helpful; as much as I love this bloggy, quilty world, I still like to refer to something I can hold in my hand.
Beth T.
P.S. Could you please tell me the name of that gorgeous wood-grain fabric? I've been watching and waiting and searching for the perfect background fabric for an Anna Maria Horner star quilt, and I think this might be perfect. (I have that tingly feeling just thinking about it mixing with the fabric I've been stashing away--that's always the sign!)
Amy Smart
Isn't it great? It's called Knock on Wood by Deena Ruter for Riley Blake. It should hit stores in the next week!
Beth T.
Thanks so much--I'll be on the lookout for it!
Vicki W.
Fabric giveaway-palooza?! Count me in! I like that method of flying geese, too -- I hate the idea of cutting off and throwing away all those little triangles!
Maureen
What a great tutorial! I need to make this.
Diana
Thank you for the tutorial. I would love to win the Sweet Orchard bundle!
pattymae
This is such a darling quilt! It is exactly the type of quilt I do not make, but need to! I always seem to go with darker colors and I really do love this, thanks for showing me that I can do!
Victoria Barker
What a nice common sense tutorial. Can't wait to try it, thanks for taking the time to do it.
Sue Summerall
Thank you for going to the work of putting so much together in one place. Those yummy fabric choices make me want to head straight to the cutting table.
Anne
Thank you for the wonderful tutorial. I love this block. And thanks for the chance to win such fantastic fabric.
Marie
Thank you for the printable directions and tutorial! What a sweet quilt ?
michelle
Love the way you broke this down, very easy to follow! Thanks.
Vickie Z.
Thank you so much! I'm kind of new to quilting and I've never seen or heard of this way to do flying geese! I'm so excited to try. Thank you for your tutorial, your printable & your giveaway! Love it all 🙂
Dorie E
What a wonderful site. I printed up the charts. Tomorrow I'll laminate them. Fingers crossed on the giveaway. I'm in love with the colors of your mini quilt! Again, thanks!
Teresa
This is wonderful! Is there a simple formula for calculating what size squares to cut if I want the 4 patch in the center? Thanks again!
Amy Smart
Take the finished center square size (for example 4" x 4") and divide it in half. You'd need four finished 2" x 2" squares. Add the 1/4" seam allowance to all four sides, making the squares 2 1/2" x 2 1/2".
When in doubt, graph paper is your friend. Just draw it out and then add the seam allowance to all four sides. 🙂
Teresa
Thank you!
Vicky
Thank you for the two printable charts! The charts, as well as your instructions, are perfect!!
Diana
Thank you so much for sharing this tutorial! I too am a bit OCD when it comes to wasting fabric and time. Love this fabric line as well.
Suzette
Thank you for a great tutorial and the printables! I think you just gave me an idea for a baby quilt for my sweet neice's baby. She is due in December after struggling with infertility for years and I want to do something extra special.
Rebecca
Fabulous tutorial..thanks a whole bunch of geese?
Marian Allen
This was just what I needed to get started! Thank you so much
Ellie Paquette
Love fast and accurate ways to make blocks Thanks for the chart so I don't have to calculate size. Stars are one of my favorite blocks.
Patty Gloekler
Thank you for that tutorial! I've seen that method before, but I can't translate it into other projects. Now I can!
Janet
Thank you so much for those charts and this tutorial. And I love the idea of using a pineapple ruler for squaring up. I've had shoulder surgery and so my quilting has been minimal. A few more weeks and I can get back to it! Thank you for the opportunity or the fat quarter bundle. Love your blog!
Lesley Gilbert
Thanks for taking the time to make this great photo tutorial and especially the PDF size charts 🙂
Janet Carrano
Thank you for sharing the charts, much appreciated. This is my favorite way to sew flying geese. I look forward to your post thanks for sharing always.
Nyla-Jean de Boer
Thank you so much for this tutorial!
Liz Horgan
Great tutorial--I love that way for making 4 quick flying geese!
Happy Labor Day weekend!
Jill
Love this tutorial...I think I can do this!! I'm itching to make some stars with that darling Sweet Orchard fabric now. Thanks!
Joy Parker
I absolutely love your first sawtooth star quilt! Thank you so much for the tutorial for my two favorite blocks!
Patricia simmons
Great toot! Thanks. ps: love the red scissors
Vicki H
Thanks for the size chart for the flying geese.
Sandy K
I haven't tried this method for flying geese yet. Looks like a great time saver.
Karen Seitz
Thank you for the free printables. I have several of these types of charts saved and have referred to them for revising block sizes.
Dorothy
Thank you, thank you for the charts. I love your sawtooth star and just figured out what I a going to make this weekend.
DJ Kelly
Your quilt made 16 years ago does not go out of style. I also love star blocks. Thank you for the free printable charts, you never know what size you will feel like making 🙂
Michelle
Love, love, love the Sweet Orchard fabric and your tutorial! Thank you.
Vicki Gensini
Your quilt is absolutely beautiful. Thanks for sharing.
Kate
Nicely done! Your quilts are so sweet and I love this method of flying geese- I like being able to make 4 at once! Thanks for the giveaway.
Robin
I have never made flying geese. This will be fun to try.
Catherine O.
Thanks for the tutorial and printouts. I have always found it tricky making flying geese that weren't wonky. Now they will turn out straight!! Beautiful quilts. I am a big fan of star quilts. Can't wait to make a mini using your method.
Susan Green
Thank you for the tutorial and the charts!
Judith
Great tutorial! Crystal Clear!!! And I love your quilt with the Sweet Orchard fabric. Love those strawberries! Thanks for the chance to win.
Jodie
I love all of the information in this tutorial, thanks so much for sharing ?
Paula
Love stars, love flying geese so naturally love the sawtooth star block. Thanks for your printable guides.
Lauren
I love how easy this tutorial is. Thank you!
Donna
Thank you for the chart! Doing a Round Robin Quilt and figuring out block sizes is the hardest part!
felicia condry
I love you blog, it makes me happy, you use "happy fabric", "happy words", "happy tools" it just makes me smile. 🙂
thank you,
Mary Jo Jones
I sincerely appreciate your tutorial❤️, Your blog is always such an inspiration...love all you share! Have an awesome weekend!
Sindy
Thanks for the sizing chart- makes life easier!
LindseyAnne
Thank you for the tutorial. I've been a bit scared of flying geese but this looks doable, especially with all the maths done!
Andrea M.
Thanks for the giveaway and efficient flying geese tutorial!!
Lea
The quilt you made 16 years ago is a beauty. Thank you for a lovely tutorial.
Sophie W
I love his block, great tutorial, can't wait to have a go!
Lynnette Hughes
I love this method - can hardly wait to give it a try. Thanks for sharing such clear instructions
Debbie W
Will have to give it a try ... thanks!
Nadia Jarreau
Thank you for a great tutorial! You're always generous with your knowledge!
Lindsey Stelly
This is such a great blog! It simplifies a block that can be intimidating to some! I can't wait to try various sizes together!! Thank you for posting!!
Debbie
Thank you SOOOO much! I have never seen this method, and haven't yet tried to make flying geese using any method. I love that there's are no tiny scraps this way, and that you can easily see by their shape which pieces have which role. I think I found my next quilt design!
Ashley
I haven't tried this flying geese method before but it sounds so efficient! Can't wait to use it!
scstephquilts
This tutorial could not have come at a better time. I am working on a quilt that needs 456 flying geese. I make a few, put it away, take it out again and make a few more flying geese, put it away and repeat for several years now. Your method just might help me finish this quilt.
Lori Marchbanks
Thank you so much for the printables--love the flying geese, hate the math 🙂
Nancy B
Sawtooth star is one of my favorite blocks, and it's going to be so handy having the chart of different sizes handy...thank you! Thanks also for the giveaway, such lovely fabrics!
krislovesfabric
Thanks for the printable charts, love the one page format!
Heather
I love your simple flying geese method. Would love to try it with the new Riley Blake line!
Jennifer M.
Great tutorial! Thanks for the printable and for the chance to win!
Sally Christiansen
Great tutorial, and thanks for the chart.
Donna Bacon
Amy, thank you for sharing your wonderful knowledge!
Carolyn Foote
Great tutorial. I'm a beginning quilter so can use all the information I can get.
Ann Maddox
Thank you for your wonderful tutorial! Very helpful! Loved your charts to use for making different sizes!
Barbara
Just gorgeous! This sawtooth star quilt is my next project. Thanks!!
Judy
Thank you, Amy, for this tutorial and the charts. Making flying geese is my least favorite thing to piece for my quilts. They always come out "wonky," and I seldom have a quarter inch above the points. I can't wait to try your method!
Kim
Wish I'd had this tutorial before making my last quilt that had umpteen flying geese units!
Sarajane
I always find your tutorials informative and easy to follow. Thank you for sharing.
Kate McNamara
Oh wow, such a sweet mini quilt, this is going to be one of my favourite fabric collections ever...and what a fab giveaway! Thanks for the opportunity to enter...
Kathy Parrish
I love it. I NEED TO MAKE THIS QUILT FOR MY GRANDDAUGHTR RACHEL WHO LIVES NEAR THE SAWTOOTHS.
Patricia Kleber
Loving your blog! Perfect for a newbie like me. Great tutorials!
quiltmichele
Thanks for tutorial on the flying geese I am just about to start a quilt with flying geese and I am going to break out of my usual way of sewing flying geese and try your method. I think that I will get good results.
Love the fabric you made them with.
pgtrans
LOVE LOVE LOVE sawtooth stars. Thanks for the tutorial.!!
janet
thank you amy....your chart is gold! i have a wall hanging that i did in all "amish" colored sawtooth stars set in a black background...simple i know but it is and always will be one of my favorites. great tutorial....those geese are always slippery characters, i am always looking for a better way to perfect them. thanks for the generous give-a-way.
Anita
What a great tutorial. I am off to make some sawtooth stars!
Jennifer
Wow! Thank you so much!
Kathy L
Thanks for the tutorial and the great chart! I need to practice my scant 1/4" seam! Thanks for a chance at the giveaway!
Sarah N
Thanks for the tutorial and giveaway!
Kathy
Thanks Amy for the great tutorial. I will definately run off the guide. Your pictures are stellar. Stars are my favorite❣
Alicia
Great tutorial and thanks for the chance of the giveaway!
KT
Great tutorial! Love your handy charts--they make it so easy!
Lori Baker
Thanks for the tutorial and the charts. Definitely going to try this method! Thanks for the giveaway!
Peggy MacMichael
Hi, Love this tutorial and love the fabric. Are these fat quarters to make this project? Thanks again love this site
Jennifer O.
I was just thinking about making a star quilt, so this is very helpful! I was interested in the ruler you used, but the link leads back to this page.
Amy Smart
Doh! I hate when I do that - pasted in the wrong link. Fixed it. Thanks so much for the heads up!
Charlene Walker
Great tutorial on flying geese! Thank you also for the printable chart for future use ?. And then a chance for a giveaway? WOW!
Stacey
Thank you so much for the chart. I just printed it out and am going to my sewing room to make a few.
mccindy
Can't wait to make a bunch of these stars. I have about 22 colors in bandana fabric that would make up beautifully in these. Thanks for your help and charts!!!
Michelle
Thank you for this tutorial. I am going to give a try soon.
Marcia
Absolutely adorable!!! Thank you for the great tutorial. I have been wanting to make a mini quilt! Now I have no excuses.
Patty R.
Thank you for teaching me something new 🙂
Malinda
This whole post is a gold mine, I pinned 5 things and downloaded two. I, too, love the little blue and yellow wall hanging and am collecting scraps to get started on one!
Melissa M.
Thanks for the downloads!! I keep it pinned, but sometimes i need a quick reference without getting out my phone 🙂
Allison in Alabama
Love your posts especially the next one about colors for quilts - very informative!! Keep up the good work!!!
Crystal
I love the sawtooth star pattern, and this fabric is so pretty. I printed out the charts for future reference. Thanks!
sandy
You do an awesome job and I always learn something from watching. Thanks
Debbie Holley
Thank you! Beautiful quilts, gorgeous colors, and really helpful tutorial.
Michelle O.
Thank you for this tutorial, and for the giveaway!
Esther Grimes
I usually don't like making stars but you make it look so simple.
Deb J
Another giveaway! Woohoo! And an easy star pattern - will give it a try!
Patty H
I love sawtooth saw stars. I think I need to try this!
Laura
Thanks for this tutorial and the printable chart! You make it look so easy and I am sure it is.
Thanks for the giveaway also.
patti
Thanks so much for the easy patterns and the help! So cute!
Kathy
Thanks for the chart will. Make it so don't have to refgggieur each time
Kathy
Rachel Sanford
No wasting time or fabric? I'm in!
Julie Cefalu
Beautiful tutorial and one of my favorite methods of making flying geese. Thank you for sharing!
Carole Williams
This is a fantastic tutorial and the printable charts are so handy! Thanks for the time and effort it takes to write your blog to help quilters like myself out! ?
Zosia
Great tutorial! thanks
Dixie Walls
This is wonderful, thank you so much. I am a beginner and this was so helpful
deanneellen
Thank you for the tutorial on flying geese. Looks easy and turns out beautiful!
sarah david
I am a newbie to quilting though I have been sewing for decades. So many of the patterns look difficult, but tutorials like this one show us the tricks to making beautiful works. Thank you so much! I love this!
Val Lloyd
Definitely going to make this as a mini quilt - thanks for the great ideas
Cindy Bartlett
Thanks for this easy step by step! My grandson (8 years old) likes to sew & create so I'm going to use this to help him "make" for room decor.
Nuria
I think with your tuto I am capable to do my first mini quilt. Thanks for sharing!
Pam
Wonderful tutorial. Thank you.
M.C.
Maravilloso edredón, unas telas muy acertadas.
Cristina.
judy koerner
Hi Amy, really enjoy your posts and creative viewpoints, Sorry to say I cannot download and print the finished flying geese chart. Only shows first two columns of data. Document is scrunched to the far right. Probably some techy thing I don't know how to correct.
Gilda
I just tried this method for making flying geese and it's great! Thanks so much for sharing it.
Shannon
This tutorial was awesome! However I was trying to make the 12"x12" block and have finished squaring up my flying geese but when I went to add the corner squares they were 1/4" bigger on each side so I just centered and sewed the rows. But then when I went to connect the rows nothing lined up right? It was like the center block was to wide? Am I crazy? I swear I measured everything correctly. HELP?!
Shannon
Never mind... I figured it out! Such a dork! Awesome chart! I have printed it out 🙂
Amy
Ok, phew!
Lorie Posey
thank you for sharing your knowledge! As a new, self-taught quilter any info i can get is a huge help. I’ve made this block before using the HST method. I’m gonna try this next time! ?
Alayna
Amy, I really appreciate your tutorial and the printables. Your site is my go-to for tutorials. But my 6"x6" sawtooth stars are not squaring up and I cannot figure out what I am doing wrong. I realize that is a difficult question to answer when you can't see what I am doing. So let's start with clarification: the 6"x6" finished star should be squared up to 6.5" x 6.5", right?
Amy
Yes - unfinished it should be 6.5" x 6.5". Typically if a block ends up smaller than planned, it's because the seam allowances are too wide. Even if they're just a tiny bit wider than 1/4" it will shrink the block - especially when there are multiple pieces involved. I definitely recommend sewing with a scant 1/4" seam allowance to help keep your pieced block accurate. Here's a post about scant 1/4" seam allowances: https://www.diaryofaquilter.com/2011/10/quilting-tip-scant-14-inch.html
Amy
I love this tutorial and reference it every time I want to make flying geese blocks. Thank you for the great information! xoxo
Karen Lind
What a cute little quilt!!!
Karen Lindemann
What a cute little quilt!!!
gracegains
Bless your heart for offering the free printable!! I'm new to quilting and this star is my favorite quilt bock. Thank you !!
Carol A. S.
I can't begin to tell you how much I appreciate this visual step-by-step tutorial, especially for the Saw Tooth(ST) quilt square. I've returned to quilting and sewing with great enthusiasm but haven't made specific squares in quite a while, found a wonderful small project with 3 small ST squares that are on the front of it, and for the life of me my brain was blocking(no pun intended!) on the correct way of placing the pieces properly so as to have the right space of the 1/4 inch edge around the block to make sure the points were not lost/ sewn over. I tried YouTube, however, no-one had exactly what I was looking for... you do - Thanks Again!!
Amy
Well, hooray! I'm so glad!
Laurie B
Wow! I think this is one of the most detailed tutorial I have ever seen in my 15+ years of reading quilt blogs. THANK you 😊
Amy
You're welcome!
Leisa
This is my favorite method for making flying geese. It appeals to my preferences for speed, accuracy and utility. Further, it is a great way to make use of small squares of fabric--or create them from leftover binding and make a suitable flying goose sky or goose blocks for the measure. In fact I'm de-stashing making many flying geese for which I plan to use in various settings to include this block.I use Deb Tucker's ruler. I like it because it has more than one size on it (v. Quilt in a Day). They turn out perfect each time. I think that starching/pressing before trimming is key. I agree that using the flying goose v HST's is preferable.
Amy
Awesome! Thanks so much for the ruler recommendation!
MARY D. CAIN
I heard about your method from Amy at AMEROONIE DESIGNS. I am making her Yellowstone wall hanging. I am having a problem with the little blocks ending up short quite often. Any idea what I am doing wrong?
Amy
Hi! Without seeing the blocks, my best guess is that your seam allowance might be slightly too wide. I recommend a scant 1/4" - helps a lot with the sizing on blocks with a lot of seams. https://www.diaryofaquilter.com/quilting-tip-scant-14-inch/
fabricartfairy
I love this. Thanks for sharing.I will make one.
Anna Bethan
Thanks! Just made an 18” star following these instructions, and it worked perfectly. Best instructions for this which I’ve managed to find on the Internet.
Maria
Hello. I would love to make your Sawtooth Star block using some small panel squares I have but they are 7 3/4 square. How do I work out the measurements of the other squares please? Thank you
Cathy
Wow, THANK YOU for this extremely well laid out tutorial. So easy and accurate! A special thanks for the multiple size cutting chart. I needed to audition multiple sizes to see what looked best with my project and this tutorial gave me everything that I needed!
Amy
You're welcome! I'm so glad!