
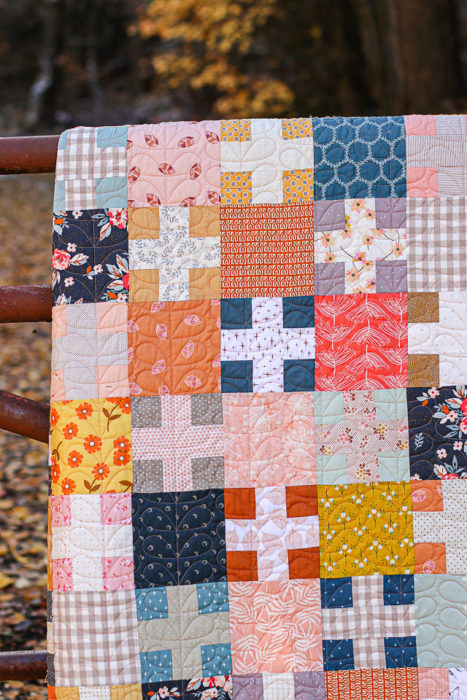
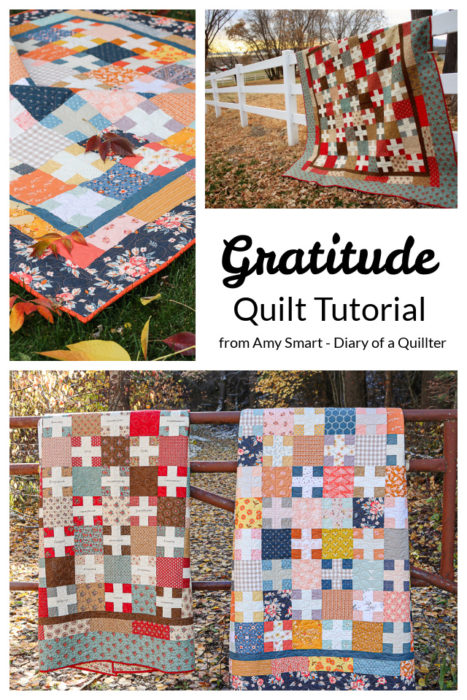
I have been working on a very fun project for the past few weeks. This is a reboot of one of my favorite quilts - my Gratitude quilt. Today I've got a tutorial to make your own gratitude plus quilt and I'll share the original and latest variations of this quilt. This quilt pattern is also perfect for cutting your blocks from precuts - Jelly Rolls, Charm Packs and Layer Cakes - or you can cut all of your pieces from yardage or scraps. So many options.
Gratitude Quilt

Another fun option: you can use the traditional plus 'signature' blocks to embroider or write people, places, or things that you're grateful for like I did with my original quilt (on the left). Or you can just make a fun, scrappy plus quilt. You get to choose your own adventure every time. 🙂
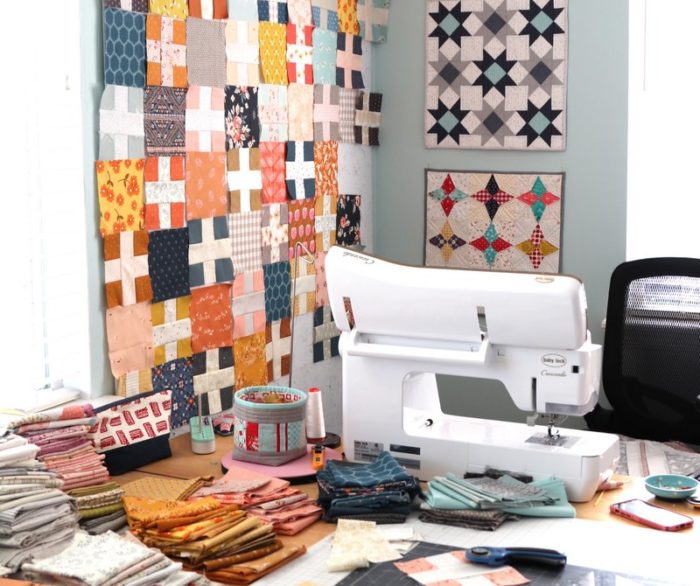
This tutorial is sponsored by Baby Lock Sewing Machines. I've been working with Baby Lock for a few years now and love every single machine that I've worked with. They've got something for every maker, level or budget. (You can read more about How to Choose a Sewing Machine here.)
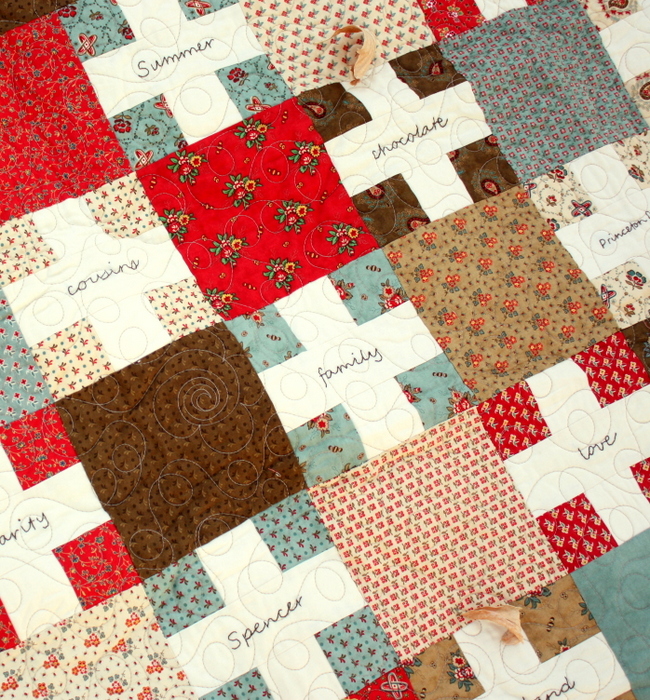
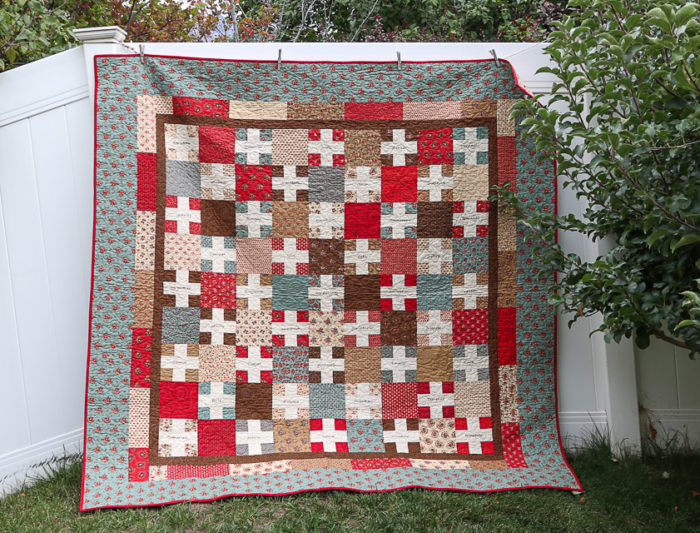
I made the original Gratitude quilt 10 years ago! You can read more about my original Gratitude Quilt, inspired by the Thanksgiving holiday, here. For this project I used a traditional plus (or cross) signature quilt block and embroidered the names or places or memories of things that I'm grateful for. It's a sentimental quilt that will always be a personal favorite.
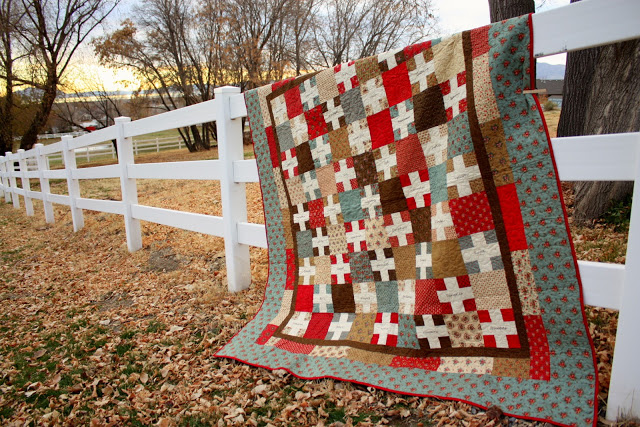
The original quilt was made entirely from Precuts: a Charm Pack (precut 5" x 5" squares), and a coordinating Layer Cake (precut 10" x 10" squares.) The cross blocks are all from solid cream pre-cut 2 ½" x 2 ½" strips.
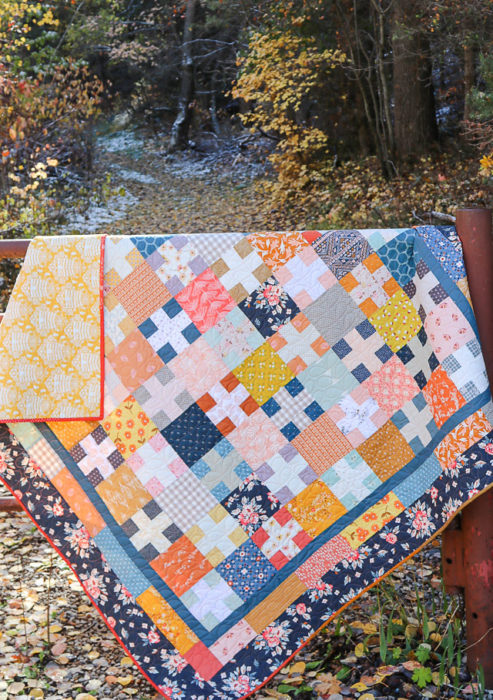
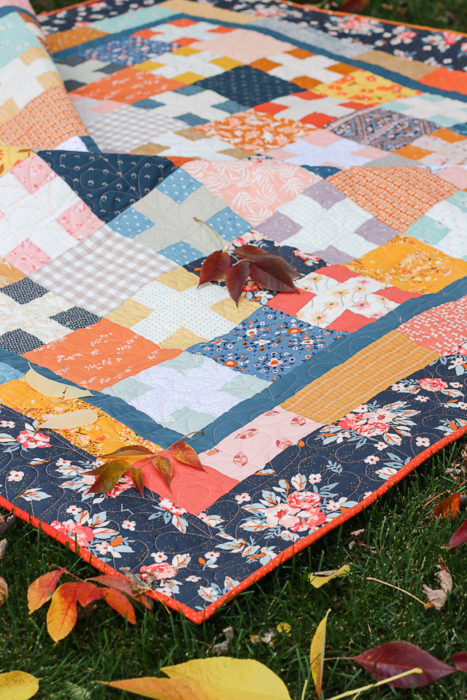
For this newest version of the quilt I cut all of my pieces from a stack of Fat Quarters and other quarter yards. I made the cross blocks scrappy with a variety of prints and I love the change of character it gives. (Hindsight, I wish I had made some of the crosses darker.)
I stuck with the fall theme though. Because these colors were just calling to me. (More about fabric choices below.)
Gratitude (Plus Block) Quilt Tutorial
Click here for a printable PDF of this pattern
Fabric Requirements:
- Signature blocks (cross background): 1 Charm Pack OR 41 squares 5” x 5”
- Setting Squares and Scrappy Border: 1 Layer Cake OR 40 squares 10” x 10” OR 40 squares 6½”x 6½” and 28 assorted 3½” x 10” strips for scrappy border
- Cross fabric: 12 strips 2½” x WOF (Width of Fabric) OR 1 yard solid OR 41 assorted strips 2½” x 12"
OR You can cut all of the above from 20+ Fat Quarters or assorted scraps (see cutting list below)
- Inside Border fabric: ½ yard
- Outside Border fabric: 1 yard
- Binding fabric: ⅝ yard
- Backing: 4½ yards
Cutting List:
- 41 5” x 5” squares

- Cut 40 squares 6½” x 6½”. (If cutting from a precut 10” x 10” squares, save the remaining 3 ½” x 10” strip for the scrappy pieced border - see photo)
- From Cross Fabric: cut a 2½” x 5” strip and a 2½” x 6½” strip for each cross block. Cut 41 matching sets or a total of 41 2½” x 5” strips and 41 2½” x 6½” if cutting from one piece of yardage.
- Inside border – cut 6 strips 2” x WOF
- Outside border – cut 7 strips 5” x WOF
- Binding: - cut 8 strips 2½” x WOF
- Backing – cut 2 pieces 81” x WOF
Signature Block assembly:
For each signature block you will need a 5" x 5" square (for background) and a contrasting 2½” x 5” strips and a 2½” x 6½” for cross.
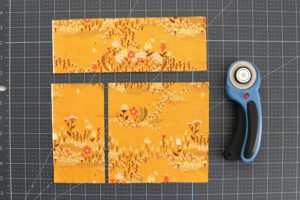
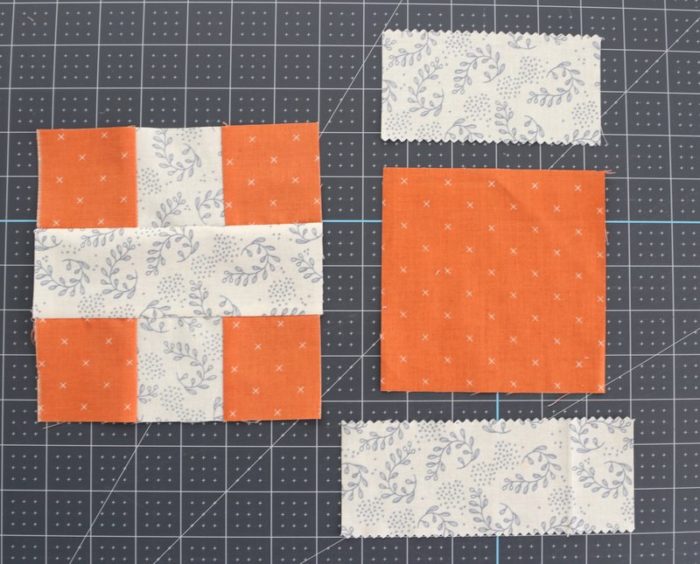 1. Cut 5" x 5" square in half to get two strips 2½” x 5”. Sew a matching pair of 2½” x 5” rectangles to either side of a contrasting 2½” x 5” rectangle along the long edges. Press the seams toward the center fabric.
2. Carefully rotary cut the strip set in half through all 3 fabrics, creating 2 matching pieced units 2½” x 6½”.

3. Sew matching pair of pieced units to either side of a contrasting 2 ½” x 6 ½” strip. Press seams toward the center fabric.

4. Optional: Embroider signatures or words, or carefully write them with a permanent ink pen in the center of the center cross strip. Alternative: you could piece the entire quilt and then embroider words or phrases before the quilting process.
5. Repeat steps 1-4 to create a total of 41 signature blocks.
Quilt Assembly:
Arrange signature blocks and setting squares in rows of 9, alternating signature block and 6½” x 6½” setting squares. (See diagram) Sew the blocks into rows, pressing seams toward the setting squares.
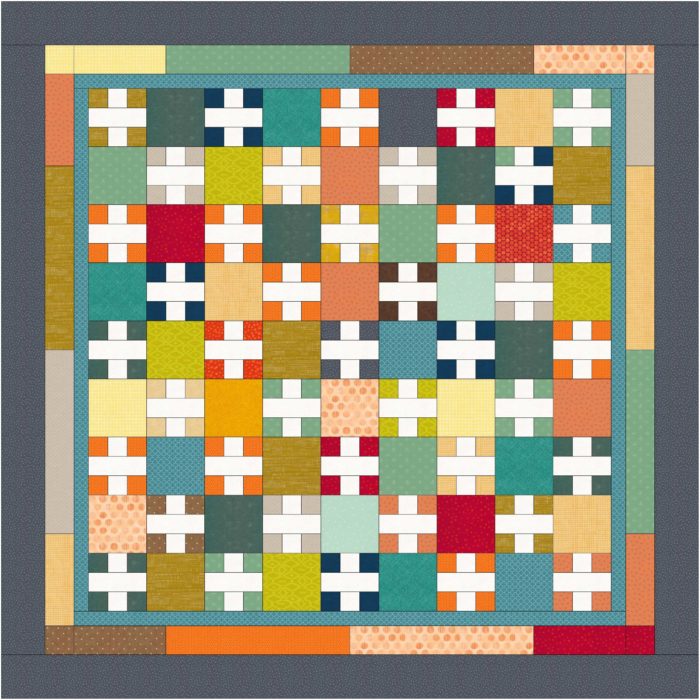
Sew rows together to create the pieced center of the quilt. Press rows in one direction.
Quilt top should measure 54½” x 54½”.
Borders:
1st border: Sew 2 pairs of 2” inside border strips together end to end. Trim each to 2” x 54 ½” and sew to the left and right of the quilt top. Press seams toward border strips.
Stitch the remaining 2” strips together end to end. Trim to make two 2” x 57½” strips and sew to the top and bottom of the quilt top. Press seams toward border strips.
2nd Scrappy-Pieced Border: Sew all 3½” x 10” rectangles end to end. (You can trim the rectangles to a variety of lengths if you want more variation.) Trim to make 2 pieced borders 3½” x 57½” – sew to left and right of quilt top. Press seams toward the 1st border.
Trim to make 2 pieced borders 3½” x 63½”. Sew to top and bottom of quilt top. Press seams toward 1st border.
3rd (Outside) border: Sew 2 pairs of 5” x WOF strips end to end. Trim to make 5” x 63½” borders and sew to right and left side of quilt top. Press toward outside border.
Sew remaining 5” strips end to end – trim to make 2 borders 5” x 72½” and sew to top and bottom of quilt top. Press toward outside border.
Finishing - Basting, Quilting and Binding

Refer to How to Finish a Quilt instructions for layering, basting, quilting and binding a finished quilt.

CLICK HERE for a Printable PDF of this pattern for $3.00
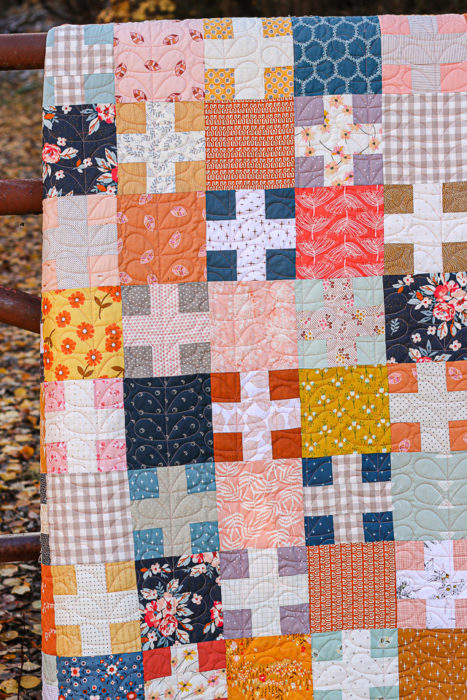
Here is some more information about the new scrappy version of the Gratitude quilt. The fabrics for this quilt were inspired by this bundle that I bought from The Cotton Bolt at Garden of Quilts last month. They honestly had some of the prettiest curated bundles ever.
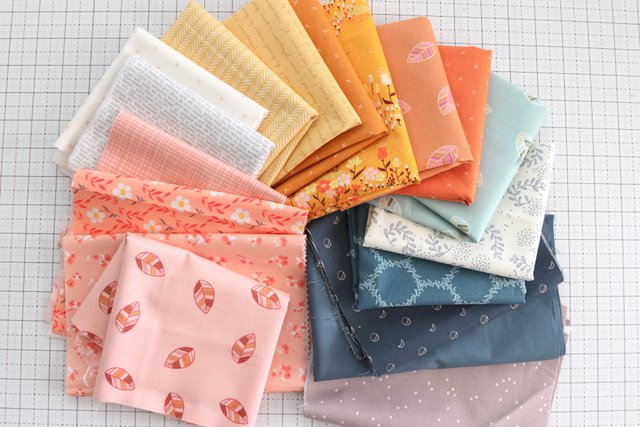
From there I pulled coordinating prints from some of the latest collections from Riley Blake including Gingham Foundry, Lori Holt Basics, Beneath the Western Sky, Harmony, and Winterland, and Heartsong.
The blue inside (1st) border is a new Confetti Cotton from Riley Blake called Stargazer. SO pretty.

Everything else was pulled from my stash. (This quilt was a really fun one for using up stash too!) Except for the outside border - I tried finding something in my stash, but the FQ of the floral from the Cotton Bolt bundle just spoke to me. And the colors were so perfect. So I bought some yardage from Simply Love Fabrics. I just loved this quilt too much and had to add that floral. The print I used for the outside border is called Togetherness at Home designed by Maureen Cracknell. I bought it
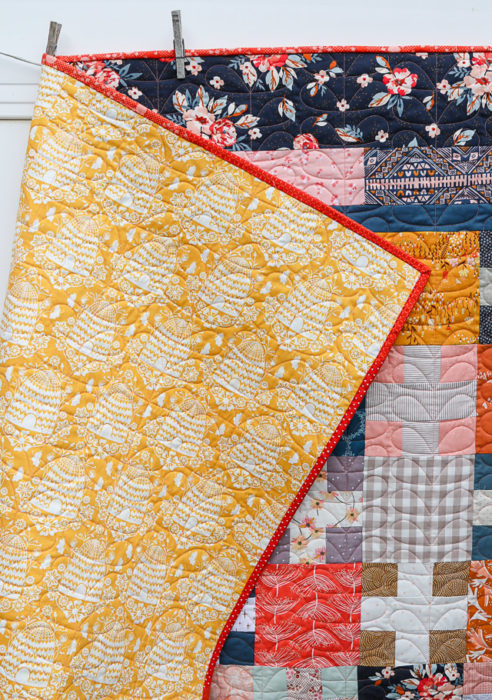
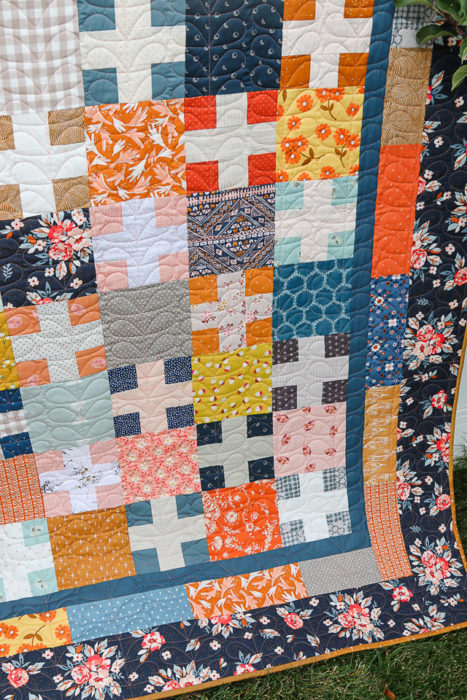
I did, however, stick to stash only for the back and binding. The Beehive backing print is an older Bonnie Christine print (from her Sweet as Honey collection) that I bought years ago (it's out of print now) and kept it waiting for just the right project. Ta-dah! Here it is!
The quilting on this quilt was done by Melissa of Sew Shabby Quilting. I chose the 60's Mod design and I love how Melissa quilted everything in pink thread! It blends perfectly.
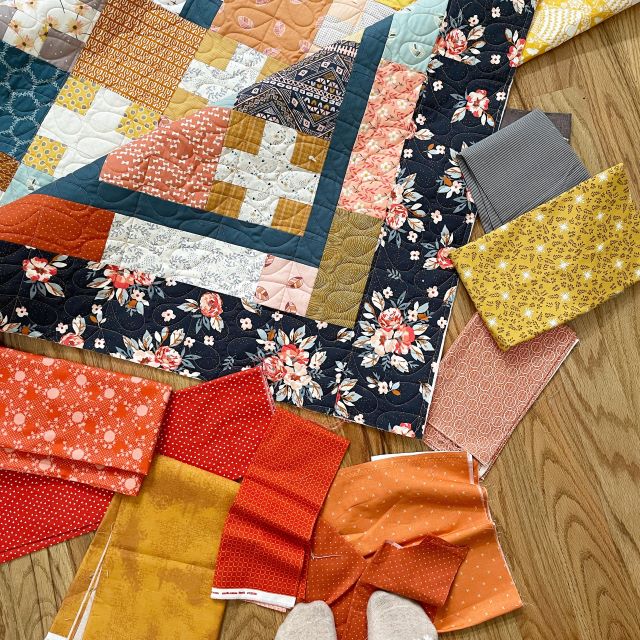
I was also trying very hard to find a binding from my stash as well. Everything that I had a big enough piece of didn't wow me and the ones that did I only had a fat quarter or so. So after throwing the dilemma out to the world of Instagram, I got a lot of encouragement to piece a scrappy binding. I was a little worried that this quilt was already too busy with it's scrappy blocks and border + a busy outside border print.
But then I decided to take a strip from the orange and gold prints that read close to solid and piece them together in a kind of ombre effect - where the colors gradually blended into each other all the way around the quilt. I love how it turned out. It's hard to tell from the photos, but it frames the quilt beautifully, without being too distracting.

I just have to say again, how enjoyable and therapeutic it's been to work on a project inspired by my favorite season and just for fun and just for me. 🙂 Happy Fall to one and All! Whether you dive right in and start one today, or just pin the idea and save it for later, I hope you'll have fun making this fun and simple quilt.
Big thank you again to Baby Lock Sewing Machines for sponsoring this project!

paula
The colors of your second Gratitude quilt remind me very much of an old scrap quilt I have that my grandma made from leftover fabric and I’m pretty sure some old clothes. It’s old and a bit tattered but I love it immensely. Thank you for sharing this pattern!
Karen S
Thank you, Amy, for the pattern and great color ideas!
Little Quiltsong
Thank you so much Amy! Love the fabrics of both quilts! My head is buzzing with which fabrics to use for this :)!
Maria elena blecha
Thank you for the great pattern, I love both quilts but the new one feels so warm and cozy!!! May I ask sho does your quilting> I love love the quilting, I would like to have someone do the quilting but I really like a soft feel, some I had done feels stiff like a cardboard!!
Amy
Great question. If you have someone quilt it for you go with a design that isn't very dense - larger scale design. This will make the quilt not as stiff. Also, after you wash the quilt for the first time it will soften up a lot too. 🙂
Dianne Mann
Always a winner. Love the idea for personalizing for someone. Thanks so much!
Gwyn
Thank you so much for the pattern! I love the color palette, similar to Cider by Basic Grey. I have a layer cake of that... Gratitude for a waste free pattern! I think I already have a list of projects for 2022, including this one!
jantaber
Amy, I had forgotten how much I love your gratitude quilt, so thank you for sharing it again! And thank you for writing up the pattern. The very idea of a gratitude quilt appeals to me so much that I'm already thinking of what I might embroider on the signature blocks. Think I'll start my list now, beginning with "quilting," of course!
Anne Cretan
Thank you Amy. What a beautiful gesture. Love the colours in your quilt and the beautiful scenery around your home. We are heading into summer in Australia and are enjoying the colour of spring. Thanks again, take care
Arlene Helms
I have both a charm pack and layer cake of Christmas Morning that I think would be wonderful in this pattern. I'm thinking of embroidering Christmas sentiments on the crosses. Oh soooo many fun project ideas!! Thanks so much to you and Baby Lock for the free pattern!
Amy
Ooo, I love it! Such a great idea!
golfingofcoursegmailcom
Thank you, Amy. I love your Gratitude quilt. I haven't embroidered in a long time - it's time to break out the floss and needles.
Carmen Montmarquet
Love your Thankful Quilt! Thanks so much for the pattern, can't wait to make it!
rtrittel
Thanks so much for the free pattern! I love both versions you showed. I especially like the scrappiness of the newer version - it looks great!
Lodi
Thanks so much to you, and Baby Lock, for the quilt pattern - It's a keeper!
Bonnie Landon
Thank you, Amy! I'm looking forward to making this quilt!
The Joyful Quilter
Pretty quilts, Amy! Thanks for sharing your tutorial.
karen s
Thanks so much, Amy! Gratitude right back to you 🙂
Lori
Thank you Amy! I’m grateful for the wonderfully generous quilting community. So many beautiful people, like you, who share their talents to teach and encourage fellow quilters. I love your Gratitude Quilt. Thank you for the pattern.
Kristi
Thank you, Amy, for your generosity in providing this wonderful pattern. I love both of your versions and hope to start one of my own very soon. Happy Fall to you and your family!
Lea
Hi Amy, thank you so much for this free tutorial. Ever since I saw this quilt it was a favorite. I love the sentiment behind it and it's perfect for fall. The fabrics you've used in your quilts are gorgeous!! I have put this quilt on my favorites list to make. Mine will certainly be a fall quilt too.
Joni
Both quilts are gorgeous! I plan to use this quilt to make a chemo quilt for our local hospital. Thank you for sharing this wonderful pattern.
Patti Howard
How kind of you! Thank you so much for this pattern. Both quilts are beautiful.
Josephine
Thank you for offering this for free! I will add it to my stash of Amy Smart patterns and fabrics. 🙂
Loris Mills
Amy, Thank you for a beautiful quilt inspiration and instruction. I am not able to quilt at the moment but will look forward to making this some day.
Susan
Thank you for the free Gratitude quilt pattern.
Catherine M Foy
Thank you for the free pattern. I have always loved this pattern. Cathy
Laurie
Thank you for this free pattern! I think it's beautiful and look forward to making it. I have many of your patterns. 🙂 I recently made a quilt from your Notting Hill fabric for a little girl whose father is from London. She and her parents loved it!
Amy
Aww, that's so sweet. I love it!
Darlene
Thank you so much for sharing such a wonderful pattern. So many thoughts: stitch’s block each week of what you are grateful for at years end you will have a lovely top. I also thought of using it like a family tree with family names & birthdays.😀
Amy
Oh, I love both of these ideas!! Thank you so much for sharing them.