• Skip to primary navigation
  • Skip to main content
  • Skip to primary sidebar
Diary of a Quilter - a quilt blog
  • Home
  • Tips + Tutorials
  • Shop
  • FAQ
  • Subscribe
menu icon
go to homepage
  • Home
  • Tips + Tutorials
  • Shop
  • FAQ
  • Subscribe
    • Amazon
    • Facebook
    • Instagram
    • Pinterest
  • subscribe
    search icon
    Homepage link
    • Home
    • Tips + Tutorials
    • Shop
    • FAQ
    • Subscribe
    • Amazon
    • Facebook
    • Instagram
    • Pinterest
  • ×

    Snow-capped Mountain Quilt Block Tutorial

    Last Modified: November 23, 2019 by Amy · This post may contain affiliate links · This blog generates income via ads · 5 Comments

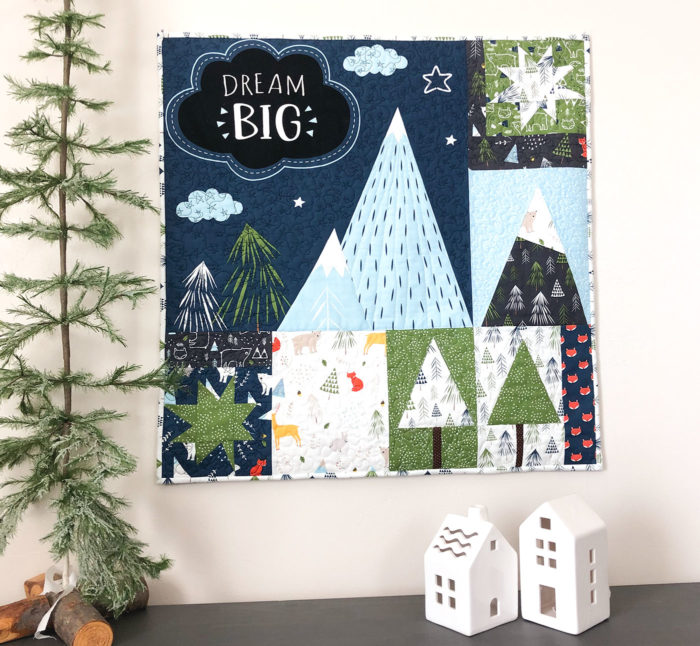
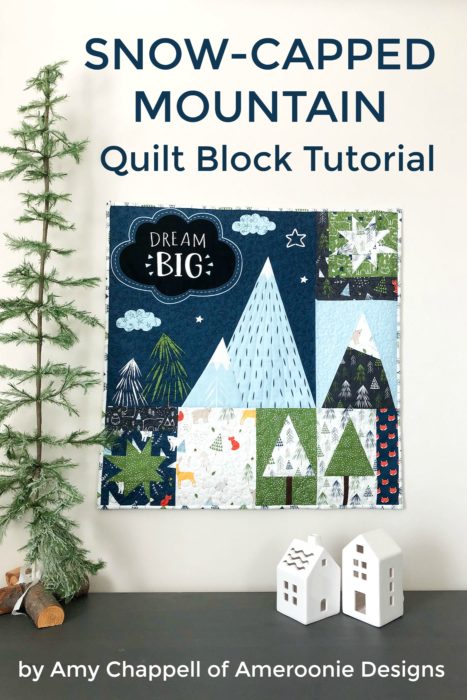
    I'm so loving this fun project idea from Amy Chappell of Ameroonie Designs where she's modified my Improv Patchwork Forest Trees to create these super fun Snow-Capped Mountain quilt block tutorial. And look how cute they look together! Amy will show you the step by step instructions here.

    Snow-capped Mountain Block -a tutorial by Ameroonie Designs 

     Snow-capped Mountain Quilt Block Tutorial by popular Utah quilting blog, Diary of a Quilter: image of a quilt with mountain quilt blocks.
    Hi! I'm Amy from Ameroonie Designs. This pattern will show you how to make a snow-capped mountain block. The tutorial is based on the modern tree block designed by Amy Smart of Diary of a quilter and can be found here.

    Mountain Quilt Block Tutorial

    Instructions for this block yield 3 blocks at a time to minimize waste.

    All seam allowances are ¼”. Please read directions all the way through before beginning.

     Snow-capped Mountain Quilt Block Tutorial by popular Utah quilting blog, Diary of a Quilter: image of three rectangular pieces of fabric.

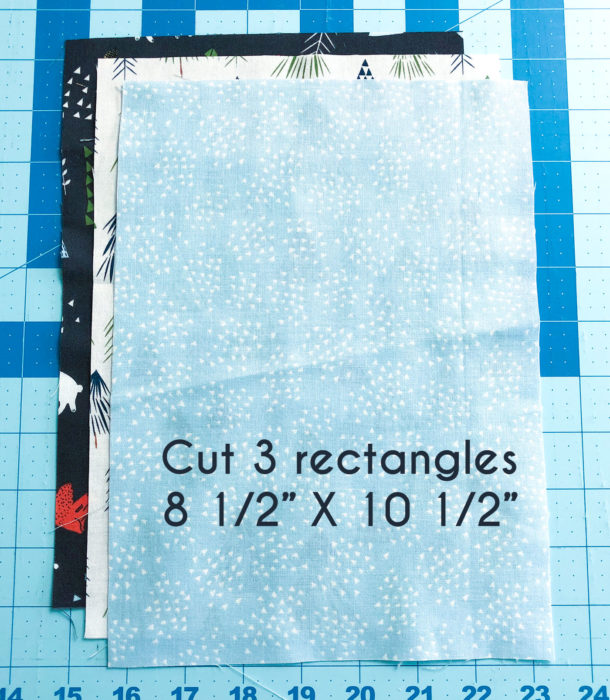
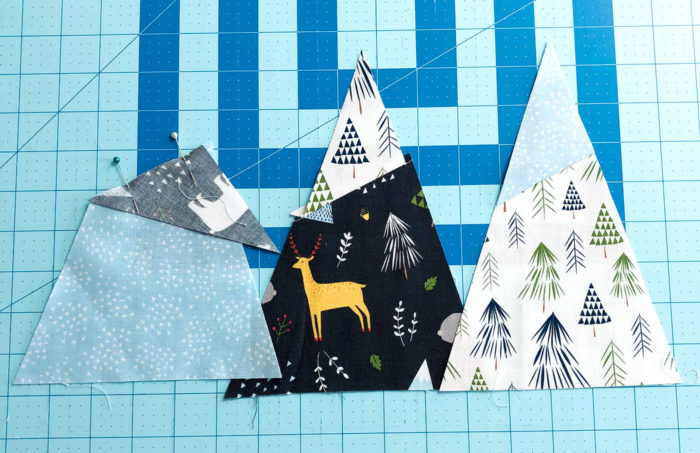
    Cut 3 rectangles 8 ½” X 10 ½”. There should be contrast between the three fabrics in both color and scale to make the different parts of the mountain clear.

     Snow-capped Mountain Quilt Block Tutorial by popular Utah quilting blog, Diary of a Quilter: image of cut up pieces of fabric. 
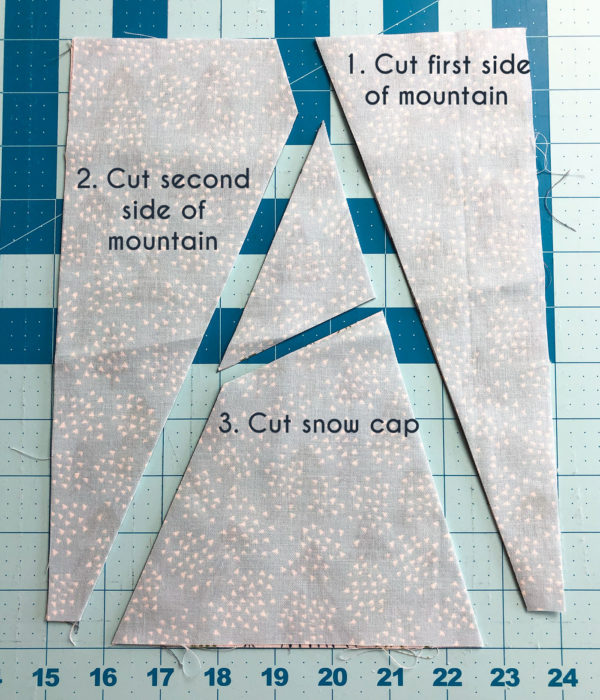
Cut the first side of the mountain. Make sure the bottom edge of the mountain is more than ½” away from the edge of the fabric to allow for squaring and trimming. Slide the cut off piece away from the rest of the fabric.

    Cut the second side of the mountain. Again the bottom should be more than ½” away from the edge of the fabric. You will also need to make sure the top of the mountain is not too close to the top of the fabric, allow at least ¾”. Slide the second side away.

    Slice the snow cap on the top of the mountain. You can choose to angle the mountain any way you like.

     Snow-capped Mountain Quilt Block Tutorial by popular Utah quilting blog, Diary of a Quilter: image of cut up pieces of fabric.

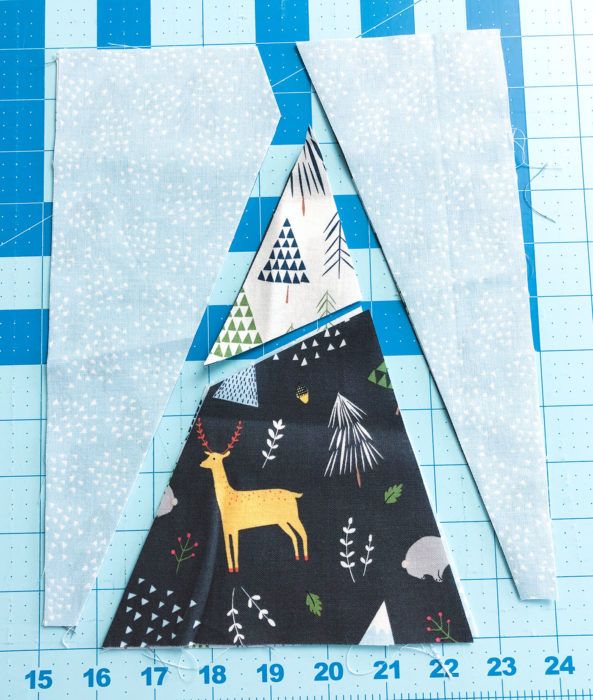
    Take the top fabric off of the snow cap and place it behind the other two pieces of fabric.

    Take the bottom fabric piece of the mountain section and place it on top. This way you have three different fabrics for each mountain block.

     Snow-capped Mountain Quilt Block Tutorial by popular Utah quilting blog, Diary of a Quilter: image of fabric cut in the shape of mountains.

    Place the snow cap on top of the mountain piece right sides together. Line up the edges where you cut them apart. Pin in place and sew.

    Press the snow cap away from the mountain.

    Use a rotary cutter and ruler to trim the sides of the mountain so they line up with the snow cap.

     Snow-capped Mountain Quilt Block Tutorial by popular Utah quilting blog, Diary of a Quilter: image of fabric cut in the shape of mountains.

    Take your mountain piece and line it up with the second background piece you cut. PIeces should be right sides together. Center your mountain along the straight edge.

    Press the background away from the mountain. Trim up the background to line up with the free side of the mountain.

     Snow-capped Mountain Quilt Block Tutorial by popular Utah quilting blog, Diary of a Quilter: image of fabric mountains.

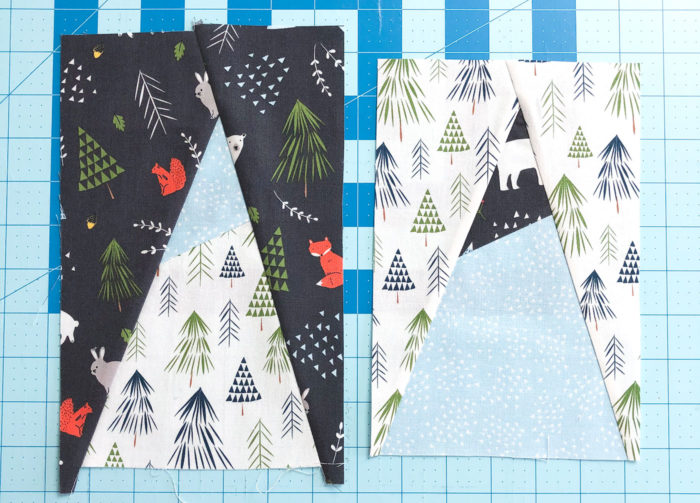
    Pin the last background piece to the free side of the mountain and sew in place.

    Press the background piece away from the mountain.

    Square up your block to 7” X 9” using the bottom of the mountain as your reference.

    These mountain blocks are so fun and can be resized for any project. I recommend adding 1 ½” - 2” to the finished size of mountain you want to make to have plenty of room for trimming and squaring your blocks.

     Snow-capped Mountain Quilt Block Tutorial by popular Utah quilting blog, Diary of a Quilter: image of a pillow with mountain quilt blocks.

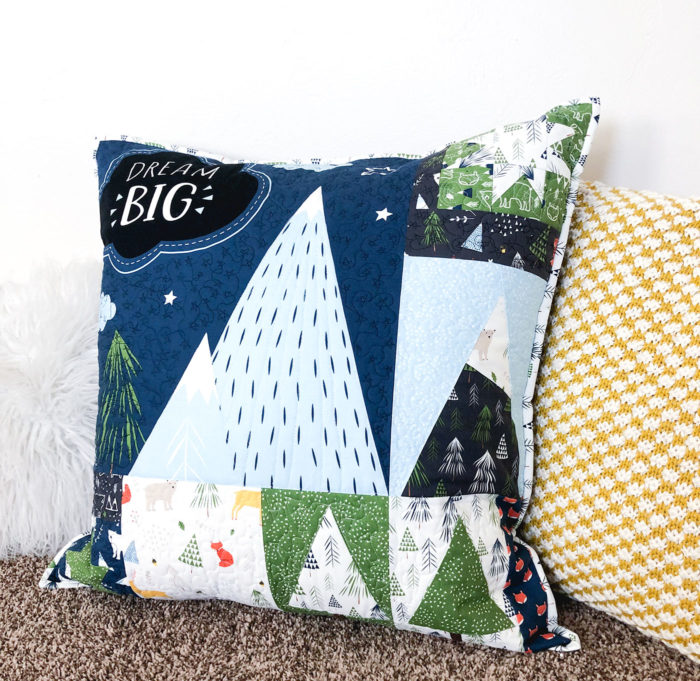
    I used the 18” pillow panel from the In The forest fabric line to make this mini quilt, adding in some wonky stars and Amy’s darling trees. It was a fun quick make. I also added a backing so I could use it as a floor pillow as well if I wanted. I like having options.

     Snow-capped Mountain Quilt Block Tutorial by popular Utah quilting blog, Diary of a Quilter: image of various fabric squares from The Forest Fabric line.

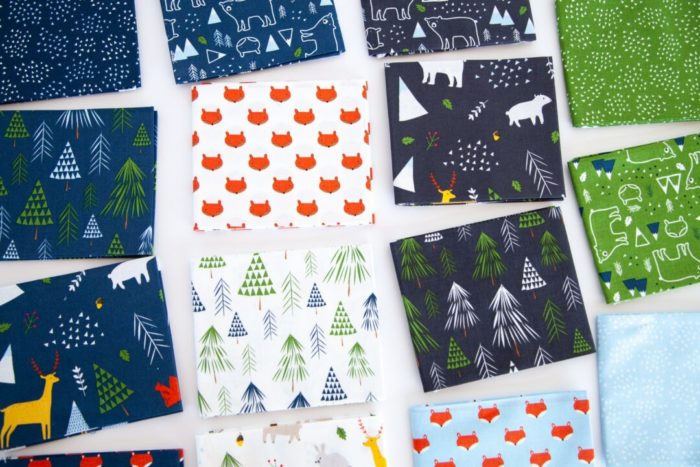
    The In The Forest fabric, including the Dream Big panel by Riley Blake can be found here, here and here.

    If you want to see how I do a pillow back for mini quilts, you can read my method for a hidden zipper pillow back here.

     Snow-capped Mountain Quilt Block Tutorial by popular Utah quilting blog, Diary of a Quilter: image of a fabric toddler backpack and a fox pillow.

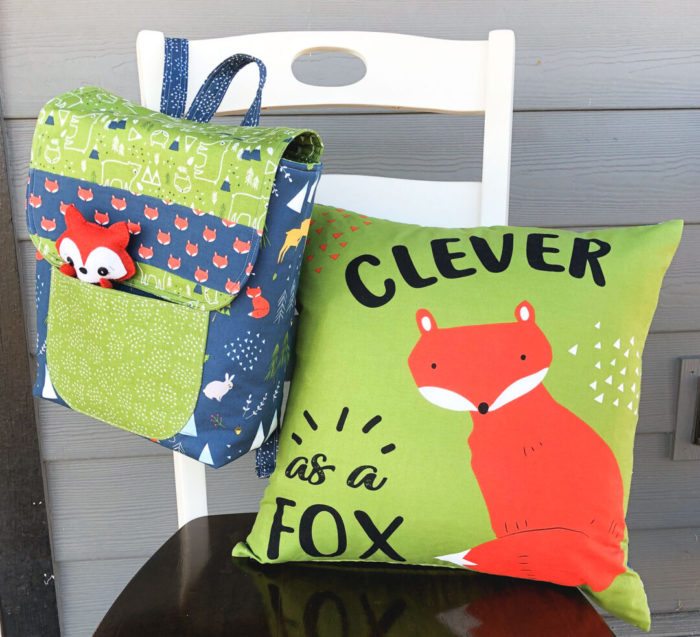
    I also sewed up my Toddler backpack in this darling In the Forest fabric and it turned out SO cute! 

    If you are looking for more mini quilt ideas, you might love this The Best Gift mini quilt which uses very simple Foundation Paper Piecing.

     Snow-capped Mountain Quilt Block Tutorial by popular Utah quilting blog, Diary of a Quilter: image of a quilt with mountain quilt blocks.

    Thanks so much Amy! I love the way this block pairs with the cute In the Forest panel too. So many fun options with this mountain quilt block variation. Let me know if you try it!

    More guest post

    • A new take on Jelly Roll Quilt Patterns with Michelle Cain
      A New Take on Jelly Roll Quilt Patterns
    • The ultimate quilting calculator and planning app
      How to Calculate Backing with Quilt Geek, the Quilting Calculator App
    • Modern Quilt Patters using Ombre color palettes with Amber Elliot
      Book: Quilts in Modern Color, Creating Ombre Palettes
    • Quilted Patchwork Tote Bag Free Tutorial from Tamara of Remi Vail Studio
      How To Make A Quilted Tote From Any Quilt Block

    Reader Interactions

    Comments

    1. Paula

      November 18, 2019 at 8:31 am

      Adorable!

      Reply
      • Charlotte Dunn

        November 19, 2019 at 6:41 am

        I just wanted to tell you how glad I am to see you demonstrate this tree. I don't know how I managed to make it difficult, but I did. I tried sewing in the same order I cut. Not pretty. Needless to say it was like a gift when I saw your blocks come together. It made all the difference starting with a larger piece than I needed. Thank you so sew much. Merry Christmas. Theres endless possibilities with this block now. Love your teaching and your work. I see lots of trees in my future.

        Reply
    2. Jocelyn

      November 18, 2019 at 9:30 am

      So pretty!

      Reply
    3. arlene houston

      November 23, 2019 at 6:47 pm

      This is adorable. I was wondering about the star block in the corner. Can you tell us what the sizes are for it?

      Reply
      • Amy

        November 27, 2019 at 8:21 am

        I will ask Amy Chappell more about that one.

        Reply

    Leave a Reply Cancel reply

    Your email address will not be published. Required fields are marked *

    Primary Sidebar

    My name is Amy Smart and I'm a quilter, pattern and fabric designer, wife & mom. Excited to have you here!

    more about me →

    THE PERFECT PLACE TO START

    I SEW WITH

    Baby Lock Sewing Machines

    MY FABRIC COLLECTIONS

    Fabric Collections by Amy Smart for Riley Blake Designs.

    FAVORITE FABRIC SHOPS

    COME SEW WITH ME CRAFTSY CLASS

    Pre-cuts Shortcuts Video Craftsy Class with Amy Smartma

    SEARCH

    Archives

    The Perfect Place To Start

    How to make a Manx Quilt Block
    Top 15 Favorite Free Baby Quilt Tutorials from Diary of a Quilter

    Ideas for Charitable Sewing

    Ideas for Charitable Sewing

    Gift-Guide-for-Quilters

    Gifts for Quilters and sewing lovers

    Proud Ambassador for

    Baby Lock Sewing Machines Ambassador

    Check Out My

    Amy Smart Pattern Shop photo Pattern Shop blog tag.jpg Amy Smart sewing tutorials photo Tutorials blog tag.jpg

    Footer

    ↑ back to top

    PRIVACY POLICY

    DISCLAIMER

    TERMS & CONDITIONS

    ACCESSIBILITY POLICY

    NEWSLETTER

    SIGN UP for weekly emails including: links to free tutorials, and new projects!

    CONTACT

    FAQ

    This site uses affiliate links:

    I make a small commission on some purchases with no additional cost to the reader.

    As an Amazon Influencer, I earn from qualifying purchases.

    Copyright © 2025 Diary of a Quilter - a quilt blog