
Part 4 of the Beginning Quilting Series
Grab your rotary cutters! (Wait! Please make sure the safety thingy is in place first!) Cutting fabric. Does it scare the heck out of you? Hopefully from this day on you will wield a rotary-cutter with confidence.
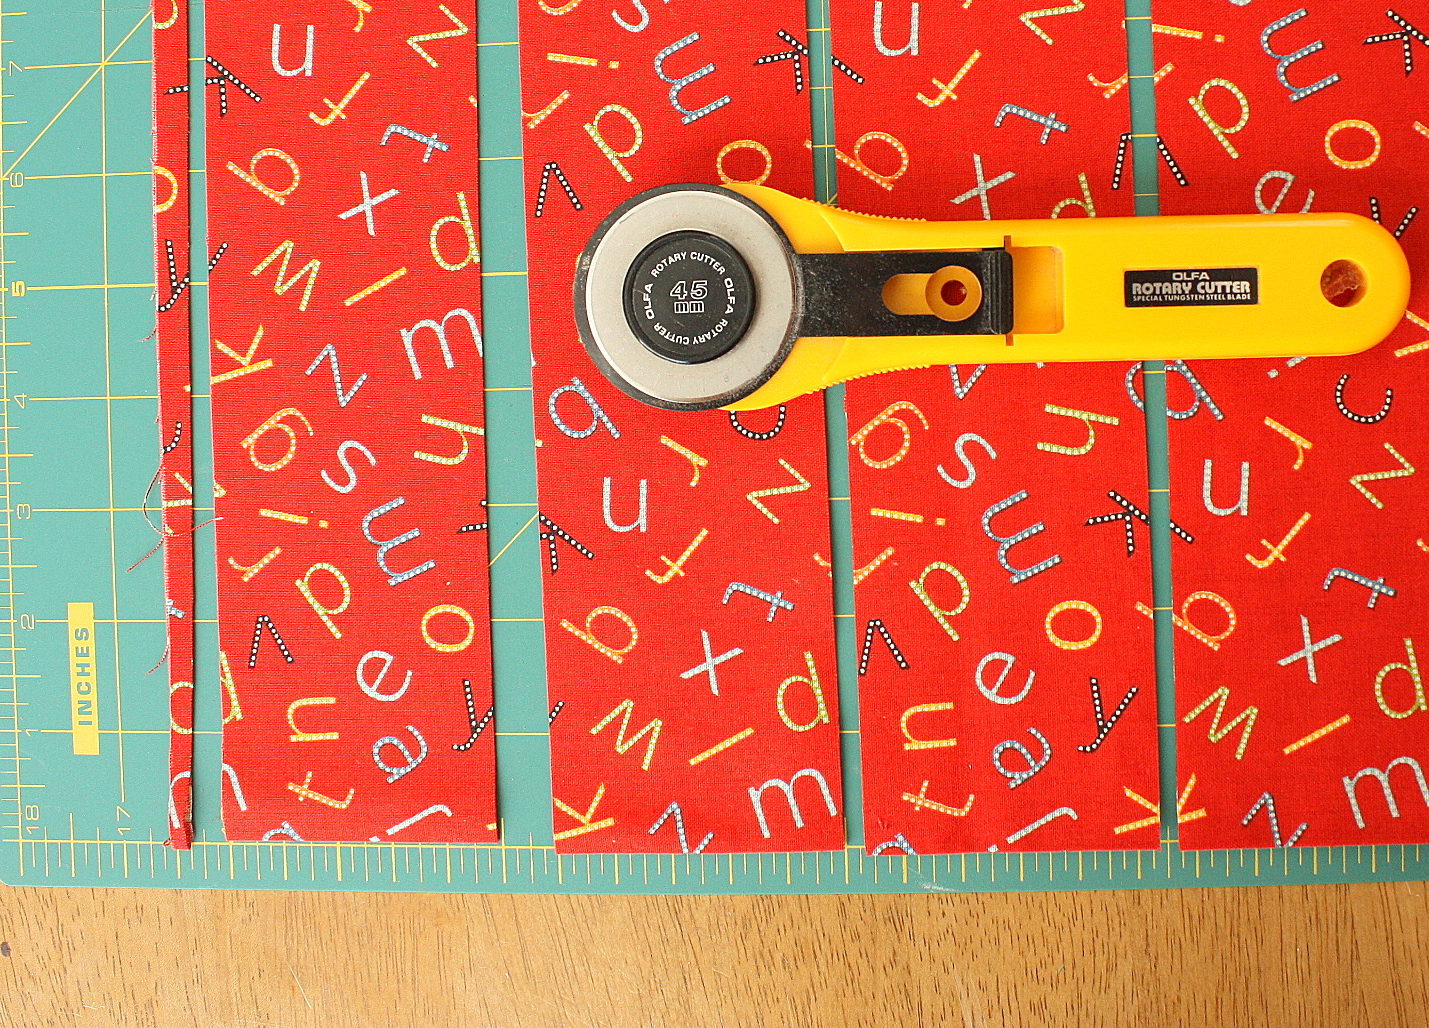
Rotary cutters have made cutting fabric much more accurate and efficient. I love my rotary cutter. Be careful though – those blades are sharp. Make it a habit to keep the safety cover in position and the cutter hidden away from curious small people.
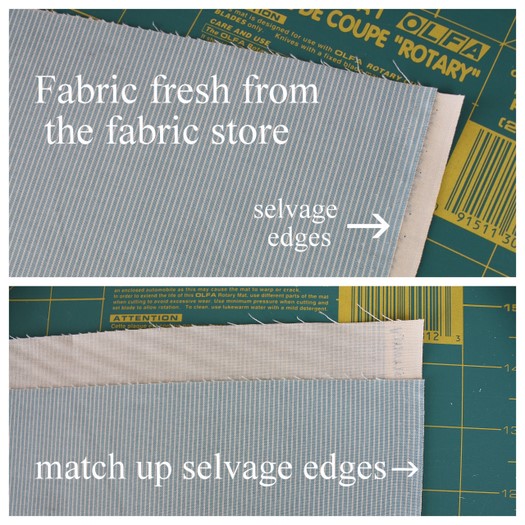
An important – and sometimes over-looked – aspect of cutting fabric is squaring-up the fabric edges before you start hacking-off strips or squares. Sometimes the fabric is wound funny on the bolt or the busy fabric-store worker may just randomly hack off your yardage. Above is a piece that I brought home from the fabric shop. When I stopped to match-up the selvage edges I found out how off it was.
Before you start cutting:
- Match-up selvage edges
- Press the fabric. This may include re-pressing the center fold if the fabric was stretched out of place.
- A light mist of spray starch can also keep things crisp and help with accuracy.
After fabric is pressed and lined-up nicely we want to trim any uneven or frayed edges so we start cutting with a clean, square edge. (Why all the fuss? What happens if we don’t square-up the edges? Your strips will end up in a useless v-shape instead of a straight line.)
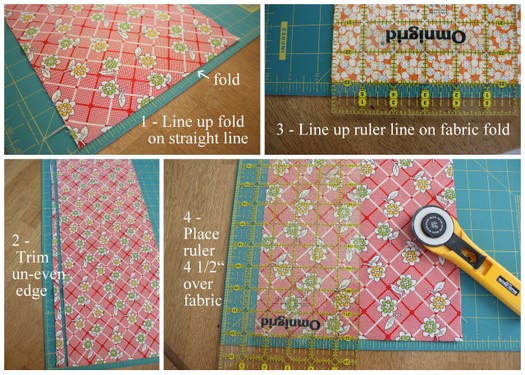
- 1- Line up center fold with a straight line on the cutting mat
- 2- Use rotary cutter to trim off the uneven edge
- 3- Line up a straight line on the ruler with folded edge to make sure your strip is square
- 4- Now you’re ready to cut your first strip at the desired width. Whenever possible, use your ruler (not the grid on the mat) to measure the width of the strip. Place the ruler over the fabric at the desired width.
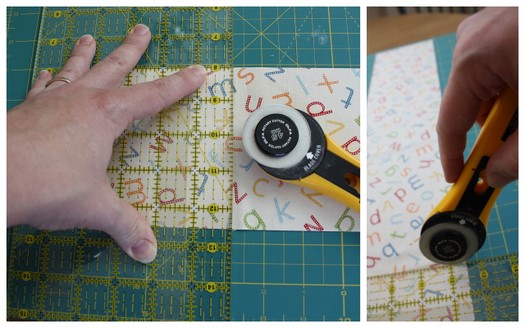
When using the ruler and rotary cutter, hold the ruler in place with a wide, steady hand. Make sure your finger is not hanging over the edge of the ruler. (Trust me on this one. Blood on nice fabric is not pretty.) Cutting while standing will give you more control.
There are other helps to keep your ruler from sliding around. The Notions department at the fabric store sells little sandpaper dots you can stick on the back of your ruler. I use Nexcare Flexible Clear Tape on the bottom of my ruler. I like it because it’s cheap and clear.
Grip the rotary cutter firmly and push it away from your body like a pizza cutter. Be sure to put pressure on the cutter so that it goes through all layers of fabric and keep the blade right next to the edge of the ruler. (The above demo is obviously for right handed folks. Reverse the image if you are left handed.)
If all this seems like a lot to keep track of, remember, the more you do it, the faster it will get and the more it will become automatic. But don’t be afraid to take it slow at first and remember the old carpenter’s rule: measure twice, cut once. Double check your ruler before you start slicing!
For our Quilt Along project, we are going to need these cut pieces:
- 81 – 4 ½” (4″ finished) squares. You should be able to get 9 squares out of ⅛th yard. (Or 64 5″ squares if you are using a Charm Pack.)
- 4 - 3 ½” strips for border fabric.
- 4 – 2 ½” strips for binding fabric. (see photo at the top.)
I am using different fabrics for my border and binding (in my case yellow pin stripe for borders and red alphabet print for binding), but you could use the same fabrics if you want. For this quilt I would go with a smaller print or solid for borders to frame the patchwork part of the quilt -especially if the squares are busy. Also keep in mind that the border fabric will become the dominant color of the quilt so go with the color you like best.

Tara @ Tara Being Tara
Great tutorial! I've been quilting for a few years but I can always use a reminder to line up the selvages...
Esther L.
Thanks Amy! I've always had a terrible time squaring up fabric. Your tutorial makes it so easy and clear.
Sarah
Hi Amy! I recently found your blog and it's been so helpful! I'm new to sewing, so this was a great post for me! <br /><br />Just a quick question for you. I sometimes purchase fabric from thrift stores to save money, and was wondering if there's an easy way to tell which edge is the selvage edge? Thanks!
ivy
Hi,I m a rotary cutter lover. I own few of them...they make my life of cutting fabric so much easier!! Only thing is you need to change the blades quite often and i actually found is it better to separate the one you cut fine fabric such as silk and cotton/ denim. AND concentrate!! Once I was talking and cutting at the same time, i had my finger in front didn't realize till it had a deep
Tara
Just discovered your Blog, really detailed and useful advice! I am hoping to start quilting over the summer, I am feeling really inspired!
Ampligen Patient with CFS
I am planning on cutting my first quilt out soon but I have never worked with a rodary cutter before so I will need that and the other supplies for cutting. Could you tell me what I need to buy?<br /><br />Thanks for putting this tutorial together it is perfect for the first time quilt maker like myself. I will be following along as I go 🙂
Lindsay Niles
Thank you for this!<br /><br />I'm new to quilting (well, to any kind of sewing in general) and I wasn't sure how to effectively use a rotary cutter. Last I tried, it kept slipping everywhere and my cuts all seemed off.<br /><br />I'll try some of your tips!
Bonnie
Hi! I am going to be making my first quilt, but I've gotten so overwhelmed about which pattern to go with (should I make a baby quilt? A lap quilt? Charms pack squares, or stripes?!). I think I've got it narrowed down to which one I'd like to try first, but I have a question:<br />You addressed the 1/4 inch seam allowance issue in another post, but I wonder if it is usually universal?
Marlene
thanks. This will be very helpful.
Erica
Hi there! This tutorial has been helpful so far but I'm now stuck at cutting. What is a center fold and how do I get it?
Amy Smart
When the fabric comes off the bolt, it is usually folded in half, with the selvage edges matched up on one side and the fold on the opposite side.
Janie
Thanks, Amy, I've been quilting for a while but I love your careful tutorials
reminding me to work efficient. It saves time and energy.
Sharon
On your header of the website there is a quilt of different coloured Union Jack flags is this pattern available??
Jenna
Hi Amy! All your info is the best I’ve seen and easiest to understand. I randomly decided to make a quilt with really zero background knowledge so you’ve been a HUGE help.... thank you!
Amy
I'm so glad!!