
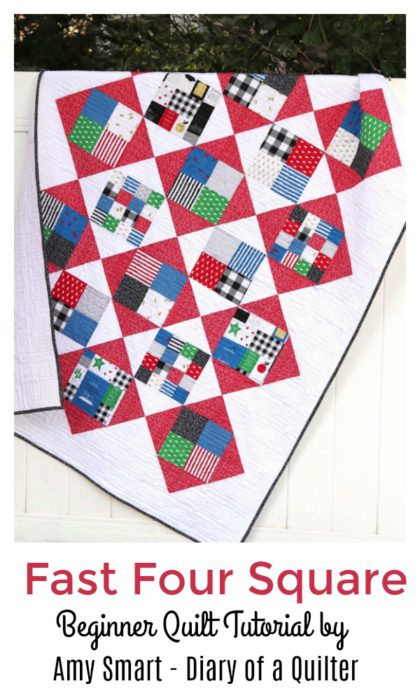
I've been working on a fun (and fast) new quilt tutorial. I love this one because it's deceptively simple, but it makes a great graphic statement. And it's a fun one for showing off cute fabric.
For this quilt tutorial I'm using the latest collection from the girls from Simple Simon and Co for Riley Blake Designs called Let them Be Little.

Let Them Be Little is a fun, graphic collection featuring crisp, primary colors + black and white + and gold sparkle. (There's also a pink and red colorway.)


I love the sweet, Scandinavian-inspired vibe (think Marimekko or Dick Bruna) and it makes a perfect juvenile quilt without looking too cutesy.

Also part of the collection is this darling cheater print (also comes in red/black and pink/black versions). It's perfect for a simple whole-cloth baby quilt (like this one made by See Kate Sew).
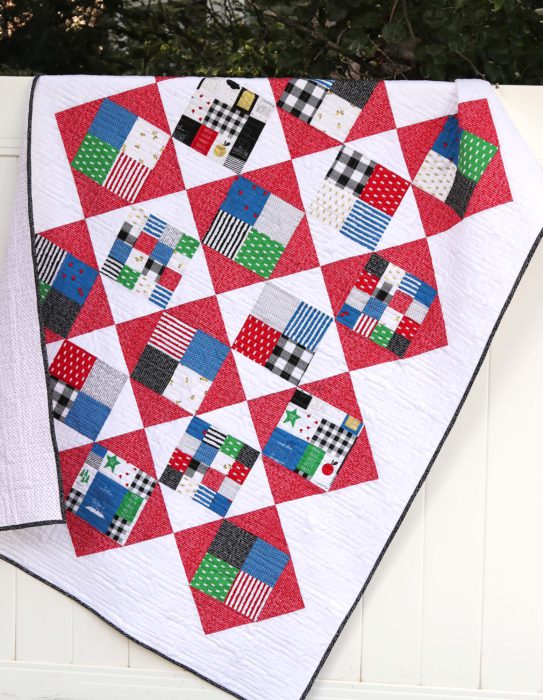
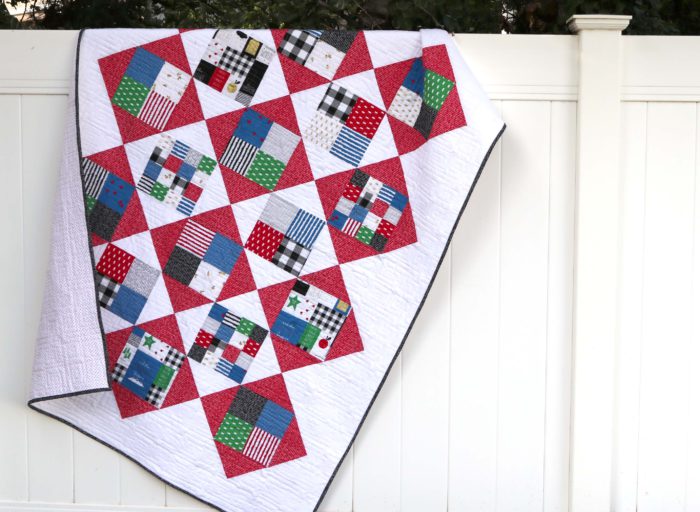
I used the blacks, golds, reds, blues, and greens to make this quilt that I'm going to share with you today! I love that the quilt is boy-friendly but bright and modern.
I'm calling this Four Square and it comes together quickly! Plus it's a great one for showing-off fun fabric. This quilt is a throw-size and finishes at 56" x 72". (I have instructions below for adding borders to make it a Twin size quilt.)
Here are the Fabric Requirements and cutting instructions:
- White: 2 ½ yards of fabric
- Red: 1 yard fabric
Patchwork blocks:
- about 12 assorted ⅛ yard cuts of fabric OR 2 sets of precut 5" x 5" squares with give a good variety. (I cut my patchwork pieces from 12 fat quarters
Binding:
- ½ yard fabric - cut 7 strips 2 ½" x Width of Fabric (If you cut on the bias - you may want ⅝ yard.)
Backing:
- 3 ½ yards
Cutting instructions:
From white background cut:
- 3 strips 9 ½" x WOF (width of fabric) - sub cut into 9 squares 9 ½" x 9 ½" and 2 rectangles 8 ½" x 4 ½"
- 1 strip 8 ½" WOF - sub cut into 8 rectangles 8 ½" x 4 ½"
- 1 strip 4 ½" x WOF - sub cut into 8 squares 4 ½" x 4 ½"
- 2 strips 5" x WOF - sub cut into 12 squares 5" x 5"
- 6 strips 4 ½" x WOF (Set aside for borders)
From Red Fabric cut:
- 3 strips 9 ½" x WOF - sub cut into 9 squares 9 ½" x 9 ½" and 3 squares 9 ¼" x 9 ¼"
- 1 strip 4 ½" x WOF - sub cut into 2 rectangles 4 ½" x 8 ½"

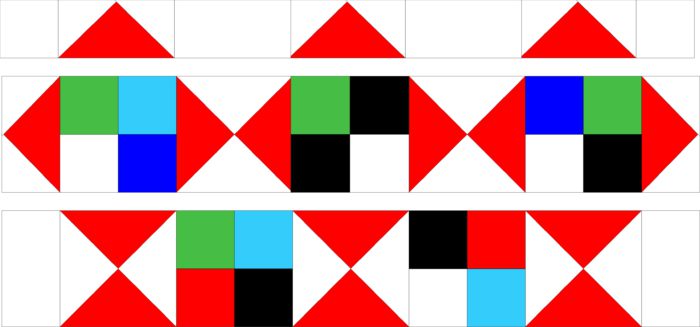
Hour Glass Quilt Block Tutorial
You will need 17 of these 8 ½" x 8 ½" (unfinished) blocks

(clockwise from top left): Match up 9 white 9 ½" x 9 ½" squares and 9 red 9 ½" x 9 ½" squares right-sides together.
Draw a diagonal line down the back of each of the white squares and sew a seam a ¼" seam allowance away on both sides.
Cut in half directly on the drawn diagonal line. Open up two half-square triangle blocks and press seams toward the red.
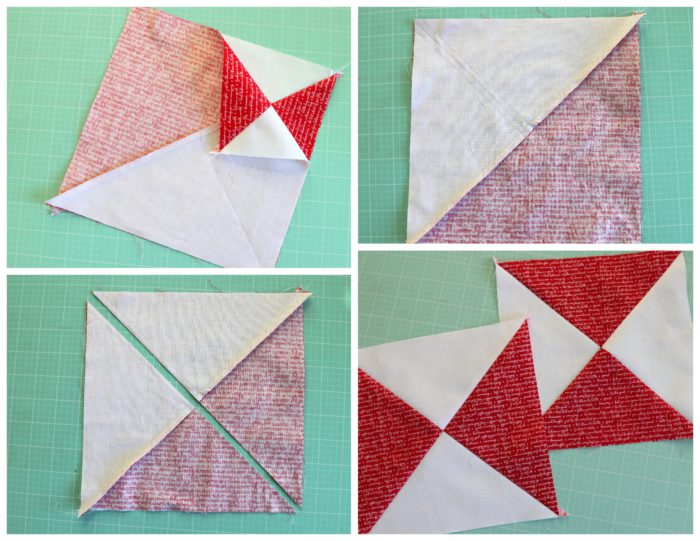
(clockwise top left): Match-up the two half-square triangle blocks right sides together with opposite fabrics facing each other. Diagonal seams should butt-up right next to each other.
Draw another diagonal line down the back of the half square triangle perpendicular (going opposite angles) from the diagonal seam.
Sew ¼" seam allowance away from both sides of the diagonal line and cut on the diagonal line.
Open up 2 Hour Glass blocks! Press seams to one side.
Square-up all blocks to 8 ½" x 8 ½". (Make sure point where triangles intersect stays in the center of the block.)
You will need 17 of these Hour Glass Blocks.

Scrappy Alternating Blocks
You will need 18 scrappy alternating blocks measuring 8 ½" x 8 ½" unfinished. All of these were cut from the assorted coordinating prints. (This is where you'll use ⅛ yards or pre-cut 5" x 5" charm squares to get a scrappy, fun variety.)
I made 12 4-patch blocks, 3 16-patch blocks and fussy cut 3 squares 8 ½" x 8 ½" from the cheater whole-cloth panels.
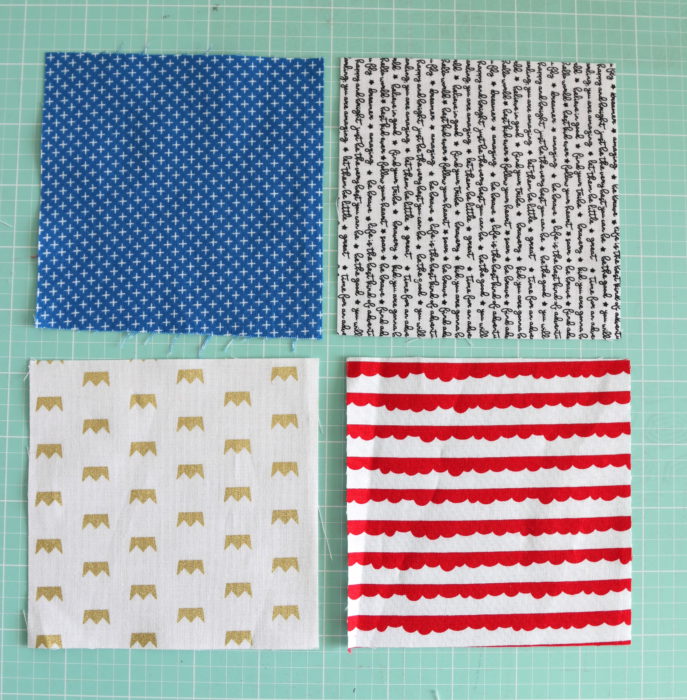
For each 4-patch block cut 4 squares 4 ½" x 4 ½". Sew squares into two rows and press seams in opposite direction. Sew rows together and press center seam one direction.
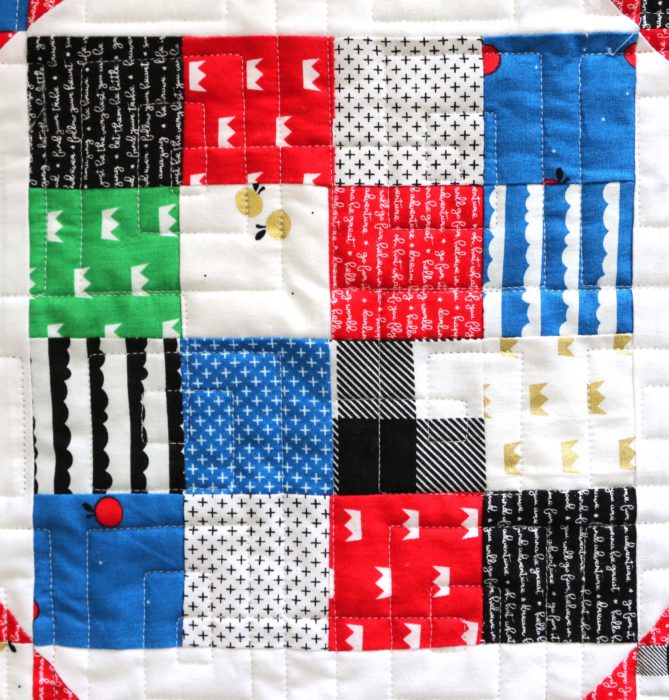
For each cut 16 squares 2 ½" x 2 ½". Sew them into rows of 4 blocks each. Press seams going opposite directions in each row. This will help the points match up when you go to sew the 4 rows together.
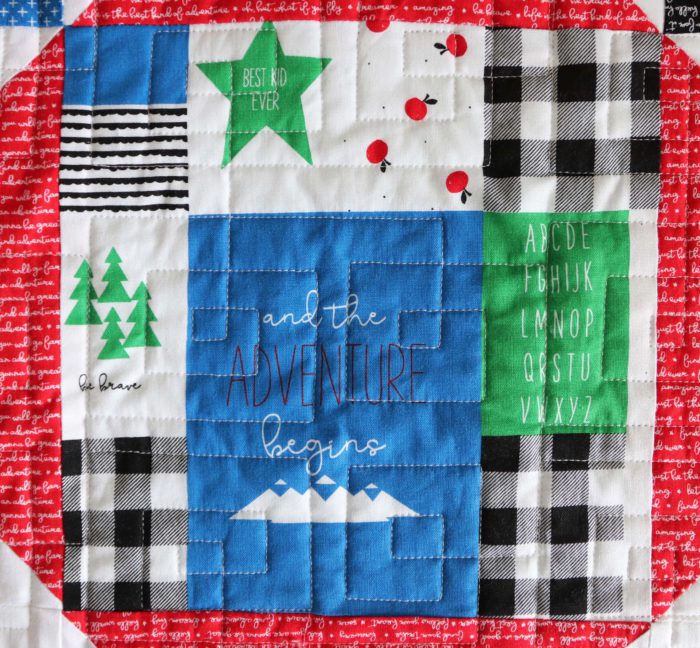
Or, simply fussy-cut 8 ½" x 8 ½" squares from a cheater print like this one. You could also incorporate any other 8 ½" x 8 ½" (8" x 8" finished) quilt block designs (like these Sawtooth Stars).
Make a total of 18 patchwork blocks.

Flying Geese Blocks
Finishing this layout calls for 14 Flying Geese blocks measuring 4 ½" x 8 ½" unfinished.
To make 12 of these Flying Geese blocks I used the No-Waste Four-at-a-Time method found here.
Start with a red 9 ¼" x 9 ¼" square and four white 5" x 5" squares. Use this method to make 4 flying geese blocks. Repeat 2 more times for 12 Flying Geese blocks.
Square-up blocks to 4 ½" x 8 ½".
The design calls for 2 more Flying Geese blocks. Use remaining red 4 ½" x 8 ½" rectangles and 4 of the white 4 ½" x 4 ½" squares.
Draw diagonal lines on the backs of the squares. Lay one 4 ½" x 4 ½" square on the left side of the 4 ½" x 8 ½" red rectangle, matching up the left edges. Sew directly on the diagonal line. Measure ¼" away from seam and trim excess fabric. Press white triangle open.
Match up another 4 ½" x 4 ½" square on the right side of the new unit with the diagonal line going the opposite direction. Sew seam on the line. Measure ¼" away from seam and trim excess fabric. Press white triangle open.
This will make remaining 2 Flying Geese blocks for a total of 14 blocks.
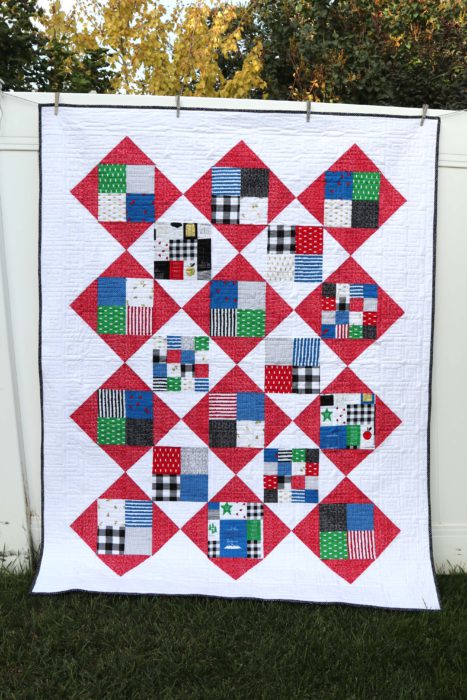
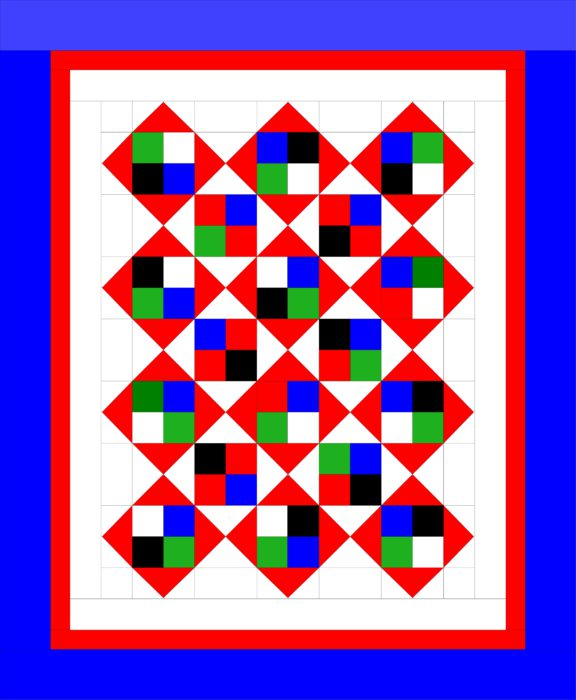
Quilt Layout
Using the above diagram, lay out the first three rows of the quilt.
Row 1: Start with white 4 ½" x 4 ½" square followed by alternating flying geese and solid 4 ½" x 8 ½" white rectangles. Finish with 4 ½" x 4 ½" square.
Row 2: Start with Flying Geese block turned vertically, followed by 3 patchwork blocks alternating with 2 Hour Glass blocks. Finish with Flying Geese block.
Row 3: Start with solid 8 ½" x 4 ½" white rectangle, followed by 3 Hour Glass blocks alternating with 2 patchwork blocks. Finish with solid 8 ½" x 4 ½" white rectangle.
Make sure you rotate the Hour Glass blocks on the alternating rows so that the colors match up with the blocks in the diagram.

Use the above diagram to finish laying out the quilt blocks.

The Flying Geese blocks on the final row will finish in this direction.

Sew rows together pressing all seams away from the Hour Glass and Flying Geese blocks. This will help seams nest together for crisper points as you sew the finished rows together.
Use remaining set-aside 4 ½" x WOF strips to add borders to center portion of the quilt. (This is my favorite method for adding borders to a quilt.)
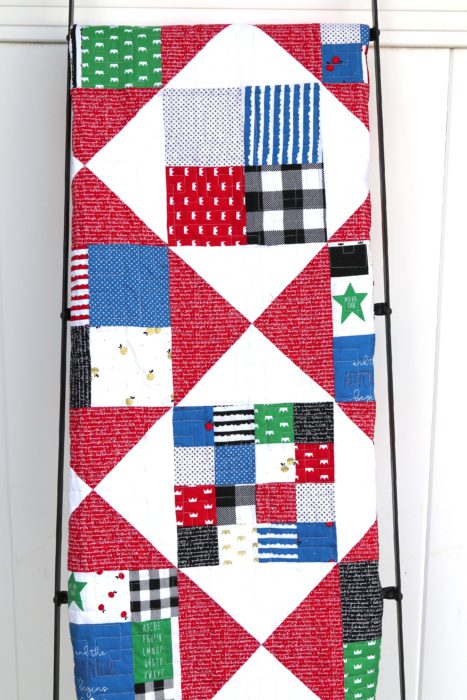
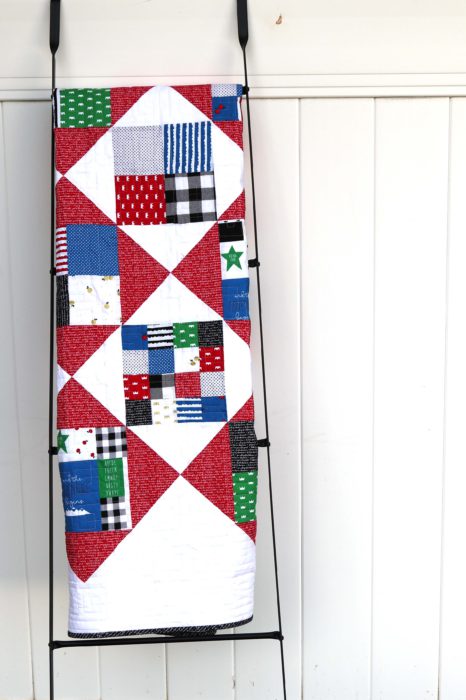
After the quilt top is pieced, baste the top to the batting and backing and quilt using your prefered method. My prefered method is taking my quilt to Melissa of Sew Shabby Quilting. 🙂 For this quilt I had her use the edge-to-edge Square Maze design to echo the square, angular design of the quilt.

Here is my favorite method for finishing and binding a quilt. I cut the cute black text print cut on the bias for my binding.
 Twin-size Variation:
If you would like to expand this quilt to a bigger size, I recommend adding borders to get it to a larger size.
For a 74" x 90" Twin-size quilt add two borders:
Cut 7 strips 3" x WOF for the 1st border and 8 strips 7" x WOF for the 2nd border.
For Backing you will need 5 ½ yards of fabric and for Binding you will need ⅝ yard (cut into 8 strips 2 ½" x WOF).
There you go! This may become my go-to quilt for a quick throw-size quilt. I love how a simple tw0-block quilt can give you something that looks so much more complex.
 If you're looking for other variations on this type of two-block quilt check out my Fast Four-Patch quilt for the easiest variation (and one of my most popular tutorials) and the Scrappy-Nines quilt that I made this summer.
*this post contains affiliate links


Susan
Such a cheery, bright quilt - it's quite striking! Love the cheater fabric that came with all those luscious prints.
Sharlyn
Stinking cute!!
Vicki in MN
Love how you took these two simple blocks and made a sweet little quilt. Thanks for the tutorial. Happy Anniversary!
Amy
Thank you!
Janet
Happy anniversary! And I’m thinking this will be a great pattern for my Liberty fabrics. Putting it on my list. Thanks for sharing!!
Amy
Oh! It would look so beautiful in Liberty!! I may have to copy you... 😉
Gail
Love this. Do you have any snowman quilts? I haven’t quilted in a year or so but want to try this one.
Marjan
Love the tutorial, nut have to tell you that Dick Bruna is not a Scandinevian but Dutch from the Netherlands.
Amy
You're right! Thanks for the clarification!
nonniew
This is super cute! I'm thinking about adapting this on a smaller scale for a crib quilt. Thank you!
Robin Jarvis
I love this colorful design,it's really great for our guys. Your quilts are always crisp and clean, love it!
Amy
Thank you, Robin!
Jackie
Would love to have printed version of the4square quilt
Amy
Gah! So sorry I haven't got that done yet. I need to do that. Thanks for the reminder! I will add it to the list for asap!